Having just discussed the Shooting menu bank item, let’s move on to the remaining 19 configurable items in the Shooting Menu and discuss each one of them. Pay careful attention to the items that are essential to your style of shooting.
Reset shooting menu
(User’s Manual page 271)
Be careful with this selection. It does what it sounds like and resets the Shooting Menu for the currently selected bank back to factory default settings. Page 419 of the User’s Manual shows the default settings, in case you are interested.

This is a rather simple process. As seen in screen three of Figure 5-4, simply scroll to Yes or No, then press the OK button or scroll to the right. That’s about it. If you select Yes, the Shooting menu bank you’re currently using will be reset to factory defaults.
(User’s Manual pages 272–273)
The D700 defaults to creating a folder on your Compact Flash (CF) card with a name of 100ND700. This folder can contain up to 999 images. If you want to store images in separate folders on the current CF card, you might want to create a new folder, such as102ND700 or 200ND700.
Each of these folders can hold 999 images and, using Active folder, you can select any one of these folders as the default folder. This is a way to isolate certain types of images on a photographic outing. Maybe you’ll put landscapes in folder number 300ND700 and people shots in 400ND700. Whenever the D700 senses that the current folder contains 999 images, a new folder is created and named by incrementing the value in the first three digits of the current folder’s name by one. Therefore, when manually creating folder names, you may want to leave room for the D700’s dynamic folder creation and automatic naming.

As shown in Figure 5-5, to create a new folder, scroll to the right when Active folder is selected. Now select New folder number by scrolling to the right. You’ll now see a screen that allows you to create a new folder with a number from 100 through 999. Choose a number using the Multi Selector, then press the OK button when you are done.
You cannot create a folder numbered 000, or any other number less than 100. Remember that the three digit number you select will have ND700 appended to it and will finally look something like 101ND700 when you have finished.
Once you have created a new folder, you can select it for receiving images or, in other words, make it the current folder. Refer to screen one in Figure 5-6, and scroll down to Select folder, then scroll right. You’ll see the available folders displayed in a list that looks like screen two in Figure 5-6.

Simply select the folder you want to use, and press the OK button. All images will now be saved to this folder until you change it to another. You can tell at a glance which folder is active by looking at screen one in Figure 5-5. To the right of the words Active folder, you’ll see the first three characters of the current folder. Folder number 101ND700 will display as Active folder 101.
If you are in folder 999ND700 and the camera records the 999th image (or if it records image number 9999), the shutter release will be disabled until you change to a different folder.
File naming
(User’s Manual page 274)
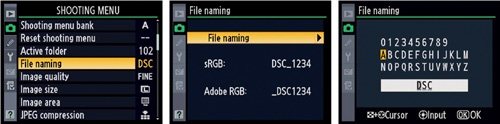
This feature allows you to change the first three letters of the image name for each of the images created by your camera. The camera defaults to using the following file naming conventions for your images (Figure 5-7):
sRGB color space: DSC_1234
Adobe RGB color space: _DSC1234
According to which color space you are using, the D700 adds an underscore character to the end of the three DSC characters in sRGB or to the beginning in Adobe RGB, as shown above.
I use this feature on my Nikon D700 in a special way. Since the D700 can count its images in a File number sequence that continues from 0001 to 9999 (see Custom setting d6), I use File naming to help me classify my images in sequence. Here’s how I do it.
When I first got my D700, I changed the three default characters from DSC to 1DY. The 1 is purely arbitrary, and DY are the initials of my name (you could certainly replace the DSC characters with your three initials), thereby helping me protect the copyright of my image in case it is ever stolen and misused. This allows me to use filenames 1DY0001 through 1DY9999 in the current folder, as long as there are no more than a total of 999 files in the folder.
Since the camera’s File number sequence counter rolls back over to 0001 when you exceed 9999 images, there needs to be a way to keep from accidentally overwriting images from the first set of 9999 images you took. Fortunately, the D700 will create a new folder when the image number in the current folder is 9999 (or even when there are 999 images in the current folder).
If Nikon ever gives us just one extra digit in our image counting, this would be a moot point since we could count in sequences of just under 100,000 images, instead of 10,000 images. I suppose that many of us will have traded on up to the next Nikon DSLR before we reach enough images that this really becomes a constraint. On my Nikon D2X, which I’ve used for over four years, I am now about to break 30,000 images.
This is merely the way I’m utilizing this useful feature in the D700. If you don’t want to add your initials, you could use the three characters to classify your image names in all sorts of creative ways.
To rename your three characters from DSC to a sequence of your choosing, please refer to Figure 5-7. From the second screen of Figure 5-7, scroll to the right until you see the third screen. This works just like the method for naming the Shooting menu banks discussed in the earlier section Setting Up Shooting Menu Bank A, except that you only have uppercase characters and numbers from which to select.
Use the Multi Selector to scroll through the numbers and letters to find the characters you want to use.
Press the Multi Selector’s center button to select a character.
To correct an error, hold down the Checkered Thumbnail button and use the Multi Selector to scroll. Use the garbage can Delete button to delete a character.
Press the OK button to save.
Now you’ve customized your camera so that the image names it creates reflects your personal needs.
Image quality, Image size, Image area, JPEG compression, and NEF (RAW) recording
(User’s Manual pages 58–70)
This section outlines five items in the Shooting Menu. All five of these are related to how Image quality is set, so they must be discussed as a unit.
There are three camera controls we’ll use to adjust the image quality parameter: the QUAL button, Main command dial, and Control Panel LCD (Figure 5-8).

The D700 supports the following image types:
NEF (RAW) Uncompressed or Compressed (two types)
TIFF (RGB)
JPEG Fine, Normal, and Basic
Combination of NEF and one of the three JPEG types at the same time (two images at once)
Let’s look at each of these formats and see which you might want to use regularly. Following this section is a special supplement called Notes on the Image Formats: RAW, TIFF, and JPEG. That special section will go beyond just how to turn the different formats on and off and discusses why you might want to use one particular format over another (Figure 5-9).