Gather up your Nikon D700, its User’s Manual, and your external flash units with their manuals. Keep them close by since I will refer to the camera and flash unit menus and manuals for additional details.
Let’s start by putting our Nikon D700 camera into Commander mode. We’ll do that by changing Custom setting e3 to Commander mode. Look at Figure 9-3 for the screen series to set this option.
Normally, Custom setting e3 defaults to TTL, as shown in screen 2 of Figure 9-3. TTL represents the single-flash i-TTL technology used by your built-in Speedlight or by any i-TTL compatible flash unit you put in your Nikon D700’s hotshoe. Since this chapter is about controlling multiple flash units, we’ll have to change that setting to Commander mode as shown in screen 3 of Figure 9-3.

Let’s discuss the settings. First we’ll look at Commander mode in TTL mode, which is the easiest to use, since it allows you to set exposure compensation for the built-in flash as well as for each of your flash groups. Next, we’ll look at M mode, since that gives you fiddly control of your flash from full-power to ![]() power. We’ll briefly look at AA mode. Then finally, we’ll consider the “--” mode, which prevents the D700 built-in flash from firing its main flash output, but does not stop the necessary monitor pre-flashes, nor the firing of the external flash units.
power. We’ll briefly look at AA mode. Then finally, we’ll consider the “--” mode, which prevents the D700 built-in flash from firing its main flash output, but does not stop the necessary monitor pre-flashes, nor the firing of the external flash units.
When your D700 is controlling external Speedlights, you must always raise the built-in flash on your D700. The D700 communicates with the external flash units during the monitor pre-flash cycle.
Basically, the Commander mode screen’s Mode fields will display the selections listed in the following sections. Use the Multi Selector to change the values, as shown in Figure 9-4.

Mode Settings:
TTL or i-TTL mode
AA or Auto Aperture mode
M or Manual mode
“--” or double-dash mode (what else would one call it?)
TTL mode – The TTL setting represents using the full power of i-TTL technology. By leaving Mode set to TTL (as shown in Figure 9-4) on each of the Built-in flash or Group A or B options, you derive maximum flexibility and accuracy from all your flash units. In this mode, the Comp setting (Figure 9-4) will display exposure values from -3.0 EV to + 3.0 EV, a full 6-stop range of exposure compensation for each group of Speedlights. You can set the Comp in 1/3 EV steps for very fine control.
AA mode – I am only briefly touching on the AA mode since it is an older non-i-TTL technology included for those accustomed to using the older technology. With the SB-900 and SB-800, it is used primarily by cameras not compatible with the Creative Lighting System. It is not available for the built-in Speedlight on the D700, nor for the SB-600. You can safely ignore the AA mode unless you want to experiment with it. It may not provide as accurate a flash exposure as TTL mode though, since it is not based on the amazing i-TTL technology. Otherwise, it works pretty much the same as TTL mode.
M mode – This allows you to set different levels of flash output in 1/3 stops for the built-in flash or the Speedlights in groups A or B. The settings you can put in the Comp field are between 1/1 (full) and 1/128. The intermediate 1/3 stop settings are presented as decimals within the fractions. For example, ![]() or
or ![]() are 1/3 and 2/3 stops below 1/1 (full). Many people are used to working with flash units this way, so it seems more familiar. CLS is willing to oblige those experienced in working manually.
are 1/3 and 2/3 stops below 1/1 (full). Many people are used to working with flash units this way, so it seems more familiar. CLS is willing to oblige those experienced in working manually.
-- mode (double-dash mode) – The built-in Speedlight will not fire its main flash in this mode. It will fire the monitor pre-flashes since it uses them to determine exposure and communicate with the external flash groups. Be sure you always raise the D700’s built-in flash in any of the Commander mode modes, otherwise the external flash groups will not receive a signal and won’t fire their flashes.

When setting the mode for Group A or B to double-dash mode, that entire group will not fire any flash output. You can use this mode to temporarily turn off one of the flash groups for testing purposes.
Look at Figure 9-5, or your D700’s Commander mode screen, and you’ll notice that just below Group B you’ll see a Channel 1 CH selection. The number “1” (factory default) is the communication channel your D700 is expecting to use to talk to the external flash groups.
You can select any number from 1 to 4. There are four channels available, just in case you happen to be working in the vicinity of another Nikon user who is also using Commander mode. By using separate channels, you won’t interfere with each other.
It is important that you realize that all your external flashes in all the groups must be on the same channel. This involves setting up your individual flash units to respond on a particular channel. They might be in separate groups, but they must be on the same channel.
We’ll next examine how to do that for the SB-800 and SB-600 Speedlight units. We’ll also look at using the SB-800 and SU-800 as commander devices.
This CLS reference section is quite long, so I have created a mini table of contents here. The sections that follow include:
Using the Nikon SB-800 AF Speedlight as a slave unit:
The SB-800 flash unit makes an excellent slave unit too, and we’ll configure it.
Nikon SB-600 AF Speedlight Slave configuration:
The SB-600 is both affordable and a great CLS slave unit.
Using the Nikon SB-800 Speedlight as a commander device:
The SB-800 flash unit can work as a master flash.
Examining the Nikon SU-800 Wireless Speedlight Commander unit:
This helps with understanding and configuring the SU-800 Commander.
Now we’ll turn to the setup of the Speedlight units themselves. Most of us have either a Nikon SB-800 or SB-600 with our Nikon D700 camera. If you have both, that is even better.
Use the following information to configure each flash unit you have, and try to become familiar with the wireless slave mode entry and exit procedures. Once you learn how to get in and out, you can usually figure the rest out by scrolling through menus on the flash units.
The Nikon SB-800 Speedlight has built-in commander-device functionality, as we discussed earlier. Setting the Nikon SB-800 as a slave to be used in a group is quite easy.
The difference is in setting the SB-800 to Remote mode. When you are in Remote mode, the flash is ready to respond to input from an external controller. Here are the steps and LCD Panel views to prepare the SB-800 to be a slave controlled by a commander device.
Setting Remote Mode on the SB-800
Overview of Settings:
Turn the flash on with the ON/OFF button.
Press and hold the SEL button in the middle of the Multi Selector for about two seconds (SB-800 manual page 68).
Once you enter the next screen, press SEL once again and the current mode selection will become highlighted. Use the Down– button to scroll down to Remote and press SEL again to select it.
Hold SEL down for another two-second period and the LCD Panel will switch to the Remote settings screen
Press SEL once and CH will be highlighted. Now use the Up+ or Down− button to select the channel.
Press SEL once and GROUP will be highlighted. Now use the Up+ or Down− button to select A or B. Don’t use C, since the D700 cannot control that group.
Detail of Settings:
In Figure 9-6, you’ll find a picture of the SB-800’s controls. You’ll use the SEL button and the Up+ and Down− buttons to configure remote mode.
Turn the SB-800 on, then press and hold the SEL button until the screen shown in Figure 9-7 appears.
Now we’ll set the SB-800 into Remote mode using the instructions that follow.
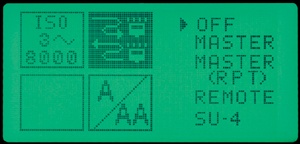
Press the SEL button once more and the current mode will be highlighted. Scroll down until Remote is highlighted (as shown in Figure 9-8), and press SEL to select it. When Remote is selected, the highlight will go away and an arrowhead will appear to the left of the word Remote.

Figure 9-9 shows the Remote screen, which we’ll select by holding down the SEL button for about two seconds.
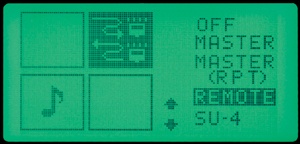
You can move around this screen by pressing the SEL button. As shown in Figure 9-10, move to the CH setting on the top left, and select a channel with the Up+ or Down− buttons. Then use SEL to move down to the GROUP setting on the bottom right. Use the Up+ or Down− buttons to select a group.
You are now ready to shoot pictures with the SB-800 as a remote wireless slave flash. Do a test shot to see if your D700 and the commander device will fire the SB-800 remotely. If not, check to make sure Channel and Group on the SB-800 are set to the same settings as your camera’s Commander mode channel and group.

This drove me nuts for a while, since the manual never really tells you how to exit once you’ve set your SB-800 to Remote mode. Oh, it does tell you that you hold down the SEL button for two seconds or press ON/OFF to return to the normal setting mode. However, what it does not tell you is that until you get the SB-800 out of Remote mode, it will never go back to being a normal flash. Here’s how to do it:

While in the Remote screen listing the channels and groups, hold down the SEL button for two seconds and it will switch back to the screen that allows you to select Master, Remote, or in this case, the all-important OFF selection.
Press SEL again, and scroll up to OFF, then press SEL again to select OFF.
Hold down the SEL button for two seconds again and it will then switch back to being a normal i-TTL stand-alone flash.