The AF-Area modes are designed to give you control over how many AF sensors are in use at one time, and different ways to track subject movement.
Figure 3-4 shows the AF-area Mode Selector switch in the Single-point AF position.
This mode uses a single AF sensor out of the array of 51 sensors to acquire a good focus. As mentioned before, you can control which sensor by selecting it with the Multi Selector. In Figure 3-5 notice how the center AF sensor point (of the 51 sensor points) is the one that provides focus information.

If I have two people standing next to each other, but with a gap in the middle, I can do one of two things.
One, I could get the focus first by pointing the center sensor at the face of one of my subjects, pressing the shutter-release button halfway to get a focus, then holding it down while recomposing the image. When I have recomposed the shot, I finish pressing the shutter release the rest of the way and take the picture.
Two, I can compose the picture first by centering it however I like, then use the Multi Selector to move the single AF sensor until it rests on the face of one of my subjects. With the sensor repositioned, I press the shutter-release button halfway down to get good focus, and the rest of the way down to take the picture.

Either of these methods will solve the age-old autofocus problem of having a perfectly focused background with out-of-focus subjects because the center AF sensor was looking at the background between them.
Many of us will use Single-point AF mode most of the time. It works particularly well for static or slowly moving subjects. When I’m out shooting beautiful nature images or at a party snapshooting pictures of my friends, I’ll use Single-point AF, along with Single frame (S) Release mode, almost exclusively. If I’m shooting a wedding, where the bride and groom are walking slowly up the aisle, Single-point AF and Continuous low speed (CL) Release mode seem to work well for me.
Now, we move on to Dynamic-area AF and see what benefits it brings us.
This mode is best used when your subject is moving. Instead of a single AF sensor alone for autofocus, several sensors surrounding the one you have selected with your thumb switch are also active. In Figure 3-6 is a picture of the AF-area Mode Selector switch with Dynamic-area AF selected.
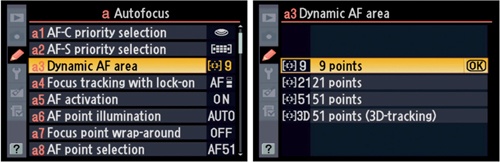
You can select the three different sensors patterns in Custom setting a3. The three primary patterns are represented in Figure 3-7. The first image shows nine points or AF sensors in use.
The second shows 21 points, and the third, all 51 points.

See Figure 3-8 for the Custom setting screens used to set the patterns.
You can, of course, move the first two patterns (nine and 21 points) around the viewfinder with your Multi Selector. Unfortunately, the camera does not show you more than the center AF sensor of the pattern, even though you have 9, 21, or 51 points selected. The sensor you can see in the viewfinder is providing the primary autofocus, but the surrounding sensors (in the pattern you’ve selected in Custom setting a3) are also active. If the subject moves and the primary AF sensor loses its focus, one of the surrounding sensors will grab the focus quickly.
If the subject is moving slowly or predictably, then you can use a smaller pattern, such as the 9 points selection in Custom setting a3. If the subject’s movement is more erratic or unpredictable, then you might want to increase the number of AF sensors involved. If nine won’t do it, try 21, and finally even 51 for subjects that are very unpredictable and move quickly.
Can you see how flexible the Dynamic-area AF mode is, especially when adjusting the patterns in Custom setting a3? If your subject will only move a short distance (or slowly), you can simply select a pattern of nine points. Maybe you’re doing some macro shots of a bee on a flower and it is moving around the flower. Or, you might be photographing a tennis game and use 21 points to allow for more rapid side-to-side movement without losing the focus. You’ll have to decide which pattern best fits your needs for the current shooting situation.

We’ll talk more about the 9, 21, and 51 points later in this chapter, and we’ll even discuss another pattern called 51 points (3D-Tracking), which allows your D700 to pay attention to the color of the subject to improve tracking accuracy with some subjects.
We’ll also examine Custom setting a4 later in the chapter. This setting allows you to enable Focus Tracking with Lock-On, which affects what happens if something briefly gets between your camera and subject while you’re following the subject with your D700.
This mode turns the D700 into an expensive point-and-shoot camera. Use this mode when you simply have no time to think but would still like to get great images. The AF Module decides what the subject is and selects the AF sensors it thinks work best. In Figure 3-9 is a picture of the AF-area Mode Selector switch with Auto-area AF selected.
If you are using Single-servo AF (S), you’ll have an idea what is going to be in focus, because the AF sensors in use will flash on the screen in red, and then turn black for a period of one second. If, however, you are using Continuous-servo AF (C) nothing, will appear on the viewfinder screen to give you a clue of what is going to be in focus. In Continuous-servo AF (C), your camera is operating like a very expensive Nikon Coolpix point-and-shoot!
According to Nikon, if you are using a D or G lens, there is a bit of “human recognition technology” built into this mode, similar to the Coolpix. Since most of us will only be using Auto-area AF when we want to shoot for fun, a human subject that is closest to the camera is the most likely subject anyway. Your D700, using Continuous-servo AF (C), can usually detect a human and help you avoid shots with perfectly focused backgrounds and blurry human subjects.

We’ve covered the Focus and AF-area modes pretty well, so now we move on to the Release modes.