To use the SB-800 in Commander mode, the SB-800 must be placed in the camera’s hotshoe. Nikon refers to Commander mode on the SB-800 Speedlight flash unit as the Commander Function or Master Flash. We’ll use the term Master mode for clarity.
When using the SB-800 Speedlight as a commander device controlling one or more other Speedlights, it is important not to allow the SB-800 to fire its main flash, unless you really want to use this flash on the camera as one of the units that light the subject. We’ll discuss how to disable the SB-800’s main flash as we proceed, if you want to do that.
Another concern is the monitor pre-flash from the SB-800 in Master mode. Even though the SB-800’s main flash is turned off, the pre-flash puts out quite a bit of light. If the subject is too close, the pre-flash could make a bright spot or even influence the exposure in an un desireable way.
The SB-800 Instruction Manual says this is not a problem unless the ISO is set to a high sensitivity or the subject is very close. The solution offered is to tilt the flash unit up into bounce mode and/or move the subject farther away from the main flash. (Use a longer lens.)
With this fact in mind, let’s look at how to configure the SB-800 as a commander device so that we can use it to control multiple groups of other Speedlight flash units.
To start our configuration process, we’ll need to get out of normal flash mode and into Master mode.
Setting Master Mode on the SB-800
Let’s look at a brief overview of the configuration steps, and then we’ll go into more detail. Please get your SB-800 flash unit so that you can apply what we cover directly to the flash. It’s a lot easier to remember this information if applied immediately.
Overview of Settings:
Turn the flash on with the ON/OFF button.
Press and hold the SEL button in the middle of the Multi Selector for about two seconds until the LCD Panel switches screens.
Once you enter the next screen, press SEL once again and the currently active mode will become highlighted. Use the Down– button to scroll down to Master and press SEL again to select it.
Hold SEL down for another two-second period, and the LCD Panel will switch to the Master settings screen.
Press SEL again and M TTL 0.0 will be highlighted. This is where we turn off the SB-800’s main flash.
Press MODE three times, or until M --- is displayed. This actually disables the main flash to prevent a direct flash look on your subject.
Press SEL again to scroll down one place to A TTL 0.0 to configure the first group of flash units (group A).
Press the MODE button numerous times to scroll through the various flash modes. Stop at the mode you want (TTL, AA, M, ---).
Press the Up+ button or Down– button to select the flash output value, which determines exposure compensation.
Press the SEL button to select group B, which defaults to B --- unless configured previously.
Press the MODE button to select a flash mode and then the Up+ or Down– buttons to set the flash output value. Repeat steps 10 and 11 for group C, if needed. (You only need to configure as many groups as you’ll need.)
Press the SEL button multiple times until CH 1 (or some other number) is selected. Use the Up+ or Down– buttons to select a communications channel (1 to 4).
Configure the slave units, and take your pictures.

Detail of Settings:
To work on any of the following settings, you’ll have to take these four basic steps first. This switches the SB-800 Speedlight out of its normal flash mode and into Master mode. Figure 9-14 shows the controls you’ll use to set your SB-800 to Master mode.
Turn the flash on with the ON/OFF button.
Press and hold the SEL button in the middle of the Multi Selector for about two seconds until the LCD Panel switches screens. Figure 9-15 shows what you’ll now see.
Once you enter the next screen, press SEL once again and the currently active mode will become highlighted (Figure 9-15). Use the Down– button to scroll down to Master and press SEL again to select it.
Hold SEL down for another two-second period, and the LCD Panel will switch to the Master settings screen (Figure 9-16).

Now we’ll need to configure the following modes for the Master Flash (M) and all three slave groups A, B, and C.

Flash Modes: The selections you’ll find under the flash modes are as follows:
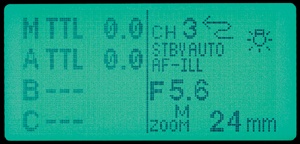
TTL mode: The image in Figure 9-17 shows group A in TTL mode. In Master mode, this is the normal i-TTL automatic mode of the SB-800 and causes the slave units to use i-TTL in measuring the flash output. You can adjust the flash output level of each of the groups of slave Speedlights directly on the SB-800 LCD panel. See the Configuring the SB-800 as a Commander Device section below.
AA mode: The image in Figure 9-18 shows group A in AA mode. This “Auto Aperture” mode is only available if you have a CPU lens mounted on your D700. If a non-CPU lens is mounted, the slave units switch to non-TTL auto flash instead. AA mode works similarly to TTL mode.
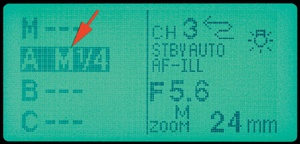
M mode: The image in Figure 9-19 shows group A in M mode. This is “Manual” mode, which means you can control the group in fractions of full-power light values. This mode is for those who are used to controlling flash power levels by setting different levels of power, like
 or
or  power. Notice how the image shows power has been set. Look just after the M at the small 1 and large 4. It may look weird, but it is functional.
--- mode: This is a simple mode. It means the group is disabled and will not fire any slave units in that group. In Figure 9-20, you’ll see that I have set all the groups, including group A, to --- mode. This setup is not very useful since no flash unit will fire, but it does illustrate the idea.


Let’s see how to configure the flash mode on one of our groups and disable the SB-800’s main flash output. Any information learned in these steps can be applied to any of the groups A, B, C, or even M for the master flash on camera. (M is normally not used, and left at --- mode, but it can be used if you need direct flash in addition to your slave units.)


First use the steps in the section Configuring the SB-800 as a Commander Device. See Figure 9-14 for the controls.
Once you are in Master mode, you will see the screen shown in Figure 9-20.
First, we’ll normally disable the M group on top (if it’s not already disabled). Press the SEL button on your SB-800 until you scroll to the M selection in the top left of the screen. You may only have to press SEL once, if you’ve never been in the Master screen before.
Once M is selected you will need to change it from M TTL 0.0 to M --- as shown in Figure 9-22. Press the MODE button numerous times until M --- appears. This disables the M or master flash from firing its main flash burst, but not its monitor pre-flash. Remember, the master flash is the one mounted on your camera.
Now we’ll configure one of the main groups, such as group A. Repeat these steps for groups B and C, if needed.
Since we are already in the Master screen, just press the SEL button until you’ve highlighted the A group. Press the MODE button until the Flash Mode you desire (as described earlier) is showing (TTL, AA, M, or ---). Notice in Figure 9-23 that I have group A set to TTL with 0.0 or no flash output compensation. Group B is also set to TTL, but it has -1.0 EV or -1.0 stops of compensation. Group A is main light, and group B is fill light. We’ll talk more about adjusting the compensation or flash output level in the next section.
Repeat the steps in the last paragraph until all three groups are set to your desired modes. If you do not need to use any groups besides group A (one group of flash units) simply set B and C to --- using the SEL and MODE buttons. Notice in Figure 9-24 how I only have group A active, and all the other groups are in ---mode, or disabled.
Often a group might only have one flash unit, and another group might have a different single unit. If you want to control the flash groups individually, so that one group has less or more power output for main or fill purposes, you’ll need to configure at least two groups. That allows you to control them on an individual basis.
Flash Output Level: Now we’ll configure the flash power output levels for each group.
Let’s say you want to set group A as the main flash and group B as the fill flash. We’ll configure groups A and B in that manner as a learning exercise. Later you can experiment with various power levels and group combinations.
You have already set your flash mode (TTL, AA, M, or ---) in the previous section, so now you will set the flash output level for this group. Really, you could have set the flash output level just after setting the flash mode, but we separated the events for learning purposes.
To set the flash output level on our main flash group A, press the SEL button until you have highlighted the group you want to modify. Now, press the Up+ button to add EV(more light) or the Down– button to remove EV(less light).
If you are using TTL or AA mode, you will see that you have the following stop values available in a plus or minus direction:
0.0, 0.3, 0.7, 1.0, 1.3, 1.7, 2.0, 2.3, 2.7, 3.0
If you are using M mode instead, you will find that the following fractional power setting range is available:
Since group A is our main light source we should leave it set to flash output level 0.0 in TTL or AA modes and ![]() in M mode, which means use normal power for the main group.
in M mode, which means use normal power for the main group.
To configure our fill light source, we will set the power output on group B to a somewhat lower value, such as -0.7 in TTL or AA modes, or -![]() in M mode. Notice in Figure 9-25 that I have group A set to TTL with 0.0 or no flash output compensation. Group B is also set to TTL, but it has -1.0 EV or -1.0 stops of compensation. This is a good example of using main and fill lights. Group A is the main light with normal power, and group B is a fill, with 1-stop less light output.
in M mode. Notice in Figure 9-25 that I have group A set to TTL with 0.0 or no flash output compensation. Group B is also set to TTL, but it has -1.0 EV or -1.0 stops of compensation. This is a good example of using main and fill lights. Group A is the main light with normal power, and group B is a fill, with 1-stop less light output.

You can simply play with the values, shooting test exposures and examining them on the camera’s Monitor LCD, or break out a hand-held light meter and do it the old-fashioned way. The powerful thing about using Nikon CLS, though, is to control the slave units from your commander device and adjust the exposures on the fly, using the histogram in your camera to judge proper exposure and using your camera’s Monitor LCD to zoom in and view light and shadow. Why go to all the trouble of figuring out complex lighting ratios when the camera and flash units will do it for you? Of course, you may be the type of person that enjoys doing it yourself. Nikon CLS gives you that choice!
Channel Number: This is a critical setting since it describes to your commander device what channel to use for communicating with the groups of slave flash units.
Once you’ve set this value, you’ll need to set the slave units to the same channel or they will just stand there grinning at you and whispering silently among themselves about the nut fiddling with his camera.
I normally leave my channel set to 1, but that’s just my preference. Yours may be different. The point is to get your commander device and all slaves on the same channel. Figure 9-26 shows how to set the channel number.

Referring to Figure 9-26, press the SEL button until the cursor moves to the top right of the Master screen, where the number 1 stands between the CH and that squiggly looking S-shaped arrow. That digit is the channel number. Once you have the cursor there, simply press the Up+ or Down– button to select your favorite channel number. You can select any number from 1 to 4.
Your SB-800 is now fully configured and ready to control all those pesky little SBs sitting out there on their stands, waiting patiently. Be sure your slave units are segregated by group and all are assigned the correct channel number. Now go experiment and enjoy your powerful CLS system!
To exit Master mode and return your SB-800 to regular flash unit functionality, simply follow these steps:
While in the Master screen with the channels and groups, hold down the SEL button for two seconds and it will switch back to the screen that allows you to select Master, Remote, or in this case the all-important OFF selection.
Press SEL again, and scroll up to OFF, then press SEL again to select OFF.
Hold down the SEL button for two seconds again, and it will then switch back to being a normal i-TTL stand-alone flash.