(User’s Manual page 349)
Retouching allows you to modify your images in-camera with no computer postprocessing. If you like to do digital photography but don’t particularly like to work on a computer later, these functions are for you!
You can use the Retouch Menu directly and choose an image to work with, or you can display an image in Playback mode and press the OK button to open the Retouch Menu. There are limitations imposed when you are working on an image that has already been retouched.

When you use the Retouch Menu items, the D700 does not overwrite your original file but always creates a JPEG file with the next available image number in the current folder on the memory card. Although the original image can be a RAW, JPEG, or TIFF image, the retouched image will always be saved as a JPEG. If you have images numbered DSC_0001 through DSC_0100 on your card and you are retouching image number DSC_0047, the resulting new JPEG image will have the number DSC_0101. The D700 looks to see how many images are in the current folder on the memory card, then adds the retouched image as a brand new exposure, assigning it the next available image number.
I am going to approach this section of the chapter with the idea that you are using the menus directly. Experiment with displaying an image and then pressing the OK button to open the Retouch Menu for that image. It works basically the same, except that the latter method leaves out the step of choosing the image since one is already on the screen.
Retouching From the Playback Preview Screen
Just for fun, here are the steps to use if you want to work with an image you just took or are looking at on your D700’s Monitor LCD. To use the Retouch Menu options, you’ll do four basic steps (except with Red-eye and Side-by-side comparison):
Using Playback Mode, choose a picture by displaying it your D700’s Monitor LCD.
Press the OK button to open the Retouch Menu.
Select one of the Retouch Menu functions.
Press OK to create the retouched copy. Between steps 3 and 4, there can be extra steps if you want to modify the presented value. For instance, let’s say you want to trim an image. You can press OK once you’ve selected Trim and the D700 will trim the image inside the crop frame it shows you. If you want, you can use the Multi Selector to move the crop frame around before you press OK to actually trim the image. Usually the default value is fine, so you can just press OK to complete the process.
Some of the retouch options are not available with this method, which is why I use the full menus for the rest of this chapter.
Using the Retouch Menu Items Directly
Let’s consider each section of the Retouch Menu in detail.
D-Lighting
(User’s Manual page 354)
D-Lighting allows you to reduce the shadows and maybe even reign in the highlights a bit. It lowers the overall image contrast, so it should be used sparingly. The D700 is not aggressive with its D-Lighting so you can use it quickly if needed. Also, please remember it will create a copy of the image, so your original is safe.
The steps to D-Light an image are as follows:
Select D-Lighting from the Retouch Menu.
Select the image you want to modify (Figure 8-43, screen 2).
Choose the amount of D-Lighting you want for the chosen image using the Multi Selector to scroll up or down. You’ll choose from Low, Medium, or High (Figure 8-43, screen 3).
When the image on the right looks the way you want it to look, press the OK button to save the new file. The D700 will display a brief “Image saved” notice, then switch to displaying the new file in full screen Playback mode.

(User’s Manual page 355)
If you have used flash to create a picture, the Red-eye correction function will work on the image if it can detect any red-eye. If it can’t detect red-eye in the image, it will not open the red-eye system but will, instead, briefly display a screen informing you that the camera was “Unable to detect red eye in selected picture.” If you try to run the red-eye routines on an image where flash was not used, the D700 will inform you, “Cannot select this file.”
The steps to execute the Red-eye correction function on an image are as follows:
Select Red-eye correction from the Retouch Menu.
Select the image you want to modify (Figure 8-44, screen 2).
Press the OK button and the Red-eye correction routines will execute. You’ll see an hourglass on your screen for three to five seconds.
After Red-eye correction is done you can use the normal zoom buttons to zoom in on the image to see how well it worked.
Press OK to save the file under a new file number (Figure 8-44, screen 4), or you can press the Playback button to cancel.

Trim
(User’s Manual pages 356–357)
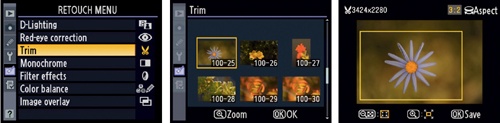
The Trim function allows you to crop an image in-camera, change its aspect ratio, and save the file out to a new image. Your original image is not modified.
Here are the steps to trim (crop) an image in the D700:
Select the Trim function from the Retouch Menu.
Select the image you want to modify (Figure 8-45, screen 2).
You’ll be presented with a screen that has a crop outline in yellow. Using the normal zoom buttons, you can zoom in for a deeper crop or zoom out for a lesser crop. You can use the Multi Selector to scroll the crop outline to the desired location on the image. Zoom and scroll until you find your best crop position.
Select the aspect ratio of the crop by rotating the Main command dial. Your choices are 3:2, 4:3, and 5:4.
Once you have the crop correctly located and sized, and the aspect ratio set, press the OK button to save the new image under a new file number.
Monochrome
(User’s Manual page 357)
The Monochrome functions in the D700 are fun to play with, and can make some nice images. You have the choice of three different types of monochrome:
Black-and-White
Sepia
Cyanotype
If you select Black-and-White, the D700 provides only one level of lightness and darkness. However, for Sepia (golden toned) and Cyanotype (blue toned), you can fine-tune the tint from almost-not-there to pretty saturated.
Here are the steps to create a monochrome image from one of your color images on the memory card:
Select Monochrome from the Retouch Menu.
Select a Monochrome tone of Black-and-White, Sepia, or Cyanotype (Figure 8-46, screen 2).
Select the image you want to modify (Figure 8-46, screen 3).
For Sepia and Cyanotype, you can use the Multi Selector to saturate or desaturate the tone. Use the Multi Selector to scroll up or down, and watch the screen until the tint is just where you want it to be. You can cancel with the Playback button (Figure 8-46, screen 4).
Press the OK button to save the new image under a new file number.

(User’s Manual page 358)
Many times when shooting images outdoors under an overcast sky, or under certain types of artificial lighting, the image can have a bluish cast or feel “cool”. The Filter effects function can help with that.
The Filter effects selection is a simple way to apply two specific filter effects to an existing image as follows (Figure 8-47):
Skylight – Provides an effect similar to a skylight filter, which removes some of the blue in an image.
Warm filter – Provides an even stronger warming effect by adding a reddish tint to the image. This is sort of like an 81A or Nikon A2 warming filter.
To execute the filter effect you’d like, follow these steps:
Select Filter effects from the Retouch Menu.
Select either Skylight or Warm filter (Figure 8-47, screen 2).
Select the image you want to modify (Figure 8-47, screen 3).
Press the OK button to save the new image under a new file number or the Playback button to cancel.
Color balance
(User’s Manual page 358)
This is a useful function for people who do not like to use computers. You can visually add a light or strong color cast to your images. You might just want to warm things up a bit by adding a touch of red or cool things down with a touch of blue. Or, you could get creative and simply add various color casts to the image for special effects. You’ll see what I mean when you try it.
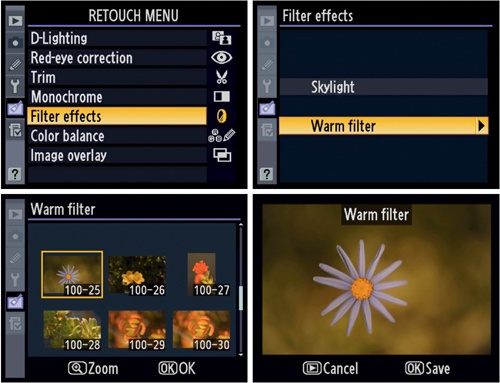
Figure 8-48 shows the Color balance screens to use.
To modify the color balance of an image, follow these steps:
Select Color balance from the Retouch Menu.
Select the image you want to modify (Figure 8-48, screen 2).
Use the Multi Selector to move the tiny black indicator square in the center of the color box toward whatever colors make you happy. Watch the histograms as they display the changing color relationships between the red, green, and blue color channels. You can see the color changes as they are applied to the small version of your image in the upper-left corner of the screen (Figure 8-48, screen 3).
Press the OK button to save the new image under a new file number or the Playback button to cancel.

(User’s Manual page 359)
The Image overlay function is a cool way to combine two RAW images as if they were taken as a multiple exposure. You can select a couple of images and combine them into a new image that is of higher quality than an image from graphic programs on a computer because they are combined using RAW image data. Figure 8-49 shows the Image overlay screens.
To execute an image overlay and combine two images into one, do the following steps:
Select Image overlay from the Retouch Menu.
Select the first image in the Image 1 box (outlined in yellow) by pressing the OK button and using the Multi Selector to select an image from the selection screen (Figure 8-49, screen 3). Press OK again to return to the combination screen (Figure 8-49, screen 4).
Use the Multi Selector to move the yellow box to Image 2. Press OK to move to the image selection screen, scroll to the desired image, then press OK again to select that image and return to the combination screen (Figure 8-49, screen 7). Anytime that Image 1 or Image 2 is selected, you can use the Multi Selector to scroll image gain either up or down, with the result being displayed in the Preview area.
Move the yellow box to the Preview area, and you’ll see two selections below. The first is Overlay, and the second is Save. If you select Overlay, the D700 will present you with another screen that allows you to see the images more closely. You can press the OK button to save the new image under a new file number or press the Checkered Thumbnail button to return to the previous screen (Figure 8-49, screen 7).
If you choose to press the OK button instead of the Overlay button, the D700 immediately combines the two images, saves the new image out to your memory card under a new file number, and displays that new image in the Monitor LCD (Figure 8-49, screen 9).

Side-by-side comparison
(User’s Manual pages 362–363)
After using the Retouch Menu to optimize a picture, you may want to compare the finished product with the original. To do so, use the Multi Selector to select the retouched image, then press OK. As shown in screen 2 of Figure 8-50, scroll down to the Side-by-side comparison option and press OK. The D700 will locate the original and display both images, side-by-side, as shown in screen 3. Note that the Retouch Menu options used are displayed above the images in screen 3. To see either image in full-screen mode, use the Multi Selector to select the desired image, then press the Zoom in button.