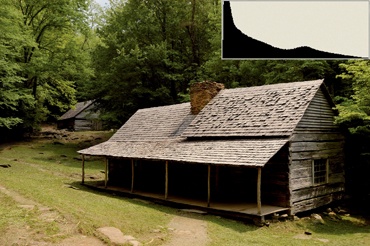
Looking at the image in Figure 2-22, taken in mid-day overhead sunshine, we see an example of a range of light that is too great to be captured by a digital sensor but is exposed in such a way that we can get a usable photo later.
Notice in Figure 2-22 how the dark values are clipped off and dark detail is lost. But, look to the right side of the histogram and notice how the light values are not clipped off. So the camera recorded all the light values but lost some dark values. Since our eye sees this as normal, this image looks okay.
If we were standing there looking at the cabin ourselves, our eye would be able to see much more detail in the front porch area. But, the camera just can’t record that much light range. If we want to get a bit more detail in the shadows than this image seems to contain, we can do it. Normally, a camera does not give us enough control to add light values on the fly, so we use the histogram to get the best possible exposure and then adjust the image later in the computer. Some cameras can be “profiled” to capture light ranges more effectively in one direction or the other, but when you push one area, the opposite area must give. So we need a way to take all this light and compress it into a more usable range.
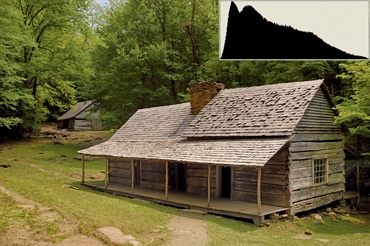
We are now entering the realm of “post-processing,” or of in-computer image manipulation. Look at the image in Figure 2-23. This is the exact same image as Figure 2-22, but it has been adjusted in Photoshop to cram more image detail into the histogram by compressing the mid-range values. Notice that the entire histogram seems to be farther right toward the light side. Also notice that the mid-range peaks are basically gone. We removed a good bit of the mid-range, but since there was already a lot of mid-range there, our image did not suffer greatly.
How this computer postprocessing was done is outside the scope of this book, but it is not very hard. I do recommend, however, that you buy a program like Nikon Capture NX 2, Photoshop, Photoshop Elements, Lightroom, or another fine graphics program designed for photographers. Your digital camera and your computer are a powerful imaging combination that can create a digital darkroom, where you are in control from start to finish, from clicking the shutter to printing the image. But, retreating from philosophy, let’s continue with our histogram exploration.
Notice in Figure 2-23 how the histogram edge is just touching the highlight side of the histogram window? A small amount of clipping is taking place, and you can see the slightly blown-out area on the peak of the cabin’s roof. Sometimes a very small amount of clipping does not seriously harm the image. The photographer must be the judge.
The greater apparent detail in this image is the result of compressing the mid-range of the light values a bit in the computer. If you compress or make the mid-range light values smaller, that will tend to pull the dark values toward the light side and the light values toward the dark side. So, you will have more apparent detail in your image. It’s like cutting a section out of the middle of a garden hose. If you pull both of the cut ends together, the other two ends of the hose will move toward the middle, and the hose will be shorter overall. Similarly, if you compress or remove the mid-range of the histogram, both ends of the graph will move toward the middle. If one of the ends of the graph is beyond the edge of the histogram window (or is clipped off), it will be less so when the mid-range is compressed.
We are simply trying to make the histogram fit into the frame of its window. If we have to cut out some of the middle, to bring both ends into the window, well, there is usually plenty in the middle to cut out, so the image rarely suffers. Remember, this is being done outside of the camera in a computer. You can’t really control the in-camera histogram to compress values, but you need to be aware that it can be done in the computer so that you can expose accordingly with your camera’s histogram. Then you will be prepared for later postprocessing of the image in your computer.
In fact, now that we have compressed the mid-range values, the image in Figure 2-23 more closely resembles what our eye normally sees, so it looks more normal to us.
In many cases, your progression from the shooting site to your digital darkroom can benefit if you shoot RAW (unprocessed) images (Nikon calls it Nikon Electronic Format, or NEF).
A RAW digital image contains an adjustable range of light. With a RAW image you can use controls in Capture NX 2, Photoshop, or even the basic Nikon Picture Project software included with the D700 to select from the range of light within the big RAW image file. It’s like moving the histogram window to the left or right over all that wide range of raw image data. You select a final resting place for the histogram window, capture the underlying RAW data, and then your image is ready for use.
This is an oversimplification of the process but, I hope, makes it more understandable. In reality, the digital sensor records a wider range of light than you can use in one image. While you might be able to use about five stops of light range in a normal image, the digital sensor is recording probably about seven stops of light range. Although you just can’t get all of that range into the final image, it is there in the RAW file as a selectable range. I prefer to think of it as a built-in bracket since it works the same way.
This bracketed light range within the image is present to a very limited degree in JPEG, and a bit more so in TIFF images, but is the most pronounced in pure RAW images. That is why many photographers choose to shoot in RAW mode instead of JPEG or TIFF.