It's almost impossible to conclude that Redmine is more a project management application or an issue tracker but its issue tracking feature is definitely what has made it so popular. Issue tracking is not possible without having a project, while project management is still possible without issues, but we spend most of our time dealing with Redmine as an issue tracker. In other words, issue tracking is an essential component of Redmine which, however, depends on many other Redmine components but which you must learn to use Redmine effectively. For these reasons, we start reviewing Redmine functionality from its issue tracking capabilities.
As it was just mentioned the issue tracking module is too deeply tied into other Redmine modules to be reviewed separately. However, the opposite is also true, other modules use issues too intensively to skip issue tracking and start from reviewing other modules. So here we will try concentrating on issue tracking but also mentioning other modules if they are applicable. Do not worry if you don't know the mentioned modules yet, I will give you the directions to where you will be able to check them quickly.
In this chapter, we will cover the following topics:
- Creating an issue
- Issue page
- Issue list
- Updating issue
- Getting updates on issues
- Issue related settings
In order to be able to create an issue, you need to have a project so create one if you have not done this yet (use Projects | New project). You can also jump to the Creating a project section in Chapter 5, Managing Projects, where project creation is described, and then come back here.
If you already have a project, or when you have created it, navigate to the New issue tab of the project menu:
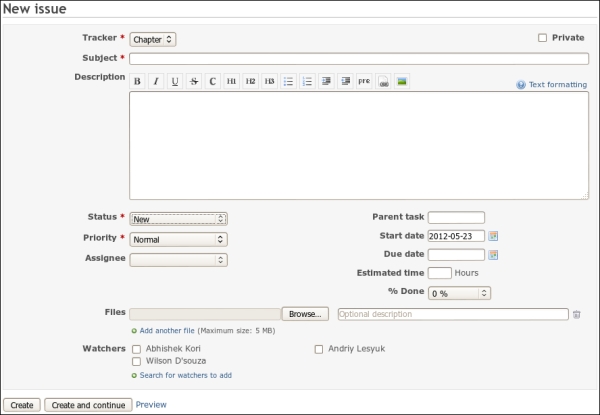
The preceding screenshot shows the form that Redmine users use to create issues.
Let's discuss each element of the issue creation form :
- In Redmine, the Tracker name is used to describe the type of the issue, thus, the appropriate item in JIRA (a popular commercial alternative to Redmine) is named literally "Issue type". By default, Redmine adds the following trackers:
- Bug
- Feature
- Support
You can delete, modify or add trackers by going to Administration | Trackers, which we will review in Chapter 8, Access Control and Workflow. In my demo project, I have added new tracker Chapter which you see selected in the previous screenshot.
- The Private checkbox can be used to make the issue visible only to you and other members of the groups that you are a member of. However, if a project is private too, such users should also be members of the project.
- The Subject field, like the e-mail subject, should briefly describe the issue. In most cases, the tracker and the subject of an issue (besides the unique numerical identifier) are visible to users on Redmine pages containing links to the issue page. Therefore, the content of this field is very important.
- I believe that the Description field does not need an explanation, but the thing that is worth mentioning here is that you can use rich text formatting within it (click on the Text formatting link to get an idea of its capabilities). We will also review the Wiki syntax, which enables text formatting, Chapter 7, Text Formatting. From this moment, in further text of the book, I will refer to the Redmine rich text formatting as the Wiki formatting.
- The Status field defines the status of the issue such as whether it is active, does anyone work on it, is it resolved, and so on. In the previous screenshot, the New status is selected as this is a new issue and, therefore, this status is selected by default. The default issue status as well as available statuses and their order can be configured by going to Administration | Issue statuses.
- The Priority field reflects how urgent or critical the issue is. Values for this field and their order can be customized in Administration | Enumeration. There you can also select the default value.
- The Assignee field holds the name of the user who will be responsible for resolving the issue. Only members of the project can be selected here, that is, if you want to assign an issue to someone you must first add that person to project members (this can be done under the Members tab in project settings).
- The Parent task field can hold the numerical identifier of another issue to which the new issue will be added as a subtask.
- The Start date and Due date fields can hold the period during which the issue is to be worked on. These fields, if both are specified, are used to display the issue on the Gantt chart. Each of these fields are also used to display the issue in the calendar. The Due date field can be used for sending reminder e-mail messages, if the latter was configured.
- The Estimated time field can be used to specify how many hours will be required to resolve the issue. This field is especially useful if you use the time tracking module because, in this case, it allows you to control the time spent for an issue.
- The Done field, also known as done ratio, stores the percentage of completion for an issue. Thus, ideally by the start date, if it is specified, it should be 0% and by the due date, if it is specified, it should be 100%. This field is also used for the roadmap to show the overall progress for a version.
- Redmine supports any number of attachments for an issue. Each file can have a description. The size of each file is limited by the Maximumattachment size option which is present in Administration | Settings | General (in my case this option is set to 5 MB).
- Each issue can be watched. If you "watch" an issue you will:
- Be able to see the list of watched issues on My page (if you enabled the Watched issues block there, this page will be reviewed in Chapter 9, Personalization).
- Be notified about any changes in the issue by e-mail (if e-mail notifications were enabled and configured; refer Chapter 3, Configuring Redmine, on how to configure e-mails).
Issue watchers can be added when an issue is created but only check boxes for project members are explicitly available. To add non-members to Watchers, you need to click on the Search for watchers to add link.
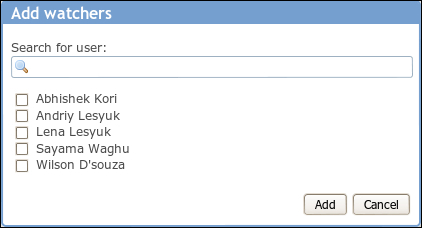
The previous screenshot shows the Add watchers window and the list of all users that are available for adding. You can type a part of the first name or last name to filter the list. When you click on the Add button the selected users will appear with checkboxes in the main form.
- When ready with editing the issue, you can click on the Create button to save it and move to the issue page, or you can click on the Create and continue button to save it and navigate back to the new issue form for adding another issue.
- The Preview link can be used to preview the issue description, in particular, to see how Wiki formatting is going to be rendered.
However, the form we have just reviewed is incomplete. This is, actually, the form you get on a just installed Redmine and it should contain more elements if you have configured the project. We will speak about configuring projects in the next chapter. Now let's talk only about things which add new elements to the new issue form.
To configure properties such as, which issue form fields should be required or read-only per issue status, member role, and tracker, go to Administration | Workflow | Fields permissions. This will also be reviewed in Chapter 8, Access Control and Workflow.
Tip
Custom fields
Redmine supports custom fields which can be added to issues as well. If added, issue custom fields will also appear on the issue form. We will review custom fields in the Chapter 11, Customizing Redmine.
In many cases having just tracker (issue type) is not enough for describing an issue. Let's take the Feature tracker. Is it a UI feature? Is it a new functionality of the project? Is it, maybe, an API feature? As you see on some complex projects you may need an additional field to make an issue more exact. Redmine provides such field. Why is it missing? You need to add at least one value for it to appear on the new issue form.
Go to the project settings (select the Settings tab on a project page) and select the Issue categories tab as shown in the following screenshot:

Now click the New category link to add a category as shown in the following screenshot:

The Assignee field can be set to a user to whom issues of this category will be automatically assigned (unless, of course, the assignee was explicitly specified). Thus, if you have different employees responsible for different parts of your project, you can create categories named by these parts and specify corresponding employees here as assignees for these categories. This way, reporters only need to select part of the project and issues will automatically get assigned to corresponding responsible employees.
But wait, how do reporters select the category? If you check the new issue form now, you will see an additional field:
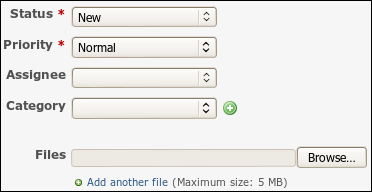
The ![]() icon at the right-hand side of the field appears only for users having the Manage issue categories permission. Such users may add issue categories right from the new issue form.
icon at the right-hand side of the field appears only for users having the Manage issue categories permission. Such users may add issue categories right from the new issue form.
If you are planning to have several future versions of your project, in which version do you plan to resolve particular issues? This question draws attention to the need to be able to assign an issue to a version. The form we have reviewed earlier does not have any fields for this. But the project—that we used—does not have any version either.
As soon as you add a version to the project, using the Versions tab which can be found in the project's settings, the new field appears on the form:

The Target version field holds the name of the version in which the issue is to be resolved. The value of this field will be used to show the issue on the project roadmap and in the version change log (both will be reviewed in the Chapter 5, Managing Projects).
Similar to the Category field, the ![]() icon allows adding versions directly from the new issue form. Of course, to be able to do this a user must have the Manage versions permission. Version management will also be reviewed in details in the next chapter.
icon allows adding versions directly from the new issue form. Of course, to be able to do this a user must have the Manage versions permission. Version management will also be reviewed in details in the next chapter.