Till now we spoke about how the text formatting is integrated into Redmine. We started the chapter by discussing this to avoid reviewing these issues later, when we will be learning the syntax rules. Therefore, now we can (and will) focus on the rules exclusively.
All Textile syntax rules can be divided into special rules (for example, ones which implement lists and tables) and the rest. So the rest actually includes not only the very basics but also the rules that are very simple and do not need a separate discussion. And these are the rules we are going to learn right now. Let's start with basic principles.
A Textile document is a plain text document. The new line symbol in Textile is treated as <br /> tag in HTML, that is, the rest of the text after the new line symbol in the current paragraph starts on a new line.
A paragraph in Textile is separated from the previous and the next paragraphs by an empty line, that is, two new line symbols. Thus, the following text will be treated as a single paragraph:
Redmine is a flexible project management web application.
Written using the Ruby on Rails framework,
it is cross-platform and cross-database.
Alternatively, you can start each paragraph with p. (there should be a space after):
p. Redmine is a flexible project management web application.

p. Written using the Ruby on Rails framework,
it is cross-platform and cross-database.
But, again, paragraphs should be divided by an empty line. Otherwise p. in the second line will just be ignored (shown as it is in the first paragraph).
The p. marker stands for paragraph and is converted into the HTML <p> tag. In fact, it's the same, if we did not use p., because Textile uses the HTML <p> tag for every paragraph, which does not have any other marker at the beginning of the line.
Similar to the p. marker h1., h2., h3., h4., h5., and h6. markers get converted into HTML's <h1>, <h2>, <h3>, <h4>, <h5>, and <h6> tags accordingly. These markers can be used to add headings to your Wiki content. The following code snippet will help us see all the heading levels:
h1. First heading

h2. Second heading

h3. Third heading

h4. Fourth heading

h5. Fifth heading

h6. Sixth heading
The earlier code is rendered as shown in the following screenshot:
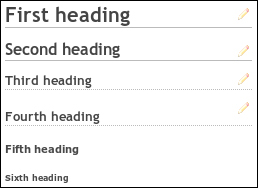
Such headings not only have their own styles but also define Wiki document sections. Thus, sections that were created using h1. to h4. markers, can be edited separately using pen icons to the right. Headings down to the fourth level also get shown in the table of contents, which can be added to the document using the {{toc}} macro, which is explained later in this chapter.
In addition to basic blocks—such as paragraph and headings—Textile supports basic inline text styles. Thus, to make the text bold use *, to make it italic use _, and so on. For example, let us see how the following text will be rendered:
This is the difference between *strong* and **bold**.
Inline cite looks ??this way??.
Inline text can be +inserted+ or -deleted-.
This is the difference between _emphasize_ and __italics__.
Also Redmine supports ^superscript^ and ~subscript~.
The following screenshot shows how the text mentioned earlier will be rendered:
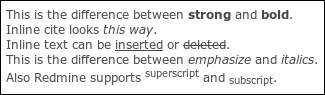
Here you should have noticed an odd thing with strong and bold, and emphasized and italic styles. Yes, in most cases * and **, and _, and __ are the same (and look the same) besides they are converted to different HTML tags. A full list of HTML analogs is given in the following table:
|
Textile |
HTML |
|---|---|
|
|
|
|
|
|
|
|
|
|
|
|
|
|
|
|
|
|
|
|
|
|
|
|
|
|
|
Sometimes when writing documentation, you may need to use shorter names or phrases for something but still reserve the possibility to check the details. For such purposes, you can use footnotes and acronyms.
A footnote, to be more exact, is a number that can be specified inline using square brackets, for example, Some text[1] (there should be no space between the text and the footnote number). The text for the footnote should be specified separately, preferably, at the bottom of the document using fnX., where X is the footnote number. Like p. and hX., the fnX. marker should be on the start of the line. As this is a so-called block marker, each footnote line should be separated from the lines above and below it with empty lines.
Unlike footnotes, acronyms are specified wholly inline using parentheses. Their syntax is ABC(Text), where ABC is an all-caps word, which is going to be shown on the page, and Text is the text, which is going to be shown when the users hover their mouse cursor over the acronym. Like for footnotes, there should be no space between the acronym and the text.
Let us see how the following Textile code will be displayed:
In Redmine[1] Wiki pages can be exported to PDF(Portable Document Format), HTML(HyperText Markup Language) and TXT(Plain text).

fn1. Flexible project management web application written using Ruby on Rails.
The following screenshot shows how the earlier mentioned code will be displayed:

You can also visually separate the content by adding --- (three dashes), ***, or ___ between paragraphs (separated from paragraphs by empty lines). These markers will produce the horizontal line (made with the HTML <hr> tag).
The Textile processing of some part of the text can be disabled using the special <notextile> tag. For example:
<notextile>This text will be shown *as it is*.</notextile>
However, this does not apply to links, this applies only to formatting. Please note that in this case this text will be processed by HTML engine, but tags won't work inside <notextile>, these tags will still be escaped by Textile, that is, they will be shown as they are. The problem here is that new line symbols and empty lines won't be processed as well, so such text will be shown in a single paragraph.
For applications like Redmine it's very useful to be able to embed quotes, especially for issue comments and forum messages. Luckily, Redmine Textile implementation allows to do this. Moreover, appropriate forms usually provide buttons for easy pasting quotes from original messages.
In Redmine quotes can be embedded in two ways.
- By default for pasting a quote Redmine uses the
>marker at the beginning of the line (it's another block marker). This marker is especially useful because it supports nesting. Thus, you can write:>> Initial message > Reply to initial message
The following screenshot shows how the earlier mentioned example will be rendered:
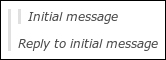
The
>marker does not have to be separated from the previous line by an empty line. Furthermore, an empty line will only break the left gray line, which indicates that this is a quote. - Another way is to use
bq.marker. Generally, both produce visually identical results (because both use the HTML<blockquote>tag) butbq.does not support nesting. However, thebq.marker, like the<blockquote>tag, supports theciteparameter.bq.:http://www.redmine.org Redmine is a flexible project management web application. Written using the Ruby on Rails framework, it is cross-platform and cross-database.
The syntax is:
bq.:cite ...
Here
citecan be an absolute or relative URL or a named anchor (starting with#). This parameter is not displayed or anyhow used by browsers but can be used by search engines.
Redmine Textile implementation supports bullet and numbered lists. Bullet list items can be created using the * marker and numbered list items can be created using the # marker. Both should be placed on the start of the line and be followed by a space (unlike strong * marker which should be followed by a word).
Bullet and numbered lists can be nested. To add a nesting level, just add another marker at the beginning. Let's see how the following example will be rendered:
# The first item
## Nested item
### Next nesting level
# The second item
The following screenshot shows how the earlier example is rendered:

You can also mix types of nested lists, for example, check the following code:
# The first item
#* Nested item
#** Next nesting level
# The second item
Images can be embedded into a Wiki content using the ! marker. The syntax of this marker is as follows:
!<options>.<image url><title>!:<href>
In the preceding syntax, <options>., (<title>) and :<href> are optional.
Image URL can be absolute or relative. Thus, to embed an image attached to a different resource (which has been described at the beginning of this chapter) you need to write the URL, for example:
!/attachments/110!
Of course, users having access to the Wiki content should also have access to the resource the image is attached to.
Images from the current resource, that is, from the resource the Wiki content is connected to (for example, Description content, which is connected to issues), can be embedded just by specifying their file names, for example:
!9144_07_12.png!
In such cases Redmine is trying to find the file with the given name in the current resource's attachment list and uses the attachment if found.
The optional
<href> parameter can be used to turn the image into a clickable link pointing to some URL, for example:
!redmine-logo.png!:http://www.redmine.org
The optional <options> parameter can be used to align the image relative to the text. Supported alignment options are <, =, and > which align the image to the left, center, and right correspondingly. For example, let's see how the following code is rendered:
!<.redmine-logo.png!

Redmine is a flexible project management web application. Written using the Ruby on Rails framework, it is cross-platform and cross-database.
The following screenshot shows how the earlier mentioned code is rendered:

The <title> parameter can be used to specify the alternative text for the image, which will be displayed if there are any problems while loading the image (it's the analog of the alt attribute of the HTML <img> tag).
Redmine's Textile supports two types of links—normal and internal.
If the text contains links starting with http://, https://, ftp://, ftps://, sftp://, or www., they will be recognized and rendered as links automatically. The same will be done with e-mail addresses, they will be rendered as mailto links.
Normal links can also be created using the following syntax:
"Anchor(Text)":link
Here, Anchor is the text, which is going to be displayed and be clickable, Text is optional link title, which will be displayed when users hover their mouse cursors over the Anchor, and link is the URL that the lik will point to.
Redmine Wiki formatting would be incomplete without support of internal links, especially, as has been noticed before, without Wiki links.
It's essential for any Wiki system to support cross-page links as such links are the basis for the Wiki navigation. Otherwise the only way to find the page you are interested in, would be to use the Wiki index.
Cross-page links in Redmine's Wiki can be created using the following syntax:
[[Project:Page#NamedAnchor|Title]]
Everything besides Page is optional in the earlier syntax. Here Page is the name of the Wiki page, which is the last element of the page URL. For example, if the page URL is http://www.redmine.org/projects/redmine/wiki/RedmineWikis, the page name is RedmineWikis.
It may be needed to link to the section on the Wiki page. Sections, which are created using h1. to h4. markers have named anchors that can be used for this (that is, we can link only to sections on the first level and down to the fourth level). A named anchor is generated from the heading title, so we can just use the heading title as NamedAnchor. For example:
[[Wiki#First heading]]
Note
The NamedAnchor is used as a URL component, also known as the fragment identifier. As characters, which can be used in URL are limited, Redmine sanitizes named anchors on the Wiki page and the value you specify in the Wiki link. If, in some cases, you need to specify the already sanitized named anchor you can determine it by hovering your mouse cursor over the heading and then over the pilcrow which will appear to the right of the heading title, the named anchor will appear after the # sign in the URL (that is, as URL fragment) on the status bar.
You will rather rarely want to use the page name as a link text. To show a different text you should put it into the Wiki link as Title (after the | sign). For example:
See [[AnotherWikiPageName|this page]] for details.
If the page you want to link to, belongs to a different project you should prefix it with the project name or identifier as follows:
[[Mastering Redmine:Wiki]]
If projects that you host on your Redmine installation are somehow related, you may want to link some projects to others. For such cases, Redmine supports project links which have the syntax:
project:Name
Here project is the keyword defining the project link and Name is the project name or identifier.
Project links point to the project overview page and always use the project name as link text (this can't be changed).
Linking to a version is a very useful feature and I, personally, use it quite often. Thus, it can be used in news when you describe new features of a new version, in issues if you want to specify which version is affected and so on. Version links point to the version page and always use the version name as link text. The syntax is:
version#ID
version:Name
In the preceding syntax, version is the keyword which tells that this is the version link, Name is the version name (can be enclosed into quotes) and ID is the numeric ID, which can be seen, for example, in URL of the version page (the last component).
To link to a version in a different project prefix it with the project identifier, for example:
redmine:version:2.0.3
Most likely, you will use issue links even if you don't plan to. That's because their syntax is very natural and obvious. It's just #X, where, X is the issue number.
Resolving an issue is the process which sometimes involves not only the assignee but also users, customers, QA engineers, and so on. In this case, it is very useful to be able to refer to the particular note (history entry) in the issue instead of just the issue, especially if this note contains a comment explaining some details. In such cases use the syntax:
#X-Y
#X#note-Y
In the preceding syntax, Y is the history entry number, which can be seen on the issue page.
Unlike other links, issue links when rendered contain more details. See the following screenshot:

The issue #6 here is already closed and, therefore, is stroked out. When users hover their mouse over an issue link the hint box is shown, which contains the issue subject and status.
While support for attachments in a resource can be used to store images, which will be used in the Wiki content of this resource, the main goal of attachments is actually different. Usually we store files in a Wiki page, an issue, a forum topic, and so on to let other users download them. In such cases somewhere in the Wiki content we refer to the attached files. Instead of just filenames and text like "attached to this page" we can use the syntax as follows:
attachment:filename.ext
This will produce the link to the attached file, which will trigger its download when users click on it. Instead of filename.ext use the filename of the attachment, enclose it into quotes if it contains spaces or other special symbols.
The file, you refer to in the Wiki content, should be attached to the resource this Wiki content is connected to. That is, you can't use the attachment links for project files.
Sometimes when we write news we may need to mention previously posted news. For such cases we can use the marker as follows:
news#ID
news:"Title"
In the preceding syntax, ID is the numeric ID of news, which can be found in news page URL (the last component), and Title is the title of news (can be enclosed into quotes). When rendered news links always use the title as the link text.
You can also refer to news in other projects using the following syntaxes:
project-identifier:news#ID
project-identifier:news:Title
The very same can be done for documents:
document#id
document:"Title"
Here, ID is the numeric document ID, which can be found in URL of the document page, and Title is the document title.
To link to a document in a different project use the following syntaxes:
project-identifier:document#id
project-identifier:document:"Title"
Linking to forums is very much the same:
forum#ID
forum:"Name"
Again, here ID is the numeric ID of the forum (you know how to find it) and Name is the name (title) of the forum.
Forum links can be used, for example, to advise users where they can discuss their questions. While message links can be used, like issue notes, for pointing to the message with details regarding some issue.
Messages, also known as topics, are what users add into forums. A message can be referenced only using ID (while it has the subject it's not guaranteed to be unique). So the syntax for message links is as follows:
message#ID
In the preceding syntax, ID is the unique numeric ID of the message.
Unfortunately, the message ID is not shown in the message list and you need to determine it on your own:
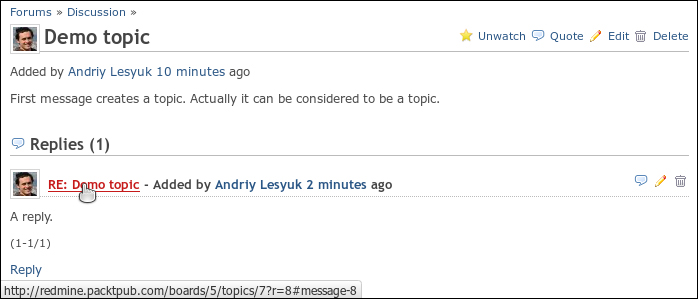
Here the message ID of the first (and only) reply is 8 as can be seen from the URL (shown on the status bar). The first message has ID 7 (it is actually the topic) and the numeric ID of the forum is 5.
To link to forums or messages of other projects just prepend the project identifier like for other similar links.
Repositories support is one of the most powerful features of Redmine so it is not surprising that many repository related links are supported.
As you might know SCM systems were created to manage and track revisions. Each revision, which is also known as commit or changeset, brings changes to files, so a reference to the revision may be needed to let users know when and how files were changed. How to do this depends on the type of the revision ID, which, in turn, depends on the type of SCM.
For numeric revision IDs, for example, for Subversion revisions, you should use:
Repository|rX
In the preceding syntax, X is the numeric revision number and Repository is the repository identifier, which should be used if you have more than one repository in the project. That is, the Repository parameter is optional. For example:
r128
stable|r9868
For other revision IDs, for example, for Git revision, you should use the following:
commit:Repository|ID
In the preceding syntax, ID is the revision ID and commit is the keyword. For example:
commit:0e1a622a
commit:stable|9fde11f9
When rendered revision links, similar to issue links show the hint box with the commit message, when users hover their mouse cursors over the link.
In addition to just revisions, you may need to reference to particular files and even lines, for example, to show where you think the problem lies. In such cases, use the syntax as follows:
source:"Repository|Path@X#LY"
Here Path is the path to the file in the repository (not including the repository name), X is optional revision ID (numeric or not), Y is optional line number, and Repository should be used if it's not the default repository in the project. For example:
source:trunk/lib/redcloth3.rb
source:redmine|trunk/lib/redcloth3.rb
source:trunk/app/helpers/application_helper.rb@7248
source:trunk/app/helpers/application_helper.rb#L779
The file from the repository can be also downloaded. That is, you can create a link which will trigger the file download. To do this, use the following:
export:"Repository|Path"
All these links (revision, sources, and download) can be prepended with the project identifier if you want to reference revisions or files in a different project.
Redmine would not be a good project hosting and issue tracking application without the possibility to embed the code into the Wiki content. The code can be syntax highlighted or not. It can be inline or in the block.
Tip
Syntax highlighting in Redmine is implemented using the CodeRay library, see at http://coderay.rubychan.de
For the inline code enclose the text into the @ marker, for example:
@Redmine::WikiFormatting@
Alternatively, you can use the <code> HTML tag as follows:
<code>Redmine::WikiFormatting</code>
Both methods produce the same result and can be used inline. But the <code> tag also supports the programming language parameter:
<code class="Lang">...</code>
Here Lang should be replaced with the code language. Currently supported values, which can be used as a Lang parameter, include C, CPlusPlus (C++), CSS, Clojure, Delphi (Object Pascal), Diff (used for viewing differences in Redmine), ERB (eRuby), Groovy, HAML, HTML, JSON, Java, JavaScript, PHP, Python, Ruby, SQL, XML, and YAML.
Unfortunately Redmine syntax highlighting always adds line numbers that makes it nearly unusable inline. However, only the <code> tag supports the programming language and therefore it has a special usage in Wiki formatting.
We'll get back to this soon and now let's speak about how to embed the code as a block. It's enough just to add additional spaces before the text, for example:
The code block:

  module Test
    class Klass
    end
  end
Note the empty line before the code block. Alternatively you can use the <pre> HTML tag:
<pre>
...
</pre>
Both these methods produce the block of code.
And here is where we can use the programming language support of the <code> tag. As none of the block markers support the language and the code block is where we really want the code to be highlighted (and line numbers to be shown) we can combine them. For example:
<pre><code class="ruby">
    def self.included(base)
        base.extend(ClassMethods)
        base.send(:include, InstanceMethods)
        base.class_eval do
            unloadable
            alias_method_chain :repository_field_tags, :add
            alias_method_chain :subversion_field_tags, :add
            alias_method_chain :mercurial_field_tags,  :add
            alias_method_chain :git_field_tags,        :add
            alias_method_chain :bazaar_field_tags,     :add
        end
    end
</code></pre>
The preceding code will be rendered as follows:

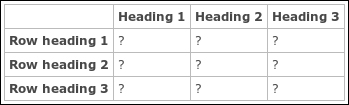
The main idea of Textile is to make the formatting code still readable even in the raw form. For this reason, perhaps, the | (the vertical bar) marker was chosen for building tables. Thus, you can write the code as follows:
|             |Heading 1|Heading 2|Heading 3|
|Row heading 1|    ?    |    ?    |    ?    |
|Row heading 2|    ?    |    ?    |    ?    |
|Row heading 3|    ?    |    ?    |    ?    |
The preceding code will be rendered as follows:

Very natural, isn't it? In practice, however, users usually skip spaces and the raw code looks less readable.
You might know that options for syntax rules are specified after the marker and before the dot. Yes, the | marker also supports options and thus, the _ option makes a cell a heading cell. So if we change the preceding code to the following:
|_.             |_.Heading 1|_.Heading 2|_.Heading 3|
|_.Row heading 1|     ?     |     ?     |     ?     |
|_.Row heading 2|     ?     |     ?     |     ?     |
|_.Row heading 3|     ?     |     ?     |     ?     |
We will get the output as seen in the following screenshot:
Unfortunately the more complex the rule is, the less readable is the raw text.
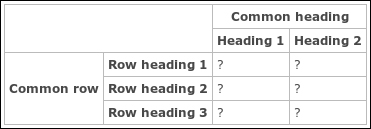
I, personally, can't imagine good tables support without the support of merging cells. In Textile, cells can be merged horizontally using the X option, where X is the number of cells, and vertically using the /Y option, where Y is also the number of cells. Let's see how it works with the preceding example slightly shortened:
|_/22.                        |_2. Common heading    |
                               |_.Heading 1|_.Heading 2|
|_/3.Common row|_.Row heading 1|     ?     |     ?     |
               |_.Row heading 2|     ?     |     ?     |
               |_.Row heading 3|     ?     |     ?     |
The following screenshot shows the result of the preceding code:
If you think that the table rules miss some important options such as aligning, don't hurry to conclude, wait for the advanced syntax topic that we will cover later.
Everything we have discussed until this topic cannot be altered or extended (or at least it's not easy, I mean Redmine API does not allow to do this). Redmine, however, introduces macros, which can be utilized to extend the Wiki formatting.
A macro has the syntax as follows:
{{MacroName(Arguments)}}Let's review macros which come with the core Redmine.
While technically it's not a macro it is reviewed here as it has a very similar syntax, which is:
{{toc}}This marker, if it's the only one on the line and is separated by empty lines from other paragraphs, generates the table of contents as seen in the following screenshot:

Optionally, the {{toc}} marker supports aligning. Thus, to align the table of contents to the right use {{>toc}} and to align it to the left use {{<toc}}.
Sometimes we need to publish marginal information, which does not have high importance but still needs to be included in the content. The problem is that this information is going to occupy space on the page and, possibly, draw attention away from more important things. This is where the {{collapse}} macro can come to our help:
{{collapse(hint)
text
}}
This macro makes the text invisible by default. Instead it shows hint, clicking on it will unhide the text.
We have already discussed how to embed images into the Wiki content. Thus, to show a smaller image on the Wiki page, which links to the full-size image attachment, we can write it as follows:
!{width:100px;}.image.png(Title)!:/attachments/download/NThe problem appears when the attached image is really huge. If using the ! marker, it gets transferred in the full size and is resized by the user's browser. So, to avoid slow load and to cache resized images on the server, Redmine adds the {{thumbnail}} macro:
{{thumbnail(image.png, size=100, title=Title)}}In the preceding macro, image.png must be attached to the current resource, size specifies the size of the thumbnail, and title defines the title for the thumbnail.
If you need to copy some text into many Wiki pages, for example, disclaimer or rules, you can create a separate page with the recurring content and then include it into other Wiki pages. That's what the {{include}} macro is used for. Its syntax is as follows:
{{include(Project:Name)}}
Project is the project identifier and is optional here, it is needed only if you include the Wiki page from another project. Name is the name of the Wiki page to include.
To assist in building, the Wiki navigation Redmine includes the {{child_pages}} macro, which has the syntax as follows:
{{child_pages(Name, parent=1, depth=2)}}In the preceding syntax, Name is the name of the Wiki page, child pages of which should be listed. If Name is omitted Redmine will use the current Wiki page (if the macro is not executed from a Wiki page, an error will be raised). The parent option tells that the Wiki page itself should be included into the list (as the parent page). The depth option limits the depth level of child pages to list.
The following screenshot shows the sample output:

This is a funny macro that is used for educational and testing purposes. It just outputs the given arguments.
{{hello_world}}If a plugin ships with a macro how do we know that it is available? That's where the {{macro_list}} macro can help, it just outputs short information about macros available in the particular Redmine installation.
The syntax is simply written as follows:
{{macro_list}}If you use plugins that provide some macros it can be a good idea to list all available macros somewhere on Help or similar Wiki page.
Redmine Textile is much more powerful than it may seem at first glance. Its power lies in options which are supported by many syntax rules. While usually you won't need to resort to the advanced options sometimes some of them may seem to be essential for receiving the result we need.
Advanced options are usually specified between the marker and the . (dot) mark, which indicates the end of options. Thus, the following syntax can be used for table cells and blocks:
|(options).|
p(options). ...
For some markers like list ones, options should be specified right after the marker and before the space:
*(options) ...
Images and normal links also can use the advanced options:
!(options)image.png!
"(options)Anchor":http://www.example.com
Some alignment options have already been mentioned but these were options specific to that rule. In addition to them, Redmine supports common alignment options as follows:
<: Align to the left=: Align centrally<>: Justify>: Align to the right
For examples:
p<>. This paragraph will be justified.
bq>. This quote will be aligned to the right.
Some of the elements, for example, table cells, also support the vertical alignment options as follows:
^: Align to the top-: Align middle~: Align to the bottom
For example:
|/3^. Cell value aligned to the top|
Block elements, such as paragraphs and cells, can be padded using ( and ) options. These options tell us how many ems of padding should be added to the left (for () and to the right (for )) side correspondingly. The amount is specified using several parentheses. For example:
p(((). This paragraph will use padding.
For this paragraph the left padding will be set to three ems and the right padding will be set to one em.
Using Textile we can do even more. For example, we can set the CSS class name for the element:
p(info). This paragraphs will use <p class="info">.
"(redmine-link)Redmine":http://www.redmine.org
Of course, such CSS classes should be defined in CSS files. But it's not a problem if the style you need does not exist in CSS rules as you can write CSS rules directly in Textile as follows:
"{color:red}Redmine":http://www.redmine.org
*{font-family:Tahoma} Tahoma font
Unfortunately, not all CSS properties are supported. Thus, supported CSS properties include namely color, width, height, border, and others which start with border-, background and ones that start with background-, padding, starting with padding-, margin, starting with margin-, font, font-, text, and anything that starts with text-.
Using Textile, you can also define the language for the element:
*[en] English
bq[en]. English quote.
If you are familiar with HTML and CSS you should know the magic <span> tag. I call this tag magic because it is intended to be used especially for styling a part of the text if no other HTML tag fits better. This element is also supported in Textile and can be created using the % marker. For example:
Let's make %{color:red}this text red% and %{color:yellow}this one yellow%.The span element supports most of the advanced options described earlier.
What if we do not want the text #1 to be rendered as the issue link? Almost every marker or element in Textile can be disabled using the ! marker. For example:
!#1
!r128
![[Wiki]]
!{{toc}}
!{{macro_list}}Tables are the most complex elements in Textile, so it may become a headache to style all the cells properly especially if we use the advanced styles. For such cases, Textile supports batch styling.
To style the whole table we can use the table. marker. This marker should be the only one on a line and should precede the table markers. For example, to make the table border color red, we can do the following:
table{border-color:2px solid red}.
|_.Heading 1|_.Heading 2|
|     ?     |     ?     |
Similarly batch mode also exists for rows. Thus, to change the background color of the heading row to gray we do the following:
{background-color:gray}. |_.Heading 1|_.Heading 2|
                         |     ?     |     ?     |