Configuring the workflow is one of the most complicated tasks in Redmine. And the proper configuration of issue status transitions is more significant and important than configuring fields permissions. So, before doing this I would recommend to draw the diagram of issue status transitions, which you plan to implement in Redmine, and discuss it with your team. This way, you will minimize the risk of the need to modify the workflow later. However, I believe, you can't fully avoid modifications as the workflow should be an adaptive system and can still change.
Modifying the workflow is not so complicated, but it is risky. Wrong setting can allow more than users need or limit them, if they need more. You have already seen all the configuration screens and the amount of elements, so you would probably agree that it's easy to miss something when you add new role, tracker, or issue status. Therefore, under this topic, we will speak about basic principles you should follow when adding new objects to the workflow.
Member roles can be added using the New role link, which can be found in the contextual menu in the top-right corner of the Administration | Roles and permissions. Clicking on this link opens the following form:

This form also contains Permissions, but I did not include them in the screenshot.
The new role form is very much like the role edit form, which was discussed earlier, but with the new Copy workflow from form. This option allows to choose the role, the workflow settings of which (that is, issue status transitions and fields permissions, but not role permissions) for all trackers will be copied into the newly created role.
So let's compile the list of things you should do when creating a new role, to make this process easier and faultless:
- For the Copy workflow from option choose the existing role, issue status transitions, and fields permissions of which are most close to the settings you want to have in the new role
- If you forgot to specify the value for the Copy workflow from option, use the Copy link to clone these setting to the new role
- Use green arrow icons to move the new role to the appropriate place in the role list
- Use the Permissions report link to adjust permissions for the new role
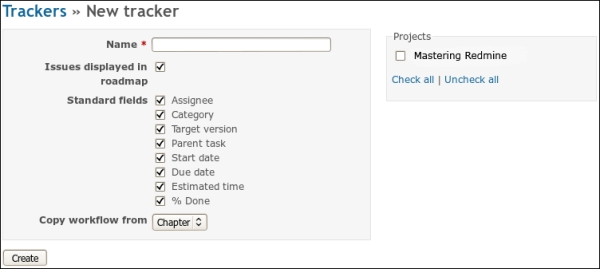
New tracker can be added using the New tracker link, which is located in the top-right contextual menu on the tracker list page in Administration | Trackers. This link opens the following form:

This form is almost identical to the tracker edit form. Like the new role form, this form also has the Copy workflow from option, which has exactly the same meaning—if a tracker is selected for this option, all workflow settings for all roles of the selected tracker will be copied into the new tracker.
So, to avoid mistakes and misconfiguration when creating new tracker, try to follow this principles:
- Using the Copy workflow from option select the tracker, settings of which are most close to the ones you would like to set for the new tracker
- Configure fields availability using either the creation form or, maybe even better, using the Summary link
- Choose projects, for which you want to activate the new tracker, using the creation form
- Using the green arrow icons in the tracker list move the new tracker to the appropriate position
New issue status can be added using the New status link in Administration | Issue statuses. This link opens the following screenshot:

Have you noticed the difference? No Copy workflow from option is available this time. Issue addition is not going to be such easy. This form is exactly the same as the one used for editing issue statuses.
The workflow for the issue status can unlikely be copied as, usually, new statuses are placed somewhere between existing statuses (for example, New—New status—In Progress) that definitely needs to be configured manually. In practice, however, users often forget about the need to add the new status to the workflow that ends up with confusion and lack of understanding of why the new issue status is not visible in issue forms and in the workflow. Unfortunately, Redmine's interface and approach to this issue do not help much.
So, let's try to define some principles which can help make this process easier:
- Using green arrow icons in the issue status list move the new status to the appropriate position (keep closed statuses at the bottom).
- Print, write down numbers, or make a screenshot of the content of the summary page, which can be accessed using the Summary link in Administration | Workflow.
- In Administration | Workflow select any role and any tracker.
- Uncheck the Only display statuses that are used by this tracker option, otherwise the workflow won't show the newly added status.
- Reconfigure the workflow taking into account the new status. Do this for authors and assignees as well if applicable. Don't forget, also, about fields permissions.
- Using the Copy link in Administration | Workflow copy the just configured workflow to other role-tracker pairs, but only to those ones, which should have similar workflows.
- Adjust workflows you have just copied settings to (if needed).
- Repeat the previous five items for every group of role-tracker pairs, which should have similar workflow settings.
- Use the Summary link in Administration | Workflow and earlier saved data to check if all relevant numbers have changed. These are just numbers of allowed status transitions, but, in this case, they can help to determine if changes were made to all necessary role-tracker pairs.
