
Whatever is possible to configure at the global level (the opposite is the project level) can be found under the Administration link in the left-top menu. This link, of course, is available only for administrator.
When you click on the link you get the list of available administration sections. Most of the sections are for managing different Redmine objects such as projects, trackers, and so on. Such sections won't be reviewed under this topic for three reasons: first, most of them are intelligible and need a little explanation; second, many of them will be reviewed in the next chapters, and third, in this chapter we discuss only general, system-wide configuration. Such configuration is bottled in the Settings section, as shown in the following screenshot:
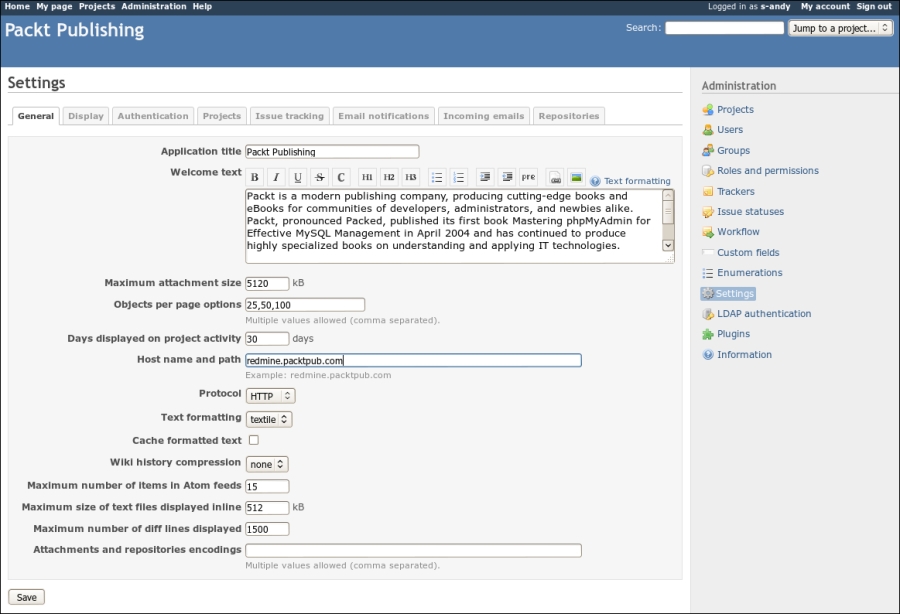
Of course, all such settings can't fit into a single page so Redmine uses tabs to organize them.
The Projects and Issue tracking tabs will be reviewed in the next two chapters.
So let's start with the General tab, which can be seen in the previous screensot.
As mentioned in Chapter 1, Getting Familiar with Redmine, Redmine supports text formatting using Textile. While converting text from Textile into HTML is performed quite fast, in some circumstances, you may want to cache resulting HTML. If so, this checkbox is what youneed.
When this option is checked all Textile content, which is larger than 2 KB, will be cached. The cached HTML is going to be refreshed only when any changes are made to the Textile content. So you should take this into account, if you use any Wiki extension, which produces dynamic content (such as my WikiNG plugin).
If performance is not very critical for you, you can leave this checkbox unchecked.
Here are some other tips for the Gener l tab:
- You may need to change the Maximun attachment size option to some large value. Thus project files are attachments too, so if you expect your users to upload large files you should change this option to a better value.
- The Host name and path value will be used to render URLs in e-mail messages sent to users, so it's important to have a proper value for this option.
- The value of Attachments and repositories encodings option is used for converting commit messages to UTF-8.
The name of the next tab is Display and, as it comes from the name, this tab contains settings related to the look nd feel:
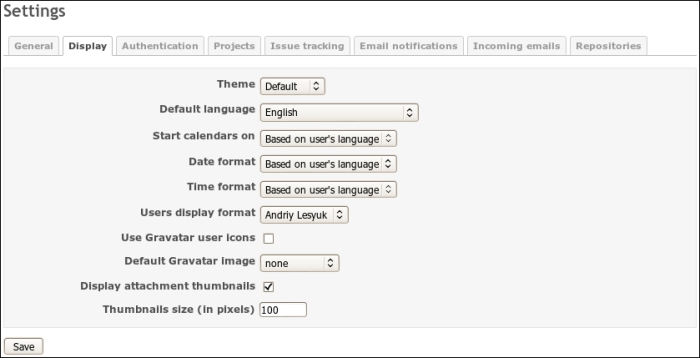
I'm fairly sure that you know what this option means but there is a thing related to this option, you should be aware of: Despite the value of this option if some string in the core Redmine or in a plugin has no translation it will use English.
Once I used a WordPress form to leave a comment on someone's blog. This form asked me to specify the first name, the last name, my e-mail, and the text. After submitting it, I was surprised to see my photo near the comment. That's what Gravatar does.
Gravatar stands for Globally Recognized Avatar and it uses the user's e-mail to show an avatar associated with it. It's quite secure as it does not transfer a plain e-mail address but uses its hash instead. Of course, in order to have an avatar image displayed in Redmine a user needs to submit it to Gravatar first (this will be reviewed in Chapter 9, Personalization).
Anyway having this option checked is a good idea (unless you don't have Internet connection).
But what happens if Gravatar is not available for a user? This is what the Default Gravatar image option is for. The following table shows the five mods available:
|
Modes |
Icons |
Description |
|---|---|---|
 | ||
 |
A geometric pattern | |
 | ||
 |
A generated 8-bit arcade-style pixelated face. | |
 |
A simple, cartoon-style silhouetted outline of a person. |
All modes, besides Mystery man, generate unique avatars based on the user's e-mail hash.
Tip
Redmine Local Avatar plugin
Consider installing Redmine Local Avatar plugin if you prefer users to upload their avatars directly onto Redmine: https://github.com/thorin/redmine_local_avatars
The next tab in administration settings is Authentication. The following screenshot shows the various options available in the Authentication ta:
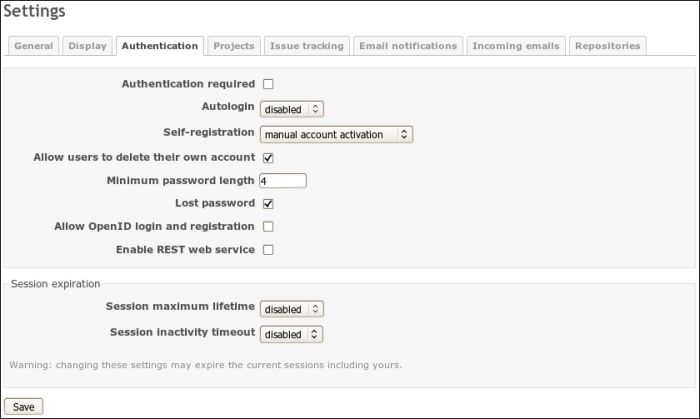
If you have a public site with open registration you, perhaps, know (or you will know, if you want your Redmine installation to be public and open for user registration) that users do not like registering on each site. It's fair enough as they do not want to have another password to remember or share their passwords on a new, and therefore yet untrusted, site. And it's also a matter of remembering another login ID and sharing their e-mail addrss.
That's where OpenID is useful. OpenID is an open standard of the authentication protocol in which authentication (password verification) is performed by an OpenID provider. This protocol is quite popular and is supported by companies such as Google, Yahoo!, PayPal, AOL, LiveJournal, MySpace, IBM, VeriSign, and WordPress. In other words, their websites can act as OpenID providers and therefore users can log into Redmine using accounts on these sites.
If your Redmine installation is public it's, perhaps, a good idea to enable this option.
Tip
Redmine OpenID is broken
Due to the bug in the Redmine core users can't authenticate using Google OpenID. To support Google, you need to install the OpenID Fix plugin from http://projects.andriylesyuk.com/projects/openid-fix.
However, to log in using OpenID, users will need to specify OpenID URL, in addition to Login and Password:

OpenID URL is a URL of an OpenID provider. Thus for Google this URL is https://www.google.com/accounts/o8/id.
Tip
OpenID Selector
Instead of asking the users to remember their OpenID URLs, you can use Jorge Barata's OpenID Selector plugin for Redmine. Download it from http://projects.jorgebg.com/projects/redmine-openid-selector.
If the Allow OpenID login and registration checkbox is disabled, this means, that you don't have the ruby-openid library istalled.
Yes, I know that there is no LDAP under the Authentication tab. Here we will discuss the LDAP authentication section under the Administration menu as this section is related to the authetication.
Just as OpenID is good for public sites to authenticate external users without registration, LDAP is good for private sites to authenticate internal corporate users. Besides Redmine many other applications support authentication against LDAP server, for example, MediaWiki, Apache, JIRA, Samba, SugarCRM, and many more. As far as LDAP is an open protocol it is also supported by some directory servers such as Microsoft Active Directory and Apple Open Directory. Therefore LDAP is often used by companies as a centralized users directory and an authentication server.
You can add a LDAP server using Administration | LDAP authentication | New authentication mode:
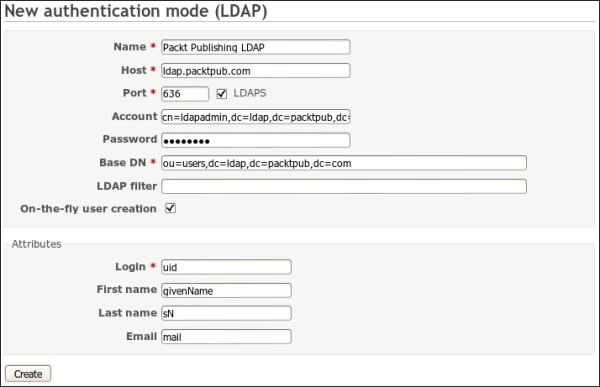
Note the On-the-fly user creation option, if this option is checked users' accounts will be automatically created when they log in to Redmine the first time. If this option is not checked users will need to be added manually. If the On-the-fly user creation option is checked, you will also need to specify Attributes, as they will be used to fetch users' detailsfrom LDAP.
In addition, LDAP authentication in Redmine can be done against multiple LDAP servers. Redmine allows selecting an authentication source (mode) for each user (it's also possible to select between LDAP and internal Redmine authentication).
For third-party tools integration Redmine provides REST API which can be turned on by this checkbox. For example, Redmine REST API is used by the Redmine Mylyn Connector and the RedmineApp for iPhone. If you do not use or do not plan to use any external Redmine tools it is safe to uncheck this option.
Redmine e-mail integration can be divided into two parts namely e-mail sending (notifications) and e-mail receiving. Both parts can be partially configured in Administration | Settings under Email notifications and Incomin emails tabs.
Most likely if you open the Email notifications tab on a just installed Redmine, you will get the following screen:

As you might guess, this means that you can't fix this using the web interface. In other words, in order to configure Email notifications we will need to modify the system file of Redmine and then configure them through the administration web interface.
Actually the e-mail delivery is the only thing which should be configured using the config/configuration.yml file. You could ask: Why not configure this using web interface? I guess, the answer would be: Because it's not a job of the Redmine administrator but of the system administrator as only the system administrator knows what delivery methods are available.
In the config subdirectory of the Redmine root directory (which is /usr/share/redmine on Debian/Ubuntu), you should find the file configuration.yml.example. Copy (or rename) this file to configuration.yml:
$ cp configuration.yml.example configuration.yml
In this file, you will find sample configurations, one of which you should select for your Redmine installation. The file contains the default e-mail configuration, which is also an example but enabled, so you will need to modify it! Find this configuration under the default section (line start with default:):
  # Outgoing emails configuration (see examples above)
  email_delivery:
    delivery_method: :smtp
    smtp_settings:
      address: smtp.example.net
      port: 25
      domain: example.net
      authentication: :login
      user_name: "[email protected]"
password: "redmine"The delivery_method option accepts the following values: :sendmail, :smtp, :async_sendmail, and :async_smtp. The :async_sendmail and :async_smtp methods deliver e-mails in separate threads thus not making users wait for the delivery to complete. So asynchronous delivery methods should be used on installations involving sending many e-mails, when a SMTP server is slow or hardly accessible or if you experience slow loading of pages which send e-mails (for example, on issue changes, wiki page additions, changes, and so on).
From the above delivery methods I, personally, would recommend to use :sendmail or :async_sendmail as these methods will use the sendmail system tool. The sendmail tool is a part of Mail Tra
sfer Agent (MTA) (MTA is a software that performs mail sending), that is, it ships with MTA and uses it to send e-mails. In other words, if you use sendmail you use the default delivery configuration of the operating system. So if the system administrator changes the system e-mail delivery configuration Redmine will automatically use it without any reconfiguration. Such configuration is also easier to maintain as you don't have to remember Redmine e-mail settings.
  email_delivery:
    delivery_method: :sendmail
But you can also select a local or remote SMTP server instead by specifying :smtp or :async_smtp delivery method. In this case you will also need to specify smtp_settings to let Redmine know how to connect to this server.
Let's review options that can be specified inside smtp_settings:
- The
addressoption should contain IP or hostname of the SMTP server. If you putlocalhosthere think about using:sendmailinstead - The
portoption should contain the TCP port number of the SMTP server. Normally it is25or587if TLS is used (for example, Gmail). - The
domainoption contains the value for theHELO SMTPcommand. Normally it's the domain part of the e-mail address. For Gmail (but not Google Apps) you should specifysmtp.gmail.comhere. - The
authenticationoption accepts values such as:plain,:login, or:cram_md5. You need to consult your system administrator on which authentication method should be used. For Gmail this should be:login. - The values of
usernameandpasswordoptions will be used to authenticate against the SMTP server. - The sample configuration misses the
enable_starttls_autooption which should be set totrueif TLS is used to connect to the SMTP server (normally it should be used if the port number is587). Set it totruefor Gmail.
Tip
Don't use a personal account in smtp_settings as the SMTP server (for example, Gmail) may overwrite the from address with the account's address (normally the e-mail specified in the Emission email address option should be used). Thus, visually, all notifications may come from this personal address. Better create a special account for this purpose.
So now, when we have configured e-mail delivery, let's apply our configuration by restarting Redmine and check the Email notifications tab again:
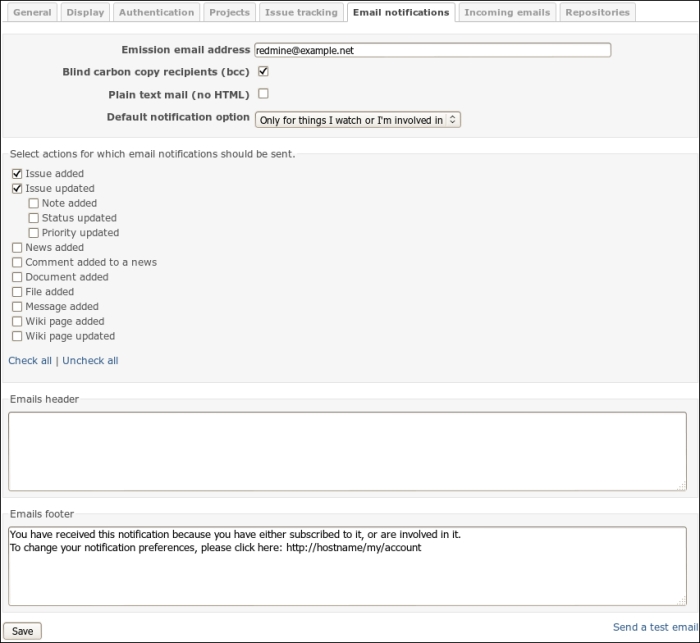
As e-mail notifications settings effect users and many e-mails from a single source used to be treated as spam these settings are very important. It's important to configure them so they won't bother your users!
The value of the
Emission email address option will be used as the from e-mail address in the e-mails sent from your Redmine. It definitely should be changed! Normally they set this address to something like [email protected] but I would recommend setting it to some real e-mail address instead, for example, to the support staff's e-mail ID.
If you uncheck the Blind carbon copy recipients (bcc) option, each user who receives a notification e-mail will be able to see which other users have received it as well. So it's normally a good idea to leave this option checked.
The most important option is, perhaps, the Default notification option. This option specifies which notification "mode" will be set for each new user. Let's review the supported modes in detail (see also Chapter 9, Personalization):
- For any event on all my projects: This mode should never be set by anyone else besides the users themselves as in this mode users will be notified about all events in projects they are members of. From my experience I can tell that such users, especially if they do not know Redmine, more likely will configure their e-mail clients to move such e-mails to a separate folder and will never read them rather than change this option to another value. That's why I believe that the users themselves should select this mode. But if you still want this mode to be default be sure to check as few actions (under Select actions for which email notifications should be sent section) as possible.
- Only for things I watch or I'm involved in: This mode is selected by default. In this mode users will be notified about events in issues they own (they are authors of) or are/were assigned to.
- Only for things I am assigned to: In this mode, users will be notified about events in issues they are or were assigned to.
- Only for things I am the owner of: In this mode, users will be notified about events in issues they are authors of.
- No events: This mode disables e-mail notifications for a user.
The Select actions for which email notifications should be sent block contains the list of events Redmine will notify on. Only administrators (and only on this tab) can control which events will generate notifications. In other words, if you uncheck for example Issue updated event users will never be notified about any changes in issues! Therefore I, personally, would recommend to check all available actions here. Otherwise users may subscribe to notifications assuming they will get notified on particular events and then get frustrated with the absence of such notifications. Let's leave this for users to control what they get.
The next two blocks are intelligible. They contain texts which will be inserted into e-mail before and after the notification text. Be sure, however, to change http://hostname/my/ac
ount to the actual URL.
Now, when we have finished configuring e-mail notifications, you can click on the Send a test email link to check if and how e-mail delivery works. This will send a test message to the email you specified in your Redmine account.
Redmine issues have optional due date attribute. Would it not be cool to be notified about the issue due date in advance? So let's do it?
Redmine ships with a special rake task which can be used to generate notifications about upcoming issues due dates. The name of this task is redmine:send_reminders. It accepts the following options:
days(defaults to 7): The number of days before a due datetracker(all trackers are used if not specified): The numerical (internal) tracker IDproject(all projects are used if not specified): The identifier (which is used in URL) of the projectusers(all users are notified if not specified): The numerical IDs of users to notify separated by comma
The syntax of the command to run the redmine:send_reminders task is:
$ rake redmine:send_reminders days=7 tracker=1 project= mastering-redmine users=1,5 RAILS_ENV=production
Let's configure our Redmine to remind all users about issues due dates a day before they are due but not on weekends. Let's use cron for this.
- We will need to put into
cronthe following command for Mondays, Tuesdays, Wednesdays, and Thursdays:rake redmine:send_reminders days=1 RAILS_ENV=production - And the following command for Fridays:
rake redmine:send_reminders days=3 RAILS_ENV=production - Now open crontab using the following command:
$ crontab -e - This command will open an editor. Now add the following two lines:
0 10 * * 1-4 /usr/bin/rake -f /usr/share/redmine/Rakefile redmine:send_reminders days=1 RAILS_ENV=production
0 10 * * 5 /usr/bin/rake -f /usr/share/redmine/Rakefile redmine:send_reminders days=3 RAILS_ENV=production
- Use
which raketo determine the path to theraketool. - Save changes and exit the editor.
The first command will be run at 10:00 on Mondays, Tuesdays, Wednesdays, and Thursdays and the second command will run at 10:00 on Fridays.
Tip
Selecting days before due date
This task will generate reminder e-mails for all issues, due dates of which are due in the next number of days, that is, if you specify 7 days, users will get notifications about issues due in 6 days and in 1 day. Running such a task (with days=7) everyday can really bother your users so that's why we select 1 day. In other words, you should execute the task once in the same number of days (for example, if you use days=7 execute the task only on Mondays).
While the e-mail invention predates the Internet invention e-mail is still one of the primary electronic ways to communicate. Thus, having a public issue tracker for my projects I still keep getting e-mails from users describing issues. That's why, perhaps, email integration is one of the essential features of modern issue tracker. And Redmine does have it.
If you had a look at the Redmine directory structure you might notice the extra directory containing different scripts and a sample plugin. Despite of what you could think these files are not, in fact, extra tools but one of the most important features of Redmine (well, except the sample plugin). We will review all these tools in this chapter. Right now we start with the rdm-mailhandler.rb. Probably you already guessed from its name that this is the tool that implements e-mail receiving for Redmine.
In addition to the rdm-mailhandler.rb, Redmine comes with two rake tasks which also can be used for receiving emails namely redmine:email:receive_imap and redmine:email:receive_pop3.
The difference between these two primary solutions is in the method by which these tools are invoked. The rdm-mailhandler.rb was designed to be launched on a mail server by for example, Postfix, while rake tasks were designed to fetch e-mails from a mail server remotely. Of course, the tool launched by a mail server on receiving an e-mail is better for several reasons: first, it gets executed only when an email comes, that is, it does not work for nothing and, second, Redmine gets an e-mail immediately after it comes to a mail server, that is, without any delay. But the tool which fetches e-mail from a remote mail server also find its consumer especially if a remote mail server is for example, Gmail, and therefore there is no way to install the former tool there.
For the above reasons, we will review both tools here. But let's start with discussing what exactly Remine can fetch using e-mail.
In addition to new issues Redmine is able to recognize issue comments and board messages. That is, for example, if you are getting notifications about new issues you can just reply to a received notification and the message you will type will be added as a note to the issue. The same way you can answer someone's note or changes if you watch an issue and receive notifications about changes in it. A similar scenario is also supported for messages in forums.
Of course, for a new issue to be created Redmine needs some attributes. They are, at least, tracker, subject, status, and priority (these attributes are required). Good news is that they can be specified in the tools which will be used for fetching e-mails. But what if your Redmine requires some custom fields? Besides, if you have hardcoded values of attributes would it not be too limited?
Luckily Redmine supports specifying attributes in the message body and supports many more attributes that just required ones. Let's check a sample e-mail body:
Hi!

I have an issue...
These are attributes:
Assigned to: Andriy Lesyuk
Tracker: Support
Status: New
Priority: Urgent
Category: Email queries
Target version: 1.0.0
Start: 2012-07-01
Due date: 2012-07-18
Estimated time: 20
Done ratio: 50
Custom field: Value
As you see even values for custom fields can be specified.
Besides new issue e-mails the attributes can be specified in replies to existing issues as well. Of course whether changes will be applied to the issue, as well as whether a new issue will be created with the specified attributes values, depends on permissions of the user who sends the e-mail (the user gets identified by the from e-mail address).
To allow specifying project, tracker, status, priority, and category in the e-mail body you need to specify all these attributes in the allow_override or allow-override option at the command line for the appropriate tool (see below).
You probably thought that having all those attributes in the issue description or in the note text is not good. For this reason Redmine allows configuring, after which lines the description should be truncated. Go to Administration | Settings | Incoming emails tab, as you see in the following screenshot there can be many lines specified:
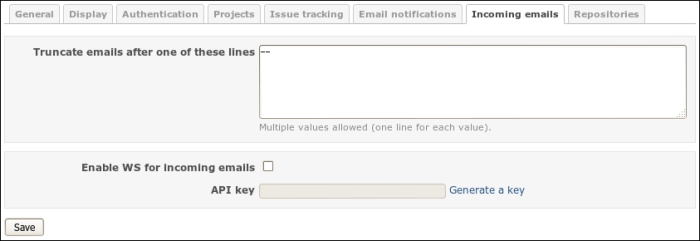
So for the preceding sample e-mail, we can specify "These are attributes:" here to remove attributes from issue description or note text. Of course, the delimiters should be negotiated with customers
If one specifies other e-mail addresses in To or CC field and if these e-mails are registered in Redmine (there are accounts with these e-mails) the corresponding users will be added to issue watchers. However, watchers are not added from replies.
If the e-mail has attachments these attachments will be added to an issue or to a forum message. Of course, the size limit specified in General tab at Administration | Settings is applied to such attachments as well.
Having read the title you, perhaps, asked yourself: What web service? Yes, we need the web service to receive e-mail messages which are sent by the rdm-mailhandler.rb tool. This web service needs to be enabled before we proceed. To do this go to the Administration area using the link in the top-left menu, then open the Settings section and click on the Incoming emails tab:
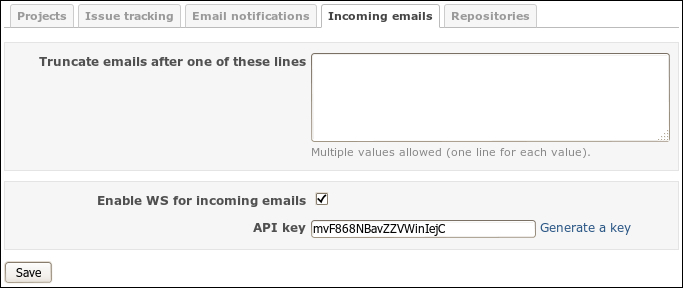
Check the Enable WS for incoming emails option and then click on the Generate a key link. After that Redmine will generate a web service key for you. Click on Save.
Now copy the rdm-mailhandler.rb tool to your mail server and place it into /usr/local/sbin. Please note that you may need to install Ruby on the mail server to be able to run this tol.
Let's now discuss arguments for this tool which should be used on the mail server. The mandatory arguments are url and key:
- The
urlargument should be set to Redmine's home page URL, for example,http://redmine.packtpub.com. - The
keyargument should be set to the key we have generated above.
Also the following optional arguments are available:
- The
unknown-useroption accepts values such as,ignore(the default),accept, andcreate. With the defaultignorevalue, all e-mail messages which come from an e-mail that is not listed in Redmine (if it is not specified as an e-mail in any account) will be ignored. If theacceptvalue is set, issues created from such e-mail messages will be authored by Anonymous user. And, finally, if thecreatevalue was specified new user accounts will be created. - The
projectoption can be set to the identifier of the project in which issues will be created. If this option is not set, the project identifier should be explicitly set in the e-mail message body. - The
trackeroption can be set to the name of the tracker, which will be used for newly created issues. - The
statusoption can be specified to set a different initial status for issues created from received e-mails. - The
categoryoption can be used to set the category for issues, which will be created from e-mails. - The
priorityoption can be used to set a different priority for issues, which are created from incoming e-mails. - And, finally, the
allow-overrideoption can be used to limit which issue attributes can be specified in the e-mail message body. Here, the issue attributes are actually the previously listed five options:project,tracker,status,category, andpriority.
So the tool should be executed in the following way:
/usr/local/sbin/rdm-mailhandler.rb --unknown-user create --project mastering-redmine --url http://redmine.packtpub.com --key mvF868NBavZZVWinIejC
The rest depends on what mail server you are using. As we just can't review all the available mail servers in this book let's assume you use Postfix and it is configured to use a plain text file for aliases, for example /etc/aliases. If you don't use it, please consult your system administrator on how to do this for your configuration (we need to forward messages intended for a particular email to the standard input of the rdm-mailhandler.rb).
Open the /etc/aliases file and add the following line:
issues: "|/usr/local/sbin/rdm-mailhandler.rb --unknown-user create --allow-override=project,tracker,status,category,priority --project mastering-redmine --url http://redmine.packtpub.com --key mvF868NBavZZVWinIejC"
Here issues is the username part of the e-mail address (full address can be for example, <[email protected]>).
Tip
Getting project from e-mail address
Thomas Guyot-Sionnest developed a frontend for rdm-mailhandler.rb which supports subaddresses such as [email protected]. This way a project can be specified in the e-mail address, then this project is passed to rdm-mailhandler.rb with the project option.
http://www.redmine.org/projects/redmine/wiki/MailhandlerSubAddress
Now you should be able to receive issues and forum messages by e-mail.
In some cases you may be unable to register the rdm-mailhandler.rb tool on your mail server, for example, if you use Google Apps. In these cases you can still fetch issues and forum messages from e-mails using special rake tasks. Such tasks are available for IMAP and for POP3. Which one to use depends on your mail server's capabilities but, generally, IMAP protocol is more powerful than POP3, so the IMAP rake task allows more than the POP3 one as well. Gmail supports both.
The command for fetching e-mails from IMAP looks like:
$ rake redmine:email:receive_imap host=imap.gmail.com port=993 ssl=1 [email protected] password=LIIWLmedev6M9yAJ RAILS_ENV=production
Let's review options available for the IMAP and POP3 raketasks:
- The
unknown_useroption like theunknown-useroption forrdm-mailhandler.rbsupports values such asignore,accept, andcreate. Meanings of these values are the same as forrdm-mailhandler.rb. - Options
project,status,tracker,category,priority, andallow_overridealso accept the same values and have the same meanings as the corresponding options ofrdm-mailhandler.rb. - The
hostoption should hold IP or hostname of the mail server. Default value islocalhost. - The
portoption should contain the port number of the mail server. For IMAP the default value is143and for POP3 it is110. - The
ssloption is available only for IMAP and should be set to1if the IMAP server supports SSL. - The
usernameandpasswordoptions define credentials which should be used for connecting to IMAP or POP3 server. - The
folderoption, which can be specified for IMAP, holds the name of the folder to process. The default name isINBOX. - The
apopoption can be used to select APOP authentication for the POP3 server.
The IMAP protocol allows moving e-mail messages between server folders. Therefore these two additional options are available for IMAP:
Now, when we know what options we can use, let's put the rake task into the cron to check the IMAP server once in an hour (do this under the user, which runs Redmine, or specify the username for crontab with -u option):
$ crontab -e
This command will open the editor. Add the following line there:
45 * * * * /usr/bin/rake -f /usr/share/redmine/Rakefile --silent redmine:email:receive_imap host=imap.gmail.com port=993 ssl=1 [email protected] password= LIIWLmedev6M9yAJ unknown_user=create allow_override=project,tracker,status,category,priority RAILS_ENV=production
This tells cron to run the rake task on 45th minute of every hour. /usr/bin/rake is the full path to the rake tool which can be obtained using which rake. /usr/share/redmine which is the root directory of Redmine installation.
Repository integration is an awesome feature of Redmine. I just can't imagine this tool without it! So, I believe, you will like Redmine for having it. But as soon as you know how deep this integration can be, I'm sure, you will love Redmineeven more!
We will start with configuring repositories and ensuring that the basic integration works. Then we will discuss how to turn Redmine into a repository manager.
So here we came to the last tab of the administration settings that is the Repositories tab:

There were days when Redmine did not show those exclamation marks thus was not hinting about issues with SCMs. Luckily nowadays to check if a SCM is properly installed we just need to go to this tab.
The hint below the checklist advises that you may need to specify paths to the SCM commands in config/configuration.yml. Actually you need to do this in rare cases, for example, when you installed SCMs from sources. In other cases, you just need to install SCMs.
You probably do not want to install all SCMs. But, still, let's shortly review how to install each of them on Ubuntu/Debian.
|
SCMs |
Command |
|---|---|
|
Subversion |
$ sudo apt-get install subversion
|
|
Darcs |
$ sudo apt-get install darcs
|
|
Mercurial |
$ sudo apt-get install mercurial
|
|
CVS |
$ sudo apt-get install cvs
|
|
Bazaar |
$ sudo apt-get install bzr
|
|
Git |
$ sudo apt-get install git
|
Having installed SCMs restart Redmine using the command:
$ sudo service apache2 reload
Now if you check the Repositories tab you should see check marks instead of exclamation marks near commands and version numbers in Version column:
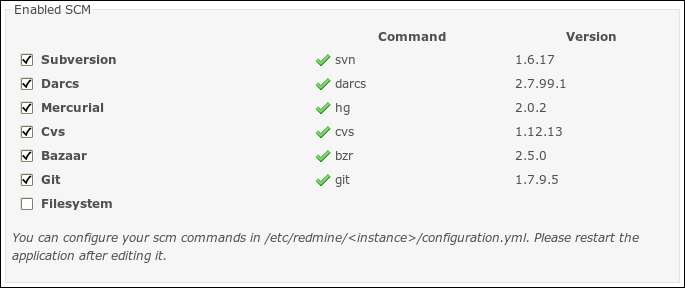
Be sure to disable SCMs which have not been installed or which have any issues (shown as exclamation marks).
The main feature provided by the SCM integration is the ability to see repository change sets under the Repository tab. Here is what I refer to:

The Repository tab lets view or download files, browse directories and revisions, compare revisions, check changes, and more. To be able do this Redmine needs to fetch changesets from the repository. Normally it does this each time a user accesses anything under the projects/<project>/repository URL (under the Repository tab).
In other words, when you click on the Repository tab it fetches change sets, when you click on for example, the trunk subdirectory it fetches change sets, then when you click on a file it fetches change sets! If Redmine does not need to serve many users and the repository is local, this should not be a big problem. But what if the Redmine installation serves many users and fetches change sets from a remote repository?
This behavior can be controlled by the Fetch commits automatically option, which is present in Administration | Settings | Repositories. To disable fetching change sets each time a user visits the Repository tab, just uncheck this option. But, wait, how will Redmine update change sets in this case? Without recent change sets the Repository view will quickly become outdated.
Redmine comes with several out-of-the-box solutions for resolving this problem. Which one should be used depends on whether the repository is local or remote and from where the update will be initiated. In other words, there are two places where you can initiate the change sets fetching—from cron or from SCM hook.
If you choose cron, you should use the following command:
$ ruby script/runner "Repository.fetch_changesets" -e production
Just put this line into crontab (under the user, which runs Redmine, or specify the username with -u option):
*/30 * * * /usr/bin/ruby /usr/share/redmine/script/runner "Repository.fetch_changesets" -e production
Replace /usr/share/redmine/ with the actual path of your Redmine installation.
This code will initiate fetching of change sets for all projects every 30 minutes.
This, of course, should be done on the same server where Redmine is running. The second option is more advanced and flexible and should be done on the server where SCM is running.
All SCMs, at least ones I used to work with, support "hooks". Hooks are just scripts located in a special subdirectory or listed in a configuration file of the repository.
Thus, for Subversion this directory is hooks, for Mercurial hooks are specified under the [hooks] section in .hg/hgrc, for CVS hooks are specified in commitinfo file, for Bazaar hooks can be put either to .bzr/hooks directory or listed in bazaar.conf file, for Git hooks should be put into .git/hooks directory, and so on. These scripts get triggered when an event occurs, for example, when a user commits a change set to a repository. Yes, this is exactly where we should initiate fetching change sets for Redmine!
To do this we will use the web service provided by Redmine and accessible under URL sys/fetch_changesets but first we need to enable this web service by going to Administration | Settings | Repositories tab:

Check the Enable WS for repository management option and click on the Generate a key link.
Now create a hook script for your SCM (check SCM's documentation for format, name of script, and location) and put the following command there:
curl -O /dev/null "https://redmine.packtpub.com/sys/fetch_changesets?key=db4ejsoF7aeYtISyvMJ"> /dev/null 2>&1
Replace https://redmine.packtpub.com with the actual URL of your Redmine installation and db4ejsoF7aeYtISyvMJ with the key which was generated for you.
Of course, different projects usually use different repositories, which may be on different servers and even use different SCMs. Therefore this web service supports an additional query argument id which should be set to a project identifier, for example:
https://redmine.packtpub.com/sys/fetch_changesets?key=db4ejsoF7aeYtISyvMJ&id=mastering-redmine
The drawback of this option is that we need to configure each repository separately. Anyway it is recommended to specify the id, especially if your Redmine installation hosts many projects. Otherwise Redmine will update all repositories in all projects.
We discussed in the earlier section how to make Redmine work as a repository browser, that is a known Redmine's feature and which, in fact, works out of the box (if a SCM is installed, of course). Now let's speak about Redmine as a repository manager.
In the default Redmine installation the repository URL, which we specify in the repository form (that can be found in project: Settings | Repositories | New repository), should already exist on the server.
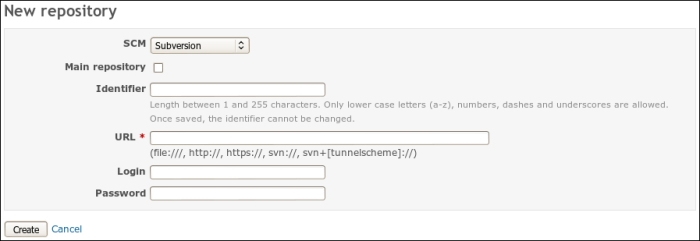
If this is a new project, this means, you need to ask your system administrator to create a repository for you first. On practice many organizations utilize SCM management software such as SVNManager to ease this process. For example, you create a repository in SVNManager and then add it to Redmine's project.
Not everyone knows that Redmine actually has a special tool for automatic creation of repositories. Its name is reposman.rb and it's located in the extra/svn subdirectory of your Redmine installation. How does it work? This tool should be launched periodically by cron on the SCM server. When run it connects to Redmine, fetches a projects list, checks if repositories are defined for all projects and creates repositories for projects which do not have repositories yet. Let's utilize it?
First, we need to know where repositories should be located. If the SCM server has already been configured, figure out what is the path for repositories and which SCMs are available.
If no SCM server exists let's just create a path for repositories for now and later, in the next topic, we'll add the SCM server. Assuming we are going to use Subversion. To conform to the FHS let's select /var/lib/svn as a path for Subversion repositories:
$ sudo mkdir /var/lib/svn
If you have not enabled the web service for repository management, as it was described in the previous topic, do it now as the reposman.rb tool uses this web service to create repositories.
Now it's time to create a repository.
If you have not created any project yet, do it now. This can either be a test project or a real project. Click on the Projects item in the top-left menu and then click on the New project link. The following form will be opened:
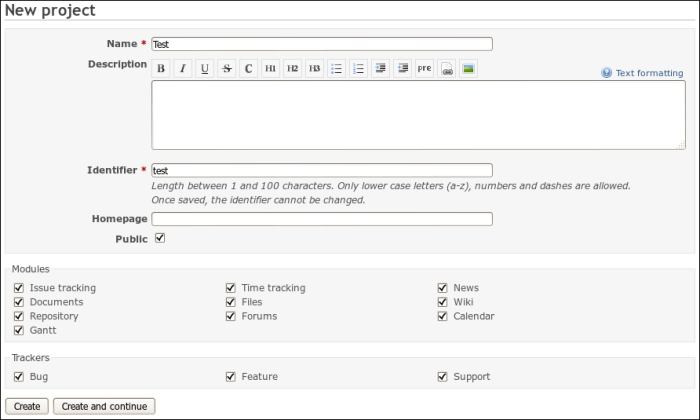
Fill in the Name and Identifier textboxes. I put Test and test in these fields as I will use this project only for testing. Click on the Create button.
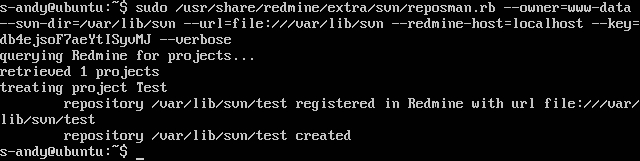
Now, when we have a project which does not have a repository yet, let's get back to the console and test the reposman.rb tool. Run it in the following way:
$ sudo /usr/share/redmine/extra/svn/reposman.rb --owner=www-data --svn-dir=/var/lib/svn --url=file:///var/lib/svn --redmine-host=localhost --key=db4ejsoF7aeYtISyvMJ --verbose
Let's see the various attributes present in the earlier mentioned command:
- The
owneroption specifies username of the user who will own repository files on the SCM server - The
svn-diroption points to the path where repositories will be located - The
urloption specifies the external path to the repositories (it may look likehttp://redmine.packtpub.com/svn). Redmine will use thisurlto fetch change sets from repository - The
redmine-hostoption holds the IP or hostname, which will be used by thereposman.rbtool for connecting to Redmine - The
keyoption specifies the key Redmine generated for the web service. - The
verboseis given for testing purposes
You should get something like the following screenshot:
Now if you open the Settings tab of the Test project and open the Repositories tab there you should see:

After we have checked how reposman.rb works, we should add it to cron so it will run periodically and create repositories if some new projects get registered. Execute the following command:
$ sudo crontab -e
And append the following line:
15 * * * * /usr/share/redmine/extra/svn/reposman.rb --owner=www-data --svn-dir=/var/lib/svn --url=file:///var/lib/svn --redmine-host=localhost --key=db4ejsoF7aeYtISyvMJ
This tells cron to run reposman.rb on the 15th minute of every hour.
Exit the editor after saving changes. From now on all your projects will have repositories automatically created for them.
If you checked the Roles and permissions section of the Administration area you might have noticed the Commit access permission. This permission has nothing to do with Redmine as a web application as no commit access is possible within Redmine. This permission is for what they name "advanced integration" and it involves an extra tool Redmine.pm which is located in the extra/svn directory.
Normally, a Subversion server is set up using the Apache web server with the WebDAV module. Same configuration can be used for Git server, Mercurial server and, if I'm not mistaken, for Bazaar server. But Redmine core developers, however, seem to prefer Subversion, maybe that's why the Redmine.pm tool was initially written for this SCM (at the moment it also has support for Git smart protocol). This tool handles authorization and is actually a Perl module for Apache, which uses ModPerl to access Apach module API.
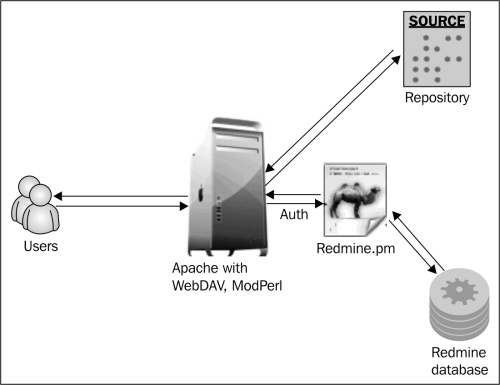
So what does it do? When a user requests access to a repository, Apache "asks" Redmine.pm if it should authorize or forbid a user. To give the answer Redmine.pm consults the Redmine database by directly connecting to it and inspecting its records. The access to a repository is granted or denied based on the answer of Redmine.pm.
In other words, Redmine controls who has access to the repository. The access is given depending on a user's role and its permissions. Thus, if a user's role in a project has the Commit access permission this user can commit changes to a project's repository and so on.
So let's see now how to configure the advanced integration for Subversion.
We'll start with installing and configuring Subversion server. Assuming you use Debian/Ubuntu to run the SCM server and have already installed Apache. Execute the following command:
$ sudo apt-get install libapache2-svn libapache2-mod-perl2 libapache-dbi-perl
This command will install WebDAV, ModPerl, and Perl DBI.
On Debian/Ubuntu, if you installed Redmine from the official package, Redmine.pm should be in /usr/share/redmine/extra/svn/ (in extra/svn subdirectory of your Redmine installation). Copy it into /usr/lib/perl5/Apache:
$ sudo mkdir /usr/lib/perl5/Apache/Authn
$ sudo cp /usr/share/redmine/extra/svn/Redmine.pm /usr/lib/perl5/Apache/Authn/
Now we need to know where repositories will be located. If you have chosen the path earlier, when reading the previous topic, use that path. Otherwise let's select /var/lib/svn:
$ sudo mkdir /var/lib/svn
At the moment, we have all we need to start configuring Apache and Subversion. Now you can add Subversion repositories configuration to the Apache configuration files either into the existing <VirtualHost> directive (if you want Subversion to be accessible under some location for example under /svn) or into new <VirtualHost> directive (if you want to use Subversion under subdomain for example, under svn.packtpub.com). Here we will try the first option, for the second option you need to create a new virtual host first.
We will use the apache2-passenger-host.conf file, which we have added when installing Redmine on Ubuntu using the official Ubuntu redmine package. Open this file and add the following lines there before the closing </VirtualHost> directive:
PerlLoadModule Apache::Authn::Redmine
<Location /svn>
        DAV svn
        SVNParentPath /var/lib/svn

        Order deny,allow
        Deny from all
        Satisfy any

        AuthType Basic
        AuthName "Packt Publishing Subversion Server"
        PerlAccessHandler Apache::Authn::Redmine::access_handler
        PerlAuthenHandler Apache::Authn::Redmine::authen_handler

        RedmineDSN "DBI:mysql:dbname=redmine_default;host=localhost"
        RedmineDbUser redmine
        RedmineDbPass HJJQHGppgx0hYvijITVbEQiLTzoQpVv1

        <Limit GET PROPFIND OPTIONS REPORT>
            Require valid-user
            Satisfy any
        </Limit>
        <LimitExcept GET PROPFIND OPTIONS REPORT>
            Require valid-user
        </LimitExcept>
</Location>
Instead of the sample credentials (database name, username, password, and so on) use your real ones. If you are not sure about them take them from /etc/redmine/default/database.yml, if you installed Redmine from package, or from config/database.yml otherwise.
When ready, restart Apache:
$ sudo service apache2 reload
Try accessing some of your projects' repositories now. I will use the previously created repository for the Test project:
$ svn ls http://localhost/svn/test
It gives nothing to me as my test repository is empty and my Test project is public. But when I uncheck the Public option in the project settings I get a warning as shown in the following screenshot:

Congratulations now! You are ready to go with the advanced Subversion integration.
Advanced Git integration can be configured in the very same way but with some Git specific modifications. The same could be also done for Mercurial and Bazaar so it would be unfair to review only Git here and it would be too much to review all of them. Other SCMs' modifications may also differ for other Redmine versions so instead you should, probably, check the official tutorials for advanced integration of other SCMs: