
This is the most complicated but the officially recommended installation method. It is also the best documented one. Unlike using Debian/Ubuntu packages, TurnKey appliance or BitNami stack these instructions may differ for other versions of Redmine. Therefore you should treat this topic as an example of installation, you should also be aware that these instructions can become outdated and, thus, you should simultaneously consult the official installation tutorial which can be checked using the URL: http://www.redmine.org/projects/redmine/wiki/RedmineInstall.
Like in the previous tutorial we will use the "clean" Ubuntu Server 12.04 LTS.
To start we need to select the location for Redmine. Let's select /opt/redmine (fine for FHS):
$ sudo mkdir -p /opt/redmine
This command will create the /opt/redmine directory. Now let's move into it:
$ cd /opt/redmine
Next we need to get the latest Redmine version in tar.gz archive from URL: http://rubyforge.org/frs/?group_id=1850. At the time of writing this topic the latest Redmine version was 2.2.0. In other words, this instruction was written for this version.
So get the archive:
$ sudo wget http://rubyforge.org/frs/download.php/76627/redmine-2.2.0.tar.gz
Now unpack the archive into the current directory (which should be /opt/redmine):
$ sudo tar xvf redmine-2.2.0.tar.gz
This command will unpack everything into the redmine-2.2.0 subdirectory. Move there:
$ cd redmine-2.2.0
Redmine comes with Bundler support. Bundler is a Ruby Gem dependency manager which is in some way similar to the Debian/Ubuntu package manager used in the previous topic. In other words, Bundler simplifies the deployment process by checking and ensuring that all dependencies are installed.
The problem is that the Bundler is not available in our "clean" system. Moreover neither gem nor ruby is available. So we need to install them first:
$ sudo apt-get install rubygems
This command will install the gem tool and all its dependencies. When you are asked for confirmation, just press Enter.
Now we can install the Bundler. To do this we will use the gem tool:
$ sudo gem install bundler

When you run the Bundler, it fetches gems from www.RubyGems.org and tries to install them failing only in case of missing system libraries (not gems, the Bundler can resolve only gem dependencies). This way, by such errors, you can determine what system libraries are missing.
Let's review a sample of such failure:
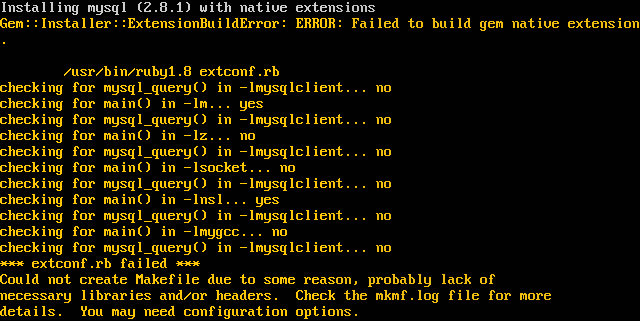
As seen on the screen the Bundler failed to install the mysql gem. Thus, the line:
checking for mysql_query() in -lmysqlclient... no
Tells that it failed to find the mysql_query() function in the mysqlclient library. The most common reason for such error is that the library is actually missing and this assumption is right as we run it on the "clean" system and we have not installed MySQL client yet. Also note that Bundler needs not just libraries but also their development files.
Sometimes the Bundler gives the filename which it cannot find. For such cases you can use the apt-file tool. To install apt-file and initialize its database do:
$ sudo apt-get install apt-file
$ apt-file update
After this you can search for a missing file, for example, to find Magick-config file run:
$ apt-file search Magick-config
We reviewed this sample to demonstrate how errors given by the Bundler can be resolved. Now let's install all the system library dependencies including but not limited to the MySQL:
$ sudo apt-get install libmysqlclient-dev libmagickcore-dev libmagickwand-dev
This command will install development files for MySQL and ImageMagick libraries as well as the libraries themselves.
Now let the Bundler install all the Gem dependencies:
$ sudo bundle install --without development test postgresql sqlite
Here we skip PostgreSQL and SQLite dependencies as we are going to use MySQL. Also we skip dependencies used for development and testing.
If the dependencies installation was successful you should get:
As we plan to use the MySQL server we need to install it as well. Besides we need to install Apache and its Passenger module. The procedure of their installation is identical to the one we used in the previous topic.
$ sudo apt-get install mysql-server mysql-client apache2 libapache2-mod-passenger
Here we will skip all the details related to installing MySQL, Apache and Passenger as they were reviewed before. For more information, see the Configuring MySQL server package and Installing Apache and Passenger sections.
Now when we are ready to go further let's create the database for Redmine. Run MySQL client:
$ mysql -u root -p
It will ask the password of the MySQL server's superuser which you should have specified during installation of the MySQL server.
Execute the following SQL queries in MySQL client:
CREATE DATABASE redmine CHARACTER SET UTF8;
CREATE USER 'redmine'@'localhost' IDENTIFIED BY 'your_password_here';
GRANT ALL PRIVILEGES ON redmine.* TO 'redmine'@'localhost';
Don't forget to replace your_password_here with your password.
Now we should specify the database details in Redmine configuration files. Example of the database configuration can be found in the config/database.yml.example file. Let's rename it into database.yml:
$ mv config/database.yml.example config/database.yml
Now open the config/database.yml file in your favorite editor and modify it so it will look like:
production:
  adapter: mysql
  database: redmine
  host: localhost
  username: redmine
  password: your_password_here
  encoding: utf8
Replace your_password_here with the password you specified in the SQL query.
Now we need to initialize Redmine state files:
$ rake generate_secret_token
After that initialize the Redmine database with the commands:
$ RAILS_ENV=production rake db:migrate
$ RAILS_ENV=production rake redmine:load_default_data
The first command initializes the database structure and the second command inserts initial data (such as trackers, administrator account, and so on) to the database. The second command will also ask you the language of the initial data.
Redmine distribution does not include the directory for plugins' static files so it needs to be created:
$ mkdir public/plugin_assets
At this moment Redmine has been already installed and configured but we need to configure Apache to run it. So let's move to the Apache configuration directory:
$ cd /etc/apache2
Now append the following lines into the apache2.conf file (do this under root):
<VirtualHost *:80>
        RailsEnv production
        PassengerAppRoot /opt/redmine/redmine-2.2.0
        DocumentRoot /opt/redmine/redmine-2.2.0/public
        <Directory "/opt/redmine/redmine-2.2.0/public">
                Order allow,deny
                Allow from all
        </Directory>
</VirtualHost>
This is the configuration of the virtual host which will run Redmine.
In Debian/Ubuntu virtual hosts are defined in files located in the sites-enabled subdirectory. Apache in these Linux distributions comes with the default site which needs to be disabled to let Redmine work. This can be done by the command:
$ sudo a2dissite default
Now reload Apache with the command:
$ sudo service apache2 reload
After this if you open the browser and point it to the IP or hostname of your server you should get:
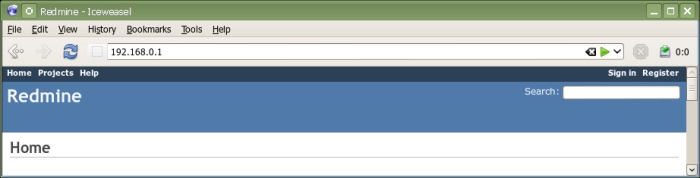
You can now log in into your new Redmine installation using login admin and password admin. As these are the default login and password you should change them as soon as you log in.