
When we add an issue and click on the Create button, we get redirected to the issue page (shown in the screenshot):

The goal of this page is not only to show you the information about the issue but also to give you all instruments, which you need to work with this issue.
All the content of the issue is located inside the big yellow block. There you will also find the Previous and the Next links allowing you to move through the issue list.
Below the yellow block you will find History that contains the list of changes made to the issue and includes information on what was changed, when it was changed, and by whom.
The sidebar on the issue page contains contextual links—most of which we will review in Chapter 5, Managing Projects—and the Watcher section, which can be used to add watchers to the issue.
When reviewing the issue page, I specially skipped the Add link to the right from the Subtasks label as I believed it was worth reviewing it separately. This link redirects you to the new issue form with the prefilled Parent task field, in other words, it is the shortcut for adding subtasks.
But what are subtasks? Let's study the following screenshot to know more about it:

In the earlier screenshot, you see the subtasks that I have added to my demo project. Besides just being shown in the hierarchical view these tasks also share the priority (the highest priority of all children is used for the parent task), the start date (the earliest date is used), the due date (the latest date is used), the done ratio (calculated using children done ratios), and the estimated time (the sum is used). Redmine does not allow setting values for these attributes explicitly for parent tasks.
Tip
Hierarchical view issue
Redmine has problems showing the hierarchical view of tasks as it considers the current sort order. On the earlier screenshot, the hierarchy is preserved because issues are sorted by numbers and they are sequential. So, to achieve the hierarchical view you need either to keep the sequential numbers of issues by creating them in the correct order or to use the Smart Issues Sort plugin of Vitaly Klimov, which resolves this issue: http://www.redmine.org/plugins/redmine_smart_issues_sort.
Another form element that I purposefully skipped is the Add link which is placed to the right from the Related issues label. Like with Subtasks this feature was too important to review it with others so I wanted to speak about it in a separate topic.
If you click on the Add link the following form will appear just under the Related issues label:

The Related issues form can be used to list issues related to the current one. For each related issue you can also specify the type of relation. The following screenshot shows the types of relation available:
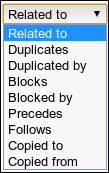
These types are mostly used not just to indicate the relation but they also provide implicit functionality. The types of relation are explained as follows:
- Related to: This is one of the relation types that does not affect anything. This is the type you should use if you just want to mark that issues are related.
- Duplicates: This type tells Redmine that the current issue should be closed too when the related issue gets closed.
- Duplicated by: This type forces the related issue to be closed too when the current one gets closed.
- Blocks: This type does not allow the related issue to be closed until the current issue is open.
- Blocked by: This type tells Redmine to forbid the closing of the current issue until the related issue is open.
- Precedes: This type forces the related issue to start after the due date (plus optional delay in days) of the current issue.
- Follows: This type forces the current issue to start after the due date (and optional delay in days) of the related issue.
- Copied to: This type marks the related issue as a copy of the current one and is automatically set by Redmine on issue copy.
- Copied from: This type marks the current issue as a copy of the related one and is automatically set by Redmine on issue copy.
Also, types Precedes and Follows use an additional value called delay. For this reason these types add an additional field Delay to the form (see following screenshot for reference):

Using the Delay field, you can specify number of days that should pass between the due date of the previous issue and the start date of the next issue.
Note
The mentioned implicit functionality can become a source of confusion. Thus, if duplicate issues are assigned to different employees closing one of them will lead to closure of another and this can come as a surprise to the assignee of the latter. Adding preceding issues with empty start and due dates can lead to clearing the following issue dates. Therefore you should be especially careful when adding issue relations.
When added, related issues are shown under the Related issues label as shown in the following screenshot:
