
When I was compiling the outline for this book, I had a choice to describe third-party plugins. Can Redmine be used without plugins? Sure, they can be used. Therefore, I decided not to mix the core Redmine review with the plugins review. Is Redmine thorough without plugins? I'm not sure whether it is. I haven't seen Redmine installation without plugins. Yet if you can extend your installation with features you might need, why not do this? Therefore, I mention appropriate plugins in the topics they are applicable for.
While checking forums, blog posts, articles, answers to questions, and similar stuff, you will find what plugins are most popular and most useful. Therefore, I could not decide which popular plugins to review. So, taking into account that you might encounter them anyway (as they are popular), I decided not to review them. That is, I decided to choose plugins for review not by their popularity.
The main criterion for selecting plugin for review is that they should be useful, but should not be prominent or usually searched for. Thus, here we will speak about plugins, which, I believe, are essential to install, for example, the Exception Handler, which will notify you of errors in Redmine. Also, we will speak about some really cool plugins, which you are unlikely to search for, for example, Mylyn, which makes it possible to integrate Redmine with Eclipse.
In other words, let's discover what amazing stuff can be done with plugins. But, let's start with some essential ones.
So, under this topic, we will review:
- Meta
- Exception Handler
- Mylyn Connector
- Screenshot Paste
- Lightbox
- Code Review
- Niko Cale
- Stuff To Do
There were times when HTTP meta tags were widely used by search engines. Thus, the meta description was used to describe the page in search results. Since then, search engines have become smarter and usually generate the description, which includes search keywords. But, the meta description, as well as meta keywords, are still used and have a huge meaning for SEO.
But, it's not only a matter of search engines, meta the description, and meta keywords are used everywhere. For example meta description is used by social networks to show more information about the page.
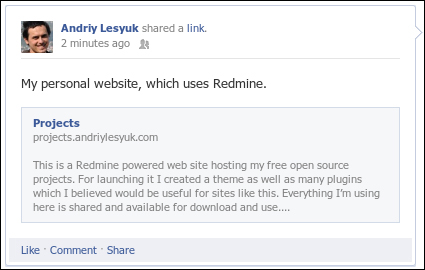
So, from this point of view, Redmine makes a big mistake using just "Redmine" for the meta description and "issue,bug,tracker" for meta keywords for all pages. As a results, when we add a Redmine-powered page to a social network, the post looks like the following screenshot (example for Facebook):

That's why I believe the Meta Tags plugin is essential for Redmine-powered sites, which can be accessed publicly, that is, pages which can be crawled by search engines and added to social networks by users.
Tip
You can find the Meta Tags plugin at http://projects.andriylesyuk.com/projects/redmine-meta.
The Meta Tags plugin adds Meta description and keywords to the start page, the project overview, the issue pages, the news pages, and the Wiki pages. In addition, it provides API for adding content for these Meta tags from within Redmine view files.
So, with this plugin, when we add a Redmine page to social networks, the post looks like the following screenshot (example for Facebook):
There is no perfect software; every application in some circumstances can give an error. Here, we talk not about a check, which results in an error message but about exceptions, which occur when the application cannot handle the situation. As mentioned, we can't avoid such situations, but that's not the matter; the matter is that such situations can happen silently, and you may never know they have happened as you can't be sure that users, who have faced the exception, will report it to you.
This becomes especially important, if we use:
- The most recent version of Redmine
- Some third-party plugins or their most recent versions
- Custom plugins, developed especially for Redmine
As too new or not a very well-tested software is known to fail. Luckily, Redmine writes all such exceptions to its logfiles. But, if your Redmine installation is heavily loaded and/or administrators do not check all logfiles regularly, you can still easily miss them.
The solution comes from the now-former Redmine core developer, Eric Davis, who developed the Exception Handler plugin. This plugin catches the unhandled exception, generates the report, and sends it to the specified e-mail addresses.
Tip
You can find the up-to-date fork of the plugin maintained by Ricardo Santos at https://github.com/thorin/redmine_exception_handler.
The very first thing which needs to be done after this plugin installation is configuring the e-mail addresses at which we want to receive notifications. To do this, go to Administration | Plugins, and click on the Configure link to the right-hand side of Redmine Exception Handler plugin.

After completing the form, you may check whether notifications can be sent to the specified e-mail addresses using the Test Settings by triggering a fake exception link.
Now you will always know when Redmine fails. And, unless you are able to check Redmine logfiles regularly and carefully, I believe, this plugin is essential to have installed.
This plugin will be of interest only for users of Eclipse IDE.
Eclipse comes with a very interesting task management concept, in which a task becomes an interface customization unit. Thus, when the user select a task, Eclipse remembers all actions the user performs and hides the rest. This helps to concentrate on the task. This concept is provided by the Eclipse plugin called Mylyn.
In addition, Mylyn is able to work with different task repositories using connectors (connectors are small plugins allow us to connect Mylyn with third-party task repositories). Thus, by default, Eclipse comes with the Bugzilla connector, but official Eclipse sites also include connectors for JIRA, Trac, Mantis, Hudson, Microsoft TFS, and much more.
Thanks to Sven Krzyzak such a connector exists for Redmine as well. This connector connects (excuse the tautology) to the Mylyn Connector plugin, which was also originally developed by Sven. Both plugins (for different systems though) let Eclipse users see, use, and manage Redmine issues straight from Eclipse.
Tip
You can find the Redmine Connector plugin for Eclipse at http://sourceforge.net/projects/redmin-mylyncon
You can find the up-to-date fork of the Mylyn Connector plugin for Redmine, which is maintained by Daniel Munn, at https://github.com/danmunn/redmine_mylyn_connector.
In Eclipse, go to Help | Install New Software… and type the following URL into the Work with field http://redmin-mylyncon.sourceforge.net/update-site/N (or click on the Add… button and add this URL there). Then install Mylyn Connector: Redmine and optionally Mylyn Connector: Redmine – Redmine-Plugin-Support, which will appear in the area below.
After installing the connector in Eclipse, open the Task List, click on the down arrow next to the new task icon and select the Add Repository… menu item:

In the list of available connectors you should see Redmine. Select it and then click on the Next button. The following dialog box (seen in the screenshot) should open:

In this dialog, you should specify the parameters required for connecting to Redmine. The dialog supports User ID and Password but I highly recommend you to use API-Key instead, which can be found on your My account page.
After completing the dialog, you will need to click on the Validate Settings button, after that the Finish button will become clickable. Clicking on the Finish button will send you to the query edit dialog.
Now, when you open the Task List you should see something similar to the following screenshot:

Each task, which is actually a Redmine issue, can also be edited directly from Eclipse as seen in the following screenshot:

In fact, using Eclipse we can now do with the issue everything that is possible in Redmine.
Also the plugin requires Redmine REST API to be enabled, which can be done in Administration | Settings | Authentication using the Enable REST web service option.
As Redmine is an issue tracking application, it's no wonder that the majority of files attached to issues appear to be screenshots. Most Redmine users are used to pressing the Print Screen button, saving the screenshot into a file, clicking on the Browse… button in the issue form, and then submitting the screenshot.
I guess, few users know that Jean-Philippe Lang, the author of Redmine, created the Screenshot Paste plugin, which is intended to assist this routine. This plugin allows you to paste the screenshot from the clipboard directly into the issue form.
Tip
You can find the up-to-date rework of the plugin, authored by Emmanuel Gallois, at https://github.com/undx/redmine_screenshot_paste.
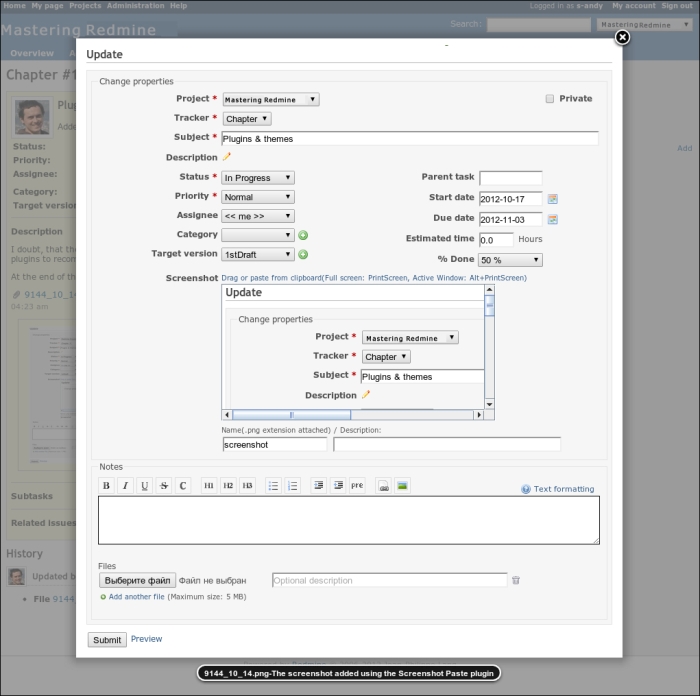
If this plugin is installed, the following new element gets added to the issue form:

After submitting this form, the new screenshot gets added to the issue as an attachment.
Since Version 2.1.x, Redmine can show attached images as thumbnails if the Display attachment thumbnails option in the Administration | Settings | Display tab is enabled. However, when we click on the thumbnail, it opens in the current window in place of the issue page, so afterwards we need to go back.
In previous versions even the thumbnails were not visible (we could only see the file links) unless the particular Redmine installation used the Lightbox plugin, which was originally authored by Genki Zhang.
Tip
You can find the up-to-date fork for the plugin, maintained by Ricardo Santos, at https://github.com/thorin/redmine_lightbox.
This plugin uses jQuery to show the attached image in a nice lightbox, when users click on the thumbnail. In addition to images, the plugin can also show the PDF documents and Flash applets. But the most beautiful thing is that it does this without leaving the current page:
So to close the lightbox, we can click on the ![]() icon in its top-right hand corner. If the issue has several images attached, clicking on the image in the lightbox moves it to the next image or PDF or Flash in the issue attachment list.
icon in its top-right hand corner. If the issue has several images attached, clicking on the image in the lightbox moves it to the next image or PDF or Flash in the issue attachment list.
Code review is an important part of the software development process, which can help to find serious vulnerabilities before the application gets released. It is especially important, if the development team includes new inexperienced members. Of course, there exists plenty of tools for automated code review and analysis but not everything can be automated and sometimes even a quick look at the code of an experienced developer can prevent the vulnerability from appearing in the production.
At the later phases of the software development process, the code review implies examining code commits, which can be easily seen in Redmine using its repository browser. Redmine revision pages include all the details regarding changes made in the code. The only thing left is to create an issue and describe what the reviewer found and why it should be fixed.
Tools such as Redmine are intended to automate everything, what is possible and acceptable, to make the work easier. So Haru Iida created the plugin to simplify issues creation during the code review process.
This plugin can be considered to allow commenting each line of the code committed. But, in fact, reviewers are allowed to "attach" issues to lines and describe their thoughts about those lines within these issues. Such issues can be bugs, requests for checks or refactoring, or just comments:

Thus, to add an issue for a line, users just need to click on the pen icon near the line number (note that only additions can be commented). After this the pop-up window with the simplified issue form appears.
If the line has been commented, then near the pen icon, we will also see the comment icon as seen in the following screenshot:
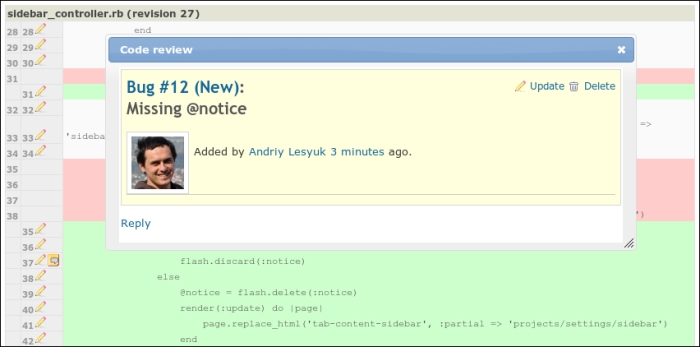
Clicking on this icon will pop-up the small issue window, which will contain the comment and links allowing you to move to the issue page:

As you see from the screen, issues, created using the Code Review plugin contain the additional field Code Review with a short link to the related line.
All code reviews that are issues created for code lines, become available under the Code Reviews tab of the project menu:

Additionally, the plugin allows you to request the code review for the commit or changes in the file. In this case an issue, which includes the details about the revision and, optionally, the file, gets created.
It's hard to overvalue motivation. When you are motivated, you are able to do much more, and much better, and it feels good to get pleasure of doing the job. Employees cannot be motivated effectively if they hate the job! Apparently, a demotivated employee is more disposed towards producing bad code and bugs.
We all know Agile. What this methodology is missing is evaluating the motivation of an employee. So, as a workaround Akinori Sakata suggested using Agile to track the mood of employees. His idea is well known as the Niko-Niko Calendar (Japanese "niko niko" means something like a "smiley").
The implementation of the Niko-Niko calendar for Redmine was originally authored by Yuki Kita, who named it the Niko Cale plugin.
Tip
You can find the up-to-date fork of the plugin, which is maintained by Yoshitani Mitsuhiro, at https://github.com/luckval/redmine_niko_cale.
This plugin adds the ability for users to specify their overall mood during the working day. This can be done using the Today's feeling link, which appears between the username and the My account link at the top-right user menu. The following screenshot shows the How do you feel? window:

Users can choose between Good, Ordinary, and Bad. Optionally, they can also add a comment describing the reason for the feeling they selected.
The Today's feeling information should be specified at the end of the working day (just before leaving). After it has been specified, the Today's feeling link disappears from the menu. The specified feeling gets added to the user's profile as seen in the following screenshot:
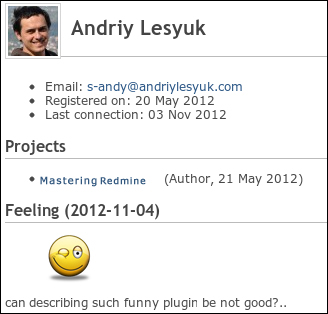
The emoticon seen on the page directs you to the feelings page:

Here feelings can be modified and deleted. Also, on this page, other employees can comment on feeling.
This is how mood can be added to Redmine. All moods specified by employees appear on the Niko-Niko Calendar, which can be found under the Nico-Cale tab in the project menu:
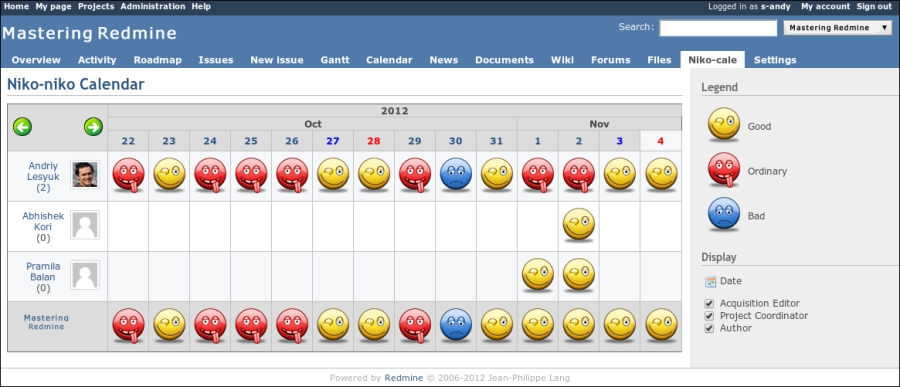
The Niko-Cale tab opens the actual Niko-Niko Calendar, which shows the mood for all project members and calculates the overall mood for the project team. The green arrow icons allow you to move through calendar periods and the filter on the sidebar allows you to filter the calendar by member roles. Hovering the mouse cursor over the emoticon shows the comment, if supplied.
Like for other Agile practices, the effectiveness of the Niko-Niko Calendar depends on employees' frankness. If properly used, this practise allows discovery of existing problems where other Agile practices fail. Thus, employees, who have too much work, who worry about the result, who get mobbed, and so on, are unlikely to use the Good icon when reporting their mood. The practice shows, that often enough the only unhappy employee in the team can appear to be not just depressed but to be the one, who knows more about problems and who is willing to speak about them. In other words, the Niko-Niko Calendar (and the Niko Cale plugin) can be used effectively to discover issues at the early stages and to find out the guy, who will speak about them frankly.
When one has many issues, it can become quite complicated to prioritize tasks and not to miss or delay more important ones. While Redmine offers custom queries, which can help here, there is the need for a simple and intuitive solution.
Eric Davis, the former Redmine core developer and a quite busy person (at least a lot of issues were assigned or related to him, thus, I also added a couple), implemented the Stuff To Do plugin aimed to help organizing users' task lists.
Tip
You can find the Stuff To Do plugin at https://github.com/ande3577/redmine-stuff-to-do-plugin.
This plugin adds the Stuff To Do item to the top-left menu. This menu is much like the My page-that is, it contains the user personalized data.
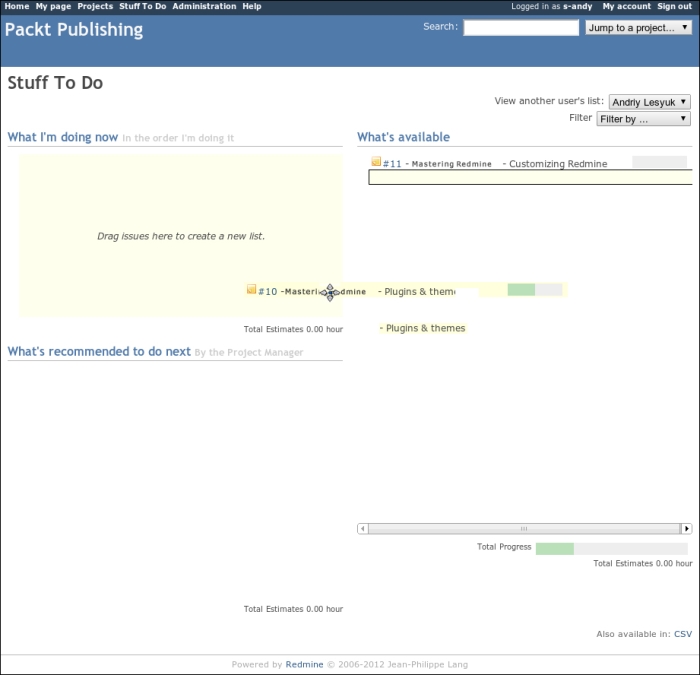
In a few words, this page contains the user's tasks. It is divided into three blocks:
- What's available: It contains a list of issues assigned to the user
- What I'm doing now: It contains a list of issues that the user is currently working on (not by the status)
- What's recommended to do next: It contains a list of user's next tasks
Issues can be dragged from one block to another (in the preceding screenshot, I'm dragging the Chapter 10 task to the What I'm doing now block). Thus, dragging the issue from What I'm doing now and What's recommended to do next actually removes the issue from the to-do list and moving the issue from the What's available block adds the issue to the to-do list. What I'm doing now and What's recommended to do next may contain a limited number of tasks that is, five for the first block and ten for the second one. As soon as an issue in the What I'm doing now block gets closed, the first issue from the What's recommended to do next block automatically moves to What I'm doing now. The order of issues in both these blocks can be changed manually just by dragging them.
If I dragged the Chapter 11 task to What's recommended to do next, it would be added to the What I'm doing now block. This is because the plugin does not allow the issue to appear in the What's recommended to do next block, if there are less than five issues in the What I'm doing now block. Unfortunately, currently this can't be configured.
The plugin also allows privileged users to manage other users' to-do lists.