
Issue tracking is not just about keeping the list of issues, it's also about implementing the issue life cycle, which is also known as the workflow.
The Redmine issues workflow can be configured in Administration | Workflow:

Let's start with reviewing each tab.
The main goal of the workflow is to control the issue status, which can be set for the issue in certain conditions. Thus, instead of setting the Open status after the In Progress status (for example, when the issue was returned) we may prefer setting the special Reopened status. So, for this, we just let the Open status be set only after the New status is set and allow setting the Reopened status after the In Progress status (this way when checking the issue status, we will always know if the issue has been returned). These are the things which can be configured under the Status transitions tab.
Issue status transitions can be configured only per role and tracker. So, in the Role field we choose one of available roles, and in the Tracker field we choose one of trackers.
Some issue statuses may be not used by certain trackers (for example, the Fixed status and the Feature tracker), so to simplify the form Redmine allows you to skip such issue statuses. This, of course, cannot be done without the possibility to change as we need a way to utilize new statuses, which, of course, won't be used by trackers yet. So, to show all the available issue statuses uncheck the Only display statuses that are used by this tracker option.
And after clicking the Edit button, we get the following form:
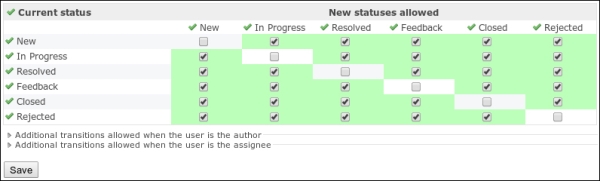
In the left-hand column we see initial issue statuses, and in rows we see possible target statuses. In other words, this table defines if the status in the left-hand column can be changed to other statuses in the row. If the checkbox is checked, the change can be made.
The table is divided into three blocks. The top block specifies common settings and two other blocks, which are collapsed by default, can optionally contain modifications to the common settings. Common settings apply to all users of the current role and to all issues with the tracker. The next block is for cases, in which the user is the author of the issue, that is, the issue was created by this user. And the last one applies to the cases, when the issue is assigned to the user.
Since Version 2.1.x of Redmine the Workflow section has the additional Fields permissions tab, which can be used to make issue fields read-only or to require them for some trackers. This tab uses the same parameters form.
Clicking on the Edit button shows the following screenshot:

Each listbox in this form allows to choose the Read-only option. If this option is chosen for the field, the user with the corresponding role won't be able to change the value of this field, if the issue is of the corresponding tracker.
Fields, which are required by default, are marked with the red asterisk here. Fields, which are not required, have the additional Required option. If this option is selected for the field, it will become required for users with the corresponding role, if the issue is of the corresponding tracker.
Like for issue status transitions, if fields permissions were set before, they are loaded with backgrounds of corresponding cells set to appropriate colors:

Here, the gray color stands for the Read-only option, and the red color stands for the Required option.
The workflow page also has the contextual menu with links in the top-right corner, which we did not review. I skipped this menu, because at that moment we did not know enough to understand what are they for.
The Edit link redirects to the same page, that gets opened, when we click on the Workflow item in the administration menu. So, this menu item is generally used to get back to the form from other workflow views.
The Copy link can be used to quickly copy configuration from one role and tracker pair to another. This feature can be used if, for example, you mistakenly changed the wrong pair. Anyway, as you have seen, the workflow configuration is quite complex and utilizes many checkboxes and listboxes, so many of you may find this link useful for different purposes (another option is if you forgot to copy configuration on creation, but we will speak about this later). Refer to the following screenshot:
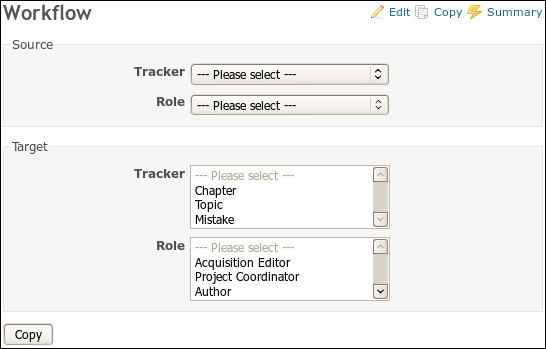
For user convenience the form supports selecting several target trackers and roles.
The Summary link redirects to the page containing aggregate data:
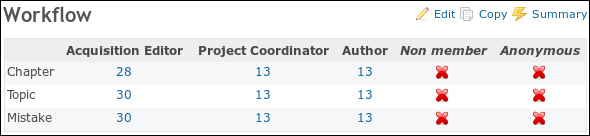
Those numbers represent the number of enabled permissions per role and tracker. ![]() means that no permissions are enabled.
means that no permissions are enabled.
While these numbers are, generally, useless each number and ![]() is a link redirecting to the corresponding form. So, the summary page can be used for a quick access to permissions editing.
is a link redirecting to the corresponding form. So, the summary page can be used for a quick access to permissions editing.