As a developer, I can assure you of the importance of rich text formatting in user requests, especially in issue descriptions, for a good text comprehension. It is especially useful if the one, who is going to comprehend for example, an issue is dealing with a lot of such issues constantly. In practice, unfortunately, users often disregard rich formatting that ends up to result in bad readability and, sometimes, in distorted messages (when some symbols are treated as formatting markers). Therefore, I believe, the familiarity with the Redmine text formatting is essential for using Redmine. Luckily the formatting is not too complicated as it uses the Textile markup language. So in this chapter we are going to learn it.
The Textile markup language attempts to add rich formatting to the plain text while not breaking its readability. Thus, list items begin with * or #, italic text is enclosed in _ (underline), and so on. This way, if one writes text without any formatting markers, in most cases, such text should be rendered just fine. Moreover, due to "naturalness" of its syntax Textile is able to recognize the following:
- Paragraphs: They should start with new lines and after an empty line
- Quotes: The paragraphs that start with
> - Links: Links starting with
http://
Textile also recognizes plain text, thus, also adding rich formatting to texts, which do not have any special Textile rules. In other words, Textile is very simple and easy to learn. At least, most of its syntax. However, this book is not aimed at simple things, which can be learned on your own, so here you will also find some complicated advanced topics as well.
In this chapter, we will cover the following topics:
- Formatting text in Redmine
- Wiki formatting syntax
You might wonder why we reviewed the Wiki module in Chapter 5, Managing Projects, and not here. The answer is: The Wiki module and the text formatting are not the same. Thus, having disabled the Wiki module you do not disable rich formatting, it will still be available for issue descriptions, issue comments, news, project description, and so on. The Wiki module is just the module which uses the text formatting most intensively. However, the rich text formatting was implemented mainly for the integrated Wiki system (which is provided by the Wiki module) and, therefore, it is often named as the Wiki formatting (and that's the name I will use to refer to it further).
While it's unlikely you will use this possibility, the Wiki formatting can be disabled in Administration | Settings | General using the Text formatting option:
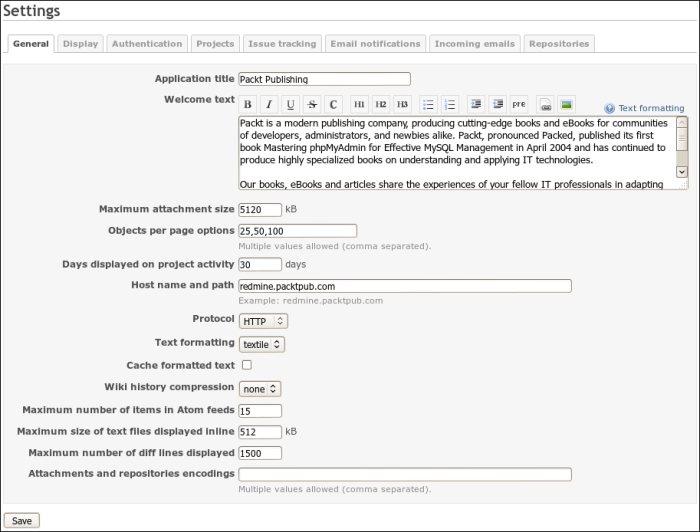
If this option is set to none, the Wiki formatting will be disabled for the whole Redmine. In other words, everything you put into a text area will be shown as it is, ignoring any formatting syntax. This, by the way, will also apply to the Wiki system, that is, Wiki pages will still be there but no Wiki syntax will be available for them. However, Redmine internal linking syntax (such as linking to issues, linking to Wiki pages, and so on), which will be covered further, will still be functioning! Otherwise the Wiki system would become completely useless, in particular, without support for links to other Wiki pages.
Almost every text area for fields, that support the Wiki formatting comes with the Wiki toolbar:

This toolbar does not make the text area a WYSIWYG editor though, it just provides an easy way for pasting most commonly used formatting markers. A well working WYSIWYG solution for Redmine does not currently exist, as far as I know.
The Text formatting link to the right opens the short summary of Wiki syntax rules. The page, which gets opened, also contains links to more detailed documentation regarding the syntax.
Neither of the toolbar icons open any dialog, all icons just paste syntax markers into the current position in the text area. If the user selects text in the text area, clicking on icons will format the selected text accordingly, thus, if the user selects a part of text and clicks on the
![]() icon, this text will be enclosed into
icon, this text will be enclosed into * (bold marker). If the user selects several lines in the text area and clicks on the ![]() or
or ![]() icon,
icon, * or # (list markers) will be added to the beginning of each selected line accordingly.
The Wiki toolbar is really helpful at the beginning of using Redmine when users do not remember all the markers. After becoming a more experienced user, I believe, you will prefer typing syntax markers directly into the text area over clicking on the corresponding icons (at least I do). Also the Wiki toolbar does not contain all the available markers, so you won't be able to completely avoid typing them. For this reason and because we have not learned available syntax markers yet, we won't review these icons here. You can play with them on your own or get back to them later after having learned the formatting markrs.
In most cases, forms with Wiki-syntax-enabled text areas also contain the Preview link:
This link can and should be used for checking, if the formatting is going to be rendered correctly, before submitting content to Redmine. After clicking on it, a preview of the content of the Wiki-syntax-enabled text area is rendered beneath the form.
If a not-yet-submitted content is using images, which have been attached to a not-yet-submitted related resource (for example, new issue), the preview won't be able to show these images as, in fact, they have not been uploaded to the server yet.
Tip
Always use the Preview link, if available, before submitting a content to the server. Do this, even if you are sure, that formatting markers are correct, or if you have not used any formatting at all, as the content can include some special symbols or sequence of symbols, which may be treated as formatting markers by core Redmine formatter or third-party extensions.
Of course, in most cases, you may change the content later, after submitting. However, if users have subscribed to the content they usually get the first submitted version and not the corrected one. Also, further changes can get logged into the resource change history (for example, issue history), this way flooding it.
As already mentioned (and as will be discussed further), the Wiki content can use linked images. Here the word "linked" means hosted on the same Redmine installation and, possibly, in the same resource (for example, issue), and embedded into the Wiki content using the Wiki syntax. Of course, the Wiki syntax allows us to use images hosted on external resources but in many cases this can be inadmissible, for example, for security reasons or for load speed. So let's see where you can place your linked images.
If the resource (for example, issue or Wiki page) you are writing content for has a possibility to attach files, attach your images to this resource. Thus, for issue comments, you can attach images to the issue.
But what if there is no way to attach files to the resource? This is the reason I wrote this topic separately. In such cases, some users attach images under the Files tab of the project's menu. I would not recommend to do this. Under the Files tab, your customers expect to see files for download, that is, installation packages, documentation, samples and so on. They may decide these images are somehow related to the project (for example, think of them as diagrams) and should be downloaded. Besides if images are placed here, it will create a confusion for the customer when they want to download project related files.
I believe, the best way is to attach such images to an especially created Wiki page, for example, "Linked-images" (see Chapter 5, Managing Projects, on how to create Wiki pages). On this page you can also describe its purpose and annotate images that are attached. If not referenced from other Wiki pages, this page will be available only on Wiki index pages such as Index by title and Index by date. If you have disabled the Wiki module, you can use a special closed issue instead.
Let's now speak about how to extract image URL. If you hover your mouse cursor over an attached file, you should see the link which ends with /attachments/<id>/<filename>. That's the URL you should use when referring to images from within the Wiki content! Use the relative URL (which starts with /, that is, /attachments/<id> or /redmine/attachments/<id> depending on whether your Redmine uses subdomain). Here <filename> is optional.