
Bitbucket is Atlassian's cloud-based code repository service. It provides public and private code repositories, with support for both Git and Mercurial. It provides a great option for organizations that want to move to DVCS but do not want to deal with the infrastructure overhead.
In this recipe, we will look at how to integrate our on-premise hosted JIRA with Bitbucket in the cloud.
Since we will be using Bitbucket in this recipe, you need to have a Bitbucket account (both Git and Mercurial repositories will work). If you do not have one, you can sign up for a free account at https://bitbucket.org.
The first step is to create a new consumer in Bitbucket for JIRA, which will generate the consumer key and secret:
- Log in to your Bitbucket account.
- Navigate to Manage Account | Integrated applications.
- Click on Add consumer and enter a name. The name you enter here will be displayed when JIRA requests access authorization, so you should use a name that is easily understandable, such as Atlassian JIRA.
- Click on Add consumer, and this will generate the consumer details we need for the next step:

After we have created the new consumer, the next step is to enter the consumer key and secret details into JIRA:
- Navigate to Administration | Add-ons | DVCS Accounts.
- Click on the Link Bitbucket or GitHub account button.
- Select Bitbucket as the Host option.
- Enter the Bitbucket account name, the key, and the secret details generated from the consumer we just created.
- Click on Add to link JIRA to Bitbucket.
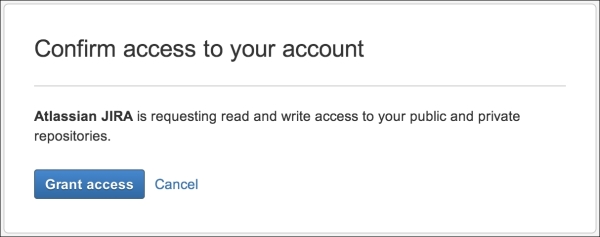
Once JIRA has established a connection to Bitbucket, you will be prompted to grant JIRA access to your Bitbucket account. Make sure the consumer name (in bold) is the same as the consumer we created and click on Grant access:
JIRA uses OAuth as the authorization mechanism to retrieve data from Bitbucket. With OAuth, the application that retrieves data is called the consumer, and the application that provides data is called the provider.
Each consumer needs to be registered with the provider, which generates a key or secret pair. We performed the registration in our first step by adding a new consumer in Bitbucket:

If you do not see the Commits tab or section, make sure you have the View Development Tools project permission.
As you might have already seen during the setup process, JIRA also supports GitHub, both the standard cloud version and the enterprise on-premise version. To integrate with GitHub, you follow the same steps, except while setting up DVCS accounts, you need to select GitHub instead of Bitbucket.
With GitHub, you will also need the consumer key and secret by registering a new application in GitHub:
- Log in to your GitHub account.
- Navigate to Account Settings | Applications.
- Click on Register new application and enter a name.
- Enter JIRA's URL for both Homepage URL and Authorization callback URL.
- Click on Register application.
After you have registered the application, a new client key and secret pair will be generated for JIRA to use.