
JIRA is not only able to send mails to users, but also to poll and process e-mails, and it can create issues or add comments to the existing issues. When set up correctly, this can be a powerful way to let your users interact with JIRA.
In this recipe, we will set up JIRA to poll incoming mails so that it can create new issues and add comments to the existing issues. This is useful in a help desk scenario where customers can write e-mails to the company's support e-mail address and let JIRA automatically create issues from them.
Since JIRA will be polling e-mails from an inbox, you need to have its connection details, including:
- What protocol does it support? (for example, POP or IMAP)
- Authentication details
The first step to configure JIRA to process incoming e-mails is to set up the inboxes that JIRA will use to poll e-mails from:
- Navigate to Administration | System | Incoming Mail.
- Click on the Add POP/IMAP mail server button.
- Click on the Test Connection button, with the credentials provided, to make sure JIRA is able to connect to the mail server. If the test is successful, click on the Add button.
After we have set up the mail inbox, we can set up what is known as mail handlers in JIRA to poll and process e-mails. In this recipe, we will use the most common handler to create and/or comment on issues from e-mail contents:
- Click on the Add incoming mail handler button.
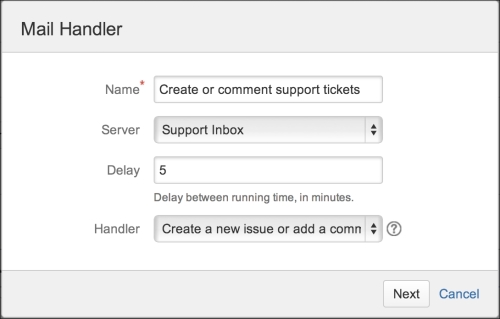
- Enter a name for the mail handler.
- Select Support Inbox from the Server drop-down list.
- Set the Delay timer in minutes for how often the handler should poll for new e-mails. Generally, you do not want to set the time too short.
- Select the Create a new issue or add a comment to an existing issue handler.
- Click on the Next button to configure the mail handler, as shown in the following screenshot:
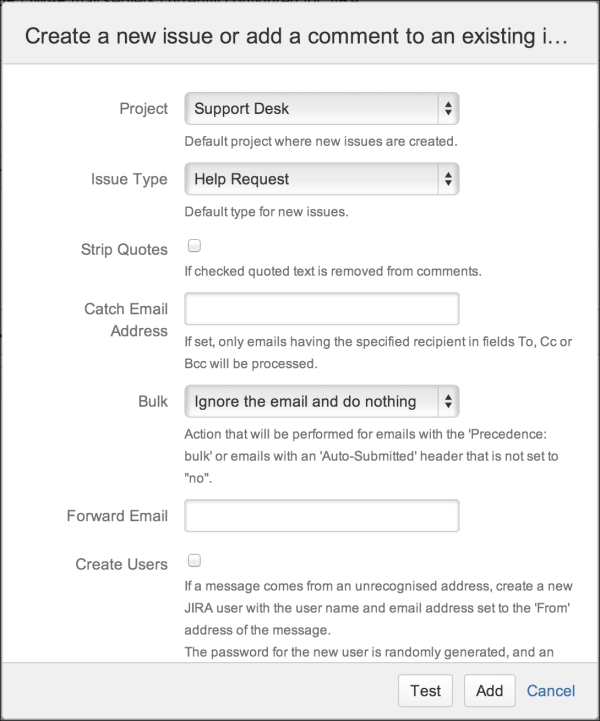
- Enter the mail handler configuration details. The most important configurations are as follows:
- Project: You can only select one project. All e-mails from the inbox will go into the project selected.
- Issue Type: This is the issue type from which new issues will be created.
- Create Users: Check this if you want to automatically create a new account based on the e-mails from the addresses. Note that this would count towards your license seat.
- Default Reporter: If you do not want to create new accounts, you can set a use case that will be the reporter for all new issues created from e-mails.
- Click on the Add button to create the mail handler.
The following screenshot shows the previously described parameters:
Mail handlers periodically poll for new e-mails from the selected incoming mail server and process them based on the handler used. The Create a new issue or add a comment to an existing issue handler will create a new issue in JIRA, where the e-mail subject becomes the issue summary and the e-mail body becomes the issue description. If the e-mail subject contains an issue key to an existing issue, the e-mail body will be added as a comment to the issue.
JIRA comes with a number of other mail handlers:
- Add a comment from the non-quoted e-mail body—this adds the e-mail body that is not quoted with the > or | symbols as a comment to an existing issue.
- Add a comment with the entire e-mail body—this adds the entire e-mail body as a comment to an existing issue.
- Create a new issue from each e-mail message—always create a new issue from an e-mail.
- Add a comment before a specified marker or a separator in the e-mail body—this adds the e-mail body before a marker line is specified as a regular expression. Contents after the marker will be ignored. This is useful when you do not want to include old contents from a forwarded e-mail.
JIRA's out-of-the-box mail handlers mostly focus on creating new issues from e-mails or adding comments to the existing issues based on certain matching criteria. This means that for each project, you will need to have a corresponding inbox. There are several other notable limitations, including:
- Not able to update issue fields
- Mapping one handler to multiple projects
- Notifying users that do not count towards JIRA licenses (non jira-users)
Luckily, there is a third-party add-on called Enterprise Mail Handler for JIRA, which addresses all these gaps and more. You can download the add-on from the following link:
https://marketplace.atlassian.com/plugins/com.javahollic.jira.jemh-ui