The following assumes that you have Custom setting f5 – Assign FUNC. Button’s setting called FUNC. Button + dials set to BKT - Auto bracketing. If you have changed this basic way to use auto bracketing, you’ll need to use your preferred method to turn bracketing on instead. The FUNC. button is also known as the Fn button.
As shown in Figure 6-50, choose the number of shots in the bracket by pressing and holding the function (Fn) button on the right front of the D700. Turn the Main command dial to select the number of shots in the bracket.
Look for the BKT symbol to appear on the Control Panel LCD, along with lines below the +/− scale to show the number of shots you’ve selected, up to nine shots total. The number of lines hanging below the +/− scale equal the number of shots in the bracket and will be equal to the number displayed preceding the F at the top of the Control Panel LCD. If you hold the Fn button and rotate the Main command dial to select five lines below the scale, that means the D700 will take a total of five exposures in the bracket: if Custom setting e7 is set to its default value, there will be two underexposed, one exactly as the meter requires, and two overexposed.
You can use Custom setting e7 to set the order of the exposures. We’ll discuss that in the section on Custom setting e7 later. The default order is normal > underexposed > overexposed. You can change it to underexposed > normal > overexposed if you’d like.
While holding the Fn button, you can rotate the Sub-command dial to change the EV value of each image in the bracket, in steps of ![]() ,
, ![]() , or 1 EV. The EV step value is set in Custom setting b2 – EV steps for exposure control.
, or 1 EV. The EV step value is set in Custom setting b2 – EV steps for exposure control.
Therefore:
Figure 6-51 through 38D are a series of pictures of the Control Panel LCD set to various bracketing values.
Figure 6-51 shows a total of five exposures (5F) with 1.0 EV between each exposure.
Figure 6-52 shows a total of nine exposures (9F) with 0.7 EV between each exposure.
Figure 6-53 shows a total of three exposures (3F) with 0.3 EV between each exposure.
I normally bracket with a 1 EV step value (1 stop) so that I can get a good spread of light values in High Dynamic Range (HDR) images. In most cases, I will do a three-image bracket, with one image overexposed and one image underexposed by one stop. If the image is really important to me, I’ll do a five-exposure bracket with one stop between each exposure.
This type of bracketing allows detail in the highlight and dark areas to be combined later in-computer, for the HDR exposures everyone is experimenting with these days.


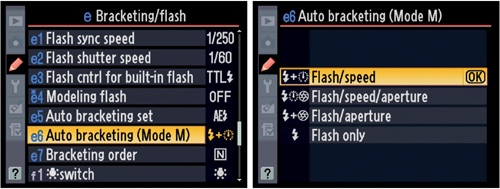
Custom setting e6 – Auto bracketing (Mode M)
(User’s Manual page 316)
In Figure 6-54 we are shown the screens used to configure Custom setting e6.
Flash/speed (default)
Flash/speed/aperture
Flash/aperture
Flash only
Flash/speed – This setting allows those who want to control the aperture for best depth of field while still doing bracketing. The camera will control the shutter speed. If Custom setting e5 is set to AE & flash, the D700 will vary the shutter speed and flash level to expose the bracketed images. If e5 is set to AE only, then the camera will only vary the shutter speed to get the exposures.
Flash/speed/aperture – This setting allows those who want to control the shutter speed and aperture while still doing bracketing. If Custom setting e5 is set to AE & flash, the D700 will vary the shutter speed, aperture, and flash level to expose the bracketed images. If e5 is set to AE only, then the camera will vary the shutter speed and aperture to get the exposures.
Flash/aperture – This setting allows those who want to control the shutter speed for best action shots while still doing bracketing. The camera will control the aperture. If Custom setting e5 is set to AE & flash, the D700 will vary the aperture and flash level to expose the bracketed images. If e5 is set to AE only, then the camera will only vary the aperture to get the exposures.
Flash only – This setting allows those who want to control only the flash while doing bracketing. The camera will only vary the flash level to get the bracketed exposures. AE only obviously does not apply with this setting.
Since I am mostly a nature shooter, I leave my D700 set to Flash/speed so that the camera will vary the shutter speed but not the aperture. That way I can control how much depth of field I allow in my images.
If I were shooting important outdoor action shots and wanted to bracket, I’d be shooting in Flash/aperture so that the camera will control the aperture and I can control the shutter speed.
If I let my flash control the exposure, as with indoor shots, I might use Flash only.
Finally, if I wanted to let the camera decide how to get the best exposure I might use Flash/speed/aperture so that all I have to do is shoot and let the camera do the rest.
Custom setting e7 – Bracketing order
(User’s Manual pages 132, 136, and 317)
Figure 6-55 shows the screens used to configure Custom setting e7.
There are two bracketing orders available in the D700. These allow you to control which images are taken first, second, and third in the bracketing series.
MTR = Metered value
Under = Underexposed
Over = Overexposed
MTR > under > over (default)
Under > MTR > over
MTR > under > over – With this setting, the normal exposure (MTR) is taken first, followed by the underexposed image, then the overexposed image. If you are taking a group of five images in your bracket (see Custom setting e5), the camera will take the images like this:

Normal exposure > most underexposed > least underexposed > least overexposed > most overexposed
Under > MTR > over – Using this order for bracketing means that the bracket will be exposed in the following manner:
Most underexposed > least underexposed > normal exposure > least overexposed > most overexposed
I leave mine set to the default so that when the images are displayed in series by the camera, I can see the normal exposure first, then watch how it varies as I scroll through the bracketed images.