(User’s Manual pages 298–304)
Custom setting d1 – Beep
(User’s Manual page 298)
Figure 6-27 shows the screens used to configure Custom setting d1.
I don’t like my camera beeping at me, but you might love it. Either way, we can each have our wish. You can set the camera to beep at you with a high-pitched or low-pitched beeping sound. The low-pitched sound is not very loud, while the high-pitched sound is quite audible. In fact, it sets up a harmonic resonance with the bones in my skull and causes my eyeballs to vibrate.
The D700’s self-timer Beep function is to let you know when the self-timer is about to fire. It counts down the seconds with a beep or two per second, then at the last moment it doubles the beeping frantically to say, “Hurry up!”
The options are
High (default)
Low
Off
If Beep is enabled, the D700 will let you know when you have focused successfully in Single-servo Autofocus (AF-S) by beeping once. It does not beep in Continuous-servo Autofocus (AF-C), since it would be beeping constantly as the focus adjusts to the subject. If you have Custom setting a2 configured to Release priority, the beep will not sound for autofocus in AF-S.

The fact that the D700 is set to beep as a default belies the professional level of the camera. If I am using my camera in a quiet area, why would I want it beeping at me, disturbing those around me? I can just imagine zooming in on that big grizzly bear, pressing the shutter release, and listening to the grizzly roar his displeasure at my camera’s beep. I want to live, so I turn off Beep.
When Beep is active, you’ll see a little musical note displayed in the top-right quarter of your Control Panel LCD.
Custom setting d2 – Viewfinder grid display
(User’s Manual page 298)
In Figure 6-28 we see the screens used to configure Custom setting d2.
A few years ago, the 35mm film Nikon F80 was released with a viewfinder grid display, and I was hooked. Later, as I bought more professional cameras, I was chagrined to find that they did not have the “on-demand” grid lines that I had grown to love.

With the D700, you have not only viewfinder grid lines, but also Live View (LV) grid lines. The best of both worlds! There are only two selections in Custom setting d2:
On – On-demand grid lines are displayed in viewfinder and LV mode.
Off – No grid lines are displayed.
I use these grid lines to line up things I shoot so that I won’t have weird tilted horizons and such. If you turn these things on, I doubt you’ll turn them back off. The nice thing is that you can turn them on and off at will. You don’t have to buy an expensive viewfinder replacement screen for those times you need grid lines. Good stuff, Nikon!
Custom setting d3 – Screen tips
(User’s Manual page 298)
Figure 6-29 shows the screens used to configure Custom setting d3.
With this setting, you can elect to see screen tips for items in the shooting info display.
On – Tips will be shown.
Off – Tips will not be shown.
Custom setting d4 – CL mode shooting speed
(User’s Manual page 299)
In Figure 6-30 we see the screens used to configure Custom setting d4.
The CL mode is for those of us who would like a conservative frame-advance rate. With the proper power, the D700 can record seven frames per second. However, unless you are shooting 200 mph race cars and have large memory cards, you may not want 43 frames of the same subject a few milliseconds apart.
As the last screen in Figure 6-30 shows, you can adjust Custom setting d4 so that your D700 shoots at any frame rate from 1 to 7 frames per second. The default is three frames per second. Remember, you always have CH mode for when you want to blast off images like there’s no end to your memory card or when you want to impress bystanders with that extra cool Nikon shutter clicking sound.


Just the other day, I was over at a superstore parking lot, waiting in the car for my wife to spend all our money. For whatever reason, there were about a dozen seagulls flying around the parking lot. I got bored, pulled out my camera, and in just a few minutes had 450 images of gulls in every possible flying position. Figure 6-31 shows one of my favorites.
See how my camera blended just the right amount of cool wing motion blur, with a nice sharp eye, and somehow even positioned my gull shot using the rule of thirds.
Use your favorite CL shooting speed and grab a few, or many, frames with each press of the shutter-release button.
Custom setting d5 – Max. continuous release
(User’s Manual page 299)
Figure 6-32 shows the screens used to configure Custom setting d5.
This custom setting is a bit misleading. It sets the maximum number of images you can shoot in a single burst. It sounds like you can just start blasting away with your D700, shooting in a single burst until you have reached the number specified in screen two of Figure 6-32, which is up to 100.


While it is possible that you could reach 100 images in a single burst, it is improbable. As shown on pages 423 to 425 of the D700 User’s Manual, your camera is limited by the size of its buffer, the selected image area, and the type of image you are shooting. Here is a list of what your D700’s buffer will allow.
NEF Raw Files – 17 to 26 images in FX mode, or 31 to 95 images in DX mode (according to whether you are shooting in 12- or 14-bit color depth and whether you are using compression or not.
TIFF Files – 17 to 28 images in FX mode, or 23 to 59 images in DX mode, according to whether you are shooting L, M, or S size.
JPEG files – 16 to 100 images, regardless of image area, according to whether you are shooting in L, M, or S size, in Fine, Normal, or Basic, and finally, whether you have selected Optimal quality or Size priority compression.
So—unless you are shooting Basic JPEG files—with the Size priority option selected, you’ll fill up your camera buffer long before you reach the maximum of 100 shots specified by Max. continuous release.
If you have a need to limit your camera to a maximum number of images in each shooting burst, simply change this number from its default of 100 images to whatever you feel works best for you.
Custom setting d6 – File number sequence
(User’s Manual page 300)
Figure 6-33 shows the screens used to configure Custom setting d6.
This setting allows your camera to keep count of the image numbers in a running sequence from 0001 to 9999. After 9999, it rolls back over to 0001. Or, you can cause it to reset the image number to 0001 when you format or insert a new memory card. Here are the settings and explanations of how they work:

On (default) – Image file numbers start at 0001 and continue running in a series until you exceed 9999, at which time the image numbers roll over to 0001 again. This process is used when a new folder is created, a new CF card is inserted, or the current CF card is formatted. If the file number exceeds 9999 during a shoot, the D700 will create a brand-new folder on the same memory card and start writing the new images in numbering order from 0001 into the new folder. Similarly, if you accumulate 999 images in the current folder, the next image capture will result in the D700 creating a new folder, but the file numbering will not be reset unless that 999th image had a file number of 9999.
Off – Whenever you format a CF card or insert a new CF card, the number sequence starts over at 0001. If you exceed 999 images in a single folder, the D700 creates a new folder and starts counting images at 0001 again.
Reset – This works in a way that is similar to the On setting. However, it is not a true solution to the “running total to 9999” problem, since the image number is dependent on the folder in use. The D700 simply takes the last number it finds in the current folder and adds 1 to it, up to 9999. If you switch to an empty folder, the numbering starts over at 0001.
I guess it figures that you have taken quite enough images in this session! The only way you will get your D700 to feel better and agree to take more pictures is to set Custom setting d6 to Reset and format or insert a new memory card. What they mean by this weird sounding notice in the manual is clearly that you should never number a folder up as high as 999 and then shoot over 999 images or let the D700’s running total of images exceed 9999 in a folder numbered 999. Next time you manually create a folder, or set up active folder numbering (Shooting Menu – Active folder setting), keep your folder numbers less than 999 if you are going to shoot more than 999 images that day or if your number sequence in that folder is about to exceed 9999. Read this paragraph over 999 times and you’ll understand just what I’m talking about.
Custom setting d7 – Shooting info display
(User’s Manual page 301)
Figure 6-34 shows the screens used to configure Custom setting d7.
This next feature is a primary reason why I say that the Nikon D700 is one of the coolest cameras I have ever used.
Look on the back of your D700 for the info button, just below the AF-area Mode Selector switch (Figure 6-35). This button brings up a helpful info screen on the Monitor LCD (Figure 6-36).
The extremely cool thing about this shooting info display is that it can adjust its color and brightness according to the ambient light the D700 senses through its lens. Try this:

With your lens cap off, camera turned on, and nothing showing on the rear screen, press the info button. If you have even dim ambient light present where you are, you’ll see a light-blue info screen with black letters. Now, go into a dark area, or put your lens cap on, and cover the eyepiece with your hand. You’ll see that anytime there is a dark ambient light condition, the D700 changes the info screen to light-gray characters on a black background. This keeps from blinding you when you display info in a dark area.
This may not impress you much, but I am easily entertained. Here are the selections in Custom setting d7.
Auto – The D700 decides through its capless lens or uncovered eyepiece how much ambient light there is and changes the color and contrast of the info screen accordingly.
Manual – This manual setting allows you to select the light or dark versions of the info screen manually. The two screens are B, dark on light, and W, light on dark.


If you want to impress your friends and make your enemies envious, just show them how cool your D700 is when it is smart enough to adjust its screen to current light conditions. I warned you that I’m easily entertained, didn’t I?
Custom setting d8 – LCD illumination
(User’s Manual page 302)
In Figure 6-37 we see the screens used to configure Custom setting d8.
This is a simple little setting that allows you to set how the illumination of the Control Panel LCD works.
Here are the two choices.
On
Off (default)

On – This setting makes the Control Panel LCD illumination come on anytime the light meter is active. If you are shooting in the dark and need to refer often to your Control Panel LCD, then switch this setting to On.
This setting will affect battery life since backlights pull a lot of power, so I wouldn’t suggest using the On setting unless you really need it.
Off – If you leave LCD illumination set to Off, the Control Panel LCD will not turn on its backlight unless you tell it to with the “light on” setting on the ring surrounding the shutter-release button. If you use your shutter finger to pull the lever to the right, the Control Panel LCD will light up (Figure 6-38).

Custom setting d9 – Exposure delay mode
(User’s Manual page 302)
Shown in Figure 6-39 are the screens used to configure Custom setting d9.
This setting is very important to me. As a nature shooter, I use it frequently. When I am shooting handheld, or on a tripod, and want a really sharp image, I use this mode to prevent mirror movement from adding to any motion blur I might introduce. Here are the settings.
On
Off (default)
On – The D700 first raises the mirror and then waits about one second before firing the shutter. This allows the vibrations from the mirror to dissipate before the shutter fires. Of course, this won’t be useful at all for shooting moving subjects or for taking any type of action shots. But for slow shooters of static scenes, this is great and keeps you from having to use Mirror up (MUP), which requires two shutter release presses to take a picture. It has the same effect as MUP but only requires one shutter release press.
Off – Shutter has no delay when this setting is turned off.
If you handhold your camera, shoot static subjects, and want sharp pictures, this will help. On a tripod, this is a time-saver compared to MUP mode.

Custom setting d10 – MB-D10 battery type
(User’s Manual pages 302 – 303)
Figure 6-40 shows the screens used to configure Custom setting d10.
If you do not have an MB-D10 attachment for your D700, this does not apply to you. It also applies only when you choose to use AA-sized batteries of various types in your MB-D10, not when you are using normal Nikon EN-EL3e, EN-EL4, or EN-EL4a Li-ION batteries, since they are intelligent and communicate with the camera.
If you do have an MB-D10 and plan on using cheaper AA batteries, then you’ll need to tell the D700 what type of AA batteries you are using for this session. It certainly is not a good idea to mix AA battery types.
Here are the types the D700 will accept.
LR6 – AA alkaline batteries
HR6 – AA Ni-MH rechargeable batteries
FR6 – AA lithium batteries
ZR6 – AA Ni-Mn rechargeable batteries
Nikon allows (but does not recommend using) AA batteries, especially alkaline and Ni-Mn (nickel-manganese). Its primary objection to these two types (LR6 and ZR6) is that they do not work well at lower temperatures. In fact, once you go below 68 degrees F (20 degrees C), an alkaline battery starts losing the ability to deliver power and will die rather quickly. You may not get as many shots out of a set of AA batteries, so your cost of shooting may rise.
However, AA batteries are readily available, and relatively cheap, so many people like to use them. If you do choose to use AA batteries, why not stick with lithium types (FR6) since that is the same type of cell used in the normal Nikon EN-EL batteries and is not affected as much by a low ambient temperature.


Custom setting d11 – Battery order
(User’s Manual page 304)
In Figure 6-41 we see the screens used to configure Custom setting d11.
If you use an MB-D10 attachment, you will need to choose in what order you want the batteries to be used: camera first, or MB-D10 first. Here are your choices.
MB-D10 – Use MB-D10 batteries first (default).
D700 – Use camera battery first.
Which battery do you want to draw down first? Personally, I like to use the MB-D10 batteries first and have my camera’s internal battery available as a backup. That way, if I remove the MB-D10, my camera won’t suddenly go dead due to a depleted battery. It also ensures that I have access to the fastest frame rates the camera can provide. Nikon thinks the same way I do, evidently, since the D700 defaults to MB-D10 – Use MB-D10 batteries first.
Custom settings e1 to e7
(User’s Manual pages 305–317)
Custom setting e1 – Flash sync speed
(User’s Manual pages 305–307)
Figure 6-42 shows the screens used to configure Custom setting e1.
The D700 has a more flexible flash sync speed than many cameras. You can select a basic sync speed from ![]() of a second (s) to
of a second (s) to ![]() s. Or, if you prefer, you can use the two Auto FP modes of your D700 (1/250 s Auto FP or 1/320 s Auto FP). These Auto FP modes are only available with certain external Speedlights, and not with the built-in popup Speedlight. As this book was being written, the following four Nikon Speedlights were compatible with the D700 in Auto FP high-speed sync mode:
s. Or, if you prefer, you can use the two Auto FP modes of your D700 (1/250 s Auto FP or 1/320 s Auto FP). These Auto FP modes are only available with certain external Speedlights, and not with the built-in popup Speedlight. As this book was being written, the following four Nikon Speedlights were compatible with the D700 in Auto FP high-speed sync mode:

SB-900
SB-800
SB-600
SB-R200
Auto FP high-speed sync enables the use of fill-flash even in bright daylight with wide aperture settings. It allows you to set your camera to the highest shutter speed available, up to 1/8000 s, and still use the external flash unit to fill in shadows. Here are your choices:
1/320 s (Auto FP)
1/250 s (Auto FP)
1/250 s
1/200 s
1/160 s
1/125 s
1/100 s
1/80 s
1/60 s
When you are using Auto FP mode, the guide number of your flash is reduced by about one stop. This poses two questions.
Why? Plus, how does the D700 allow me to shoot at any shutter speed I want, while firing my flash, without cutting off part of the frame like in the old days?
The answers are simple. In a normal flash situation, with shutter speeds of ![]() of a second and slower, the entire shutter is fully open and the flash can fire a single burst of light to expose the subject. It works like this: There are two shutter curtains in your D700. The first shutter curtain opens, exposing the sensor to your subject; the flash fires, providing correct exposure; and then the second shutter curtain closes. For a very brief period, the entire sensor is uncovered. The flash fires during the time that the sensor is fully uncovered.
of a second and slower, the entire shutter is fully open and the flash can fire a single burst of light to expose the subject. It works like this: There are two shutter curtains in your D700. The first shutter curtain opens, exposing the sensor to your subject; the flash fires, providing correct exposure; and then the second shutter curtain closes. For a very brief period, the entire sensor is uncovered. The flash fires during the time that the sensor is fully uncovered.
However, when your camera’s shutter speed goes above ![]() of a second, the shutter curtains are never fully open for the flash to expose the entire subject in one burst of light. The reason is that, at higher shutter speeds, the first shutter curtain starts opening, and then the second shutter curtain immediately follows it. In effect, a slit of light is scanning across the surface of your sensor, exposing the subject. If the flash fired normally, the width of that slit between the shutter curtains would get a flash of light, but the rest of the sensor would be blocked by the curtains. So you would have a band of correctly exposed images, and everything else would be underexposed.
of a second, the shutter curtains are never fully open for the flash to expose the entire subject in one burst of light. The reason is that, at higher shutter speeds, the first shutter curtain starts opening, and then the second shutter curtain immediately follows it. In effect, a slit of light is scanning across the surface of your sensor, exposing the subject. If the flash fired normally, the width of that slit between the shutter curtains would get a flash of light, but the rest of the sensor would be blocked by the curtains. So you would have a band of correctly exposed images, and everything else would be underexposed.
What happens to your external Speedlight to allow it to follow that slit of light moving across the sensor? It changes into a strobe unit instead of a normal flash unit. Have you ever danced under a strobe light? A strobe works by firing a high-speed series of pulses of light. When your camera’s shutter speed is so high that the Speedlight cannot fire a single burst of light for correct exposure, it uses its FP mode and fires a series of light bursts over and over as the shutter curtain slit travels across the sensor. The speedlight can fire thousands of bursts per second, but to a photographer or subject it still looks like one big flash of light, even though, in reality, it is hundreds or thousands of bursts of light firing off consecutively.
When you are in Auto FP mode, you’ll see something like this on your Speedlight’s LCD monitor: TTL FP or TTL BL FP.
This tells you that the D700 and Speedlight are ready for you to use any shutter speed you’d like and still get a good exposure. Even with wide open apertures!
You can safely leave your camera set to 1/320 s Auto FP or 1/250 s Auto FP all the time, since the high-speed sync mode does not kick in until you crank the shutter speed above the maximum setting (![]() or
or ![]() ). Below those shutter speeds, the flash works in normal mode and does not waste any power by pulsing the output. This pulsing of light reduces the maximum output of your flash by about one stop but allows you to use any shutter speed you’d like while still firing your external Speedlight. Now you can use wide apertures to isolate your subject in direct sunlight, which requires high shutter speeds. The flash will adjust and provide great fill light if you are using Auto FP high-speed sync mode.
). Below those shutter speeds, the flash works in normal mode and does not waste any power by pulsing the output. This pulsing of light reduces the maximum output of your flash by about one stop but allows you to use any shutter speed you’d like while still firing your external Speedlight. Now you can use wide apertures to isolate your subject in direct sunlight, which requires high shutter speeds. The flash will adjust and provide great fill light if you are using Auto FP high-speed sync mode.
If you are only using the built-in pop-up Speedlight, your D700’s maximum flash shutter speed is limited to ![]() s. If you use the external Speedlights SB-900, SB-800, SB-600, or SB-R200, you can use any shutter speed and the flash will adjust.
s. If you use the external Speedlights SB-900, SB-800, SB-600, or SB-R200, you can use any shutter speed and the flash will adjust.
Custom setting e2 – Flash shutter speed
(User’s Manual pages 308 and 188)
In Figure 6-43 we see the screens used to configure Custom setting e2.
This particular custom setting controls the minimum shutter speed your camera can use in various flash modes. Let’s consider each of the modes and the minimum shutter speed for it:
Front-curtain sync (default), Rear-curtain sync, or Red-eye reduction – In P-Program mode or A-Aperture Priority mode, the slowest shutter speed can be selected from the range of ![]() second to 30 seconds (Figure 6-43). S-Shutter Priority mode and M-Manual mode cause the camera to ignore Custom setting e2, and the slowest shutter speed is 30 seconds.
second to 30 seconds (Figure 6-43). S-Shutter Priority mode and M-Manual mode cause the camera to ignore Custom setting e2, and the slowest shutter speed is 30 seconds.

Slow sync, Red-eye reduction with slow sync, or Slow rear-curtain sync – These three modes ignore Custom setting e2, and the slowest shutter speed is 30 seconds.
The User’s Manual is a bit confusing on this feature, but my explanation is a result of my study and testing. Additionally, Custom setting e2 is only partially used by the flash modes, since the default is preset to 30 seconds in Shutter Priority and Manual modes, as listed earlier.
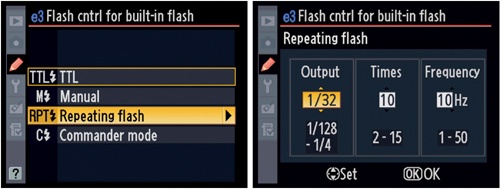
Custom setting e3 – Flash cntrl for built-in flash
(User’s Manual page 309)
Figure 6-44 shows the screens used to configure Custom setting e3.
The D700 has four distinct ways to control flash output. Chapter 9, is devoted to using Nikon’s Creative Lighting System (CLS) and covers each of the modes in much greater detail than the summary found here. Let’s briefly consider each of these modes.
TTL – Also known as iTTL, this mode is the standard way to use the D700 for flash pictures. TTL stands for Through The Lens, and allows very accurate and balanced flash output using a pre-flash method to determine correct exposure before the main flash burst fires. This is a completely automatic mode and will adjust to distances, along with the various shutter speeds and apertures your camera is using.
Manual (Figure 6-45) – This mode allows you to manually control the output of your flash. The range of settings can go from Full power to
 power and a range of settings in between.
Repeating flash – This setting turns your D700 into a strobe unit, allowing you to get creative with stroboscopic multiple flashes. There are three settings, as shown in Figure 6-46:
Output – You can vary the output of the flash from
 to of full power. The more power the flash uses, the more it will cut down on the number of times the flash can fire. Here is a table of how many times the built-in pop-up flash can fire using the different Output levels:
1/4: 2 times
1/8: 2–5 times
1/16: 2–10 times
1/32: 2–10 or 15 times
1/64: 2–10, 15, 20, 25 times
1/128: 2–10, 15, 20, 25, 30, 35 times
Times – Refer to the table above to set the number of times the flash can fire. Increasing the power output—going toward
—will lower the number of times, while decreasing the power—going toward —will increase the number of times the flash can fire like a strobe.Frequency – This setting controls the number of times the flash will strobe per second, between one and 10, then by 10 to 50. If you have Output set to
, Times set to 5, and Frequency set to 50, that means the the D700 will fire its built-in pop-up Speedlight at of full power, five times, with each flash burst divided up into (50 * shutter speed) pulses. Therefore, the flash will pulse a total of 250 times at power for a one-second exposure, or four times for a  second exposure.
Commander mode (User’s Manual pages 311–314) – This mode allows your camera to become a Commander, or controller, of up to two banks of an un limited number of external CLS-compatible Speedlight flash units. The range of the farthest external flash unit is about 33 feet (10 meters) from the camera (see Figure 6-47). Refer to Chapter 9, for details on how to use the built-in Commander mode to control external Nikon Speedlights.


Custom setting e4 – Modeling flash
(User’s Manual page 315)
Figure 6-48 shows the screens used to configure Custom setting e4.
On (default)
Off
On – This setting allows you to see (somewhat) how your flash will light the subject. If you have this setting turned On and Custom setting f6 is set to Preview, the depth of field preview button strobes the pop-up flash, or any attached/controlled external SB Speedlight unit, in a series of rapid pulses. These pulses are continuous and simulate the lighting that the primary flash burst will give your subject. The modeling flash can only be used for a few seconds at a time, to keep from overheating the flash unit, so look quickly.

Off – This means that no modeling flash will fire when you press the depth of field preview button.
I often forget that I have this turned on and want to check my actual depth of field while using the flash on a product shot. Instead of depth of field, I get the modeling light. I don’t find this feature to be particularly useful, and it often startles me. One of these days, I’ll get around to turning it off. You might like it if you do a lot of flash photography. Give it a try, but just be prepared.
Custom setting e5 – Auto bracketing set
(User’s Manual page 315)
In Figure 6-49 we see the screens used to configure Custom setting e5.
This setting allows you to control how auto bracketing exposures are made.
You have four choices.
AE & flash
AE only
Flash only
WB bracketing
AE & flash – When you set up a session for bracketing, the camera will cause any type of shot you take to be bracketed, whether standard exposures or using flash. See the following section.
AE only – Your bracketing settings will affect only the exposure system and not the flash.


Flash only – Your bracketing settings will affect only the flash system and not the exposure.
WB bracketing – White balance bracketing is described in detail in Chapter 4. As described in the next section, it works the same for exposure and flash bracketing, except it is designed for bracketing color in “mired” values instead of light in EV step values.