
As an administrator, being able to automate tasks is often a very important task. Earlier, you often needed to have some programming skills in order to take advantage of some of the automation facilities provided by JIRA, such as Listeners and Services. Luckily, Atlassian now provides a tool to help with automation, without the need to know any programming.
In this recipe, we will set up an automated task where JIRA will periodically check for issues that have not been updated in seven days, close them, and add a comment.
For this recipe, we need to have the JIRA Automation Plugin add-on installed. You can download it from the following link and install it using the UPM:
https://marketplace.atlassian.com/plugins/com.atlassian.plugin.automation.jira-automation-plugin
Perform the following steps to set up an automated task:
- Navigate to Administration | Add-ons | Automation.
- Click on the Add Rule button.
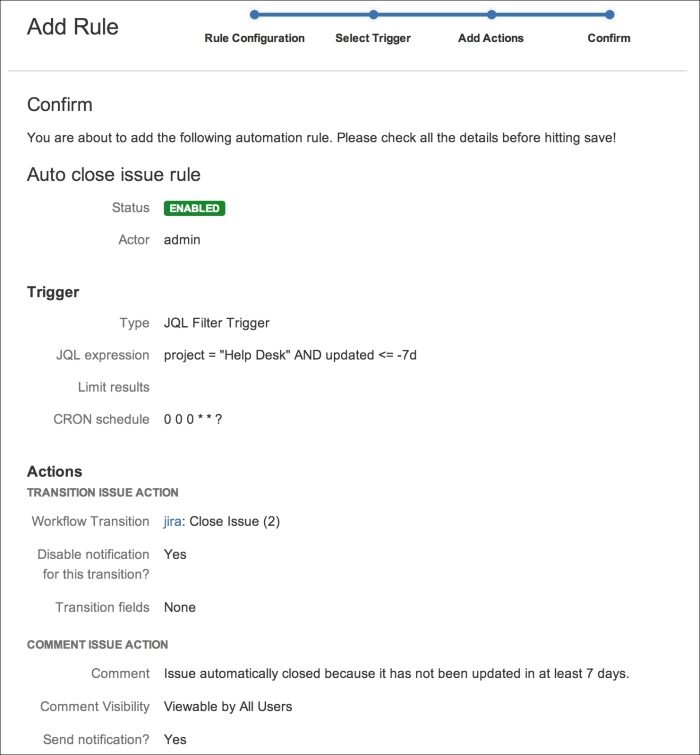
- Enter a name for the new automation rule and select the user that will be used by JIRA to run this task.
- Check the Enable rule once created? option and click on Next to continue:

- Select the JQL Filter Trigger option.
- Enter CRON schedule. If we want our task to run every day at midnight, we will use the
0 0 0 * * ?expression. - Enter the JQL expression named
project = "Help Desk" AND updated <= -7d. This will get us the list of issues in the Help Desk project that have not been updated in the last seven days. - Click on Next to continue:

- For the first action, we want to close these issues, so we select Transition Issue Action.
- Select the Close Issue transition. We need to make sure that the Close Issue transition selected is available for the project.
- Check the Disable notification for this transition option.
- Create a new action by clicking on the Add action… button.
- Select Comment Issue Action.
- Add a comment to the Comment box.
- Check the Send notification? option so that users will receive a notification with the comment we added.
- Click on Next to continue.

- Review the automation task summary and click on Save to create the task.
An automation rule consists of two components, the trigger and the action. The trigger will cause the task to happen. The two built-in triggers are as follows:
- JQL filter: This trigger runs periodically as per a CRON schedule. All issues that are part of the JQL query will be subjected to the action, provided it does not fall outside of the limit.
- Issue event: This trigger runs when the corresponding issue event occurs. Issues that fire the event will be subjected to the action, unless restricted by a JQL query and/or an event author.
An action is what will happen when a trigger is fired. A trigger can fire more than one actions. The five built-in actions are as follows:
- Set assignee to last commented: This action assigns the issue to the user that last commented on it
- Edit labels: This action adds and/or removes labels from the issue
- Comment issue: This action adds a comment to the issue
- Transition issue: This action transitions the issue along the workflow
- Edit issue: This action updates the field values of the issue
With our automation task, we have set up a trigger to run every day at midnight with the 0 0 0 * * ? CRON expression. We then used a JQL query to select only the issues in the Help Desk project that have not been updated in the last seven days at the time when the task was run.
We then added two actions for the trigger, one to transition all the issues returned from the JQL query to Close and another to add a comment, which will also send out a notification.