
Presentation: Screens and Icons
Now that our Angry Bots break is over, and the basics of building and running a Unity iOS project have been covered, it’s time to resume our work on the bowling game and get it working on iOS!
From this point on, I will generally assume you’re testing by building and running on a device, but in many cases you can test in the Editor with the Unity Remote or test in the iOS Simulator.
Tip It’s a good idea to always do some testing in the Unity Editor to catch errors that might not show up when testing on a device. And if you run into a weird problem on a device, go back to the Editor and see if you can debug it there.
This chapter focuses on making the game look right on an iOS device. This includes making sure the game shows up in the correct orientation and all the game elements show up at an appropriate resolution on the screen, which is a precursor to making the game playable (it’s hard to start playing when you can’t read or tap the Play button).
Furthermore, besides providing required attributes such as the app name and icon, we’ll add some polish by including a splash screen and the familiar iOS activity indicator to indicate the game is loading.
Some of these presentation details might seem to be cosmetic and easy enough to implement that they could be deferred until the end of a project (and typically they are), but easy work could and should be done early. Tasks that can be accomplished quickly help you get into a development groove. And when you’re working crunch-time hours trying to finish your game, the last thing you want to see is unfinished work you could have gotten out of the way early.
Besides, packaging is important. In fact, when I’m creating desktop software, I like to start with the installer, because that is the first customer experience. For iOS apps, the customer first sees the app icon and name and then the splash screen while launching the app. This will form the customer’s first impression of whether the app is polished or amateurish. And you’re the first customer of your app. You’ll feel better about your project and have a clearer idea of what you want your app to be if it’s packaged like a finished product from the very beginning. And you never know when you’ll need to demo it!
The corresponding Unity project is available online at http://learnunity4.com/, and, as usual, I recommend typing in the scripts rather than copying them from the online project. But there are some textures in the project files that will be used for the icon and splash screen, so, from the online project for Chapter 12, copy the additional files in the Textures folder to the Textures folder into the Textures folder of your bowling project (remember, you can drag the files into the Project View). You should have three Fugu Games splash textures of different resolutions, one splash screen displaying a book cover (of this book), and an icon texture (Figure 12-1).

Figure 12-1. The Textures for this chapter copied from http://learnunity4.com/
In the Unity Editor, bring up the Project Wizard (Open Project in the File menu), and select the bowling project as you last left it in Chapter 9, before we switched to Angry Bots. You should now be familiar with the process of switching build targets.
Bring up the Build Settings window (select Build Settings in the File menu), select iOS as the build target, and click the Switch Platform button.
If you have the Necromancer GUI installed from Chapter 9, some script errors will appear in the Console View after switching the build target to iOS, because a test script in that package wasn’t written with #pragma strict and is missing some type declarations. This can be resolved quickly by just removing GUITestScript.js from the Project View or wrapping #if !UNITY_IPHONE around all its contents (bonus points for going in and fixing the code by appending :int to the function parameters). Removing the script will disable the Necromancer GUI test scene but otherwise the GUISkin is still usable in your pause menu. All of the changes introduced by this chapter will work with or without the Necromancer GUI (but the screenshots show the Necromancer GUI because it’s prettier).
Once the asset reimport is complete, go to the Edit menu, and under Settings, select Player to bring up the Player Settings in the Inspector View. In the Cross-Platform Settings, fill in your Company Name and Product Name (the app name). Select the iOS tab to display the iOS Player Settings and fill in the bundle ID of the app (Figure 12-2).

Figure 12-2. The Player Settings for Fugu Bowl
Both the original and iOS versions of HyperBowl are portrait-mode games (and it turns out that portrait mode is best for the swipe-to-roll control that will be implemented in the next chapter), so let’s restrict this game to portrait mode (and portrait upside down, because that kind of symmetry is required on the iPad).
Therefore, set the Orientation property in the Player Settings to Auto Rotation, with only the Portrait and Portrait Upside Down options selected (Figure 12-3).
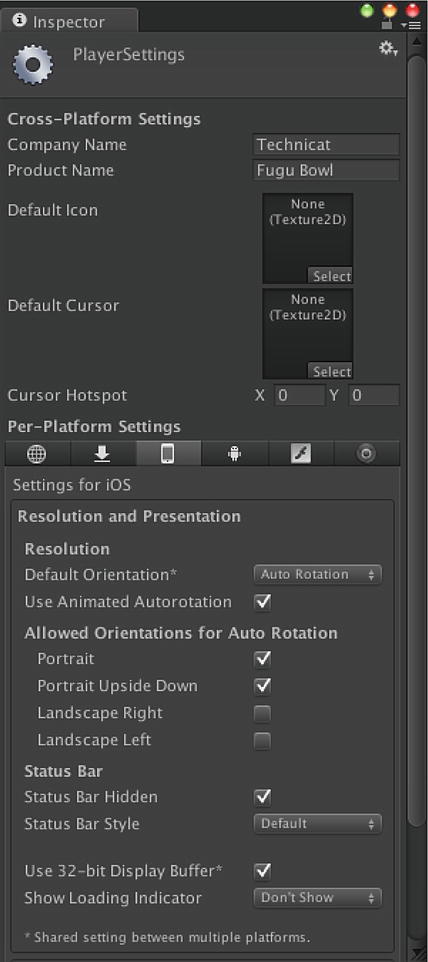
Figure 12-3. The Resolution and Presentation settings for Fugu Bowl
We now have enough set up to build and run, and the initial screen of our game looks fine, if we run it on a low-resolution iOS device (i.e., the iPhone 3GS), which has a 320 × 480 pixel screen. But on any of the newer devices, all of which have at least double the screen resolution, the pause menu looks really small, to the point where it’s difficult to read or even tap an individual button. For example, Figure 12-4 shows the pause menu on the 640 × 960 screen of an iPhone 4.

Figure 12-4. The pause menu looking tiny on a high-resolution screen
To scale the GUI, you first need to figure out the scaling factor you want to use, which is the current screen width divided by the screen width you were originally targeting. The GUI looks alright on the iPhone 3GS, at 320 × 480 pixels, so let’s say the base screen width we’re targeting is 320. So if we’re actually running on an iPhone 4, for example, at 640 × 960 pixels, we’ll have to scale up the GUI by a factor of two.
The next step is to apply the scaling factor. This can be done in UnityGUI by setting the static variable GUI.matrix, which is a transformation matrix. In computer graphics, a transformation matrix encompasses and applies a translation (change of position), rotation, and scale.
In fact, the local position, rotation and scale of a Transform Component corresponds to a 4 × 4 transformation matrix for that GameObject. And the world position, rotation and scale are calculated by combining (multiplying) all the transformation matrices of a GameObject’s parent GameObjects. In the good old days, you had to include this linear algebra code when programming in computer graphics. Now you can let the game engine hide this from you, but you’re getting a little taste of it here.
Scale the Scoreboard
Let’s start with the scoreboard, because that’s a little bit simpler, by making the modifications shown in Listing 12-1 to the FuguBowlScoreboard script. The addition is a variable named baseScreenWidth that specify the base screen width, defaulting to the 320-pixel width of the iPhone 3GS. The variable is public, so you have the option of adjusting it in the Inspector View.
Then, at the beginning of the OnGUI function, so it takes effect before any GUI rendering takes place, two lines of code construct the scaling matrix and assign it to GUI.matrix.
Listing 12-1. Scaling Added to the FuguBowlScoreboard.js Script
var baseScreenWidth:float = 320.0;

function OnGUI() {
#if UNITY_IPHONE
        var guiScale:float = Screen.width/baseScreenWidth;
        GUI.matrix = Matrix4x4.TRS (Vector3.zero, Quaternion.identity, Vector3(guiScale, guiScale, 1));
#endif
The new code is only intended for iOS (although it would work on any platform), so new lines of code are wrapped between #if UNITY_IPHONE and #endif. UNITY_IPHONE is a built-in preprocessor definition that is only defined when the build target is iOS (you can also use UNITY_IOS). The end result is that the additional code only turns into executing code for iOS and essentially disappears if you’re building to any other target (we don’t do that for baseScreenWidth because we don’t want to lose its Inspector View setting if the build target is changed).
Of the two lines of real code, the first calculates how much you need to scale the GUI, based on Screen.width, the current screen width, and baseScreenWidth, the screen width the GUI is coded to render on. The result is assigned to a local variable guiScale.
You might have wondered why we declared baseScreenWidth as a float instead of an int. Well, this is why: Screen.width is an int, and if you divide an int by an int, then the compiler assumes you want the result as an int, which works out okay if, for example, you’re dividing 640 (iPhone 4) by 320 and end up with 2. But if you’re running on an iPad 2, then you would be dividing 768 by 320, and the result will round down to 2, which is wrong in this case. But as long as one number in the operation is a float, then the compiler will treat the whole thing as a floating point computation.
Caution Watch out for operations where you’re supplying ints as inputs and expecting float results. It’s a common source of errors.
The result is passed to a call to Matrix4x4.TRS, which constructs a 4x4 matrix with a translation, rotation and scale. The translation is Vector3.zero (x, y, and z are 0), Quaternion.identity (the identity quaternion represents no rotation), and a Vector3 representing the scale. The scale factor based on the screen size is applied in the x and y directions, and the z-axis is left unscaled since that’s the direction pointing into the screen.
Scaling the pause menu is almost exactly the same process. Let’s add the same baseScreenWidth public variable and the same code to set GUI.matrix in the beginning of the OnGUI function in the FuguPause script (Listing 12-2).
Listing 12-2. Scaling the Pause Menu in FuguPause.js
var baseScreenWidth:float = 320.0;

function OnGUI () {
        if (IsGamePaused()) {
                 #if UNITY_IPHONE
                 var guiScale:float = Screen.width/baseScreenWidth;
                 GUI.matrix = Matrix4x4.TRS (Vector3.zero, Quaternion.identity, Vector3(guiScale, guiScale, 1));
                 #endif
                 if (skin != null) {
                         GUI.skin = skin;
                 } else {
                         GUI.color = hudColor;
                 }
                 switch (currentPage) {
                         case Page.Main: ShowPauseMenu(); break;
                         case Page.Options: ShowOptions(); break;
                         case Page.Credits: ShowCredits(); break;
                 }
        }
}
However, one more alteration is required. The BeginPage function centers the GUI using Screen.width, so you need to use baseScreenWidth instead. Listing 12-3 shows this code change.
Listing 12-3. Modified BeginPage Function to Work with Scaled GUI
function BeginPage(width:int,height:int) {
#if !UNITY_IPHONE
         GUILayout.BeginArea(Rect((screenWidth-width)/2,menutop,width,height));
#else
         GUILayout.BeginArea(Rect((baseScreenWidth-width)/2,menutop,width,height));
#endif
}
Notice how we used #if !UNITY_IPHONE. The exclamation mark means not, so the first line of real code exists for any built target except iOS and the other line is just for iOS. We could have flipped the order of the two lines of code and started with #if UNITY_IPHONE.
While we’re at it, we should remove the Quit button from the pause menu, as Apple rejects any app with a quit option. The Quit button in the ShowPauseMenu function of the FuguPause script is already excluded from Unity webplayer builds by checking the UNITY_WEBPLAYER preprocessor definition, so we can just add a check for UNITY_IPHONE (Listing 12-4).
Listing 12-4. Excluded Quit Button from the iOS Build of FuguPause.js
function ShowPauseMenu() {
        BeginPage(150,300);
        if (GUILayout.Button ("Play")) {
                 UnPauseGame();
        }
        if (GUILayout.Button ("Options")) {
                 currentPage = Page.Options;
        }
        if (GUILayout.Button ("Credits")) {
                 currentPage = Page.Credits;
        }
#if !UNITY_IPHONE && !UNITY_WEBPLAYER
        if (GUILayout.Button ("Quit")) {
                 Application.Quit();
        }
#endif
        EndPage();
}
The Quit button is only included in the build #if !UNITY_IPHONE && !UNITY_WEBPLAYER, which is true when the build target is not iOS and not a webplayer. When you build the game now, you should see the pause menu running on a device (or the iOS Simulator) scaled up with the screen resolution and missing the Quit button, like the iPhone 4 screenshot in Figure 12-5.
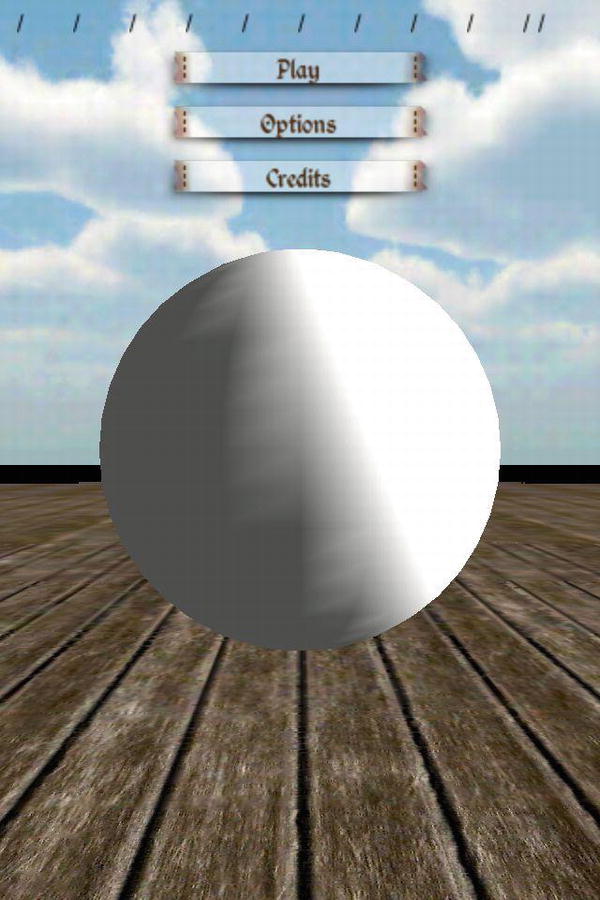
Figure 12-5. The scaled pause menu
By default, the icon for your app will be the Unity logo. Figure 12-6 shows the icons for several demo apps published by Unity Technologies on the App Store. Aside from Angry Bots, they all have the default Unity icon, albeit an older one because they were built with Unity 3 (and at the time of this writing haven’t been updated).
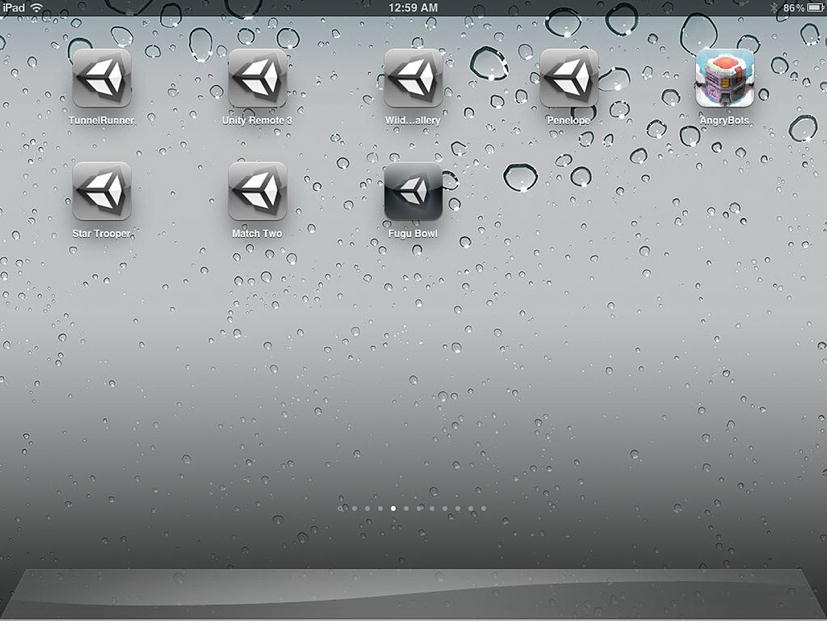
Figure 12-6. Apps with the default Unity icons
Figure 12-6 also shows the icon for our Fugu Bowl app if we were to build it right now. It looks a bit different because it’s published with Unity 4 and also has the gloss that is automatically applied by Apple, since we didn’t select Prerendered Icon in the iOS Player Settings.
To customize the icon, you can drag any texture into the Default Icon field of the Player Settings. Let’s use the Icon1024 texture in the Textures folder, copied from the project for this chapter at http://learnunity4.com/. I often indicate the original texture size in the file name (a 1024x1024 texture in this case), which saves a lot of time in assigning icon and splash screen textures.
Since you’re using the texture as an icon, you should adjust the import settings appropriately.
Select the Icon1024 texture in the Project View, and then in the Inspector view, set the Texture Type to GUI instead of Texture (Figure 12-7). This will prevent Unity from applying settings that are suitable for textures with 3D models but not for GUI display. For example, textures used with models should have dimensions that are powers of 2, such as 256 × 256 or 512 × 512, because that’s what graphics hardware likes to operates with, and the textures are stretched around models, anyway. But, generally, GUI textures should stay at their original resolution, since they’re usually sized according to their intended display (which is usually not at a power of 2 resolution).You can switch the Texture Type to Advanced to compare the underlying settings of the Texture and GUI preset texture types, i.e., select Texture then switch to Advanced, then select GUI and switch to Advanced. And within Advanced, you can override any of the preset values for more control over the import settings.

Figure 12-7. The import settings for the icon texture
Tip If you’re going to use a texture for two different purposes, duplicate it so you can apply different import settings for each.
Below the Texture Type area is where texture maximum size and compression level is specified. Unity will generate a warning at build time if you have used a compressed texture as an icon, pointing out correctly that compressed textures may not look good as icons. So select the Default tab so these settings apply to all platforms unless overridden, set the Max Size as 1024 to avoid scaling the texture, and set Format to TrueColor for full color resolution and no compression. Click Apply to reimport the texture with the adjusted settings, and the Preview at the bottom will reflect the new format, size, and memory usage.
Now drag the icon texture into the Default Icon field of the Player Settings in the Cross Platform area. Examine the Icon foldout of the iOS Settings (Figure 12-8). As long as the Override for iPhone check box is not selected, automatically scaled versions of the Default Icon will appear for all the other icon sizes (Figure 12-8).

Figure 12-8. The Default Icon scaled to different icon sizes in the Player Settings
The various icon sizes correspond to the screen resolutions of the various iOS devices:
- 57 × 57: Any iPhone or iPod touch preceding the fourth generation (the iPhone 3GS or the third-generation iPod touch)
- 114 × 114: Fourth generation and later iPod touch and iPhone
- 72 × 72: The original iPad, iPad 2, and iPad Mini
- 144 × 144: The “new” iPad (or as I like to call it, the iPad 3)
Ideally, there would be an icon tailored for each size, in which case you would check mark the Override box, and then drag the various versions of your icon to each appropriate box. Any box that you leave unfilled with use the Default Icon. But Unity does a good job of scaling textures down (it is far preferable to scale down then up), so I often reuse the same 1024 × 1024 texture that I upload for the iTunes Connect app description.
Tip If you don’t use the same icon file for iTunes Connect and the Player Settings, make sure the various icons at least resemble each other. I’ve had an app rejected because its icon iTunes Connect did not resemble the app icon as displayed on a device.
I recommend you always select the Prerendered Icon option to avoid the gloss that otherwise would be automatically added by Apple.
Besides the optional shine, the portion of the build executed from Xcode also automatically rounds the corners of the icon and adds a drop shadow. So don’t do that yourself! Just keep it square with sharp corners and no special borders.
All iOS apps display a static “splash” screen on startup. Like the default app icon, the default splash screen in a Unity-built app shows the Unity logo (Figure 12-9).

Figure 12-9. The default Unity splash screen
If you’re using Unity iOS Basic, you’re stuck with the default splash screen. But if you’re using Unity iOS Pro, you can supply your own splash screen in a manner similar to the way you customized the app icon.
The Splash Image foldout is located beneath the Icon foldout in the iOS Settings, and, as with the icon selection, it has slots for multiple resolutions appropriate for the various iOS screens and also for both portrait and landscape orientations (Figure 12-10):
- Mobile splash screen: 320 × 480 for any iPod touch or iPhone preceding the fourth generation (i.e., the iPhone 4)
- iPhone 3.5”/Retina: 640 × 960 for the Retina display of the iPhone 4, iPhone 4S, and fourth generation iPod touches
- iPhone 4”/Retina: 640 × 1136 for the iPhone 5 and fifth-generation iPod touch
- iPad Portrait: 768 × 1024 for the original iPad and the iPad 2
- iPad Landscape: 1004 × 768 for the original iPad and the iPad 2
- High-Res. iPad Portrait: For the Retina display of the new iPad (the iPad 3)
- High-Res. iPad Landscape: For the Retina display of the new iPad (the iPad 3)

Figure 12-10. Splash screens for different screen resolutions and orientations
There is no single default splash screen that Unity will automatically resize for all the splash resolutions, so you have to populate the splash screen boxes for the resolutions and orientations that your game will use. Since only Portrait and Portrait Upside Down orientations (along with Auto Rotation) are selected in the Resolution and Presentation settings, only the portrait splash screens need to be assigned. Like icons, the splash screens can be any textures, and Unity will scale them as needed, but you’ll get the best results with textures that are already the target size. You’ll want to use something appropriate for your company and game.
Note Apple recommends that the splash screen resemble an actual screen of your game, but it’s typical to just present a company logo. Personally, I think it’s confusing to have a screen that acts like an unresponsive game screen.
Drag each splash screen texture from the Textures folder into the matching Splash screen box in the Player Settings (Figure 12-10): Fugu320x480 into Mobile Splash Screen, Fugu640x960 into iPhone 3.5”/Retina, and Fugu1536x2048 into High Res. iPad Portrait. The iPhone 4”/Retina needs a texture, so drag the closest match, Fugu640x960 into it. And Fugu1536x2048 can be used for iPad Portrait.
A Second Splash Screen
Although you can’t change the splash screen in Unity iOS Basic, you can make a splash screen that appears right after the built-in one. You just need to make a scene that displays the splash texture on the screen for a few seconds and then loads the first game scene. This can also be useful with Unity iOS Pro if you want to have more than one splash screen. For example, in HyperBowl I have some HyperBowl artwork displayed by the built-in splash screen and then my Fugu Games logo in the second splash screen.
Invoke the New Scene command from the File menu to create a new empty scene. Save it as Splash. Bring up the Build Settings window and click Add Current to add the new scene to your build. It will appear at the bottom of the list of scenes, so drag it up to the top. Its scene index should now display as 0, meaning it’s the first scene loaded (Figure 12-11).

Figure 12-11. The Build Settings with a splash scene added
The easiest way to display a full-screen texture is with a GUITexture. In the splash scene, go to the Create Other submenu in the GameObject menu and choose GUI Texture (Figure 12-12).

Figure 12-12. Creating a GUITexture
Rename the resulting GameObject to Screen and examine it in the Inspector View. The newly created GUITexture displays a Unity watermark centered in the screen (Figure 12-13). Unlike UnityGUI, GUITexture uses normalized screen coordinates: x and y range from 0 to 1, where 0,0 is the top left corner of the screen and 1,1 is the bottom right, so setting x and y to 0.5 each specifies that the texture is centered on the screen.

Figure 12-13. A default GUITexture
Let’s replace the watermark texture with our splash texture. Drag the LearnUnityCover texture from the Textures folder in the Project View into the Texture field of the GUITexture component. To make the texture stretch across the entire screen, change the scale to 1,1,1 and set all the Pixel Inset values to 0 (Figure 12-14).

Figure 12-14. A full-screen GUITexture
Now if you run the game, you’ll see the splash texture stretched to fill your screen. When running on a device or the iOS Simulator, it will appear after the built-in splash screen (Figure 12-15).

Figure 12-15. The full-size secondary splash screen
As a splash screen, this scene should stay up for just a few seconds and then begin to load the game scene. Like any real game level, this scene could use a main logic script, so create a new JavaScript, name it FuguSplash, and add the contents of Listing 12-5.
Listing 12-5. Wait-and-Load code in FuguSplash.js
var waitTime:float=2; // in seconds
var level:String;     // scene name to load

function Start() {
        yield WaitForSeconds(waitTime);
        Application.LoadLevel(level);
}
There are two public variables that can be customized in the Inspector View: the time (in seconds) to wait before loading the next scene and the name of the scene to load. The Start function is really simple; it waits for the built-in coroutine WaitForSeconds to finish, passing in the specified wait time, and then it calls Application.LoadLevel to load the level you specified. In the process, the current scene will be unloaded so the splash screen will disappear.
Let’s add the script to the splash scene. Create an empty GameObject, name it Splash, and attach the FuguSplash script to it. Then in the Inspector View, enter the name of the bowling scene in the Level field (Figure 12-16). Now if you run the game, either in the Editor or in an iOS build, the splash screen will appear for a couple of seconds and then the bowling scene will appear.

Figure 12-16. The FuguSplash script added to the splash scene
Just a few words about WaitForSeconds; it is convenient, but you could have implemented your own version. Listing 12-6 shows a hypothetical implementation.
Listing 12-6. An Implementation of WaitForSeconds
function WaitForSeconds(waitTime:float) {
        var startTime:float = Time.time;
        while (waitTime > Time.time-startTime) {
                 yield;
        }
}
Note that the specified wait time is game time, not real-world time, so WaitForSeconds isn’t useful, for example, while the game is paused and game time is stopped. But if you need to wait in real seconds, you can use the hypothetical implementation of WaitForSeconds and replace Time.time with Time.realtimeSinceStartup, which returns the time in real-world seconds since the game was started (Listing 12-7).
Listing 12-7. A Real-Time Version of WaitForSeconds
function WaitForSecondsRealtime(waitTime:float) {
        var startTime:float = Time.realtimeSinceStartup;
        while (waitTime > Time.realtimeSinceStartup-startTime) {
                 yield;
        }
}
Display the Activity Indicator
When something is taking a while, it’s nice to have some kind of loading indicator. For the initial scene load, there’s a convenient way to display the iOS spinner that you often see in apps as an activity indicator. You can enable this by choosing one of the activity indicator styles for Show Loading Indicator at the bottom of the Resolution and Presentation foldout in the Player Settings (Figure 12-17). Given the splash screen is providing a mostly white background, Gray is the best style (the other styles are white).

Figure 12-17. The Player Settings with Gray Show Loading Indicator selected
Now when you run the game in an iOS build, you’ll see the Gray activity indicator spinning on the built-in splash screen.
It would be nice to use the activity indicator elsewhere, especially when loading other levels. Fortunately, Unity has a scripting interface for the activity indicator, in the form of static functions in the Handheld class. We just need a script that calls those functions to start and stop the activity indicator. Create a new JavaScript called FuguSpinner and add the contents of Listing 12-8 to the script.
Listing 12-8. Starting and Stopping an Activity Indicator in FuguSpinner.js
#pragma strict

#if UNITY_IPHONE
function Start() {
        DontDestroyOnLoad(this.gameObject);
        Handheld.SetActivityIndicatorStyle(iOSActivityIndicatorStyle.WhiteLarge);
        Handheld.StartActivityIndicator();
}

function OnLevelWasLoaded() {
        Handheld.StopActivityIndicator();
        Destroy(gameObject);
}
#endif
In the Start callback, the call to Handheld.SetActivityIndicatorStyle specifies the appearance of the activity indicator. The available options, represented by the iOSActivityIndicatorStyle enum, match the Loading Indicator options available in the Player Settings. We’ll choose iOSActivityIndicatorStyle.WhiteLarge, since we know the secondary splash screen has a mostly black background.
The call to Handheld.StartActivityIndicator makes the activity indicator visible in the center of the screen. The Unity Scripting Reference documentation for Handheld.StartActivityIndicator says that the activity indicator will be activated after the current frame, so you need to yield at least a frame before calling Application.LoadLevel. Otherwise, the indicator won’t appear until after the new level is loaded, which defeats the purpose of activating the indicator in the first place. We don’t have to worry about that, here, because we know the FuguSplash script is yielding for some number of seconds before loading the next scene.
However, the activity indicator will keeps going even after the new scene is loaded by FuguSplash. To stop the activity indicator after the scene has finished loading, this script has to survive the scene load, which is why DontDestroyOnLoad is called at the beginning of the Start function, passing it the GameObject this script is attached to. This ensures the GameObject, and thus this script, survives when the next scene is loaded.
Because the GameObject survives the scene load, we can be assured the MonoBehaviour callback OnLevelWasLoaded is called after the new scene has finished loading. This is a perfect place to turn off the activity indicator with a call to Handheld.StopActivityIndicator. At this point, the script and the GameObject it’s attached to aren’t needed, anymore, so Destroy is called on the GameObject.
Tip It’s a good practice to destroy objects when you don’t need them anymore. Besides freeing up space, you want to avoid the worst case where you loop back into the scene where the object was originally created, and then you end up with two versions of the same object!
Note that DontDestroyOnLoad and Destroy are both static functions in the Object class, so just as we called Instantiate in Chapter 7, instead of calling Object.Destroy, for example (or UnityEngine.Object.Destroy to avoid the name clash with System.Object class in .NET), here you’re implicitly calling this.Destroy, which works because this is an Object.
Attach the FuguSpinner script to a new GameObject in the scene, called Spinner. Now when you Build and Run on a device, the activity indicator appears in the center of the splash image and disappears after the next scene has loaded (Figure 12-18).

Figure 12-18. Secondary splash screen with an activity indicator
Explore Further
Now our bowling game for iOS looks like a real app! It has an icon, a splash screen (or two), an activity indicator spinning away on the splash screen, it runs in portrait orientation, and the graphics scale to fit the screen including the UnityGUI scoreboard and pause menu. The menu is even automatically functional in iOS, with its buttons responding to taps on the screen. We can’t quite say that about the actual gameplay, but we’ll implement touchscreen game controls in the next chapter.
Reference Manual
Once again, we’ve spent some time in the Player Settings (a recurring theme now that we’re making iOS builds), so the Reference Manual documentation on the Player Settings is worth a review.
We used just one new Component in this chapter, a GUITexture Component for our splash screen image. GUITexture and its parent class GUIElement have no relation to UnityGUI (in fact, GUITexture and its sibling GUIText were the closest things to user interface elements before UnityGUI arrived).
This chapter was devoted largely to icon and splash screen images, which should all be imported using the GUI preset import settings, which are documented fo Texture2D in the Asset Components section.
Scripting Reference
The one new UnityGUI feature introduced in this chapter was the “matrix” variable in the “GUI” class. At the time of this writing, the Scripting Reference page for that variable is nearly blank, but the “GUIUtility” class has some better-documented functions, including “ScaleAroundPivot”, which can be used as an alternative to setting GUI.matrix (in fact, it is a helper function that sets GUI.matrix internally.
We only used the “Matrix4x4.TRS” constructor, but the Scripting Reference documentation on “Matrix4x4” is not bad, explaining how matrices are used in Unity and listing many class functions that will be useful if you ever have to start messing around with matrices.
The yield instruction “WaitForSeconds” was already introduced in Chapter 8 for the game over state, and it turns out to be convenient fordisplaying a splash screen a certain number of seconds. We took this opportunity
to explore hypothetical implementations of WaitForSeconds and compare the static “Time” variables “Time.time” and “Time.realTimeSinceStartup”. It’s an important distinction when the pause menu is up and game time is suspended.
We called the static “Application” function “LoadLevel” to transition from the splash scene to the bowling scene, but we also could have called an asynchronous version of the function, “Application.LoadLevelAsync”. As an asynchronous function, it doesn’t suspend Unity while it’s loading a new scene, so, really, you could have anything happen in the splash scene while waiting for the new scene to finish loading.
As demonstrated with our use of the activity indicator functions in the “Handheld” class, you can make Objects survive across scenes loads by calling “DontDestroyOnLoad” called on them and “Destroy” them when they’re not needed anymore. These are both static functions in the “Object” class, which is always worth reading up on since it’s the parent class of everything that can be in a scene.
To display and hide the activity indicator, we called the “StartActivityIndicator” and “StopActivityIndicator” functions in the “Handheld” class. See the documentation on the activity indicator functions about the necessity to yield before performing a scene load. “iOSActivityIndicatorStyle” enumeration for a list of the available activity indicator styles.
The Handheld class is worth a looking over, as it contains all the scriptable Unity mobile features (except those specific to iOS). For example, the Handheld class has a static “PlayFullScreenMovie” function that can play a movie from local storage or streamed from a web site, which is another possibility for a cool-looking splash scene. The Scripting Reference page for that function has details on the supported video formats and how to control the movie player (based, at the time of this writing, on the native iOS movie player, MPMoviePlayerController).
iOS Developer Library
As we explore Unity iOS features, more and more of the documentation in the iOS Developer Library is relevant. Remember, that documentation is available both on the Apple Developer site (http://developer.apple.com/) and from the Xcode Organizer window.
One document worth reading in its entirely, found in the “User Experience” topic of the iOS Developer Library, is Apple’s iOS Human Interface Guidelines. The original guidelines dating back to the original Mac were the gold standard in user interface best practices. Since then, the guidelines have been split into Mac and iOS versions, but you should read the iOS version if only to avoid app rejections. Related to this chapter, the Custom Icon and Image Creation Guidelines lists requirements and recommendations for creating app icons and splash screens (known as “launch images” in their terminology).
Many Unity classes that are mobile-specific or iOS-specific will have an Objective-C counterpart. For example, the activity indicator controlled by Unity’s Handheld class is accessed in Objective-C via the UIActivityIndicatorView class, also found in the User Experience topic in the Windows and Views section.
Asset Store
The Transitions Manager from DFT Games, available free on the Unity Asset Store, provides more sophisticated introductory screen behavior than what has been described in this chapter, including fading the screen in and out and using multiple screens. I use the Transitions Manager in all my apps.
Books
Josh Clark’s Tapworthy: Designing Great Apps is the book that convinced me to eschew automatic icon gloss and always select Prerendered Icon in the Unity Player Settings. It’s also a good treatment of app design in general.
There are plenty of textbooks on linear algebra (and even a hefty “matrix” article on http://wikipedia.org/), but any computer graphics book will have a primer on matrix math. For example, Real-Time Rendering (http://realtimerendering.com/) has an appendix on “Some Linear Algebra.”