
Let’s Dance! Animation and Sound
Of the three ways to move GameObjects in Unity, scripted control of the Transform Component was covered in the previous chapter, and physics will play a significant role in the bowling game example initiated in the next chapter. Scripted movement is ubiquitous. For example, even in the upcoming bowling game, which relies heavily on physics to control and simulate the bowling ball and its collision with the floor and bowling pins, the Camera following behavior is implemented by a script that modifies its Transform Component (much like the MouseOrbit script used in the cube scene). Not only that, every moving GameObject is reset between rolls and frames by restoring the values in its Transform Component.
Before proceeding on to that bowling game, you’ll spend a little more time in this chapter building on the cube scene constructed so far, enhancing it with a dancing character animation to get a feel for Unity’s animation support. And it wouldn’t be a dance demo without music, so the scene will incorporate looping sound. It will still be a non-physical and only mildly interactive scene, but hopefully it will provide a pretty and entertaining way to introduce Unity’s animation and audio support before delving into a lot of physics (a big topic, spanning two chapters) and even more scripting (a bigger topic, spanning the rest of this book).
Quality animations, particularly character animations, are not easy to create if you’re not a professional. The same goes for music. Fortunately, there are plenty of music and character animation packs on the Unity Asset Store, many of them free, including the Skeletons Pack and General Music Set used in this chapter. Those assets are not included in the corresponding project on http://learnunity4.com/, but that project can be used as a starting point if you’re just jumping in at this point and don’t have the cube scene constructed from the previous chapter.
Import the Skeletons Pack
As demonstrated in the previous chapter, you can search the Asset Store from within the Project View. Type “skeleton” in the search field, and the skeleton asset from the Skeletons Pack will show up in the Free Assets results (Figure 5-1).

Figure 5-1. The Project View search results for the Skeletons Pack
Tip Search terms in the Project View are matched against individual assets already imported in the project and available for import from the Asset Store, but the Asset Store portion of the search can be disabled in the Unity Preferences.
Select the skeleton asset and confirm in the Inspector View that the package is indeed the Skeleton Pack (Figure 5-2). You can click the Import package button to import the Skeleton Pack immediately, or you can click the Open Asset Store button to see the full description in the Asset Store window first and import the package from there.

Figure 5-2. The Inspector View of the Skeletons Pack
However you choose to import the Skeletons Pack, the installation will add a SkeletonData folder in the Project View along with several prefabs in the Prefabs folder (Figure 5-3).
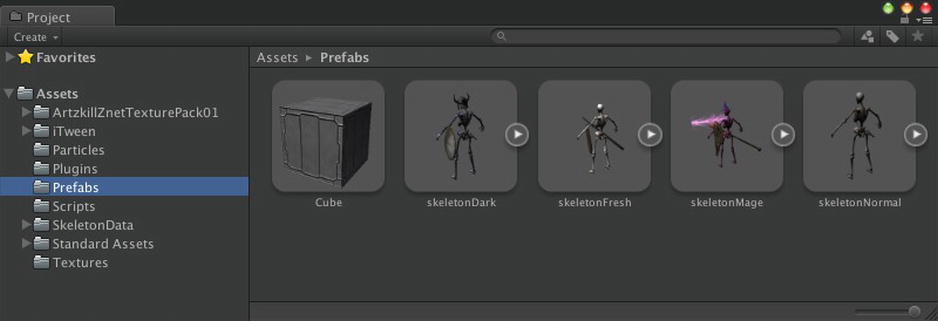
Figure 5-3. The Project View of the Skeletons Pack prefabs
Add a Skeleton
The four prefabs installed by the Skeletons Pack all have the same skeleton but sport different gear, such as a sword and shield. However, it turns out the prefabs with armed skeletons look like they’re chopping their own limbs off when dancing, so let’s just stick with the skeletonNormal prefab, which has just the bare bones (ha!) skeleton. Add an instance of the skeletonNormal prefab to the scene by dragging that prefab into the Hierarchy View (Figure 5-4).

Figure 5-4. The cube scene with the skeleton active and the Cubes deactivated
The skeletonNormal GameObject has an Animation Component that references the animation data of the skeleton. skeletonNormal also has two child GameObjects. One, named Bip01, is actually a hierarchy of GameObjects that represents the bones of the skeleton. As the skeleton moves, so does the arm, and any hand movement is relative to the arm, and so on. The skeleton hierarchy is reminiscent of the “Dem Bones” song—“The thigh bone’s connected to the hip bone . . .”
The other child GameObject, skeleton, is a GameObject with a SkinnedMeshRenderer Component. SkinnedMeshRenderer, like MeshRendererer, is a subclass of Renderer. However, the SkinnedMeshRenderer Component renders the Mesh that wraps around the skeleton and follows its joints as they move. The Mesh essentially forms the skin around a skeleton, so the process of mapping such a Mesh to a skeleton is often called skinning.
The skeletonNormal GameObject also contains a couple of particle effects, implemented with ParticleEmitter Components. Particle effects consist of many tiny animated primitives and are great for creating flames, explosions, smoke, or any kind of sparkly effects.
Note The particle effects included in the Skeletons Pack work with Unity’s Legacy particle system, not the newer Shuriken particle system introduced in Unity 3.5. The Legacy system uses the ParticleEmitter Component, while Shuriken uses the ParticleSystem Component.
Hide the Cubes
This scene is all about the dancing skeleton, so you can dispense with the Cubes that featured in the previous two chapters. Instead of deleting the Cubes from the scene (by selecting them and invoking Delete from the Edit menu or using the Command+Delete shortcut), they can be made invisible, out of sight and out of mind, by deactivating them. Select the parent Cube in the Hierarchy View, uncheck the top-left check box in the Inspector View, and the entire tree of Cubes in the Hierarchy View is now grayed out to indicate they are inactive (Figure 5-4).
All the child Cubes are effectively inactive because the parent’s active status overrides the children’s. In other words, a GameObject is really active only if it’s marked as active and its parent is marked as active and its parent’s parent is marked as active, and so on. Any inactive GameObject has its Components effectively disabled. Its Renderer Component no longer renders, its Collider Component no longer collides, and any attached scripts do not have their callbacks called, with the exception of OnEnable and OnDisable.
Orbit the Skeleton
Although the Cubes are deactivated, the MouseOrbit script on the Main Camera still has the main Cube as its target. The Main Camera should now orbit the skeleton, so select the Main Camera in the Inspector View and then drag the skeletonNormal GameObject from the Hierarchy View into the Target field of the MouseOrbit script (Figure 5-5).
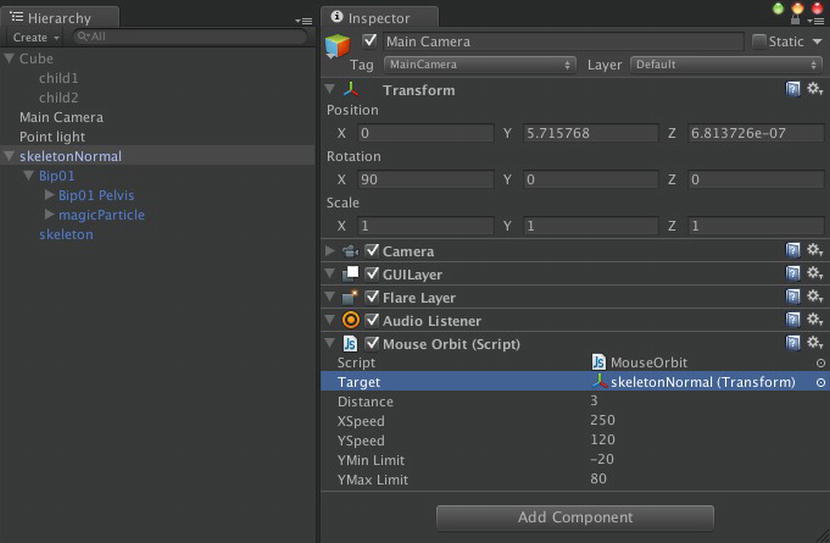
Figure 5-5. The MouseOrbit script on the Main Camera with a skeleton target
Now when you click Play, the Main Camera orbits the skeleton as you move the mouse (Figure 5-6). As a bonus, since the skeleton prefab includes a particle effect, the skeleton appears to be standing amid a sparkly haze.

Figure 5-6. The Game View of an idle skeleton
Make the Skeleton Dance
Right now the skeleton just shuffles around a little instead of dancing. If you select the skeletonNormal GameObject and examine it in the Inspector View, you can see the GameObject has an Animation Component with a field that references an “idle” AnimationClip (Figure 5-7).

Figure 5-7. Changing the skeleton’s position and animation
Notice also that the Play Automatically checkbox is checked, which is why the animation runs as soon as you click Play. This option would be unchecked if the animation is intended to be initiated by a script at some time during the game.
To replace the idle AnimationClip with a dancing AnimationClip, click the circle to the right of “idle” to bring up the AnimationClip selection list (Figure 5-8). Select the AnimationClip named “dance.”

Figure 5-8. An AnimationClip selection list
Now when you click Play, the skeleton dances! (Figure 5-9).

Figure 5-9. The dancing skeleton
Make the Skeleton Dance Forever
If you let the skeleton dance for a while, it eventually stops when the AnimationClip ends. But the AnimationClip can be set to loop. In the Inspector View of the skeletonNormal GameObject, click the reference to the dance AnimationClip in the Animation Component. The Project View will show the selected the AnimationClip and associated skeleton Mesh along with the skeleton’s other AnimationClips (Figure 5-10).

Figure 5-10. Looping the animation
The Inspector View displays a single stretch of animation data that’s split into the various AnimationClips. Select the dance clip in that list, and below, the Wrap Mode will display as Default. Change the Wrap Mode to Loop and click the Apply button (just below the Wrap Mode field).
Now when you click Play again, the skeleton will dance, and dance, and dance.
Note This skeleton uses Unity’s Legacy animation system. You can verify this by clicking the Rig button shown in Figure 5-10 and see that the Legacy check box is checked. Unity 4 introduced a new animation system called Mecanim, which, among other features, allows you to apply an animation to different skeletons (or avatars, as they are called in Mecanim).
Watch the Hips
Now that the skeleton is dancing properly, let’s improve the Main Camera view of the character. Notice how you seem to be looking at the character’s feet? That’s because the origin (or pivot point, as 3D modelers may know it) of the character is typically at the feet instead of the center of the model. This convention makes it easier to position the character so that its feet are correctly placed on the floor or ground.
One way to have the Main Camera orbit around the midsection of the skeleton is to create a new GameObject for the MouseOrbit target and make it a child of the skeletonNormal GameObject. But skeletonNormal already has child GameObjects representing the bones of the skeleton. In fact, the hip bone, or rather the GameObject named Bip01 Pelvis, is perfect for the MouseOrbit target. Drag the Bip01 Pelvis GameObject into the MouseOrbit Target field and shorten the distance to 2 so that the skeleton fills up more of the screen when you play (Figure 5-11). Then when you click Play, in the Game View you’ll be looking at and orbiting the skeleton’s hips (Figure 5-12).

Figure 5-11. The Inspector View of the Main Camera orbiting around the hips
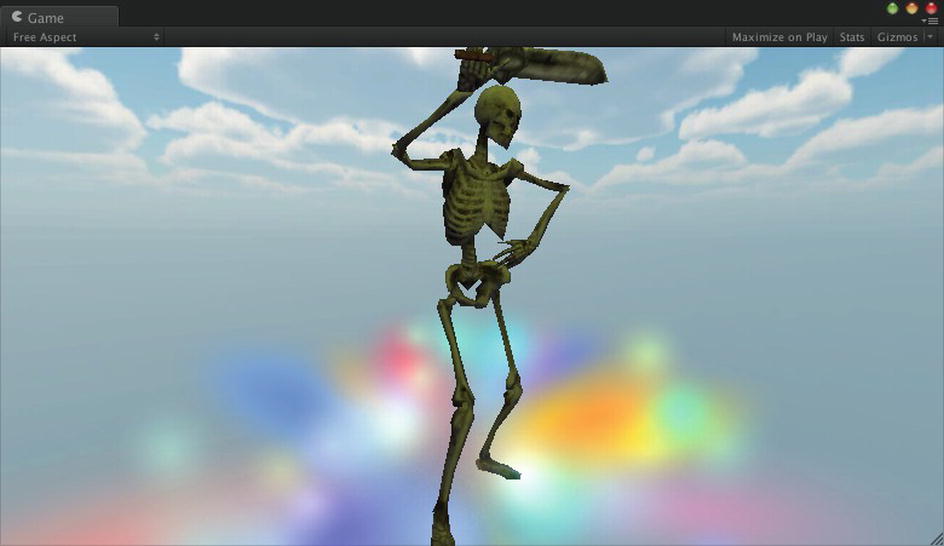
Figure 5-12. The Game View with the Main Camera looking at the hips
By the way, you may have noticed that when you drag a GameObject into the Target field of the MouseOrbit script, the Inspector View appends (Transform) to the displayed GameObject name. If you examine the MouseOrbit script, you can see that the target variable is indeed declared to be of type Transform. Unity’s drag-and-drop system conveniently allows you to drag a GameObject from the Hierarchy View into a field of type Transform and automatically assigns the Transform Component of the GameObject to the variable.
Other Components of a GameObject can be used as public variable types, too. But I like to keep the GameObject-Component relationship clear in my own scripts, so I stick to declaring variables as GameObjects in these situations and access the Components through the GameObjects.
Add a Dance Floor
The skeleton looks kind of strange dancing in the sky, so let’s give it a floor to dance on. You could make another Cube and scale it, but there’s a more suitable primitive GameObject that you can use—a Plane. Like the Cube, you can make a Plane from the Create submenu of the GameObject menu on the menu bar. But this time, try the Create button on the top left of the Hierarchy View (Figure 5-13).
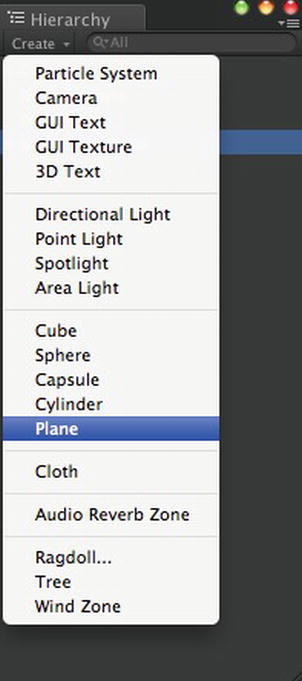
Figure 5-13. Creating a Plane using the Create menu in the Hierarchy View
Note that all the items in the Create menu are available in the GameObject menu on the menu bar, but not all the items that can be created from the GameObject menu are available in the Hierarchy View Create menu.
Now a Plane is listed in the Hierarchy View and displayed in the Scene View (Figure 5-14). A Plane is like a flat Cube—it has a top and bottom but no sides and no height. If we change its x and z scale in its Transform Component, the Plane will stretch out, but changing the y scale (height) makes no difference.

Figure 5-14. The Scene View of the new Plane
Remember, the skeleton position was set to (0,0,0), and the skeleton’s origin is at the bottom, coinciding with the skeleton’s feet. Select the new Plane that’s now shown in the Hierarchy View, and then, in the Inspector View, set the Plane’s position also to (0,0,0), so that the floor is placed at the skeleton’s feet. Specifically, the y positions (height) of the feet and floor that have to match up.
That’s a pretty bland-looking floor, which could benefit from a Material with a texture. The Free Artskillz Texture Pack is already imported and used for the Cube, so you might just as well use it here for the floor. With the cubes, you just dragged a texture onto the Cube in the Hierarchy View and then modified the resulting Material in the Inspector View.
This time around, go straight to the Inspector View of the Plane (Figure 5-15) and change its shader to Bumped Specular. Then drag a main texture and its associated bump (normal map) texture from the Free Artskillz Texture Pack (in the figure, I’ve chosen the Floor03 and Floor03_n textures from the Fantasy folder of the pack).

Figure 5-15. Editing the Plane position and material
Now when you click Play, the skeleton is dancing on a floor! (Figure 5-16).
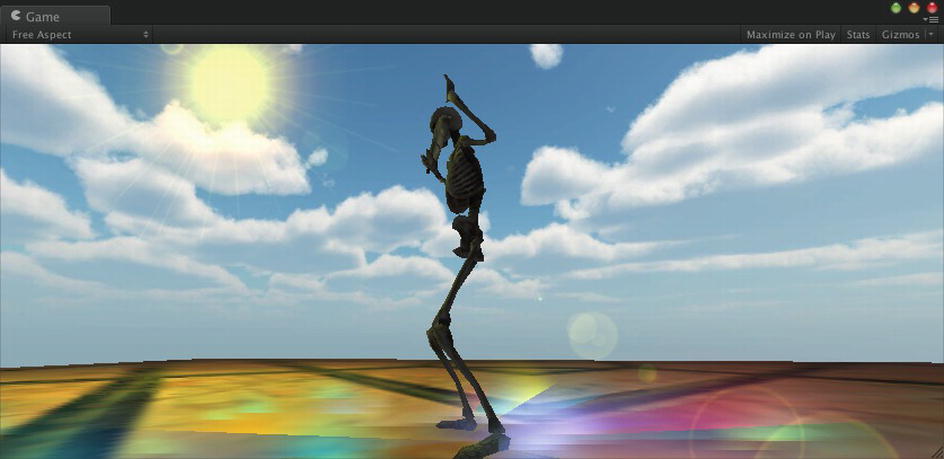
Figure 5-16. The skeleton dancing on a textured Plane
Add a Shadow (Pro)
One of the Light Component properties discussed in Chapter 3 is Shadow Type. Now that the scene has a floor that shadows can be cast on, let’s try out this feature.
Note Dynamic shadows (shadows that move according to the shadow caster’s movement) is a Unity Pro and Unity iOS Pro feature, so if you’re not running Unity Pro right now, you can still follow along with this exercise, but you won’t see the intended shadow.
Select the Point Light (either in the Hierarchy View or Scene View), and in the Inspector View (Figure 5-17), change the Shadow Type from None to Soft Shadows. This provides shadows with a nice soft fuzzy border (the penumbra of the shadow), which looks better than the sharp borders of Hard Shadows.
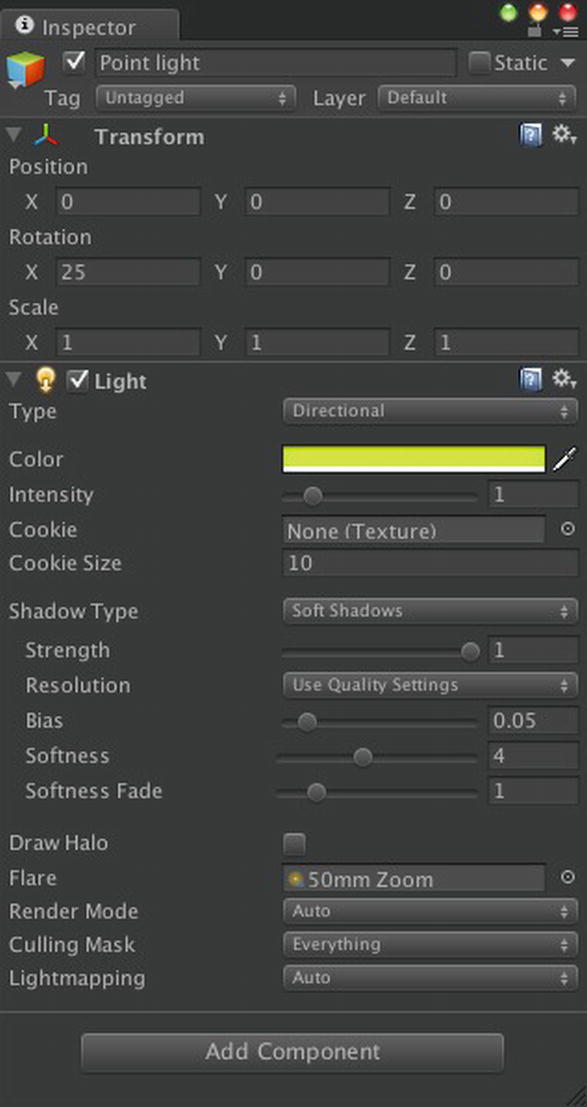
Figure 5-17. A Point Light converted to a Directional Light with Soft Shadows
Now you should change the Type from Point Light to Directional Light. Point Lights can cast shadows, but only Hard Shadows, and only when rendering in Deferred Mode, which isn’t available in Unity iOS. Actually, Soft Shadows aren’t available in Unity iOS at all, but they look so good, let’s try them out here.
Whereas a Point Light radiates light in all directions from a position, a Directional Light is treated as if it were infinitely far away, and thus its position doesn’t matter but its rotation does. So in the Transform Component, you can enter 0,0,0 for the position (which doesn’t really matter for a Directional Light, but it looks cleaner than having an arbitrary position), and 25,0,0 for the rotation, indicating the Light is rotated 25 degrees around the x axis. In other words, the Light is looking down 25 degrees from horizontal.
Instead of entering a rotation, you could manually rotate the Light in the Scene View (Figure 5-18) by selecting the Light, clicking the Rotate tool in the button bar on the top left of the Unity Editor (third button from the left), and then dragging the circle representing x-axis rotation on the Light.

Figure 5-18. Rotating a Directional Light in the Scene View
There’s no reason to use the Move tool (second button from the left on the button bar), since the position of a Directional Light doesn’t matter, but it can help visualize what the Light is illuminating if you move it up and away so that it’s obviously pointing at the skeleton.
Tip You can aim a Directional or Spot Light (or anything that can be aimed) in the same way you aimed the Main Camera at the Cube in Chapter 3. In this case, you would select the skeleton, press the F key to Frame Selected, click the leftmost button on the top left toolbar to enter the Hand tool mode in the Scene View, and then in the Scene View alt+click+drag until the Scene View camera is pointing the way you want the Light to point. Then select the Point Light and invoke Align to View from the GameObject menu.
If you click Play at this point, you should see a shadow, but one with room for improvement, even with the Strength set to 1. Unity uses a technique called shadow maps for generating shadows, where the shadow quality is dependent on the resolution of the shadow maps. The default setting for the shadow map resolution in the Light Component is Use Quality Settings, which you can override in the Inspector View. But let’s go to the Quality Settings, instead, by selecting Project Settings ![]() Quality from the Edit menu (Figure 5-19).
Quality from the Edit menu (Figure 5-19).

Figure 5-19. Selecting Quality Settings from the Edit menu
The Quality Settings manager appears in the Inspector View (Figure 5-20), displaying a list of Quality Settings and the selected Quality Setting for each build platform. The default Quality Setting desktop platforms is Good. Select that line in the platform-settings table so the individual settings for Good is displayed. The Shadow settings, in particular, control the shadow quality. So change the Shadow Resolution to Very High Resolution and also lower the Shadow Distance to 10, since shorter shadow distances lead to better shadow resolution (but too short, and the shadow won’t render).

Figure 5-20. The adjusted Quality Settings for Shadows
Now when you click Play, you have a dancing shadow that should look pretty good! (Figure 5-21).

Figure 5-21. The Game View of the skeleton with a shadow
Add Music
No dance demo would be complete without music. Fortunately, there’s plenty of free music available in the Asset Store. One music package I’ve used frequently is Gianmarco Leone’s General Music Set. If you enter “general music” in the Project View search field, all of the AudioClips in that package show up in the results (Figure 5-22). Click any one of them, and then import the package from the Inspector View.

Figure 5-22. Searching for the General Music Set in the Asset Store
After the AudioClips install in the Project View (Figure 5-23), select the AudioClip named Caribbean Isle. I think it’s got a nice beat, and you can dance to it. But you can decide for yourself by previewing the audio. In the Inspector View (Figure 5-24), click the Play button at the bottom, above the stereo waveform display, to listen to the AudioClip. While you’re there, since this AudioClip will be used essentially as background music, not a sound effect with a position, uncheck the 3D Sound checkbox and click the Apply button to reimport the sound.

Figure 5-23. The Project View of the General Music Set
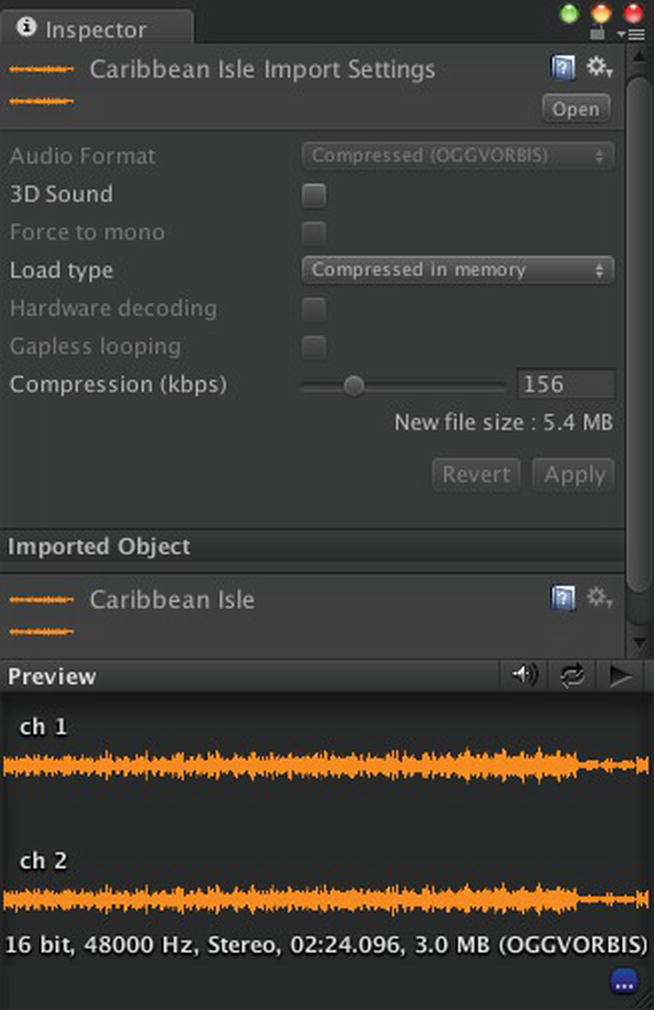
Figure 5-24. The Inspector View of an AudioClip
Now you’re ready to add the AudioClip to the scene. Simply drag the AudioClip from the Project View into the Hierarchy View, and a same-named GameObject will automatically be created (Figure 5-25).

Figure 5-25. Audio in the scene
Select the Caribbean Isle GameObject and you will see in the Inspector View that the it has an AudioSource Component. Among its properties is a reference to the Caribbean Isle AudioClip (described as a 2D sound since you unchecked its 3D sound checkbox), and a Play On Awake checkbox. That specifies the sound will start playing as soon as the scene starts playing. You should check the Loop checkbox too, so the song will keep playing over and over, just like the dancing animation.
Now when you click Play, you have a real music dance party!
Explore Further
Thus ends our dalliance with dancing skeletons. For the rest of this book, you’ll be concentrating on developing a bowling game with mostly physics-based motion. But you should already feel a sense of accomplishment, having spent the past three chapters evolving a simple static cube scene into a musical dancing skeleton scene, complete with fancy graphics features like particle effects and dynamic shadows. But fancy features tend to be expensive features in terms of performance, so use them judiciously!
Unity Manual
The “Asset Import and Creation” section covers the two new types of assets introduced in this chapter: audio and animation. The page titled “Audio Files” lists the audio formats recognized by Unity and describes the AudioClip asset that results from importing an audio file.In earlier chapters, we just dipped out toes into the “Creating Gameplay” section of the Unity Manual, but now we’ve deeper end, adding content described in the pages “Particles,” “Legacy Animation System,” and “Sound.” Also, the “Mecanim Animation System” is the future of Unity animation, so it’s worthwhile to read up on that.
Dynamic shadows is a big topic. The “Advanced” section of the Unity Manual has an extensive treatment on “Shadows in Unity”, which covers “Directional Shadows,” “Troubleshooting Shadows,” and “Shadow Size Computation.”
Reference Manual
The “Animation Components” section of the Reference Manual has pages on the “Animation” Component and “Animation Clip” asset used by the Legacy animation system. This section also includes several pages on Components used in the new Mecanim animation system.
The “Audio” section lists the audio Components need to add music to the dancing scene constructed in this chapter: “AudioListener” (normally automatically attached to the Main Camera) and “AudioSource” (attached to the sound source). In addition, the section lists “Audio Filter Components (PRO Only)” that can add effects like echo, for example.
The “Effects” section has a page on the new Shuriken particle system and multiple pages on the Legacy particle system.
The Reference Manual also documents the various Settings Managers, including the one for “Quality Settings,” which you used to adjust your shadow quality, but it also affects other visual quality elements, such as lighting and particles.
Asset Store
The Asset Store not only offers a lot of music in the Audio category, much of it free, but also provides scripts for playing music. If you want to play more than one song in your dance scene, you could write a script that plays a fixed or random sequence of songs, using the Unity functions defined in the AudioSource class (to play and stop music) and AudioListener class (to control the volume). But it’s easier to just download, for example, the Free Jukebox script from the Asset Store (or Jukebox Pro if you’re willing to part with a few dollars).
Computer Graphics
I mentioned the book Real-Time Rendering at the end of Chapter 3, and it merits a recommendation again for the computer graphics topics you encountered in this chapter: animation, particle effects, and dynamic shadows. There are many books just on character animation, including those on the content-creation side for professional animators, such as George Maestri’s Digital Character Animation.