
Making It Move: Scripting the Cube
Now that you know how to construct a static 3D scene by placing GameObjects, it’s time to make the scene dynamic, and more interesting, by adding movement to GameObjects while the game is played. After all, a 3D graphics scene is nice, but an animated 3D graphics scene is even better!
But applying animation data isn’t the only way to move a GameObject. Making a GameObject physical will cause it to move in response to collisions and forces, including gravity. And a script can also move a GameObject by changing the position and/or rotation values in its Transform Component. In fact, any method for moving a GameObject, whether it’s animation, physics, or a script, ultimately changes the Transform Component, which always represents the position, rotation and scale of the GameObject.
This chapter will focus on moving GameObjects by scripting, demonstrating how to rotate the formerly static Cube created in the previous chapter and even introducing tween-style animations implemented with the open-source iTween library. In the process, I’ll present basic concepts and tools (editing and debugging) of the Unity scripting system.
The scripts you’ll be writing are available on http://learnunity4.com/ in the project for this chapter, but I recommend creating them from scratch. You have the best chance of understanding how code works (and doesn’t work) when you type it in yourself
Organize the Assets
It’s easier to view and browse assets in the Project View when they’re partitioned by type. So before you start adding scripts, this is a good time to get organized and create some folders for the scripts and textures in the project.
Launch the Unity Editor, if you don’t already have it open from the previous chapter, and make sure you have the project from the previous chapter loaded and the cube scene open. Then click the Create button in the top left of the Project View (Figure 4-1) to bring up a menu of new assets that you can add to the project (alternatively, you can right-click in the Project View and select the Create submenu). Select the Folder item in the menu, and a folder titled New Folder will appear in the Project View. Rename the folder to Textures and drag any textures into it that you imported in the previous chapter (like my cat photo). Although you haven’t created any scripts, yet, go ahead and create a Scripts folder, too.

Figure 4-1. Creating a Textures folder in the Project View
Create the Script
Select the newly-added Scripts folder and then, also from the Create menu of the Project View, select JavaScript (Figure 4-2). A script called New Behaviour (U.S. readers, you’ll just have to get used to the British spelling) will appear in the Scripts folder. If you accidentally created the new script file outside the Scripts folder, just drag the script into the folder.
Note Although the Create menu in the Project View lists “Javascript,” with just the first letter capitalized, I’ll pretend it says “JavaScript,” which is the official capitalization and used in the Unity documentation (who knows, a Unity update may fix the menu spelling at any time). Also, this book will use the phrase “a JavaScript” to refer to a script, instead of the more correct but clumsier-to-say “a JavaScript script.”

Figure 4-2. Creating a JavaScript
Since this new file is a JavaScript, it has a .js extension. The Project View does not display filename extensions, but the language of the script is evident from its icon (Figure 4-3). And if the script is selected, its full name is shown in the line at the bottom of the Project View.

Figure 4-3. The Project View of the new script
Name the Script
New Behaviour is not a very meaningful name for a script, so the first order of business is to give it a new name. An obvious choice is Rotate, since the eventual purpose of the script is to rotate the Cube. But with overly general names, you can run into a conflict (Unity will report an error) if there are two scripts with the same name, even if they reside in different folders. This is because each script defines a new class (a subclass of MonoBehaviour, to be specific), and you can’t have two classes with the same name.
One approach is to name each script with a standard prefix (much like how Objective-C classes start with NS, harkening back to the NextStep origins of OS X). This is a common technique adopted by third-party Unity user interface packages. If everyone names their button class Button, they can’t coexist!
Note C# scripts have the option of partitioning classes among namespaces to avoid name clashes. This book uses JavaScript nearly all the way through, but examples of C# scripts and namespaces are provided in Chapter 17.
Sometimes, I use the game name as a script name prefix, if the script is specific to the game (in HyperBowl, I have a lot of scripts that start with Hyper). However, I usually prefix my script names with Fugu, corresponding to my game brand, Fugu Games. This book will stick with that convention, so go ahead and name the new script FuguRotate (Figure 4-3). Of course, in general, you’re free to choose your own script name convention.
Anatomy of a Script
If you select the FuguRotate script in the Project View, the Inspector View displays the source code, or at least as much as will fit in the Inspector View display (Figure 4-4).

Figure 4-4. The Inspector View of the new script
As the Inspector View shows, when Unity creates a new script, it includes three items (Listing 4-1).
Listing 4-1. The Contents of a New Script
#pragma strict

function Start () {
}

function Update () {
}
The top line of the script, #pragma strict, instructs the script compiler that all variables have type declarations, or at least have types that are easily inferred by the compiler. This is not a requirement for Unity desktop builds, but it is required for Unity iOS, so you might as well make a habit of it.
Note All of the complete script listings in this book start with #pragma strict. Any code that doesn’t include that line is only an excerpt from a script.
The two functions in the script are callbacks, which are called by the Unity game engine at well-defined moments in the game. The Start function is called when this script is first enabled. A Component is not completely enabled unless the GameObject it’s attached to is also active. So if a GameObject is initially active in a scene and it has an enabled script attached, then the Start function of that script is called when the scene starts playing. Otherwise, the Start function is not called until the script is enabled (by setting the enabled variable of the script Component) and the GameObject is made active (by calling the SetActive function of the GameObject).
In contrast to the Start function, which is only called at most once in the lifetime of a script Component, the Update function is called every frame (i.e., once before each time Unity renders the current scene). Like the Start function, Update is only called when the script is (completely) enabled, and the first call to Update happens after the one and only call to Start. Thus, the Start function is useful for performing any initialization needed by the Update function.
Attach the Script
Like other assets in the Project View, a script has no effect until you add it to the scene, specifically as a Component of a GameObject. Ultimately, you want the FuguRotate script to rotate the Cube, so drag it from the Project View onto the Cube GameObject in the Hierarchy View. The Inspector View now shows the script is attached to the Cube as a Component (Figure 4-5).

Figure 4-5. The FuguRotate script attached to the Cube
Unity often offers two, and sometimes three, ways to perform the same operation. For example, you could also have attached the FuguRotate script to the Cube by clicking the Add Component button in the Inspector View of the Cube and then selecting the FuguRotate script from the resulting menu. Or you could have dragged the FuguRotate script into the area below the Add Component button (but that’s difficult if there isn’t much space displayed below the button).
Edit the Script
Now it’s time to fill out the script. Select the FuguRotate script in the Project View, and then in the Inspector View click the Open button to bring up the script editor. Double-clicking the script in the Project View, or selecting Open from the right-click menu on the script will work, too. The default script editor for Unity is a customized version of MonoDevelop, a code editor and debugger tailored for Mono, the open source framework underlying Unity’s scripting system (Figure 4-6).

Figure 4-6. The MonoDevelop editor
If you prefer to use another script editor, you can change the default by bringing up the Unity Preferences window, selecting the External Tools tab, and then browsing for the application of your choice (Figure 4-7). Unitron, no longer officially supported but still included in the Unity installation, is an option, but scripts are text files, so any text editor can be used as a script editor. For example, as an old school programmer, I like to use Aquamacs, an OS X version of Emacs.

Figure 4-7. Choosing a different script editor
The FuguRotate script as it stands won’t do anything noticeable, since the callback functions are empty, having no code between their brackets. Let’s start off with some tracing code in the Start and Update functions to demonstrate when those callbacks are invoked (Listing 4-2).
Listing 4-2. FuguRotate.js with Calls to Debug.Log
function Start () {
        Debug.Log("Start called on GameObject "+gameObject.name);
}
function Update () {
        Debug.Log("Update called at time "+Time.time);
}
One cool feature of Unity’s MonoDevelop is its code autocompletion. For example, Figure 4-8 shows that as you type Time.t, MonoDevelop pops up a list of functions and variables that are members of the Time class and looks for one that starts with “t.”

Figure 4-8. Autocompletion in MonoDevelop
Understand the Script
Now that the FuguRotate script is doing something, let’s try to understand what that is. Both Start and Update call the function Debug.Log to print messages to the Console View. Log is a static function defined in the Debug class, meaning you can call that function by specifying its class name before the function name, instead of an object (functions defined in classes are also called methods).
Note Static functions and variables are also called class functions and variables, since they are associated with a class instead of instances of that class.
The variable gameObject references the GameObject this component (the script) is attached to (in this case, the Cube), and every GameObject also has a name variable that references the name of this GameObject (in this case, “Cube”). The + operator can be used to concatenate two strings (it’s not just for addition, anymore), so the Start function will print "Start called on GameObject" followed by the name of the GameObject.
Similarly, the Update function calls Debug.Log, concatenating "Update called at time" with the value of the static variable Time.time, which holds the time elapsed (in seconds) since the game started (in the case of running from the Unity Editor, when you click the Play button). Time.time is of type float (a floating point number, which can represent non-integer values), but the + operator will convert the number to a String before appending it.
Read the Scripting Reference
Besides autocompletion, another handy feature of MonoDevelop is the ability to bring up the Scripting Reference documentation for any Unity class, function, or variable. Clicking on Debug at the beginning of a Debug.Log call in the script and pressing Command+’ will bring up the Scripting Reference documentation for the Debug class in a browser window. Clicking on Log will bring up the specific documentation for the Debug.Log function.
Tip Every time you see a Unity class, function, or variable you’re not familiar with, the first thing you should do is read the Script Reference documentation on it.
The Scripting Reference is available in the Unity Help menu (Figure 4-9).

Figure 4-9. Bringing up the Scripting Reference from the Help menu
The Scripting Reference contains documentation for all Unity classes plus their functions and variables (Figure 4-10). I find the fastest way to look up an arbitrary Unity class, function, or variable in the Scripting Reference is to type it in the search box. Command+’ in MonoDevelop effectively performs that search when it doesn’t know exactly what definition you’re looking for. For example, perform Command+’ on Start in the FuguRotate script and a list of search results for Start will appear.

Figure 4-10. The Scripting Reference
However, clicking Runtime Classes on the left of the Scripting Reference will give you the entire list of classes, indented so the class hierarchy (i.e., which classes are subclasses of others) is apparent (Figure 4-11). Some classes, such as Debug and Time, are static classes, meaning they contain only static functions and variables (there are no Unity functions that don’t reside in a class) and there’s no reason to subclass them.
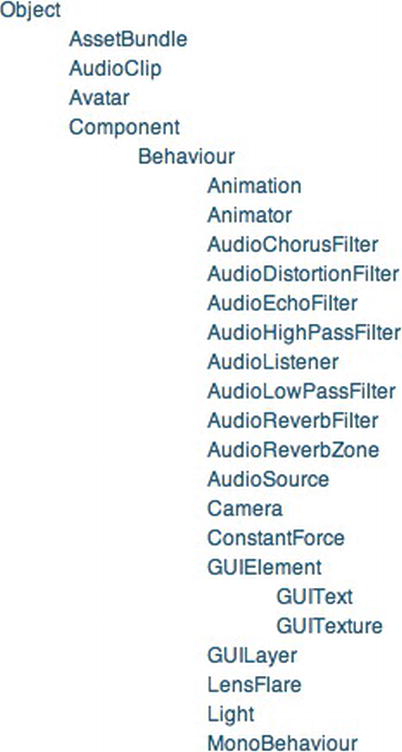
Figure 4-11. The class hierarchy of runtime classes
Most classes, however, act as types of objects. The Cube in the scene is an instance of the class GameObject. And GameObject is a subclass of Object, meaning it inherits all of the documented variables and functions of Object. Conceptually, and in object-oriented parlance, the Cube is a GameObject and thus also is an Object. Contrast this with the relationship between GameObject and Component. The Cube is a GameObject and it has a MeshFilter (which has a Mesh).
From the Runtime Classes list, you can see that just about everything that can be in a scene is a subclass of Object, including GameObject and Component. Many Component subclasses, including Light and Camera, are also subclasses of Behaviour, which is a Component that can be enabled or disabled (as evidenced by their checkboxes in the Inspector View). Some are not, though, like Transform, which is a direct subclass (no intervening classes) of Component and cannot be disabled (no checkbox in the Inspector View).
Each script is actually a subclass of MonoBehaviour, which is a subclass of Behaviour (so you can enable and disable scripts). Thus, the FuguRotate script defines a subclass of MonoBehaviour called FuguRotate. This class declaration is implicit in JavaScript, although you could make it explicit, as shown in Listing 4-3.
Listing 4-3. A Version of FuguRotate.js with an Explicit Class Declaration
#pragma strict

class FuguRotate extends MonoBehaviour {


function Start () {
                var object:GameObject = null;
                Debug.Log("Start called on GameObject "+object.name);
        }

        function Update () {
                Debug.Log("Update called at time "+Time.time);
        }

}
Run the Script
Proper programming is a lot like the scientific method you learned in school. You should have a general theory on how things work, hypothesize about what your code should be doing, and then you’re ready to run an experiment to validate that hypothesis. In other words, it’s time to run your code and see if it does what you expect. When you click Play, the messages emitted by Debug.Log will show up in the Console View (Figure 4-12).

Figure 4-12. Tracing the Start and Update callbacks
If the code doesn’t behave as you expect, it is time to revise your theory on what it’s doing. This may be a small consolation, but debugging your code is a learning experience!
Debug the Script
Of course, your code will not be perfect as soon as you type it in. On the contrary, usually it will require several iterations of debugging. There are basically two types of errors: compilation errors that appear even before you try to run the game, and runtime errors that occur while the game is playing.
Compilation Errors
Every time a script is saved, it’s automatically compiled (converted from the source code to the code format that actually runs). Errors in the script that prevent successful compilation will appear in red at the bottom of the Unity Editor and in the Console View.
Double-clicking the error message at the bottom of the Editor will bring up the corresponding message in the Console View, and double-clicking the message in the Console View will bring up the script editor with the cursor located at the offending line of code. Even without that convenience, the error message will list the file name and line number of the offending code, so it can be found manually.
For example, if you had typed Time.tim instead of Time.time in the Update function, an error message would have appeared as soon as you tried to save the script (Figure 4-13.) Conveniently, Unity will often do a decent job of suggesting what you may have intended to type (although generally computers aren’t good at “do what I mean, not what I say”).

Figure 4-13. A script compilation error
Runtime Errors
Like compilation errors, runtime errors also show up in the Console View. To demonstrate, replace the reference to gameObject in your Start function with a reference to a local variable named object(Listing 4-4). A local variable is declared within a function declaration, and therefore is only accessible within the scope of the function. In this case, object is initialized as null, meaning it’s not referring to any actual GameObject, and is never assigned any GameObject. When you click Play, an error results when the script tries to reference the name of the GameObject (Figure 4-14).
Listing 4-4. Start Function in FuguRotate.js with a Null Reference Error
function Start () {
        var object:GameObject = null;
        Debug.Log("Start called on GameObject "+object.name);
}

Figure 4-14. A script runtime error
Debug with MonoDevelop
I still perform most of my debugging by calling Debug.Log (old school, again) and examining error messages in the Console View. But modern programmers are accustomed to more sophisticated debugging tools. It turns out that MonoDevelop also provides a full-featured debugger that’s been customized to work with Unity. To enable debugging with MonoDevelop, select the Sync MonoDevelop Project command from the Assets menu (Figure 4-15).

Figure 4-15. Sync MonoDevelop Project to start debugging
The Sync MonoDevelop Project command updates the MonoDevelop project files corresponding to this Unity project and then opens the MonoDevelop project solution file. If MonoDevelop doesn’t automatically open that solution file, you can open it from MonoDevelop File menu or double-click the solution file in the Finder (the highlighted file in Figure 4-16).

Figure 4-16. MonoDevelop project files
With the MonoDevelop solution loaded, enable debugging by selecting Attach to Process from the MonoDevelop Run menu (Figure 4-17).

Figure 4-17. The MonoDevelop Attach to Process command
Then choose Unity Editor in the resulting process list (Figure 4-18).

Figure 4-18. Attaching MonoDevelop to the Unity Editor
Click Play, again, and this time MonoDevelop will show not only the line of code where the error occurred, but also the specific type of error (NullReferenceException) and associated information like the stack trace, which is useful in determining what chain of function calls resulted in the error (Figure 4-19).

Figure 4-19. MonoDevelop error details with the Unity Editor attached
While in debugging mode, the Unity Editor is unresponsive, so when you’re finished with a debugging run, select Detach from the Run menu in MonoDevelop to detach the Unity Editor process (Figure 4-20). The Detach command is also available as a button on the MonoDevelop toolbar.

Figure 4-20. Detaching the Unity Editor process from MonoDevelop
Let’s fix the null reference problem by changing the initial value of the variable object from null to the script’s GameObject (Listing 4-5).
Listing 4-5. Start Function in FuguRotate.js with Null Reference Fix
function Start () {
        var object:GameObject = this.gameObject;
        Debug.Log("Start called on GameObject "+object.name);
}
The reference to this.gameObject is equivalent to just gameObject. The variable this always refers to the current object, which is this script Component (in some other programming languages, self is used in the same way). Sometimes I like to explicitly prefix variables like gameObject with this. to make it clear that I’m referring to an instance variable, which is a variable defined in the class that is not local to a function and not static, so each instance of the class has its own copy.
Now the script shouldn’t break in the Start function (you can click Play in the Unity Editor to confirm). But you can still make execution stop on any line in MonoDevelop by adding a breakpoint. Click to the left of the line in the Update function, and a breakpoint indicator will appear by the line (Figure 4-21).

Figure 4-21. Adding a breakpoint in MonoDevelop
Now when you invoke Attach to Process, connect to the Unity Editor, and click Play in the Unity Editor, execution will stop in your Update function just as if there were an error there (Figure 4-22). When execution is halted in MonoDevelop while in debugging mode, you can examine the stack trace and inspect the runtime environment in other ways. For example, Figure 4-22 shows the result of typing gameObject in the Watch panel and then halting at a breakpoint in the FuguRotate Update callback. The current value of gameObject is the Cube GameObject, which can now have its member variables examined.

Figure 4-22. Execution halted at a breakpoint
Once you’re finished examining the runtime state at the breakpoint, you have an option in the Run menu to Continue until the next breakpoint or error. The Run menu also has commands to Step Over (continue until the next line of code in this function), Step Into (continue until the first line of code any function called by this line of code), or Step Out (continue until you’ve exited this function), so you can step through your script one line at a time. All of these commands have keyboard shortcuts shown in the Run menu and are also available as buttons on the toolbar.
Make It Rotate
Now that you’re familiar with scripts and how to attach, edit, and debug them, we’re ready to make this script do what we ultimately want—rotate the Cube.
Rotate the Transform
Moving a GameObject at runtime requires changing its Transform Component. Rotating the GameObject specifically requires changing the rotation value in its Transform Component. Replacing the contents of the FuguRotate script with the code in Listing 4-6 will do the trick.
Listing 4-6. FuguRotate.js Script with Rotation Code in Update
#pragma strict
var speed:float = 10.0; // controls how fast we rotate
function Start () {
        var object:GameObject = this.gameObject;
        Debug.Log("Start called on GameObject "+object.name);
}

// rotate around the object's y axis
function Update () {
        //Debug.Log("Update called at time "+Time.time);
        transform.Rotate(Vector3.up*speed*Time.deltaTime);
}
Let’s go though the new code. First, any line starting with // is a comment and not executed as code. This is a convenient way to deactivate a line of code without deleting it from the file. Comments can also be added within /* and */, which is useful for multiline comments.
Note Some will say code should be written well enough to be self-explanatory, but as a basic rule of thumb, if the intent of the code is not obvious, add a comment. I’ve wasted plenty of time trying to remember why I wrote some code the way I did.
The speed variable controls how fast the object rotates, and since it’s declared as a public instance variable, it’s available as an adjustable property in the Inspector View.
You could have just typed var speed=10.0 instead of var speed:float=10.0, since the compiler can infer that speed must be of type float, since it’s initialized with a floating point number (this is known as type inference). But it’s better to be as clear as you can, not just for the Unity compiler, but also for any human reading the code, including yourself!
The variable speed is used in the Update function, which calls the Rotate function defined in the Transform class. Rotate takes a Vector3 as an argument and interprets its x,y,z values as Euler angles (rotation, in degrees, around the GameObject’s x,y,z axes). A vector represents a direction and magnitude, but it’s common in game engines to use the vector data structure to represent Euler angles.
Note The movie Despicable Me has as good a definition of vector as any: “I go by Vector. It’s a mathematical term, represented by an arrow with both direction and magnitude. Vector! That’s me, because I commit crimes with both direction and magnitude. Oh yeah!”
Vector3.up is a conveniently defined Vector3 with values (0,1,0), so the Update function is rotating around the y axis by speed * Time.deltaTime degrees. Time.deltaTime is the elapsed time since the last frame, in seconds, so, effectively, you’re rotating by speed degrees per second. In Update callbacks, you almost always want to multiply any continuous change by Time.deltaTime so that your game behavior does not fluctuate with differences in frame rate. If the multiplication by Time.deltaTime was omitted, the FuguRotate script would rotate objects twice as slow on any machine that’s running two times slower.
As intended, the variable speed shows up in the Inspector View and you can edit it (Figure 4-23).

Figure 4-23. The Inspector View of the FuguRotate script with adjustable speed
If you click Play, the Cube now spins at a moderate rate, and continuous change in the Transform Component’s y rotation value will be displayed in the Inspector View. You can edit the Speed value of the FuguRotate script in the Inspector View to slow it down or speed it up.
Other Ways to Rotate
Transform.Rotate is a good example of why you should read the Scripting Reference for every function you encounter. It turns out Transform.Rotate is an overloaded function, meaning it has variations with different parameters.
Note The term parameter is used when describing the function declaration and argument refers to the same value when its passed at runtime, but it’s a subtle distinction. Parameter and argument can usually be used interchangeably without confusion.
The documentation for Transform.Rotate lists several combinations of arguments that it can take. Instead of accepting a Vector3 to rotate around and an angle (in degrees), Transform.Rotate can take the x, y, and z axis rotations separately. Listing 4-7 shows an alternative version of our Update function that just passes in the x, y, and z rotations.
Listing 4-7. Version of Transform.Rotate That Takes Rotation in x, y, and z Angles
function Update () {
        transform.Rotate(0,speed*Time.deltaTime,0);
}
Or the x, y, and z rotations can be packaged into a Vector3, as shown in Listing 4-8.
Listing 4-8. Version of Transform.Rotate That Takes Rotation in a Vector3
function Update () {
        transform.Rotate(Vector3(0,speed*Time.deltaTime,0));
}
Although a vector has a precise mathematical definition, Unity follows a common practice among 3D application programming interfaces of reusing its vector data structure to represent anything that has x, y, and z values. For example, if you read the Scripting Reference page on Transform (and you should), you’ll see its position, rotation, and scale are all Vector3 values.
Rotate in World Space
Each of the Transform.Rotate variations also has an optional parameter, which defaults to Space.Self. This specifies that the rotation takes place around the transform’s (and thus the GameObject’s) local axes, which correspond to the axis handles you see in the Scene View when the GameObject is selected. If you specify Space.World, as shown in Listing 4-9, the rotation takes place around the world axes (the x, y, z axes centered at 0,0,0).
Listing 4-9. Rotating Around the World Axes
function Update () {
        transform.Rotate(Vector3.up,speed*Time.deltaTime,Space.World);
}
Tween Rotation
Changing a GameObject’s transform steadily over time is straightforward, but the coding can be more involved and substantial for more complicated motions, such as moving a GameObject from one position to another smoothly over a certain period of time. This is the type of thing that Flash programmers use the ActionScript Tween class for. Although Unity doesn’t have a built-in Tween class, Unity users coming from a Flash background will be happy to learn there are multiple third-party solutions.
The tween package I use for HyperBowl is called iTween. I have around 200 iTween animations in that game. A sample usage: After a strike is bowled, the 3D STRIKE text is scripted with iTween so that the letters slide onto the screen one letter a time, bob a bit, then fly off the screen while rotating.
Conveniently, iTween is on the Asset Store. In Chapter 3, we searched for packages in the Asset Store window, but this time, let’s use the search function in the Project View. Type “itween” in the search box, and click the Asset Store link in the breadcrumbs. iTween will show up in the Free Assets results (Figure 4-24).

Figure 4-24. Searching for iTween on the Asset Store
Tip Figure 4-24 shows the view menu in the Project View allows switching between One Column Layout and Two Columns Layout. Two Columns Layout is new in Unity 4, but One Columns Layout is still nice to have, particularly when performing a search in the Project View instead of navigating with the left panel.
Select iTween in the Project View and a description of the package will show up in the Inspector View (Figure 4-25), along with options to import the package or preview the full description in the Asset Store window. Go ahead and click the Import package button.

Figure 4-25. The Inspector View of the iTween on the Asset Store
The resulting iTween installation shown in the Project View includes sample and documentation files, but the entire iTween code library is a single script located in the iTween ![]() Plugins folder (Figure 4-26).
Plugins folder (Figure 4-26).

Figure 4-26. Project view of iTween
As you can see in Figure 4-26, iTween is a C# script, with .cs as its filename extension. JavaScript can call functions and refer to variables in C# scripts, but only if the C# scripts are located in a few special folders that are designated to load before all other scripts. One of those folders is Assets ![]() Plugins, so you can just drag the iTween
Plugins, so you can just drag the iTween ![]() Plugins folder up a level to just below Assets.
Plugins folder up a level to just below Assets.
To get a flavor of iTween, add the third line in Listing 4-10 to the Start function in the FuguRotate script. That line starts a rotation tween, and, following the arguments in order from left to right, rotates around the local y axis 1 multiple of 360 degrees over 2 seconds, eases in as the target rotation is achieved, and eases back out as the rotation bounces back in the other direction.
Also, use /* and */ to comment out the Update function so you don’t have two pieces of rotation code fighting for control.
Listing 4-10. FuguRotate.js with iTween Called in the Start Function
#pragma strict
var speed:float = 10.0; // controls how fast we rotate

function Start () {
        var object:GameObject = this.gameObject;
        Debug.Log("Start called on GameObject "+object.name);
        iTween.RotateBy(gameObject, iTween.Hash("y", 1, "time", 2, "easeType", "easeInOutBack", "loopType", "pingPong"));
}

// rotate around the object's y axis
/*
function Update () {
        //Debug.Log("Update called at time "+Time.time);
        transform.Rotate(Vector3.up*speed*Time.deltaTime);
}
*/
Children of the Cube
A scene with just one cube is not very interesting, so let’s make it slightly more interesting by adding more cubes. You could repeatedly create new cubes in the same manner as the first one. Or you could save some time by duplicating the existing Cube (select the Cube and then invoke the Duplicate command on the Edit menu or use the Command+D keyboard shortcut). But let’s take this opportunity to learn about prefabs.
Making Prefabs
A prefab is a special type of asset created for cloning a GameObject. The prefab can then be used to create identical copies of that GameObject. In that sense, Unity prefabs are like prefabricated housing, but better. If you make a change to one instance of a prefab, you can have that change automatically propagate to all other instances of the prefab.
First, in keeping with our asset organization, create a new folder in the Project View named Prefabs. Then, with the Prefabs folder selected, click Prefab on the Create menu in the Project View to create an empty prefab in that folder. You can then fill out the prefab by dragging the Cube from the Hierarchy View onto the empty prefab.
Alternatively, instead of starting with an empty prefab, you can just drag the Cube directly into the Prefabs folder, and a prefab will automatically be created and named after the original GameObject (Figure 4-27).

Figure 4-27. The Project View of the Cube prefab
You can now drag the prefab into the Hierarchy View every time you want to create a new cube that looks just like the original Cube GameObject. But instead of having multiple independent cubes in the scene, let’s add some cubes as children of the existing cube. Drag the prefab directly onto the Cube in the Hierarchy View twice, and you’ll now have two new cubes underneath Cube. In the Inspector View (Figure 4-28), you can see the new cubes are identical to Cube, featuring the same Components and Component properties. Let’s name the new cubes child1 and child2 (by the way, this is a good time try out the Lock feature of the Inspector View, so you can inspect two GameObjects at the same time).
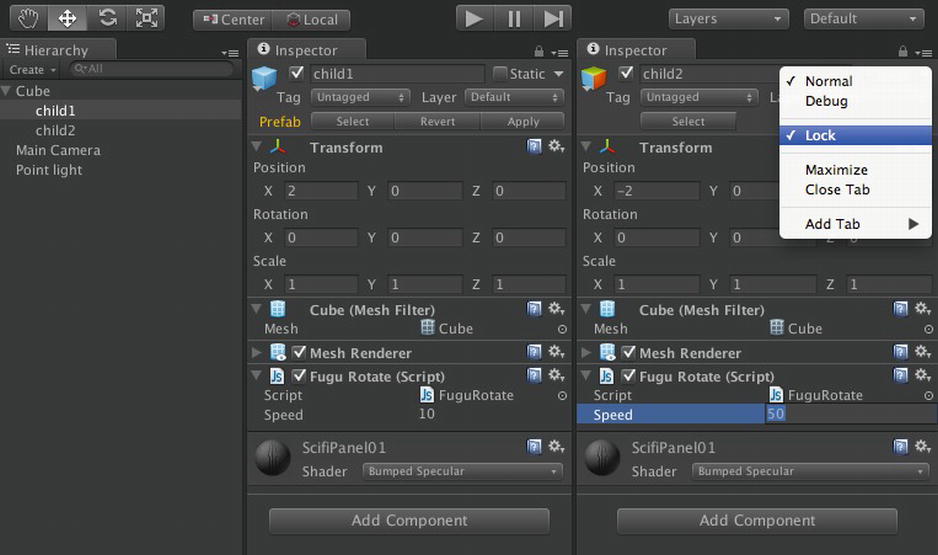
Figure 4-28. Editing the child cubes
As children of Cube, the positions of child1 and child2 displayed in the Inspector View are relative to the position of their parent, Cube. Which means if a child cube has position (0,0,0), it is in the exact same position as its parent. So let’s set the positions of child1 and child2 to (2,0,0) and (-2,0,0). The two child cubes now are spaced out from their parent Cube like satellite cubes (Figure 4-29).

Figure 4-29. Scene view of the Cube and its child cubes
Before you click Play, change the FuguRotate script to the simple transform.Rotate call (Listing 4-11). Now when you click Play, the main Cube rotates as before, and the child cubes follow around like the spokes in a wheel. The child cubes also spin around their own axes since they’re running their own copies of the FuguRotate script (all three cubes would rotate around the same world origin if you had supplied Space.World in the Transform.Rotate call).
Listing 4-11. FuguRotate.js Reverted to Rotation in Update
#pragma strict
var speed:float = 10.0; // controls how fast we rotate

function Start () {
        var object:GameObject = this.gameObject;
        Debug.Log("Start called on GameObject "+object.name);
        //iTween.RotateBy(gameObject, iTween.Hash("y", 1, "time", 2, "easeType", "easeInOutBack", "loopType", "pingPong"));
}

// rotate around the object's y axis
function Update () {
        //Debug.Log("Update called at time "+Time.time);
        transform.Rotate(Vector3.up*speed*Time.deltaTime);
}
Change the FuguRotate Speed property for child2 from 10 to 50, click Play, and you will see that cube spins faster than the others. You can easily make the same change in child1, but imagine if you had 50 cubes to change. That would be tedious! This is where the power of prefabs comes in. Select child2 and then invoke Apply Changes To Prefab in the GameObject menu (Figure 4-30).

Figure 4-30. Applying changes to a prefab
Now child1 is identical to child2 again (except for the name and position, which Unity reasonably assumes you don’t want the same in every instance of the prefab). When you click Play, the child cubes are now spinning at the same faster speed.
Breaking Prefabs
But the main Cube is also spinning faster due to the updated rotation speed. If that isn’t what you intended, you can change the Cube’s Speed back to 10, and then to ensure that you don’t propagate changes in the child cubes to the main Cube, you can select the main Cube and invoke Break Prefab Instance in the GameObject menu (Figure 4-31).

Figure 4-31. Breaking a Prefab Instance
Now the Cube no longer has a relation to the prefab, and any change to the child cubes will not be propagated to the Cube.
Explore Further
The scene has evolved from pretty and static to pretty and dynamic, merely with the addition of simple scripted movement. We’ll jazz up the scene some more in the next chapter with animation and sound, but the major milestone you’ve reached at this point really is learning how to create, edit and debug scripts. From now until the end of the book, you’ll be adding scripts, so get used to it!
Unity Manual
The “Building Scenes” section of the Unity Manual has two pages relevant to the work in this chapter—a description of “Prefabs” and an explanation of the “Component-Script Relationship.”
The one new type of asset introduced in this chapter (besides prefabs) is the script. The page in the “Asset Import and Creation” section on “Using Scripts” introduces the basic concepts covered in our rotation script—creating a script, attaching it to a GameObject, printing to the Console View (using the print function instead of Debug.Log as you did), declaring a variable, and even applying a rotation in the Update function.
It’s worth mentioning the page on “Transforms” again, since our rotation script is in the business of modifying Transforms. That page also describes the parent–child GameObject relationship, which technically is among Transforms, but since there’s a one-to-one relationship between GameObjects and Transforms, it’s less confusing to think of the linkage among GameObjects, as displayed in the Hierarchy view.
We dipped into one Advanced topic in this chapter—“Debugging.” This section describes the Console View, the MonoDevelop debugger, and where to find Log files on your file system.
Scripting Reference
I’ve mentioned two of the three main pieces of official Unity documentation so far—the Unity Manual and the Reference Manual. The third piece is the Scripting Reference. This chapter presented our first foray into scripting, so everything in the “Scripting Overview” section of the Scripting Reference is worth reading at this point. The list of “Runtime Classes” illuminates the inheritance relationship among the Unity classes. After that, I recommend making frequent use of the search box on that page anytime you see anything in a script you don’t recognize (or even if you do recognize it, if you haven’t read its documentation).
Asset Store
We downloaded iTween from the Asset Store, but iTween users should also visit Bob Berkebile’s official iTween web site with comprehensive documentation and demo projects on http://itween.pixelplacement.com/.
Although iTween is popular and one of the first tween packages for Unity, at this point several tween implementations are available (just search for “tween” in the Asset Store), including Holoville’s HOTween, documented and also available on http://holoville.com/hotween/, and Prime31 Studio’s GOKit, source code available on GitHub, http://github.com/prime31/GoKit.
Scripting
Although we’re only working with JavaScript in this book, there’s enough JavaScript and C# out in the Unity world that you should get comfortable with both. The book Head First C# by Andrew Stellman and Jennifer Greene is a great visual step-by-step introduction to C#.
And since C# was created by Microsoft as part of its .NET framework, the official C# documentation and other resources can be found by searching for C# on the Microsoft Developer Network (MSDN) at http://msdn.microsoft.com/.
While you’re on MSDN, search also for .NET documentation, as the Unity scripting engine is implemented with Mono, which is an open source version of .NET. The official Mono web site is http://mono-project.org/
You probably don’t need to worry about Boo, the other Unity scripting language (I have yet to see a Boo script in the wild), but if you’re curious, the official Boo web site is http://boo.codehaus.org/.
Put two programmers together in a room, and if there’s anything they’ll fight about, it’s coding conventions. My rule of thumb is to go along with the convention of the official language and framework that I’m coding in. It’s a dull topic with fun names.
For example, Unity uses a combination of camel case and Pascal case in its capitalization rules (or camelCase and PascalCase, if we apply the conventions to themselves). You can look up “camel case” on Wikipedia.
Bracket placement is also a common source of contention. The convention I use here (and by Unity, at least when creating the template for new scripts) is called Egyptian style, according to Jeff Atwood (of StackExchange fame) on his popular blog Coding Horror (http://www.codinghorror.com/blog/2012/07/new-programming-jargon.html). The article also terms the practice of applying a standard prefix to class names “Smurf naming.”