
At this point, we have the glimmerings of a bowling game, or at least a scene in the Unity Editor where the player can roll the ball around on the floor. But the game won’t look like a bowling game until it at least has bowling pins. That will be remedied in this chapter and involve more Unity physics, including collisions between Rigidbodies (among the ball and pins) and compound colliders (to accommodate the shape of a bowling pin). On top of that, we’ll add collision-based sounds effects so the game will sound like a bowling game, too.
This additional functionality will require the construction of several new scripts, available in the Unity project for this chapter on http://learnunity4.com/ However, the barrel model used for the bowling pins and the audio for pin collisions and the ball rolling sound are taken (free) from the Asset Store and not included in the online project.
Before adding bowling pins to the bowl scene, which should be open in the Unity Editor as we left it in the previous chapter, we need some more room to roll. Select the Floor in the Hierarchy View, and in the Inspector View (Figure 7-1) set Scale to 10 for X, Y, and Z.

Figure 7-1. The larger Floor GameObject, scaled up by a factor of 10
Tip For performance reasons, it’s best to avoid changing the scale in the Transform Component (for imported models, change the scale in the Import Settings, instead). And if you have to change the scale, change it uniformly along all three axes.
The Floor is now ten times larger (except in height, since a Plane has zero height). But the textures on the Floor are also stretched, resulting in some really wide planks. To compensate, you should also adjust the Tiling for the Floor’s Main and Normalmap textures by a factor of 10, which results in a new Tiling factor of 50 in each direction and the wooden planks looking as they originally did.
Now that there’s room to roll, it’s time to add the pins. In lieu of a bowling pin model, you can make a simplistic version of a bowling pin with the Capsule primitive.
Select Capsule from the Create menu of the Hierarchy View (Figure 7-2). Capsule, like the other primitive models, is also available in the GameObject menu on the menu bar.

Figure 7-2. Creating a Capsule
Name the resulting GameObject Pin. To create ten pins, you could duplicate the Pin nine times, but in the same way the Cube was cloned in the cube scene, it’s better to make a prefab first. This way, any changes you make to a single pin can be applied to all ten of the pins.
So go ahead and drag the Pin into the Prefabs folder in the Project View to create the prefab (Figure 7-3).

Figure 7-3. The Pin prefab in the Project View
But dragging nine copies of the prefab into the scene and manually placing them would be laborious and error-prone. A task fitting that description is a good candidate for implementing in a script! So plan on spawning all of the pins in the game using a script and the Pin prefab. In that case, the Pin GameObject in the scene is redundant, so delete it (by selecting the GameObject in the Hierarchy View and invoking Delete from the Edit menu or the keyboard shortcut Command+Delete).
Besides spawning the pins, the bowling game will surely require more scripting to implement the rules of the game and the playing sequence. In fact, any game that’s not really simple can benefit from having a single game controller script that implements the the overall flow of the game. So let’s plan on implementing the pin creation as the first action in the bowling game controller.
Create the Script
In the Project View, create a new JavaScript, place it in the Scripts folder, and name it FuguBowl (we’ll follow a convention of naming the game controller script after the game itself). Then add the code in Listing 7-1, which consists of a few variables, a CreatePins function, and an Awake callback that calls the CreatePins function.
Listing 7-1. Pin Instantiation Code in FuguBowl.js
#pragma strict

var pin:GameObject; // pin prefab to instantiate
var pinPos:Vector3 = Vector3(0,1,20); // position to place rack of pins

var pinDistance = 1.5; // initial distance between pins
var pinRows = 4; // number of pin rows

private var pins:Array;

function Awake () {
        CreatePins();
}

function CreatePins() {
        pins = new Array();
        var offset = Vector3.zero;
        for (var row=0; row<pinRows; ++row) {
                offset.z+=pinDistance;
                offset.x=-pinDistance*row/2;
                for (var n=0; n<=row; ++n) {
                         pins.push(Instantiate(pin, pinPos+offset, Quaternion.identity));
                         offset.x+=pinDistance;
                }

        }
}
The CreatePins function first creates an Array, which is similar to the built-in array denoted by brackets, but with adjustable size, so it can grow as you add elements and shrink as you remove them. The function then loops through the number of rows specified and in each row instantiates an increasing number of pins: row one has one pin, row two has two pins, and so on. Thus when you have four rows, you end up with a triangle of ten pins as desired!
The Instantiate function takes an Object, position, and rotation as arguments to create an identical Object at the specified position and rotation (in world space, not local space). Instantiate copies the entire Object hierarchy, so if the Object is a GameObject with child GameObjects, then the entire hierarchy is copied. If the Object is a Component, then the GameObject of that Component and all of that GameObject’s children are copied.
If the original GameObject is already in the scene, then calling Instantiate is similar to selecting the original GameObject and invoking Duplicate on it from the Edit menu (or Command+D). If the original object is a prefab, as is the case here, then calling Instantiate is similar to dragging the prefab into the scene to create a new GameObject.
The position is a Vector3 and the rotation is passed in as a Quaternion instead of an Euler angle. A quaternion is not a very intuitive representation of rotations (quaternions are complex numbers with three imaginary components), but they have some advantages over Euler angles (e.g., more natural interpolation) and thus are used internally by Unity. In this case, passing in the static variable Quaternion.identity specifies that no rotation takes place (same as a rotation of 0,0,0 in Euler angles).
Caution Quaternions also have x,y,z values (and one more, w) so be careful about confusing them with Euler angles. In particular, note that the rotation and localRotation variables in the Transform Component are Quaternion values. The Euler angles are stored in the variables eulerAngles and localEulerAngles.
Instantiate is a static function of the Object class. The call to Instantiate in the script is equivalent to calling this.Instantiate, where this is the script Component. And Component is a subclass of Object, so the compiler knows you’re calling Object.Instantiate. Instantiate is also an overloaded function, with a variation that takes just one argument: the Object to clone. The newly instantiated Object will appear at the same position and with the same rotation as the original Object.
Normally I’d prefer to explicitly call Object.Instantiate to make it clear that Instantiate is a static function in the Object class and doesn’t have to be called on an actual instance of Object (in which case it would be termed an instance function). However, spelling out Object.Instantiate in the script results in the Console View error message: ‘Instantiate’ is not a member of ‘Object’ (Figure 7-4).

Figure 7-4. A compiler error referencing the (wrong) Object class
The problem here is that there is another Object class defined in Mono. That class acts as the superclass of other Mono classes, just like the Unity Object class is the superclass of most Unity classes (at least the ones that can exist in a scene). The compiler thinks you’re referring to the Mono Object class instead of the Unity class. This is the issue we’ve been trying to avoid by naming classes with a (hopefully) unique prefix. Useful class names like Object and Button are likely to be used by many different developers.
But how can the Unity and Mono versions of Object coexist? The answer is namespaces. Every class defined by Unity is in the UnityEngine namespace, whereas the Mono version of Object is defined in the System namespace. The fully qualified name of every class is the class name preceded by the namespace name, so the Unity Object class is really UnityEngine.Object and the Mono Object is System.Object. References to Unity classes rarely include the UnityEngine prefix, because JavaScript implicitly imports that namespace (equivalent to adding “import UnityEngine” at the top of the script). This means the compiler will look in the UnityEngine namespace when it’s trying to figure out where a class is defined. Unfortunately, JavaScript also implicitly imports the System namespace and Object resolves to System.Object first. So a call to Object.Instantiate generates the the same error as a call to System.Object.Instantiate, since there is no Instantiate function defined for the System.Object class. But a call to UnityEngine.Object.Instantiate works just fine. So just know that any time any call to just plain Instantiate is really a call to UnityEngine.Object.Instantiate!
By the way, there is no such confusion with the Object class in C# scripts, as they do not automatically import the System namespace. And although JavaScript doesn’t yet allow declarations of new namespaces, C# does have that support beginning with Unity 4.
The Awake function is a script callback very similar to Start. Like Start, Awake is called just once, when the GameObject is first made active. Unlike Start, Awake is called regardless of whether the script is enabled. And Awake is always called before Start.
Note Originally, Awake was called as soon as the GameObject was loaded into a scene or created, regardless of whether the GameObject was active. This behavior didn’t work well with prefabs, hence the current behavior where Awake resembles an earlier Start callback.You could use either Awake or Start in this case, but I like to use Awake for initialization and Start for actively commencing the script’s behavior.
For the game controller script to run, it has to be attached to a GameObject in the scene. Although FuguBowl.js could be attached to an existing GameObject, like the Main Camera, it’s cleaner to create a new GameObject. The GameObject can be named in a way that clearly indicates the game controller script is attached, and you don’t have to worry about the GameObject getting deactivated while it’s being used for other purposes.Going with that strategy, create a new GameObject in the Hierarchy View, name it FuguBowl, same as the script it will hold, and drag the FuguBowl script onto the FuguBowl GameObject (Figure 7-5).

Figure 7-5. The game controller GameObject with FuguBowl.js attached
Most of the properties of the FuguBowl script can be left at their default values, but you do need to drag the Pin prefab from the Project View into the Pin field of the FuguBowl script. Now click Play, and all ten bowling pins appear (Figure 7-6).
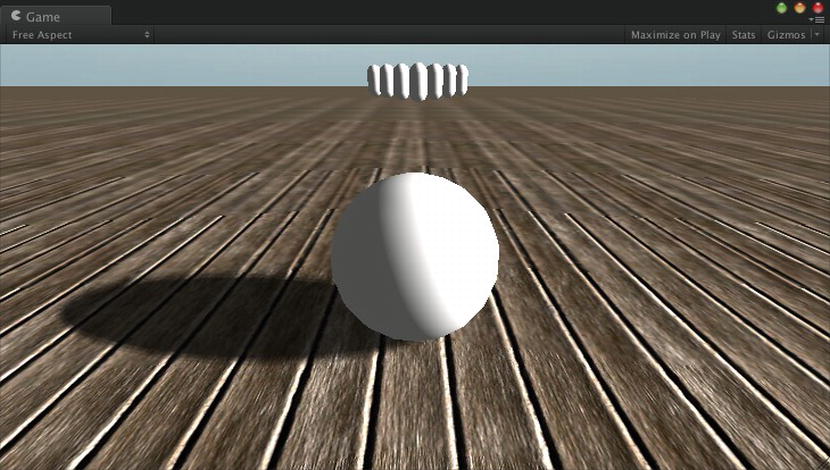
Figure 7-6. The bowling with pins
But as you bowl into the pins, the Ball just bounces off them since the pins have Collider Components but are static GameObjects. Like the Ball, each pin has to have a Rigidbody Component in order to react to forces. A Rigidbody Component can be added to the Pin prefab from the Component menu, but this time, let’s try it another way. Select the Pin prefab in the Project View and then in the Inspector View click the Add Component button. In the resulting pop-up, under Physics select Rigidbody (or you can find that selection by typing “rigidbody” in the search field of the pop-up). Whichever way you choose, there should now be a Rigidbody Component on the Pin prefab (Figure 7-7).

Figure 7-7. The bowling pin prefab with a Rigidbody
Like the Floor and Ball Collider Components, the Pin prefab should have its own PhysicMaterial. A quick way to create a suitable PhysicMaterial is to copy the one used for the Ball, so select the Ball PhysicMaterial in your Physics folder in the Project View, duplicate it using the Edit menu or Command+D, and name the new PhysicMaterial Pin (Figure 7-8).
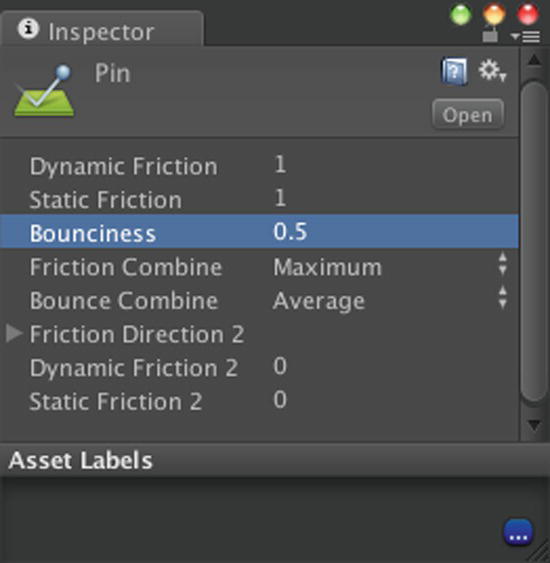
Figure 7-8. A PhysicMaterial for the Pin prefab
Since the bowling pins should roll just as well as the Ball, leave the Dynamic and Static Friction values at 1 (to avoid slippage while rolling), and leave the Fiction Combine value at Maximum. Unlike the Ball, however, the bowling pins should be fairly bouncy, so set the Bounciness to 0.5 and the Bounce Combine value to Average (taking in account the bounciness of whatever it’s bouncing against).Finally, it’s time to assign the Pin PhysicMaterial to the Pin prefab. Select the Pin prefab in the Project View, and then in the Inspector View, click the circle to the right of the PhysicMaterial field of the Collider Component and select the Pin PhysicMaterial from the pop-up chooser (Figure 7-9).

Figure 7-9. Assigning the Pin PhysicMaterial to the Pin prefab
Now when you click Play and roll the Ball into the pins, they get knocked around, as shown in Figure 7-10, bouncing and rolling!

Figure 7-10. Collision with pins that each have a Rigidbody
It’s rather tiresome to have to stop the game and click Play again every time you want to test a roll. And when the Ball rolls off the Floor, you’re stuck watching the Ball fall indefinitely. So let’s have the Ball, Main Camera, and pins reset if the Ball rolls off the edge of the Floor.
First, you need a script that will restore a GameObject to its initial position and rotation (can’t forget rotation—if a pin is knocked down you want to reset it to its initial standing orientation). Create a new JavaScript, call it FuguReset, with the contents of Listing 7-2.
Listing 7-2. Restoring a GameObject position in FuguReset.js
#pragma strict

private var startPos:Vector3;
private var startRot:Vector3;

function Awake() {
        // save the initial position and rotation of this GameObject
        startPos = transform.localPosition;
        startRot = transform.localEulerAngles;
}

function ResetPosition() {
        // set back to initial position
        transform.localPosition = startPos;
        transform.localEulerAngles = startRot;
        // make sure we stop all physics movement
        if (rigidbody != null) {
                rigidbody.velocity = Vector3.zero;
                rigidbody.angularVelocity = Vector3.zero;
        }
}
The Awake function saves the GameObject’s position and rotation in a couple of variables and the function ResetPosition restores the GameObject to those settings. ResetPosition also checks if the GameObject has a Rigidbody. If so, then the function stops it from moving or rotating.
The FuguReset script should be attached to every GameObject that will need to reset its position and (and possibly rotation) when you restart the game. That list includes the Ball, the pins, and the Main Camera. Start by dragging the FuguReset script onto the Main Camera and Ball GameObjects in the Hierarchy View. Then select the Pin prefab in the Project View, and in the Inspector View click the Add Component button to add the FuguReset script (Figure 7-11).
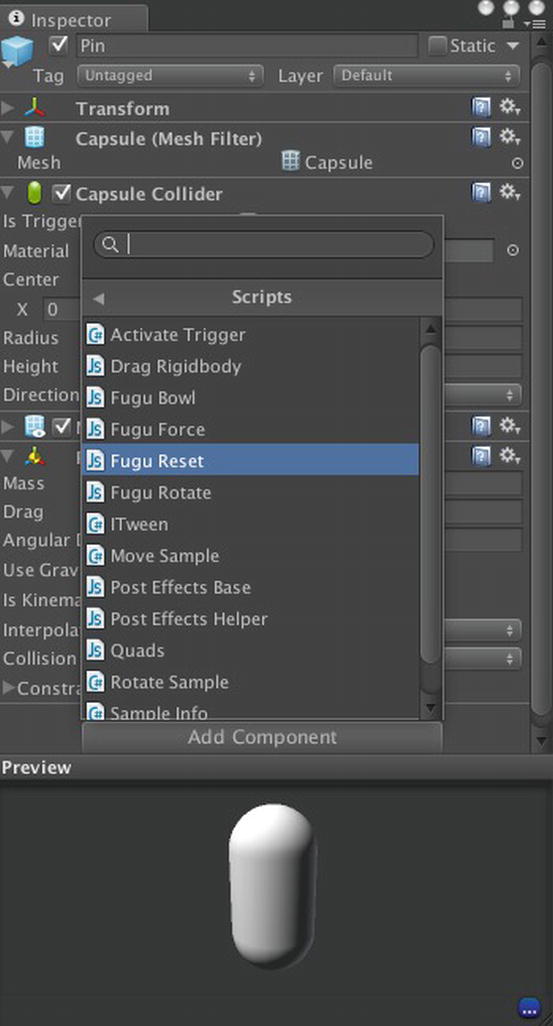
Figure 7-11. Attaching the FuguReset script to the Pin prefab
The Ball, pins, and Main Camera now record their original positions and rotations when the game starts and you have a ResetPosition function ready to call that will restore them to those original positions and rotations.
Normally, calling a function in a script attached to one GameObject from a script attached to another GameObject is a little bit tricky. It involves calling GetComponent on a GameObject to retrieve the script and then referencing that script to call the function.
But in simple cases (e.g., when you don’t care about the return value of the function), Unity allows you to call functions by sending messages to GameObjects using either the SendMessage or BroadcastMessage function in the GameObject class. A GameObject receiving a message, which consists of the name of the function to call, will pass that message on to any attached script that might have that function.
Let’s add some functions to our game controller script that will send ResetPosition messages (Listing 7-3).
Listing 7-3. Functions to Send ResetPosition Messages in FuguBowl.js
var ball:GameObject; // the bowling ball

function ResetBall() {
        ball.SendMessage("ResetPosition");
}

function ResetPins() {
        for (var pin:GameObject in pins) {
                pin.BroadcastMessage("ResetPosition");
        }
}

function ResetCamera() {
        Camera.main.SendMessage("ResetPosition");
}

function ResetEverything() {
        ResetBall();
        ResetPins();
        ResetCamera();
}
The additional code begins with a public variable that will refer to the Ball. The script already has a pins Array that references all of the bowling pins, and the Main Camera can always be referenced through the static variable Camera.main, so now the script can access every GameObject that it needs to reset.The functions ResetCamera and ResetBall call SendMessage to send the ResetPosition message to their respective target GameObjects. Every ResetPosition function defined in scripts attached to those GameObjects will be called. Specifically, since the Main Camera and the Ball have the FuguReset script attached, the ResetPosition function in that script will respond to the message.
The ResetPins function is a little bit different in that it calls BroadcastMessage to send the ResetPosition message. BroadcastMessage behaves the same as SendMessage except that the message is also propagated to any child GameObjects of the original recipient GameObject. This will be useful later in this chapter when we swap in some pins that have their Rigidbodies attached to child GameObjects.
ResetPins does generate a warning in the Console about an Implicit downcast from ‘Object’ to ‘UnityEngine.GameObject’ (Figure 7-12).

Figure 7-12. The Console View of an Implicit Downcast warning
The warning appears because Array is defined to contain elements of type Object, but each element is treated as a GameObject. That’s plausible, since GameObject is a subclass of Object, but as far as the compiler knows, not necessarily true. You can remove the warning by adding #pragma downcast to the script, which basically tells the compiler, “trust me.”
When the Ball rolls off the edge of the Floor, it’s essentially a gutter ball, since there’s no hope of reaching the pins at this point. So a reset of the game is definitely in order when this happens. The gutter ball can be implemented by checking in every frame whether the y position of the Ball has dropped below a certain level. That can be implemented by adding the public variable sunkHeight and Update callback in Listing 7-4 to the FuguBowl script.
Listing 7-4. Update Callback in FuguBowl.js to Test for Gutter Ball
var sunkHeight:float = -10.0; // global y position which we call a gutterball

function Update() {
        if (ball.transform.position.y<sunkHeight) {
                ResetEverything();
        }
}
The variable sunkHeight specifies what y position the Ball has to fall below to reset everything. The default value at some of sunkHeight is some distance below zero so the players has some time to see the Ball fall before it resets.The Update callback checks every frame whether or not the Ball’s y position is below sunkHeight. If it is, ResetEverything is called, which sends out all the ResetPosition messages to the Ball, Main Camera, and pins. Before you click Play to test this, you need to assign the ball public variable in the script by dragging the Ball GameObject from the Hierarchy View into the Ball field of the FuguBowl script (Figure 7-13).
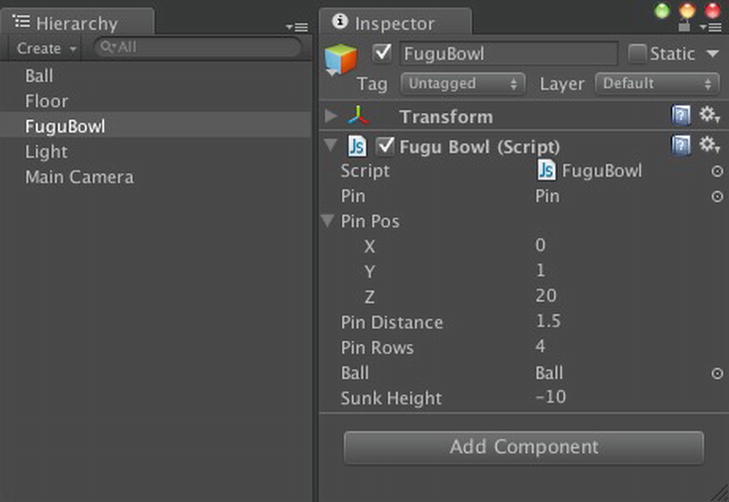
Figure 7-13. Game controller properties in FuguBowl.js to support resetting the ball
Now when the Ball rolls off the Floor, the Ball, Main Camera and pins should pop right back into their beginning positions. Continuous gameplay!
The complete game controller script is given in Listing 7-5.
Listing 7-5. . The Complete Listing for FuguBowl.js
#pragma strict
#pragma downcast

var pin:GameObject;                   // pin prefab to instantiate
var pinPos:Vector3 = Vector3(0,1,20); // position to place rack of pins
var pinDistance = 1.5;                // initial distance between pins
var pinRows = 4;                      // number of pin rows

var ball:GameObject;                  // the bowling ball
var sunkHeight:float = -10.0;

private var pins:Array;

function Awake () {
        CreatePins();
}

function CreatePins() {
        pins = new Array();
        var offset = Vector3.zero;
        for (var row=0; row<pinRows; ++row) {
                offset.z+=pinDistance;
                offset.x=-pinDistance*row/2;
                for (var n=0; n<=row; ++n) {
                         pins.push(Instantiate(pin, pinPos+offset, Quaternion.identity));
                         offset.x+=pinDistance;
                }

        }
}

function Update() {
        if (ball.transform.position.y<sunkHeight) {
                ResetEverything();
        }
}

function ResetBall() {
        ball.SendMessage("ResetPosition");
}

function ResetPins() {
        for (var pin:GameObject in pins) {
                pin.BroadcastMessage("ResetPosition");
        }
}

function ResetCamera() {
        Camera.main.SendMessage("ResetPosition");
}

function ResetEverything() {
        ResetBall();
        ResetPins();
        ResetCamera();
}
Capsules make for very simplistic bowling pins, both in appearance and collision shape. A real bowling pin model would be much better, but, unfortunately, searching for bowling pins on the Asset Store turns up nothing (although that could change at any time if a vendor decides to fill the void). However, there are a lot of other models on the Asset Store, that, if we’re flexible, could act as bowling pin substitutes. It turns out there are several packages of barrel models, so we’ll go with barrels as pins for our backup plan.
A search for barrel on the Asset Store reveals several free packages of barrel models (Figure 7-14).

Figure 7-14. Free barrels on the Asset Store
Any of the free packages will work fine, but the Barrel package from Universal Image, that one displaying three barrels in its Asset Store icon, already has a prefab set up, so let’s download that package. From the Asset Store description, and from the Project View after you import the package, you can see the Barrel package is nicely organized, with a folder named Barrel that contains the Barrel prefab and the Barrel model (Figure 7-15).

Figure 7-15. The Project View of the Barrel package
The two assets look similar in the Project View, but clicking on the prefab shows the full filename Barrel.prefab at the bottom of the Project View, while clicking on the Barrel model displays Barrel.FBX, indicating it’s an imported FBX file (3D format used by Autodesk).
We need a Barrel prefab to replace the simple Pin prefab, but we should avoid modifying the original Barrel prefab (another import of the Barrel package would clobber our changes). To make our own copy of the Barrel prefab, select the prefab, press Command+D (or Duplicate from the Edit menu), and drag the copy of the prefab into the Prefabs folder. Then rename it to BarrelPin, since it’s a Barrel and we’re using it as a bowling pin (Figure 7-16).

Figure 7-16. Copy of the Barrel prefab
Select the child GameObject of the BarrelPin prefab so that it is displayed in the Inspector View. A MeshFilter Component and MeshRenderer Component are present, but to use this prefab as a bowling pin, it needs a Collider Component and Rigidbody Component so the pins (barrels) are subject to gravity and can collide with each other, the Ball, and the Floor. The prefab also needs a FuguReset script attached to handle the ResetPosition messages sent by the game controller.
For now, let’s take care of the Rigidbody Component and FuguReset script and defer adding the Collider Component, as matching the barrel shape will be somewhat involved. With the prefab selected, you choose Rigidbody from the Component menu on the menu bar, or you can click the Add Component button at the bottom of the Inspector View and choose Rigidbody from the resulting menu (Figure 7-17).

Figure 7-17. Adding a Rigidbody and FuguReset script to the Barrel prefab
In the newly attached Rigidbody Component, set the Mass to 2 (kg). That’s pretty light for a metal barrel, but the game won’t be fun if the Ball can’t knock down the barrels-as-pins without too much trouble. In games, fun trumps reality!
The FuguReset script can added to the prefab by dragging the script into the Inspector View or also by using the AddComponent button.
Use the Prefab
To replace the simple capsule-shaped Pin with the BarrelPin prefab, select the FuguBowl GameObject in the Hierarchy View so that it’s Components display in the Inspector View, and then drag the BarrelPin prefab into the Pin field of the FuguBowl script, replacing Pin prefab we started with (Figure 7-18). Now when you click Play, ten barrels will appear instead of ten capsules. But they will immediately fall through the Floor, because the pins don’t have Collider Components, yet!
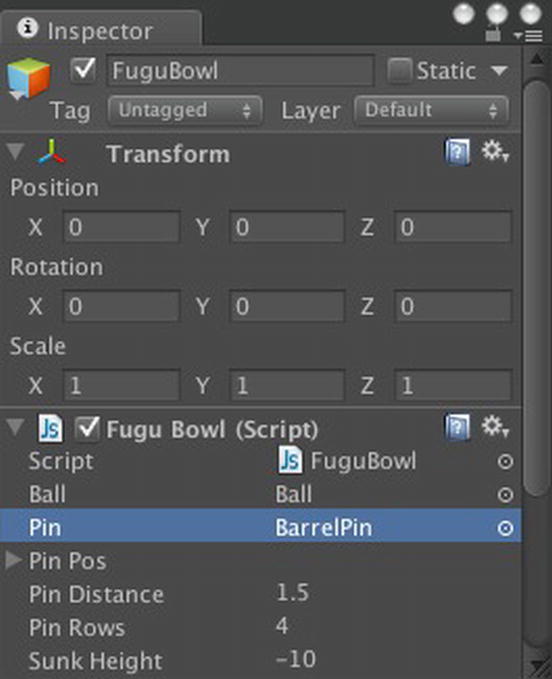
Figure 7-18. Using the BarrelPin prefab as the bowling pin
We can’t avoid it any longer. It’s time to take care of the BarrelPin collision. So that we can visualize the BarrelPin and it’s collision shape in the Scene View, temporarily place the BarrelPin prefab in the scene by dragging the prefab into the Hierarchy View. Once there, open the BarrelPin GameObject and select the child Barrel GameObject so that it is displayed in the Inspector View, and press the F key to invoke the Frame Selected, which will center the Barrel in the Scene View. Also, change the viewing options (top left pull-down menu in the Scene View) from Textured to Wireframe, so the Mesh and Collider Component’s shape can be seen more easily.Unfortunately, the Component menu doesn’t list any primitive colliders that are barrel-shaped (a CylinderCollider would be perfect, but it doesn’t exist), and although a MeshCollider would conform to the shape of the barrel, MeshColliders are not appropriate for physical GameObjects because of performance issues. The closest matching shape in the Components menu is the CapsuleCollider. So let’s start with a Capsule Collider on our Barrel GameObject and see how well it fits.
Although Unity tries to size a Collider Component to fit the GameObject’s Mesh when the Collider Component is added, in this case the fit isn’t very good, largely because, as you can see from the rotation in the Transform Component, this GameObject is rotated 90 degrees around its x axis. Without that rotation, the barrel is lying on its side, but the rotation also affects the orientation of the Collier Component. To adjust for the rotation, switch the axis of the Capsule Collider to the z axis. After that, setting the radius to 2 and height to 6 will produce a much closer match between CapsuleCollider and the Barrel (Figure 7-19).

Figure 7-19. Adding a CapsuleCollider to the Barrel
The Capsule matches the Barrel shape pretty well around the side but not on the top and bottom, which should have flat surfaces instead of just the endpoints the capsule. For flat surfaces, BoxColliders are the obvious choice. So this is a situation where you want to combine multiple Collider Components into a compound collider.
Add a Compound Collider
Unity allows more than one Collider Component on a GameObject, but they have to be different types of Colliders. For example, two BoxCollider Components cannot be attached to the same GameObject. However, an arbitrary set of primitive Collider Components can be combined into a compound collider by attaching each of the Collider Components to its own GameObject and making all of those GameObjects children of the Rigidbody’s GameObject.This is the approach we’ll take in combining a CapsuleCollider Component and a BoxCollider Component for the Barrel. To hold those two Collider Components, create two child GameObjects of the Barrel in the Hierarchy View and name them box and capsule for their respective shapes (Figure 7-20).

Figure 7-20. Child GameObjects for a compound collider
Rather than create a new CapsuleCollider Component from scratch, let’s take advantage of the CapsuleCollider Component that’s already oriented and sized properly on the Barrel GameObject by copying that Component. Select the Barrel GameObject, and in the Inspector View, right-click on the CapsuleCollider Component and select Copy Component (Figure 7-21).

Figure 7-21. Copying a Component
Then select the capsule GameObject again, right-click its Transform Component in the Inspector View, and in the pop-up menu select Paste Component As New (Figure 7-22). The capsule GameObject now has a CapsuleCollider Component just like the one created for the Barrel GameObject, so we don’t need the original one, anymore. Select the Barrel GameObject, right-click on the CapsuleCollider Component that you just copied, and select Remove Component in the pop-up menu to remove the CapsuleCollider Component. There should be just one CapsuleCollider Component in the Barrel hierarchy, now.

Figure 7-22. Pasting a Component
Let’s turn our attention to the BoxCollider Component. You could add it directly to the box GameObject using the Component menu, but if you add the BoxCollider Component to the Barrel GameObject, instead, then Unity will do the work for you in sizing the BoxCollider to the Mesh.So let’s repeat the process you went through with the CapsuleCollider Component, only this time with a BoxCollider. With the Barrel GameObject selected, add a BoxCollider Component using the Component menu or the AddComponent button. In the Scene View, you can see the BoxCollider encompasses the Barrel (Figure 7-23).

Figure 7-23. A BoxCollider automatically sized around the Barrel
It’s fine that the BoxCollider extends from the top to bottom of the Mesh, since it’s desirable to have two flat collision surfaces on both ends. But it’s not so desirable to have the BoxCollider extending outside the curved portion of the Barrel. Decrease the width of the BoxCollider by lowering its x and y values of its Size in the Inspector View (remember, the Barrel is rotated) to 2.5. From the top-down vantage of the Scene View (click the y axis of the Scene Gizmo), you can see the BoxCollider now fits inside the barrel (Figure 7-24).
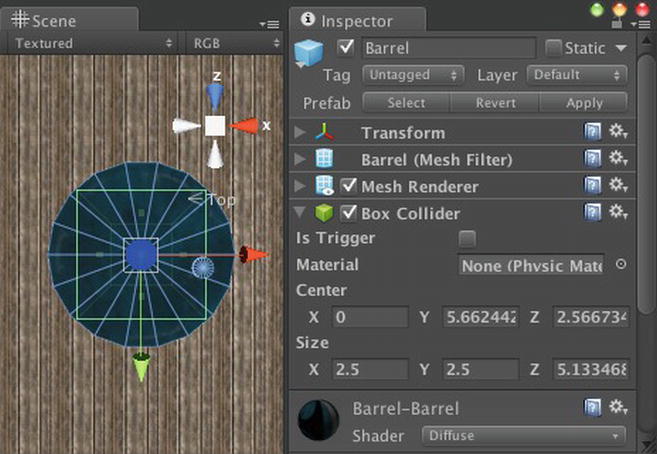
Figure 7-24. Top-down view of a BoxCollider fitting within the Barrel
Now that you have the BoxCollider sized the way you want it, repeat the process for the CapsuleCollider—right-click the BoxCollider in the Inspector View, select Copy Component, select the box GameObject, right-click its Transform Component in the Inspector view, select Paste Component As New. And don’t forget to go back to the BoxCollider Component on the Barrel, right-click it to Remove Component. With the Barrel selected, you should see both Collider Components displayed in the Scene View, providing a better approximation of the Barrel shape than either of the Collider Components individually (Figure 7-25).
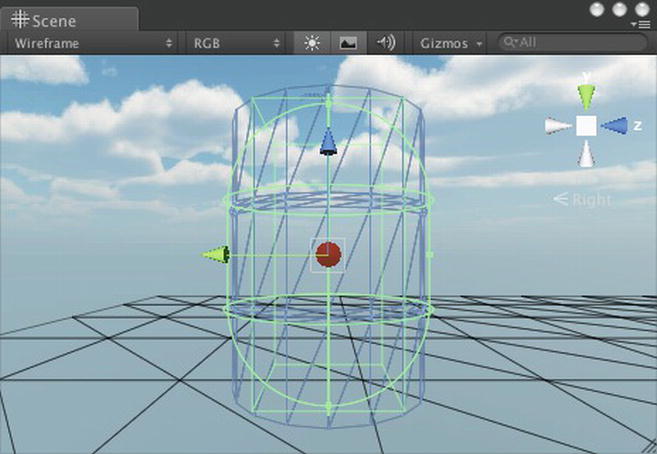
Figure 7-25. Both colliders in a compound collider on display
Finally, now that the Barrel is ready to go, select Apply Changes To Prefab in the GameObject menu (Figure 7-26).

Figure 7-26. Applying changes to the BarrelPin prefab
Tip It’s a good idea to perform a Save Project or Save Scene (which implicitly performs a Save Project), to make sure prefab changes are really saved. Project changes are saved when Unity exits normally, but if it exits abnormally, all bets are off.
With the prefab updated, the Barrel GameObject is no longer needed in the scene and can be removed (Command+Delete or choose Delete from the Edit menu). Now when you click Play, the barrels no longer fall through the Floor, and, as shown in Figure 7-27, they tumble when you roll into them!

Figure 7-27. Bowling into Barrels
A Complex Collider (HyperBowl)
The compound collider created for the BarrelPin prefab is still fairly simple, consisting of just two primitive Collider Components. Compound colliders can be much more complex, depending on the shape they’re approximating. As an example of a more realistic bowling pin, take a look at HyperBowl (Figure 7-28).

Figure 7-28. A compound collider for HyperBowl bowling pin
The compound collider for a bowling pin in HyperBowl consists of six primitive colliders: a BoxCollider to provide a flat surface at the bottom, a CapsuleCollider for the neck of the pin, and four SphereColliders of various size to fill out the body and top of the pin.
Our bowling game is starting to look good, but it’s awfully quiet! You could add background music or ambient sound like the looping music to in the dance scene. But a bowling game really should have collision-based sounds, such as a rolling sound for the Ball and collision sounds for each pin.
Get Sounds
First, we need to find some sound files. Once again, let’s visit the Asset Store, navigating to the Sound category and then the Sound Effects (FX) subcategory (Figure 7-29).

Figure 7-29. Asset Store search results for free Sound FX
The Free SFX Package from Bleep Blop Audio lists a good variety of audio clips, so let’s download that package. The files show up in a Project View folder named Assets inside your Assets folder (submitting packages to the Asset Store is a little tricky so that file organization was probably unintentional).
Feel free to play the various sounds by selecting them and clicking the Play button in the Inspector View. But for now we’ll use the Sci-Fi Ambiences sound for the Ball rolling sound. It’s not a great ball-rolling sound, but it’s the only AudioClip in this package that’s suitable for looping (Figure 7-30).

Figure 7-30. The AudioClip used for the Ball rolling sound
Drag the AudioClip to the Ball GameObject in the Hierarchy View and select the Ball. The Inspector View should display a new AudioSource Component that was automatically created to reference the AudioClip (Figure 7-31).

Figure 7-31. The Inspector View of the Ball with an AudioSource
The rolling sound will be controlled by a script and not played automatically, so make sure the Play on Awake checkbox is unchecked. But when the rolling sound is played, it should continue playing until told to stop, so the Loop checkbox should be checked.
The AudioClip is a 3D sound, as indicated in the AudioSource Component below the AudioClip name. That means the sound will attenuate with the distance between the AudioSource Component and AudioListener Component (which is attached to the Main Camera). The attenuation is specified by the graph shown at the bottom of the AudioSource Component. You can adjust the attenuation by selecting among the Volume Rolloff options and also specifying the Min Distance, which specifies at what distance the attenuation begins. If the AudioListener is less than the Min Distance from the AudioSource, then the sound is not attenuated at all. Or you can directly manipulate the attenuation curve by dragging the handle along the curve.
Tip If you’re having trouble hearing an AudioSource, try starting with a high Min Distance to be certain you’re hearing it at full volume and then adjust the Min Distance and attenuation curve to your liking.The script to play the rolling sound will be attached to the Ball. Create a new JavaScript, place it in the Scripts folder, and name it FuguBallSound. Then add the contents of Listing 7-6 to the script.
Listing 7-6. FuguBallSound.js Script for Ball Rolling Sound
#pragma strict

var minSpeed:float = 1.0;
private var sqrMinSpeed:float = 0;

function Awake() {
        sqrMinSpeed = minSpeed*minSpeed;
}

function OnCollisionStay(collider:Collision) {
        if (collider.gameObject.tag == "Floor") {
                if (rigidbody.velocity.sqrMagnitude>sqrMinSpeed) {
                         if (!audio.isPlaying) {
                                 audio.Play();
                         }
                }  else {
                         if (audio.isPlaying) {
                                 audio.Stop();
                         }
                }
        }
}

function OnCollisionExit(collider:Collision) {
        if (collider.gameObject.tag == "Floor") {
                if (audio.isPlaying) {
                         audio.Stop();
                }
        }
}
There is some similarity with the FuguForce script, since both scripts keep track of when the Ball is rolling using collision callbacks and checking the tag of the colliding GameObject to see if it’s the Floor. FuguBallSound uses just two of the OnCollision callbacks: OnCollisionStay and OnCollisionExit. OnCollisionEnter isn’t implemented, as it would be redundant with OnCollisionStay (the FuguForce script didn’t really need OnCollisionEnter, either). Both of the script’s collision callbacks reference the audio variable of this Component, which is equivalent to the audio variable of this Component’s GameObject and references the attached AudioSource.
When the Ball is on the Floor, OnCollisionStay checks if the Ball is moving faster than a minimum speed, which is specified in a public variable minSpeed so that it can be adjusted in the Inspector View. The script actually compares the square of the Ball speed against the square of minSpeed to avoid the computational expense of square root calculations. If the Ball is on the Floor and moving fast enough, and if the Ball’s AudioSource is not already playing its AudioClip, then the script starts playing the AudioClip. If the Ball’s speed drops far enough, the rolling sound will stop.
The job of OnCollisionExit is easier, as it just needs to check if audio is playing, and if it is, then stop playing the audio. In other words, if the Ball loses contact with the Floor because it bounced or rolled off, then the rolling sound stops.
Drag the script onto the Ball in the Hierarchy View (Figure 7-32), and click Play to try it out. As the Ball rolls around, the rolling sound should become audible, and the sound should cease when the Ball comes to rest.

Figure 7-32. The FuguBallSound script attached to the Ball GameObject
Now you’re ready for the pin sound. In place of a real bowling pin sound, we’ll make do with the Coin_Pick_Up_03 sound from the Free SFX Pack (Figure 7-33).

Figure 7-33. The AudioClip used for Pin collision sounds
Select the Pin prefab in the Project View and add an AudioSource Component using the Add Component button at the bottom of the Inspector view. Then click to the right of the AudioClip field of the AudioSource Component to select the Coin_Pick_Up_03 AudioClip. And once again, uncheck the Play on Awake checkbox or you’ll hear that sound play whenever the game starts.
Similar to how the Ball rolling sound is played by a script attached to the Ball, the Pin collision sounds will be played by a script attached to each Pin. Create a new JavaScript, place it in the Scripts folder, and name it FuguPinSound. Add the code in Listing 7-7 to the script.
Listing 7-7. Generating Pin Collision Sounds in FuguPinSound.js
#pragma strict

var minSpeed = 0.01; // actually the square of the minSpeed

function OnCollisionEnter(collider:Collision) {
        if (collider.relativeVelocity.sqrMagnitude > minSpeed) {
                if (collider.gameObject.tag != "Pin") {
                         audio.Play(); // hit anything besides another pin, play the sound
                }  else {
                         // otherwise pin with lower ID gets to play
                         if (gameObject.GetInstanceID() < collider.gameObject.GetInstanceID()) {
                                 audio.Play();
                         }
                }
        }
}
This script is different from FuguBallSound in that it uses the OnCollisionEnter callback and not the OnCollisionStay or OnCollisionExit callbacks. Again, there is a minSpeed variable that is compared with the squared magnitude of a velocity. But this time the velocity is the relativeVelocity variable of the Collision, since both the Pin and whatever it’s colliding with (the Ball or another Pin) may both be moving.
Here it is assumed that each Pin has a tag named Pin, so you can test if the Pin is colliding with another Pin. If the Pin is not colliding with another Pin, then it must be getting hit by the Ball or is falling on the Floor, in which case the script plays the collision sound. If the Pin is getting hit by another Pin, then a decision has to be made which Pin gets to play the collision sound. Otherwise, they’ll both play the sound at the same time.A simple trick is used to arbitrate. Each Object in Unity has a unique ID number that can be retrieved by the Object function GetInstanceID. The rule used in the script is that the Pin with the lower ID number wins and gets to play the collision sound.
To attach the FuguPinSound script to the Pin prefab, select the prefab in the Project View and use the Add Component button in the Inspector View to select the script. And while you have the Pin prefab in the Inspector View, set its tag to Pin, as the FuguPinSound script expects. In the same manner that the Floor tag was create ad assigned to the Floor GameObject, select Add Tag in the Tag menu, add a tag named Pin in the TagManager (make sure you’re creating a new tag, not a new layer), and select the Pin prefab again so that you can use the Tag menu to choose the new Pin tag. This, by the way, is an example of how a tag can be used to identify a group of elements rather than uniquely naming one, like we did with the Floor.
The Barrel GameObject in our BarrelPin prefab should now look like Figure 7-34 in the Inspector View.
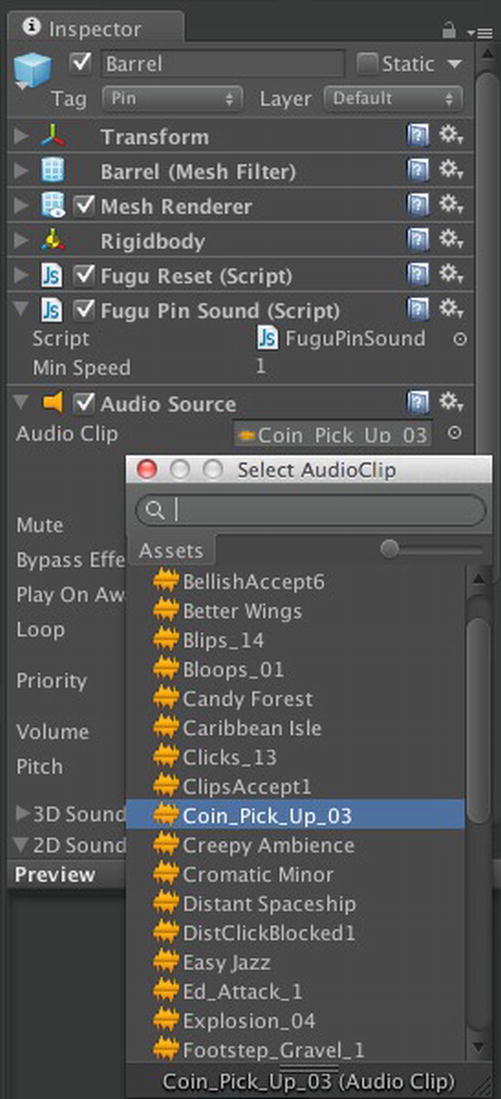
Figure 7-34. AudioSource and FuguPinSound script attached to the BarrelPin prefab
Now when you click Play and bowl into the barrels, pleasant coin sounds chime in as the barrels bounce around!
Explore Further
The bowling game is starting to look like a bowling game at this point (whereas at the end of the previous chapter, we had at best what could be called a rolling game). But although he player can roll the ball around and knock down bowling pins, we still don’t have the rules of the game. Stay tuned for that in the next chapter, which will get much heavier into scripting. In fact, this chapter is sort of a turning point, trending to more and more scripting and less introduction of new Components. So from now on, so you should be spending most of your time in the Scripting Reference of the Unity documentation.
The “Instantiate” function in the “Object” class was introduced to create the bowling pins at runtime. This is the function used to spawn GameObjects, typically from prefabs. In other games, you might use Instantiate to spawn anything from pickup items to NPC’s. The function is described in the “Scripting Overview” but its page in “Runtime Classes” has more detailed information.
One new callback, “Awake”, was introduced as an alternative to the “Start” callback. The “MonoBehaviour” collision callbacks “OnCollisionEnter”, “OnCollisionStay”, and “OnCollisionExit” were introduced in the previous chapter but used again for rolling and collision sounds. The “Collision” class for information on collisions: relative velocity, the GameObject that was collided against. Other data such as the actual point of contact are also available.
The page for the “Rigidbody” class is worth reading in its entirety. Its variables correspond largely to the properties available in the Inspector view, and besides the “AddForce” function you used to push the Ball, there are many related functions: “AddRelativeForce”, “Add Torque”, “AddRelativeTorque”, “AddExplosionForce”, “AddForceAtPosition”.
The “Transform” class was used again, this time checking “Transform.position” to determine if the Ball had rolled off the Floor. Since Quaternions were mentioned, take a look at the “rotation” and “localRotation” variables in “Transform” and compare to the “eulerAngles” and “localEulerAngles” variables.From the “GameObject” class, the “SendMessage” and “BroadcastMessage” functions were used to invoke the “ResetPosition” functions in other GameObjects. There’s also a “SendMessageUpward” function that works like “BroadcastMessage”, except the message is sent up the GameObject’s hierarchy instead of down. The message functions are also defined in the “Component” class.
“AudioSource” functions were used to play and stop AudioClips. Other functions are useful if you want to refine your sound code. For example, the HyperBowl rolling sound code changes the volume of the sound (using the “AudioSource.volume” variable) according to the ball’s velocity, which not only provides a nicer rolling sound but also a softer cutoff of the sound when stopping.
We saw the Asset Store has a bountiful selection of free barrel models and sound libraries. And there’s much more if you don’t restrict yourself to free assets.
Although the Asset Store doesn’t yet have bowling pin models, it’s not hard to find some on 3D model marketplaces such as http://Turbosquid.com/. Free audio, including bowling sounds, are available on the Creative Common licensed http://freesound.org/.