
Let’s Roll! Physics and Controls
At last, we’re ready to begin the main Unity project for this book, a bowling game in the style of HyperBowl, an arcade/attraction game I worked on over ten years ago and ported to Unity just a few years ago. HyperBowl has a unique be-the-ball gameplay where the player constantly rolls the ball around a 3D environment to reach the pins. The bowling game constructed in this book will be much simpler but feature the same style of control.
Even a simple bowling game like this one is a significant project. It will incorporate physics, input handling, camera control, collision sounds, game rules, a score display, and a start/pause menu. And that’s even before performing any adaptation for iOS. This chapter just focuses on getting a ball to roll around and will require some physics setup but only a single script for the ball control.
The script is available in the project for this chapter on http://learnunity4.com/ But it’s a fairly simple script and developed incrementally throughout this chapter, so it’s best to follow along, implementing it from scratch.
Make a New Scene
The dance scene in the previous chapter was really a modification of the original cube scene we started with in Chapter 3, so we didn’t have create the entire scene from scratch again. The skybox, light and floor would be useful in the bowling game, so by the same token we could continue modifying the cube scene and deactivate or remove the skeleton and music before adding content for the bowling game. But there’s no rule saying we can have only one scene in a project, so let’s leave the cube/dance scene intact and just make a copy of it to use as the beginnings of the bowling scene.
From the previous chapter, you should have the Unity Editor still open to the dance (cube) scene. The quickest way to start working with a copy of this scene is to select Save Scene As in the File menu (Figure 6-1).

Figure 6-1. Saving the scene as a new scene
This will be a bowling scene, so let’s name it “bowl” (Figure 6-2).

Figure 6-2. The bowl scene saved at the top level of Assets
Note To be consistent with the asset organization system, scenes would go into a Scenes folder, but if I have just one or a few scenes, I often just leave them saved at the top level of the Asset folder.
Instead of using Save Scene As, you could have duplicated the scene by selecting it in the Project View and invoking Duplicate from the Edit menu (or the keyboard shortcut Command+D), then renamed the new scene and then switched to it by double-clicking the scene file.
Delete GameObjects
Now you can clean out anything from the scene that’s not needed for bowling without fear of mangling the dance scene. So instead of deactivating the skeleton, just delete it by selecting the skeleton GameObject in the Hierarchy View and using the Delete command from the Edit menu (or the Command+Delete keyboard shortcut). Also delete the Cube hierarchy and Caribbean Isle GameObject (Figure 6-3), as cubes and music won’t be necessary for bowling, either.

Figure 6-3. Deleting unneeded GameObjects from the bowling scene
Adjust the Light
Once again, a little housekeeping is in order before starting work on a new the scene. Let’s start with the color of the Light. Beginning with white lights until all the assets are in the scene allows you to see everything in its full original colors. So let’s change the Light color to white by clicking in its Color field and selecting white in the color chooser (Figure 6-4).

Figure 6-4. Set the Light color to white
Also, since the Point Light was actually changed to a Directional Light in the previous chapter to support soft shadows (for Unity Pro users), the name “Point Light” is misleading. This is a good time to change its name to just “Light,” which will keep your options open if you want to change its type again, later.
Retile the Floor
The shiny patterned floor from the dance scene doesn’t look much like a bowling lane, so let’s change its appearance. This is an opportunity to try out Unity’s support for procedural materials, which is based on Allegorithmic’s Substance technology. Procedural materials use textures generated from algorithms instead of image files. This allows a lot of variation in the materials by tweaking the texture-generation parameters and also potentially offers space savings, since the procedural materials don’t require loading image files as textures.
Let’s try out a procedural material for the floor. Search for “substance” in the Asset Store window (the Project View searches among individual assets, so in this case it won’t bring up any Asset Store results). A number of free Substance packages from Allegorithmic will appear in the Asset Store window (Figure 6-5).

Figure 6-5. The Asset Store results for “substance”
The package we want is Eighteen Free Substances. Select and import that package, and 18 Substance archives (files with the .sbsar extension) will show up in the Project View in a Substances_Free folder (Figure 6-6). The Substance file that will provide a wood floor look is Wood_Planks_01, listed at the end.

Figure 6-6. The Project View of the 18 Free Substances package
Each Substance archive contains one or more ProceduralMaterial assets (ProceduralMaterial is a subclass of Material) and their supporting textures and scripts. Clicking the right arrow of the Wood_Planks_01 icon will change it to a left arrow and expand to show the ProceduralMaterial of Wood_Planks_01 followed by its associated textures (Figure 6-7).

Figure 6-7. An expanded view of the Wood_Planks_01 Substance archive
The wood planks ProceduralMaterial looks like a decent candidate for a bowling lane floor (at least better than our fantasy and sci-fi textures), so drag the wood planks ProceduralMaterial (not the archive) to the Plane in the Hierarchy View. You can see in the Scene View that the Plane now has wood planks (Figure 6-8).

Figure 6-8. The Plane with the Wood_Planks_01 procedural material
The planks look overly large, but you can adjust how the textures (there’s a main texture and a normal map texture) stretch across the Plane by editing the UV scale fields of the textures. Select the Plane in the Hierarchy View, and in the Inspector View set the x and y Tiling values of both textures to 5 instead of 1 (Figure 6-9).
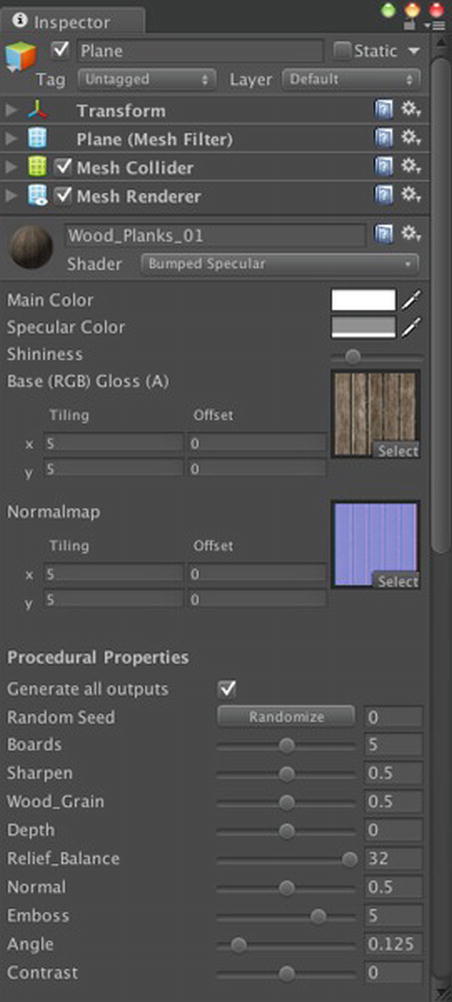
Figure 6-9. The Inspector View of the Plane with a procedural material
Now the textures are tiled five times, where before you just had one (Figure 6-10). In the Inspector View, notice that you have a number of procedural properties you can play with to vary the appearance of the generated textures.
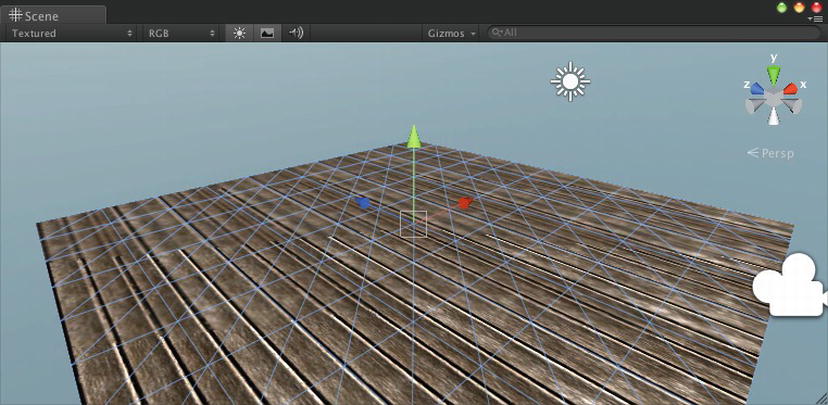
Figure 6-10. The Plane with its Tiling values set to 5
And as with the Light, while you have the Inspector View up, this is a good time to change the name in the top text field and rename the Plane to Floor, to make its function more obvious.
Reset the Camera
The MouseOrbit script attached to the Main Camera isn’t suitable for the bowling game, so you can disable that script. Better yet, remove the script entirely from the Main Camera by selecting the Main Camera in the Hierarchy View, and then in the Inspector View, right-click the MouseOrbit component and select Remove Component (Figure 6-11).

Figure 6-11. Removing the MouseOrbit script from the Main Camera
While you’re at it, set the Main Camera position to (0,1,-5) and its rotation to (0,0,0). Now you should be looking at a nice floor and sky and not much else (Figure 6-12).

Figure 6-12. The Game View with a fixed Main Camera
Make a Ball
Now the scene has a Skybox, Light, Flare, and a Floor, and a Main Camera with a fixed viewpoint. It’s time to add the bowling ball.
Make a Sphere
Two primitive GameObjects have been used so far in this book: Plane and Cube. For a ball, there’s another primitive that’s perfect: Sphere. Like Plane and Cube, Sphere can be selected from the Create submenu of the GameObject menu on the menu bar, but a Sphere can also be instantiated using the Create button on the top left of the Hierarchy View (Figure 6-13).
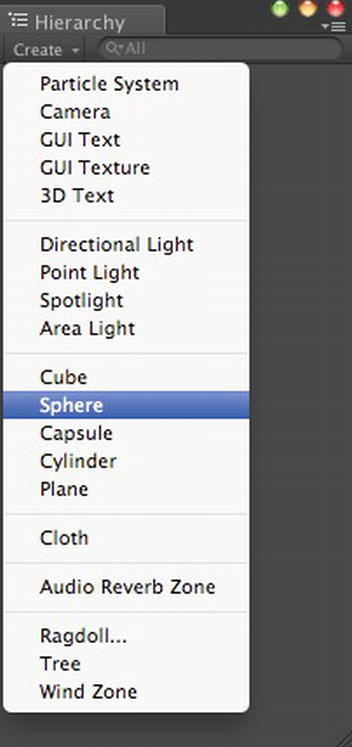
Figure 6-13. Creating a ball
After selecting Sphere from the Create menu, a new GameObject named Sphere should be listed in the Hierarchy View. Select the Sphere GameObject in the Hierarchy View so it can be examined in the Inspector View (Figure 6-14).

Figure 6-14. The Inspector View of the Ball
Like the Cube and Plane primitives, the Sphere GameObject has a MeshFilter Component and a MeshRenderer Component, plus a Collider Component that is of the same shape as the primitive (in this case, a SphereCollider). First, in the spirit of meticulously naming GameObjects, change the name of the Sphere to Ball so it’s clear that this GameObject is the bowling ball. Then set the Ball position to (0,1,0), which places the center of the Ball 1 m above the Floor. Since the radius of the ball is 0.5 meters (the SphereCollider Radius shown in Figure 6-14 is a good hint), this gives some clearance between the Ball and Floor. And when you click Play, the Ball will hang in the air above the Floor (Figure 6-15).

Figure 6-15. The Ball in the air
This is as expected, of course. Just like everything else created so far—the floor, cubes, even the dancing character—the Ball will go or stay where it’s told.
Make It Fall
For the Ball to fall in response to gravity and respond to other forces, the Ball must be made physical. A GameObject is made physical by addding a Rigidbody Component.
Note Most game physics is known as rigid body simulation, which is pretty much what it sounds like—simulating how hard objects with nonchanging shapes react to forces and collision. A bowling ball is perfect for rigid body simulation. A blob of tapioca pudding, on the other hand, is not.
To add a Rigidbody Component to the Ball, select the Ball in the Hierarchy View, and then in the Component menu on the menu bar, choose the Physics submenu, then Rigidbody (Figure 6-16). You could also click the Add Component button on the bottom of the Inspector View to add a Rigidbody Component.

Figure 6-16. Adding a Rigidbody Component to the Ball
The Inspector View now shows a Rigidbody Component attached to the Ball (Figure 6-17).

Figure 6-17. The Inspector View of the Ball with a Rigidbody Component
Most of the Rigidbody properties can be used with their default values, but a Mass of 1 kilogram is a bit light for a bowling ball. Let’s set it to 5, as 5 kg is in the ballpark for a bowling ball weight.
The minimal values for Drag (air resistance) and Angular Drag (the drag experienced from rotating) are fine. There’s no reason to increase drag unless, say you’re bowling underwater.
The Use Gravity property specifies that the Ball will respond to gravitational force. If the checkbox is not checked, then the Ball will behave as if it were in a zero-G environment (Bowling in Space!).
The Is Kinematic property is used for GameObjects that move and collide but don’t respond to forces (e.g., an elevator platform). Any GameObject with a Collider Component that is going to move should also have a Rigidbody Component attached, and if the movement is not from physics but from scripting or animation, then it should be a Kinematic Rigidbody.
Note A GameObject that is a Kinematic Rigidbody should not be moved by directly changing its Transform Component, as that results in horrible performance. Instead, it should be moved by calling the Rigidbody.MovePosition and Rigidbody.MoveRotation functions on the GameObject’s Rigidbody Component.
The Interpolation property allows smoothing of the GameObject’s movement (at a computational cost).
Likewise, the Collision Detection property provides improved collision detection, in particular for fast-moving GameObjects (again, at a computational cost).
The Constraints property can limit how the GameObject can move in response to forces. For example, a GameObject can be limited to movement along one plane or even just one direction.
With the Rigidbody Component properties appropriately set, click Play again. Now the Ball drops, and even better, it lands on the Floor! (Figure 6-18).

Figure 6-18. The Game View of the Ball landing on the Floor
The default gravitational force, by the way, is standard Earth gravity, approximately 9.8 m/s2. This can be customized in the PhysicsManager (Figure 6-19), available under the Project Settings submenu of the Edit menu.

Figure 6-19. The PhysicsManager
The Gravity property of the PhysicsManager is a vector (specifically, a Vector3 if you access the PhysicsManager from a script), with the only nonzero value in the y direction (and negative, so the force is downward). Thus, not only could you change the gravitational force to, say, that of the Moon, you could even change its direction! If you change the y value from -9.81 to 9.81, the ball will fall upward, and if you change the gravitational vector from (0,-9.81,0) to (1,0,0), the Ball will fall sideways at 1 m/s2. And if you want weightlessness, a gravitational force of (0,0,0) will do the trick.
Customize Collision
A Collider Component provide a GameObject with a collision shape. If you examine the Ball and Floor in the Inspector View, you’ll see each has a Collider Component that was automatically attached and has a shape matching its Mesh. The Floor has a MeshCollider Component, which always matches the GameObject’s Mesh, and the Ball has a SphereCollider Component, which always has a spherical shape. When you select the Ball or Floor, the Scene View highlights not only the Mesh of the GameObject but also the shape of its Collider Component. You can toggle the display of Collider gizmos using the Gizmos menu in the Scene View.
There is almost a one-to-one correspondence among primitive GameObjects and primitive colliders (by “primitive” I mean it’s built in to Unity and also that the shape is simple, which is a good thing for performance). There are exceptions, though. For example, there is a primitive Cylinder GameObject that you can create from the GameObject menu but no available Collider in the shape of a cylinder. Instead, if you create a Cylinder, it automatically uses a CapsuleCollider Component.
The MeshCollider is a special case. Automatically following the shape of the associated Mesh sounds good, but it’s only a good idea for static (i.e., nonmoving) GameObjects. Anything that is moving or might move should have a primitive collider or an aggregation of primitive colliders (more about that in the next chapter). A MeshCollider also has to have its Convex property (checkbox) enabled if it’s to collide with other Mesh Colliders.
PhysicMaterials
Collider Components dictate at what point two GameObjects will collide, but what actually happens when the collision is detected? Does one GameObject bounce off the other, and if so, by how much? Will the Ball slide or roll along the floor or just stick to it? That’s where the Material property of a Collider Component comes in. The property name is a little bit misleading, as the Material of a Collider Component isn’t the same Material used with MeshRenderer Components to determine the appearance of a Mesh surface. Instead, a Collider Component uses a PhysicMaterial to determine the collision properties of the the collision surface. The spelling is a little odd, but I think of a PhysicMaterial as a physics material or physical material.
Note Unlike ProceduralMaterial, the PhysicMaterial class is not a subclass of Material.
The Material property for Collider Components defaults to the Default Material property in the PhysicsManager (Figure 6-19), which is None. To customize its collision behavior, a Collider Component has to have a PhysicMaterial assigned.
Standard PhysicMaterials
You can create a new PhysicMaterial from scratch from the Project View Create menu, but Unity conveniently provides a package of various PhysicMaterials in its Standard Assets. From the Assets menu on the menu bar, select Import Package and then Physic Materials (Figure 6-20).

Figure 6-20. Importing PhysicMaterials from Standard Assets
In the Project View, the new PhysicMaterials will show up in a Standard Assets subfolder named Physic Materials (Figure 6-21).

Figure 6-21. The Project View of the PhysicMaterials from Standard Assets
Anatomy of a PhysicMaterial
Select among the various PhysicMaterials and compare their values in the Inspector View. For example, check out the differences between the Bouncy and Ice PhysicMaterials (Figure 6-22).

Figure 6-22. Comparison of Bouncy and Ice PhysicMaterials
Notice how Ice has particularly low friction values. Dynamic Friction is the friction that occurs while one object is sliding over another. Static Friction is the friction of an object resting on the other. The range for friction is 0-1, where 0 is frictionless and 1 means no sliding at all. Ice also has a Bounciness value of 0, which makes sense, since ice doesn’t bounce. And the Bouncy Physic Material has the maximum Bounciness value of 1.
What happens when a collision occurs between GameObjects with two different Physic Materials? Their Friction and Bounciness values are combined according to the Friction Combine and Bounce Combine values, respectively. The Friction Combine value for Bouncy indicates that when it collides or slides along another PhysicMaterial, the applied friction is the average of the friction values from the two materials. And the Bounce Combine value for Bouncy specifies that the maximum bounciness from the two PhysicMaterials will be used (and since Bouncy already has the maximum bounciness value of 1, that will always be the result).
You might be wondering what happens if the two PhysicMaterials have different combine values, as do Bouncy and Ice. Which one will be used? Well, as of this writing, it’s not actually documented officially, but the precedence order, from low to high, appears to be Average, Multiply, Minimum, and Maximum. So if Bouncy and Ice collide, it will result in Minimum friction, which is the Ice friction at 0.1, and Maximum bounciness, which is the Bouncy bounciness of 1. Which is what we would expect!
The last three properties shown in the Inspector View of the PhysicMaterials allow for anisotropic friction, meaning different friction values in different directions. If the Friction Direction property is filled in with a nonzero vector, then the secondary static and dynamic friction takes effect in that direction. For the wood-tiled Floor, you might specify a secondary friction direction that runs along the grain of the wood and lower static and dynamic friction values along that direction.
Apply the PhysicMaterial
You can drag any of these standard PhysicMaterials into the Material fields of the Floor and Ball Colliders or click the little circle on the right of the Collider’s Material field to select from a pop-up (Figure 6-23). Or you can drag the PhysicMaterial from the Project View onto the GameObject in the Inspector View, and the PhysicMaterial will show up in the right place, i.e., the Material field of the Collider Component.

Figure 6-23. Adding a Bouncy PhysicMaterial to the Ball
Go ahead and try out some different PhysicMaterials on the Floor and Ball. Choose the Bouncy PhysicMaterial for the Ball and Metal for the Floor. Then click Play and watch the Ball bound and bounce and bounce, then switch the Ball to Ice, and watch the Ball land with a thud.
Instead of swapping different PhysicMaterials in and out of a Collider Component, you could adjust the PhysicMaterials themselves. For example, you could select the Bouncy PhysicMaterial in the Project View and then in the Inspector View edit the PhysicMaterial properties. But since those PhysicMaterials are in a Standard Assets package, they could get replaced if you ever reimport the package (either accidentally or deliberately if there is an upgrade). Also, if a PhysicMaterial is used by more than one GameObject, changing its properties would affect all of those GameObjects.
The clean and safe solution here is to create a new PhysicMaterial for every GameObject that needs one. Conceptually, you would expect a unique PhysicMaterial anytime you also need a unique Material. Or, to put it another way, a unique surface would have its own Material and PhysicMaterial. For instance, the Ball and the Floor should each have its own PhysicMaterial, while all of the bowling pins (that you’ll create in the next chapter) should share the same PhysicMaterial.
Make a New PhysicMaterial
Before creating new PhysicMaterials, for organizational purposes, you should create a folder to contain them. Select the top level Assets folder in the left panel of the Project View, then using the Create menu in the Project View, create a new folder and name it “Physics” (it’s shorter and less oddly spelled than “PhysicMaterials”).
You can make a brand new PhysicMaterial using the Create menu in the Project View and then fill in all the properties of the new PhysicMaterial in the Inspector View. But you can save yourself some work by copying a PhysicMaterial from Standard Assets, preferably one that is already close to what you want. Given that the Floor has a wood Material, it’s convenient to start with the Wood PhysicMaterial in Standard Assets. Make a copy of the Wood PhysicMaterial by selecting it in the Project View and invoking Duplicate from the Edit menu (or Command+D for the keyboard shortcut).
Drag the copy of the Wood PhysicMaterial to your new Physics folder in the Project View and rename it “Floor,” since you’ll apply it to your Floor GameObject. Then Duplicate the Floor PhysicMaterial and name the new one Ball (Figure 6-24), since you’ll apply that one to your Ball GameObject.

Figure 6-24. Custom PhysicMaterials
Now there’s a PhysicMaterial for the Floor and one for the Ball. To use these PhysicMaterials on their intended GameObjects, drag the Floor PhysicMaterial onto the Floor GameObject in the Hierarchy View and drag the Ball PhysicMaterial onto the Ball GameObject (you may want to check the two GameObjects in the Inspector View to verify the PhysicMaterials are showing up in the Collider Material fields). Now you’re ready to start tweaking the PhysicMaterial properties.
As one would expect, the Wood PhysicMaterial already has values reasonable for a wood floor, so you can leave it alone. But you want to tweak the Ball Physic Material, so select the Ball PhysicMaterial and set its values as shown in Figure 6-25.
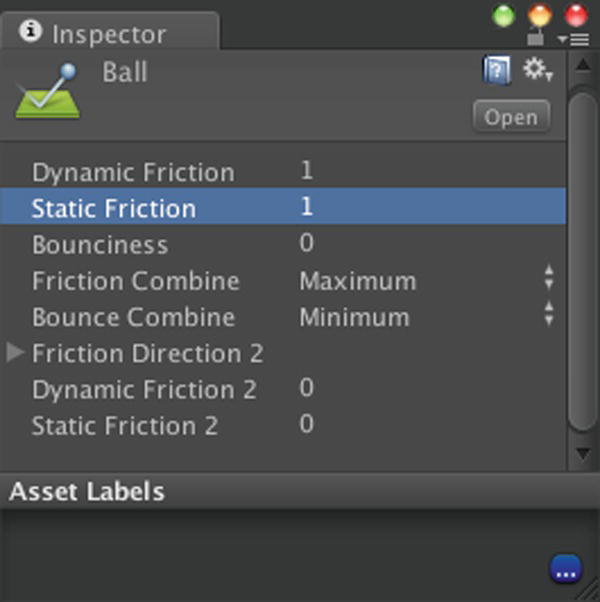
Figure 6-25. Adjusted values for the Ball PhysicMaterial
The Ball to shouldn’t bounce on the Floor (or off the bowling pins when you add them later), so set the Bounciness value to 0 and Bounce Combine to Minimum, which will ensure that the Ball never bounces at all no matter what it collides with. Then set the Dynamic and Static Friction values to 1 and Friction Combine to Maximum so the Ball always has maximum friction whether it’s at rest or rolling. The maximum friction values ensure the Ball rolls instead of slides.
Now when you click Play, the Ball should just drop on the Floor and come to rest without bouncing.
Make It Roll
To get the ball rolling, you’ll need to add some controls to the game (for it to be even a game, in fact). The original arcade version of HyperBowl was controlled by a real bowling ball that acted as a large trackball. Spinning that ball would impart a spin on the ball in the game (resulting in comical body movement while trying to bowl up the hills of San Francisco).
Of course, building an air-supported bowling ball peripheral is outside the scope of this book, but the PC version of HyperBowl provided a mouse-based version of this control, in which pushing the mouse would impart a spin on the ball in that direction. This control is fairly straightforward to implement with just a single script.
Create the Script
Select the Scripts folder in the Project View, create a new JavaScript using the Create button on the top left of the Project View, and name the new script FuguForce, since you’ll be using it to apply a force to the Ball (I’m tempted to call it FuguRoll for the sushi connotation, but I don’t want the name to imply that we’re applying a torque, a rotational rather than a linear force). Then drag the FuguForce script onto the Ball in the Hierarchy View, so you’ll be ready to test it as soon as you add some code to the script.
Update: Gather Input
Attempting to calculate rotations and translations (changes in position) to simulate rolling the Ball would be complicated, involving collision detection and responses with the floor and pins, taking in account gravity and friction and bouncing…all the calculations that the physics engine already does. It would be a waste not to leave that aspect up to the Unity physics system.
And because the Ball already has a Rigidbody Component, it is already a physical object subject to forces, including gravity, and responding to collisions, including the Floor. So all that’s needed to roll the Ball is a push. How much of a push depends on the input, which, in our design, is the movement of the mouse.
Note The original, non-Unity version of HyperBowl applied a torque (rotational force) to the bowling ball, effectively spinning it. Unity does have a script function to apply torque to a Rigidbody, Rigidbody.AddTorque, but I’ve found that it works better in Unity to roll the ball by pushing it with a linear force using Rigidbody.AddForce.
The mouse movement, and input in general, can be checked every frame, so the input gathering code and computation of the corresponding push should go in the Update callback of the script, as shown in Listing 6-1. Copy that listing into the FuguForce script.
Listing 6-1. Update Callback in FuguForce.js
#pragma strict
var mousepowerx:float = 1.0;
var mousepowery:float = 1.0;

private var forcex:float=0.0;
private var forcey:float=0.0;

function Update() {
        forcex = mousepowerx*Input.GetAxis("Mouse X")/Time.deltaTime;
        forcey = mousepowery*Input.GetAxis("Mouse Y")/Time.deltaTime;
}
The script begins with variables mousepowerx and mousepowery used to scale force applied the Ball. mousepowerx affects the force resulting from moving the mouse left or right, and mousepowery affects the force resulting from moving the mouse forward and backware. The variables are public so they can be adjusted in the Inspector View.
The final calculated force is stored in the private variables forcex and forcey, also corresponding to left-right and forward-backward mouse movement, respectively.
Tip It’s a good idea to always specify an initial value for variables in their declarations. That makes the meaning of the code more clear and avoids errors due to wrong assumptions about the initial values (C and C++ programmers especially know to be wary of mystery bugs from uninitialized variables).
The Update callback is where forcex and forcey are calculated from mousepowerx and mousepowery and the mouse movement. Input in Unity is queried using the Input class. For example, the mouse position can be checked by examining the static variable Input.mousePosition, so the mouse movement could be ascertained by saving the mouse position in each Update call and comparing the current position with the saved position from the previous frame.
But the higher-level Input.GetAxis function does that work, already. Input.Getaxis returns a value from -1 to 1 for left-right or forward-backward movement from a mouse, joystick, or keyboard, depending on the argument passed to the function.
In the Update callback, Input.GetAxis("Mouse X") is called to obtain the left-right mouse movement and Input.GetAxis("Mouse Y") is called for the front-back movement that occurred over the previous frame. The results are assigned to the variables forcex and forcey, respectively, after taking into account how much time elapsed during the frame (our old friend Time.deltaTime) and multiplying by scaling factors mousepowerx and mousepowery.
With this code in the FuguForce script, you can see the public mousepower variables show up in the Inspector View of the Ball (Figure 6-26).
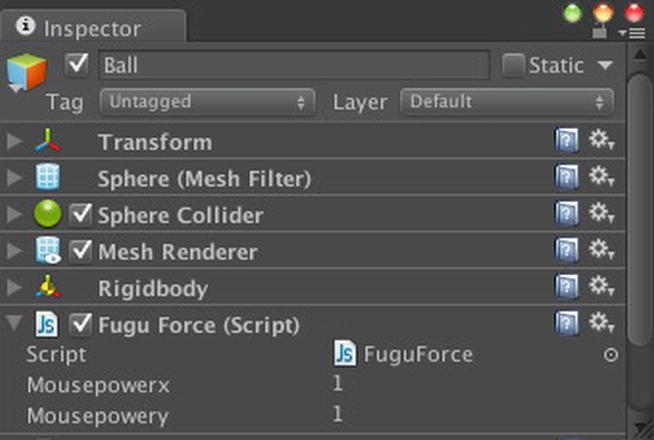
Figure 6-26. The Ball with the FuguForce.js script
And when you click Play, you still don’t have any control over the Ball, since you haven’t added the actual ball-pushing code yet. However, if you select the Debug option in the Inspector View menu, the private forcex and forcey variables will display, and you can see them change as you move the mouse.
FixedUpdate: Use the Force
Functions that affect physics, including Rigidbody.AddForce, should be invoked in the FixedUpdate callback. Unlike the Update callback, which is called once per frame and can take any amount of time, the FixedUpdate callback takes place after every fixed time step has elapsed. For good results, physics simulations need to run at a fixed interval, typically with more frequency than Update. Varying intervals between physics computations can result in varying behavior and long lags between physics updates. In Unity, this time step is set in the TimeManager (Figure 6-27), which is available in the Project Settings submenu of the Edit menu.

Figure 6-27. The TimeManager
The FixedUpdate callback is called at these physics update intervals (I think of FixedUpdate really as PhysicsUpdate and the Fixed Timestep as the Physics Timestep), so this is where any change to the physics simulation should take place, especially any action on a Rigidbody.
Since the force for pushing the Ball is already calculated in the Update callback, the FixedUpdate callback just needs to apply those values in a call to Rigidbody.AddForce on the Ball’s Rigidbody Component (Listing 6-2).
Listing 6-2. FixedUpdate Callback in FuguForce.js
function FixedUpdate() {
        rigidbody.AddForce(forcex,0,forcey);
}
The Rigidbody function AddForce is called on the variable rigidbody, which is a Component variable that always references the Rigidbody Component or this GameObject. The GameObject class also has a rigidbody variable, so a reference to gameObject.rigidbodywould be equivalent.
The three values passed to RigidBody.AddForce are the x, y, and z values of the force, which is a vector since it has direction and magnitude. The direction of the force is in world space, and from the viewpoint of the Main Camera in this game, x is left-right and z is forward-backward. So forcex is passed in for the x argument and forcey for the z argument. The controls don’t push the Ball up ro down, just forward and sideways, so 0 is passed in as the y argument.
Note Be sure to check the Scripting Reference page on RigidBody.AddForce. It is an overloaded function with a variation that takes the force as a Vector3 instead of three separate numbers. Also, both variations take an optional argument that can specify the value applied to the Rigidbody is a quantity besides force—either acceleration, an impulse, or an instantaneous change in velocity.
Now when you click Play and move your mouse, the Ball rolls in that direction. Try changing the mousepowerx and mousepowery values in the Inspector View to get the roll responsiveness you want.
Is It Rolling?
You might notice that if you move the mouse while the Ball is falling, you can actually push the Ball while it’s still in the air, which doesn’t seem right. Moving the mouse should only roll the Ball when it’s on a surface.
Fortunately, Unity has callback functions, each prefixed by OnCollision, that are called when a GameObject collides with another GameObject and when the contact ceases. Each of the callbacks takes one argument, a Collision object which contains information about the collision, such as a reference to the other GameObject that was involved.
The FuguForce script could check if the colliding GameObject is the Floor by checking if it’s name is “Floor” (using the GameObject name variable). But in general it’s a better practice and more efficient to find and identify GameObjects by their tags (using the GameObject tag variable). If you select the Floor GameObject and examine it in the Inspector View, you can see in the upper left it has the default tag Untagged. To change the GameObject’s tag to Floor, the Floor tag must first be created by selecting Add Tag from the Tag menu of the GameObject (Figure 6-28).
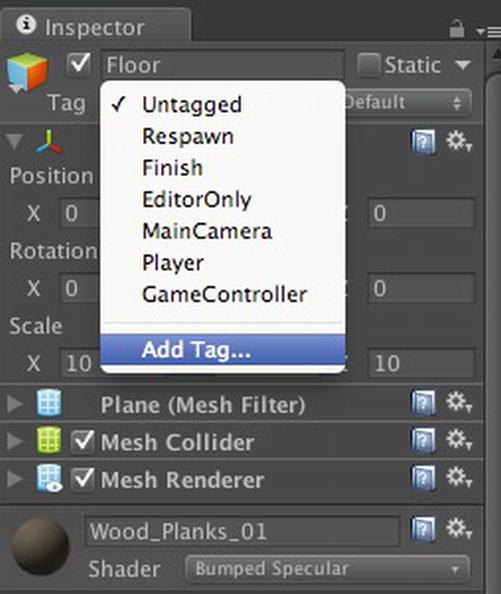
Figure 6-28. Adding a new Tag
This brings up the TagManager in the Inspector View. The TagManager manages tags and layers. Tags are used to identify GameObjects, so you can create practically an unlimited number of them. Layers, on the other hand, are used to label groups of GameObjects, and at most 32 layers can be defined, since they are implemented as bits in a 32-bit number. This makes it convenient to specify combinations of layers, for example, in the Culling Mask properties of Cameras and Lights.
To create a new tag named Floor, just type “Floor” into the first empty tag field in the TagManager (Figure 6-29). Then select the Floor GameObject in the Hierarchy View again, click the Tag menu in the Inspector View again, and the new Floor tag is available for selection.

Figure 6-29. The TagManager
Now the FuguForce script can be augmented with collision callbacks to see if the Ball is on the Floor (Listing 6-3).
Listing 6-3. Collision Callbacks in FuguForce.js
private var isRolling:boolean=false;
private var floorTag:String = "Floor";

function OnCollisionEnter(collider:Collision) {
        if (collider.gameObject.tag == floorTag) {
                isRolling = true;
        }
}

function OnCollisionStay(collider:Collision) {
        if (collider.gameObject.tag == floorTag) {
                isRolling = true;
        }
}

function OnCollisionExit(collider:Collision) {
        if (collider.gameObject.tag == floorTag) {
                isRolling = false;
        }
}
Two private variables are added. The first variable, isRolling, is true when the Ball is on the Floor. The second variable, floorTag, is the tag assigned to the Floor.
Tip Defining a variable for the tag avoids having to spell out the tag in multiple locations (and avoids hard-to-debug spelling errors), and if the name of the tag is changed later, only the variable needs to be updated. Each of the three collision callbacks checks if the GameObject the Ball collided against is the Floor by checking the tag of the tag of the colliding GameObject. If the GameObject is not the Floor, then the collision callback doesn’t do anything.
The OnCollisionEnter callback is called by Unity when the Ball collides with another GameObject, so that function sets isRolling to true. Conversely, OnCollisionExit is called by Unity when contact ceases between the Ball and a GameObject, and in that case isRolling is set to false.
In the meantime, OnCollisionStay is called while the Ball stays in contact with a GameObject, so it also ensures that isRolling stays true.Now the FixedUpdate callback can check if isRolling is true, indicating that the Ball is on the Floor, before applying a push to the Ball (Listing 6-4).
Listing 6-4. Add a Rolling Check in FixedUpdate of FuguForce.js
function FixedUpdate() {
        if (isRolling) {
                rigidbody.AddForce(forcex,0,forcey);
        }
}
Limit the Speed
Finally, as a bit of polish, the ball control script can check the Ball’s speed before pushing the Ball, avoiding cases where the Ball ends up rolling much faster than we intended, due to some freak combination of existing velocity, frame rate, and input values (Listing 6-5).
Listing 6-5. Add a Speed Check in FixedUpdate of FuguForce.js
var maxVelocitySquared:float=400.0;

function FixedUpdate() {
        if (isRolling && rigidbody.velocity.sqrMagnitude<maxVelocitySquared) {
                rigidbody.AddForce(forcex,0,forcey);
        }
}
This is a pretty simple change, requiring only the addition of a variable maxVelocitySquaredto hold our maximum velocity value, actually the square of the maximum velocity value. Then FixedUpdate, in addition to checking if the Ball is on the Floor, also checks if the Ball if the squared magnitude of the Ball’s velocity is below maxVelocitySquared. In other words, FixedUpdate is checking the square of the Ball’s speed.
The velocity variable of Rigidbody is a Vector3, which in turn has a magnitude variable that gives you the length of the Vector3. But finding the length of a Vector3 involves a square root operation (remember the Pythagorean theorem from high school geometry?), and square roots require more computation. So whenever you need to compare the length of two Vector3’s, you should instead compare the square of their lengths.
The Complete Script
Listing 6-6 presents the complete listing for the Ball controller script, FuguForce.js, put together so far, available in the Chapter 6 project on http://learnunity4.com/.
Listing 6-6. Complete Listing of FuguForce.js
#pragma strict

var mousepowerx:float = 1.0;
var mousepowery:float = 1.0;

var maxvelocity:float=400.0;

private var forcey:float=0.0;
private var forcex:float=0.0;

private var isRolling:boolean=false;
private var floorTag:String = "Floor";

var maxVelocitySquared:float=400.0;

function Update() {
        forcex = mousepowerx*Input.GetAxis("Mouse X")/Time.deltaTime;
        forcey = mousepowery*Input.GetAxis("Mouse Y")/Time.deltaTime;
}

function FixedUpdate() {
        if (isRolling && rigidbody.velocity.sqrMagnitude<maxVelocitySquared) {
                rigidbody.AddForce(forcex,0,forcey);
        }
}
function OnCollisionEnter(collider:Collision) {
        if (collider.gameObject.tag == floorTag) {
                isRolling = true;
        }
}

function OnCollisionStay(collider:Collision) {
        if (collider.gameObject.tag == floorTag) {
                isRolling = true;
        }
}

function OnCollisionExit(collider:Collision) {
        if (collider.gameObject.tag == floorTag) {
                isRolling = false;
        }
}
Be the Ball
The Ball control works pretty well at this point, but the Main Camera just sits there while the Ball rolls off into the distance. This is a glaring deficiency, as any decent 3D game has some kind of camera movement. In HyperBowl, the Main Camera follows the ball as you roll, but always facing the same direction (toward the pins). It turns out Unity has a Camera follow script in Standard Assets. The Scripts package was already imported from Standard Assets in Chapter 3 to obtain the MouseOrbit script. The follow script is also located in the Camera Scripts folder of the Scripts package and called SmoothFollow (Figure 6-30).

Figure 6-30. The Camera scripts in Standard Assets
Drag the SmoothFollow script from the Project View onto the Main Camera in the Hierarchy View. Then select the Main Camera in the Hierarchy View so you can edit the SmoothFollow script properties in the Inspector View (Figure 6-31).

Figure 6-31. The Inspector View of the Main Camera with the SmoothFollow script
The Main Camera should follow the Ball, so drag the Ball GameObject from the Hierarchy View into the SmoothFollow script’s Target field in the Inspector View.
As for the other SmoothFollow properties, set the Distance to 2, which will leave the Main Camera trailing 2 meter behind the Ball, and Height to 1, so the Camera stays 1 meter above the Ball instead of following right behind it. Height Damping of 2 allows the Main Camera to spring up and down a bit while following the Ball’s height, and a Rotation Damping of 0 ensures the Main Camera will always stay behind the Ball and not swing around to the left or right.
Now click Play, and as you roll around, you’re rolling and following!
Explore Further
Now we have the beginnings of real gameplay. It’s not a complete bowling game, yet, but it has physics (a ball rolling on a floor), interactive control (pushing the ball), and camera movement (following the ball). Each of those features are rich topics in game development, but in particular we’ll be digging deeper into physics in the next chapter with the addition bowling pins and collision-based sound effects. Then the game will look a lot more like a bowling game!
Unity Manual
In the “Asset Import and Creation section,” the page on “Procedural Materials,” which you used on the Floor, describes the Substance archive format a little bit and provides an overview of the tools used to create and analyze procedural materials.
In the “Creating Gameplay” section, the page on “Input” describes the Input class and its GetAxis function used in the FuguForce script implemented in this chapter and lists the joystick and keyboard values passed to that function. The lower portion of that page describes Input functions and variables available for iOS, so you can read that for a preview of this book’s chapter on iOS input.
This chapter has been mostly about physics, so the page on “Physics” is the most important to read. It lists all the collider types, including the SphereCollider, BoxCollider, and MeshCollider Components used in this chapter. The page describes the differences between Rigidbodies (the ball) and static colliders (the floor), and how PhysicMaterials and their properties affect collision behavior.
Reference Manual
In the “Asset Components” section, the page on “Procedural Material Assets” explains what you see in the Project View and Inspector View for procedural materials.
The section on “Physics Components” lists all the available colliders in detail, along with the available joints (including hinges and springs), constant force, and cloth components (cloth is not supported in Unity iOS).
A new Settings Manager was introduced in this chapter, the “TagManager,” which was used to create a new tag for the Floor.
In the “Scripting Concepts” section, the page titled “What Is a Tag?” expands on how to create a tag and apply it to a GameObject, along with an example of how a tag can be used to find a GameObject at runtime.
The page on “Rigidbody Sleeping” explains how a Rigidbody “goes to sleep” when it rests. This is a nice optimization that reduces unnecessary physics computation.
Scripting Reference
In the Runtime Classes listing, the page for the “MonoBehaviour” class lists the collision callbacks that were introduced in this chapter: “OnCollisionEnter,” “OnCollisionStay,” and “OnCollisionExit.”
We queried the “Collision” class for information on collisions: relative velocity, the GameObject collided against. Other data like actual point of contact are available.
I introduced the “Rigidbody” Component in this chapter, and the Scripting Reference page for this class is worth reading in its entirety. It’s variables correspond largely to the properties available in the Inspector View, and besides the “AddForce” function you used to push the Ball, there are many related functions: “AddRelativeForce,” AddTorque, AddRelativeTorque, AddExplosionForce, AddForceAtPosition.
“Component” has several variables that act as shortcuts to reference other Components often attached to GameObjects. Of the two scripts created so far in this book, the FuguRotate script references the “transform” variable, and the FuguForce script references the “rigidbody” variable. The Component variables mirror the same set of variables in “GameObject.”
The one function in the “Input” class that we used is “Input.GetAxis.” If you plan on making any desktop or web games, you’ll want to check out the various functions used to query the keyboard, mouse, and joystick. This page also lists the Input functions available for mobile applications.
On the Web
The physics implementation in Unity is based on an older version (2.x) of the PhysX engine, originally developed by NovodeX, acquired by Ageia who bundled it with a hardware physics accelerator, and now a product of nVidia. The latest version (3.x) is available on the nVidia Developer Zone (https://developer.nvidia.com/physx). The PhysX Software Development Kit is worth a look just to get a better idea what physics engine features underlie the Unity physics Components and script functions.
The fairly new Learn section on the Unity web site (http://unity3d.com/) includes an extensive set of physics tutorials covering much of what was discussed in this chapter and what will be discussed in the next chapter.