
Now that you have Unity installed, it’s time to get acquainted with the Unity Editor. The Editor (I’ll use the terms Unity, Unity Editor, and Editor interchangeably, as long as the meaning is clear) is where you create, test, and build a game for one or more target platforms. The Editor operates on a single Unity project containing assets included in a game.
This chapter will introduce the Unity Editor using the Angry Bots demo project that is installed with Unity. I won’t delve into the inner workings of Angry Bots here, but it’s a convenient ready-made project you can use to get acquainted with Unity, even to the point of building Angry Bots as an OS X app to get a feel for the build process. Hopefully, this will get you comfortable with Unity’s workflow, user interface, and various file types before learning how to create a new project from scratch in the next chapter.
Tip Filename extensions are hidden by default in OS X, but anyone performing any kind of development should be looking at complete filenames. To ensure extensions are displayed, go to the Advanced tab in the Finder Preferences window and check “Show all filename extensions.”
During the installation process of the previous chapter, an example Unity project called Angry Bots was installed in the Users ![]() Shared
Shared ![]() Unity folder. If you’re a longtime Unity user, you probably have some other projects left there from older versions of Unity. For example, Figure 2-1 shows my Unity shared example folder. Besides the latest version of Angry Bots (the more recent ones have the corresponding Unity version in their file names), I still have the Star Trooper example project that came with Unity 2.
Unity folder. If you’re a longtime Unity user, you probably have some other projects left there from older versions of Unity. For example, Figure 2-1 shows my Unity shared example folder. Besides the latest version of Angry Bots (the more recent ones have the corresponding Unity version in their file names), I still have the Star Trooper example project that came with Unity 2.

Figure 2-1. The Unity shared folder of example projects
Open the Angry Bots Project
Unity will automatically open the Angry Bots demo project when you bring up the Unity Editor for the first time. If for some reason Unity doesn’t immediately open Angry Bots, or if you want to return to it later (as we will in Chapters 10 and 11 where we will use Angry Bots to get acquainted with Unity iOS), select the Open Project item in the File menu on the Unity menu bar (Figure 2-2).
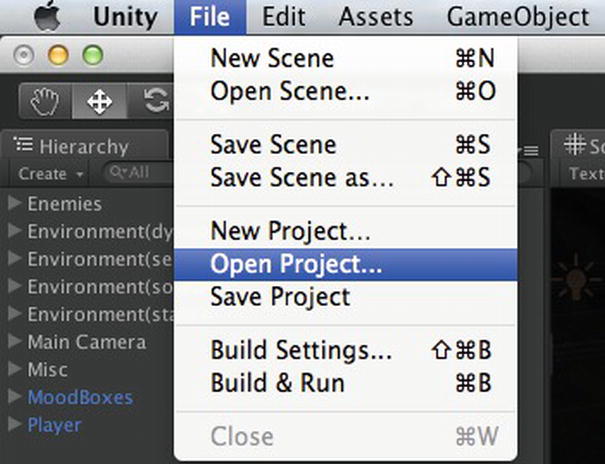
Figure 2-2. The Open Project menu item
The Project Wizard will appear (the same Project Wizard referred to by the Always Show Project Wizard item in the Preferences window). Select the AngryBots project from the list of recent projects in the Project Wizard (the same one that will show up every time you start Unity if you left the box checked) or click the Open Other button (Figure 2-3).
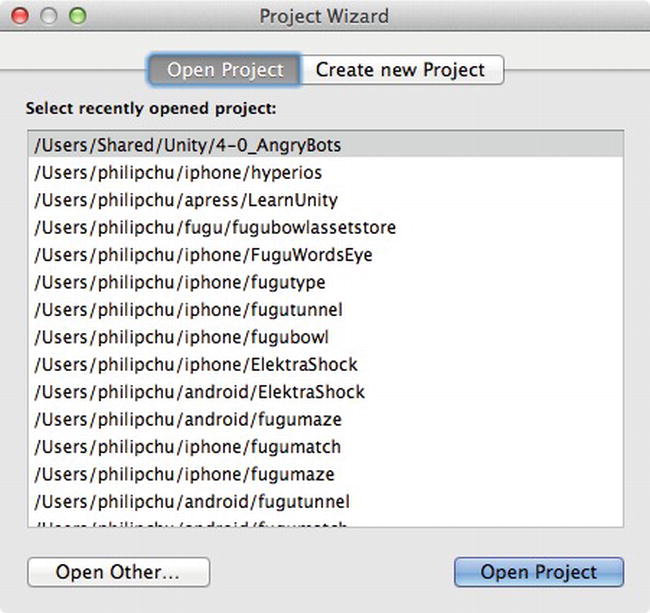
Figure 2-3. Selecting Angry Bots from the Open Project wizard
With the Angry Bots project open, the Unity Editor should now display the main scene of the project, named AngryBots. The title bar of the window should list the scene file, AngryBots.unity, followed by the project name and the target platform (Figure 2-4).

Figure 2-4. The Angry Bots project opened with a new scene
The scene name is displayed along the upper border of the Editor window, and the scene contents are reflected in the Hierarchy View, Scene View, and Game View. I’ll explain views in a bit and spend a good portion of this chapter going over each view in detail.
A scene is the same as a level in a game (in fact, the Unity script function that loads a scene is called Application.LoadLevel). The purpose of the Unity Editor is to construct scenes, and thus it always has one scene open at a time.
If the Editor doesn’t open an existing scene at startup, it will open a newly created scene, the same as if you had selected New Scene from the File menu on the Unity menu bar.
If you’re not looking at the AngryBots scene right now, then select the Open Scene command in the File menu (Figure 2-5).

Figure 2-5. The Open Scene menu item
The resulting file chooser will start off in the top level of the project’s Assets folder, where you can select the AngryBots scene file (Figure 2-6). All scene files are displayed with a Unity icon and have the .unity filename extension.

Figure 2-6. Selecting the AngryBots scene in the Load Scene chooser
With the desired scene open, click the Play button at the center top of the Editor to start the game. The Game View will appear and display the running game, which can be played with standard keyboard and mouse controls (Figure 2-7).

Figure 2-7. The Play mode in the Editor
Use the AWSD keys to move forward, back, left, and right, respectively, move the mouse to look around, and press the Esc key to pause. Clicking the Play button again will stop the game and exit Play mode. The two buttons next to the Play button are used to pause and step through the game.
During normal development, you would alternate between editing a scene and playing it.
When you’re satisfied how the game plays in the Editor, then you’re ready to build the app for the target platform. You won’t start building for iOS until Chapter 10, but to get a feel for the build process, go ahead andl build an OS X app version of Angry Bots right now. Select the Build Settings item from the Unity File menu to bring up the Build Settings window (Figure 2-8).
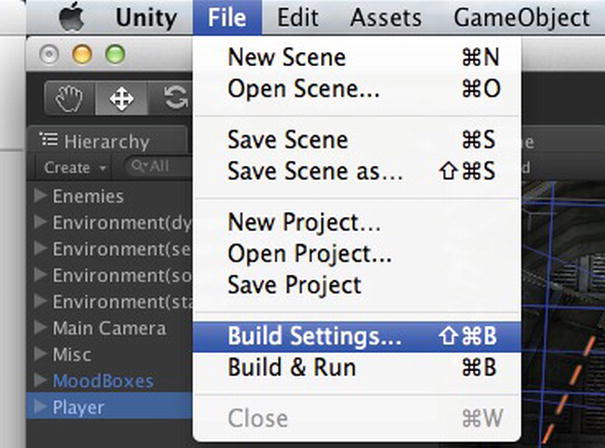
Figure 2-8. Bringing up the Build Settings window
The upper portion of the window lists the scenes to include in the build. Just the scene you have open should be checked. Any unchecked or unlisted scenes won’t be included in the build (Figure 2-9).
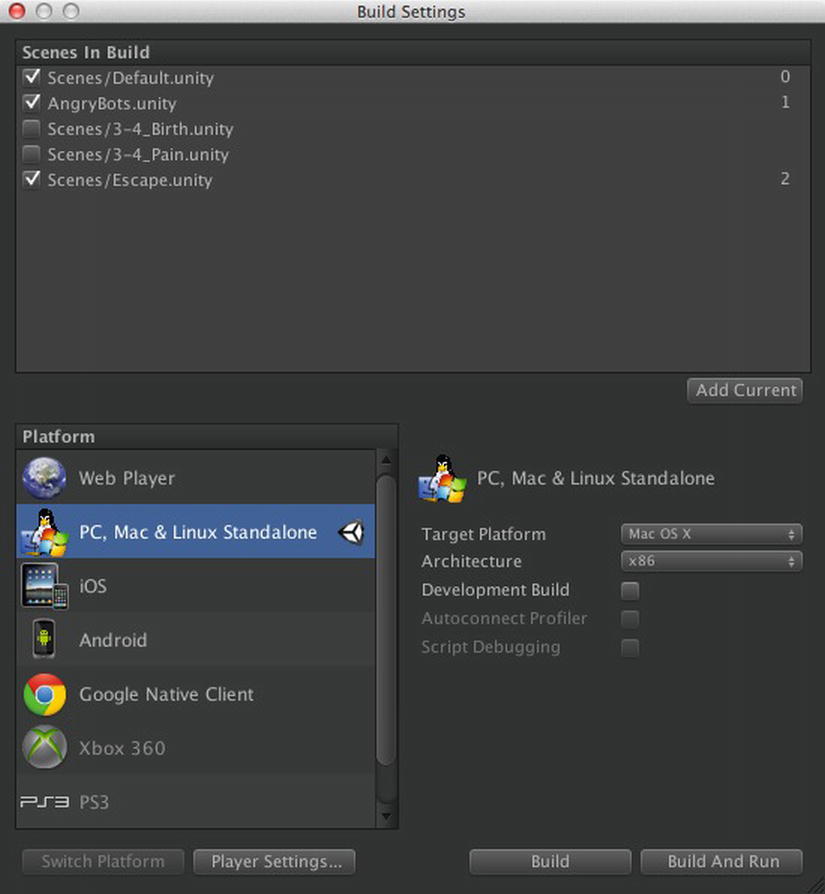
Figure 2-9. The Build Settings for the Mac platform
The default platform selected in the Platform list on the left is PC, Mac & Linux Standalone, matching the platform listed on the Editor title bar. The default specific Target Platform on the right is set as a Windows executable, but since you’re operating on a Mac, let’s set the Target Platform in the menu on the right to Mac OS X. Then click the Switch Platform button on the lower left. This will initiate a conversion of the project assets to formats suitable for use on a Mac. After the conversion is complete, the title bar of the Editor will update to reflect the new platform.
Now you can click either the Build or Build and Play button in the Build Settings window. Clicking Build will generate an OS X app version of our game. Clicking Build and Play will do the same but also run the game, which just saves the effort of bringing up a Finder window and double-clicking the new app. Unity will prompt you for a file name and location for the app, defaulting to the top level of the project directory, which is fine (Figure 2-10).
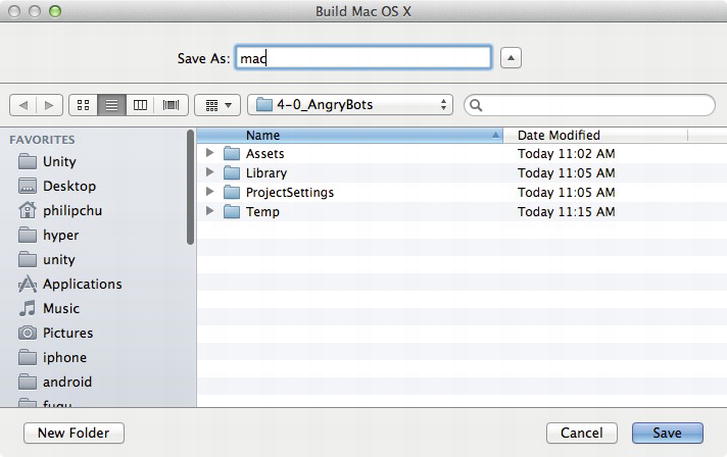
Figure 2-10. Saving an OS X app build
When the build is complete, double-click the generated app to run the game. Or if you selected Build and Run, the game should start automatically. Unity-generated OS X apps start with a resolution-chooser window (Figure 2-11).

Figure 2-11. Startup dialog for a Unity OS X app
After selecting the desired resolution and clicking Play!, you’ll see a game window with the size you just specified. Now you have Angry Bots running in its own Mac window (Figure 2-12).

Figure 2-12. Angry Bots as an OS X app Mac app
Now that you’ve got a feel for the Unity test-and-build workflow with the Angry Bots project, let’s take a closer look at the layout of the Unity Editor. The main window is divided into areas (I’m used to calling them panes, but I’ll call them areas since that’s the term used in Xcode). Each area holds one or more tabbed views. The currently displayed view for an area is selected by clicking the view’s tab. Views can be added, moved, removed, and resized, and the Editor supports switching among layouts, so a layout essentially is a specific arrangement of views. For example, the default layout of the main window (Figure 2-13) has an area containing a Scene View (Figure 2-14) and a Game View (Figure 2-15).
Note The Unity documentation is somewhat inconsistent in naming views. It’s obvious from their names that the Game View and Scene View are views. But the Console and Inspector are also views. In this book, I’ll include View in all of their names to make clear they are all views and can be manipulated the same way.

Figure 2-13. The default layout of the Unity Editor

Figure 2-14. The Scene View selected in a multitabbed area
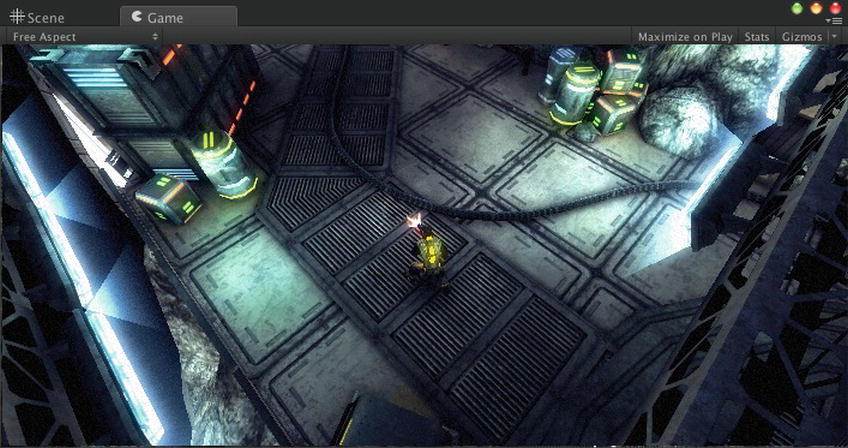
Figure 2-15. The Game View selected in a multitabbed area
The default layout is just one of several preset layouts. Alternate layouts can be selected from the menu in the top right corner of the main window (Figure 2-16). Go ahead and try them out. Figures 2-17 through 2-20 show the resulting layouts.

Figure 2-16. The Layout menu
I’ll describe the individual types of views in more detail shortly, but for now note that the 2-by-3 layout (Figure 2-17) is an example of a layout where the Scene View and Game View are in separate areas instead of sharing the same one. The 4-split layout (Figure 2-18) has four instances of the Scene View (reminiscent of tools used for computer-aided design), demonstrating that a layout is not restricted to one of each type of view.

Figure 2-17. The 2-by-3 layout

Figure 2-18. The 4-split layout

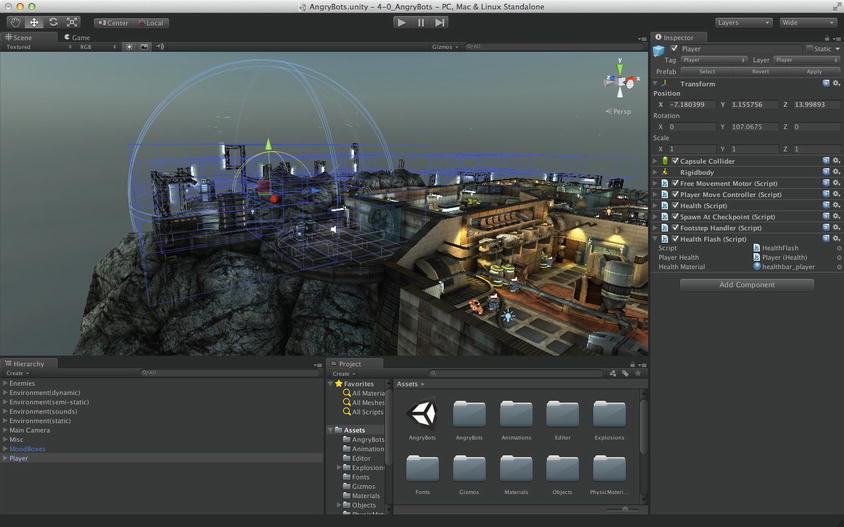
Figure 2-20. The Wide layout
Custom Layouts
The preset layouts provide a variety of workspaces, but fortunately you’re not restricted to using them exactly as they are. Unity provides the flexibility to completely rearrange the Editor window as you like.
For starters, you may notice while trying out the various preset layouts that some of the areas are too narrow, for example, in the left panel of the Wide layout (Figure 2-20). Fortunately, you can click the border of an area and drag it to resize the area.
Even cooler, you can move views around. Dragging the tab of a view into another tab region will move the view there. And dragging the tab into a “docking” area will create a new area. For example, start with the Default layout, drag the Inspector tab to the right of the Hierarchy tab. Now the Inspector View shares the same area as the Hierarchy View. And then drag the Console tab into the bottom region of the Hierarchy/Inspector View. That effectively splits the area into two, the bottom half now containing the Console. The result should look like Figure 2-21.

Figure 2-21. A workspace customized with views moved
Detach Views
You can even drag a view outside the Editor window so that it resides in its own “floating” window, which can be treated just like any other area. Drag the Scene tab outside the Editor so it resides in a floating window, and then drag the Game tab into its tab region. The result should look like Figure 2-22. Likewise, dragging a tab into a docking region of the floating window will add another area to the window.

Figure 2-22. The list of views in the Windows menu
Tip I like to detach the Game View into a floating window, since I normally don’t need to see it while I’m working in the Editor until I click Play, and this allows me to maximize the Game View to fill up to the entire screen.
Floating windows are often covered up by other windows, so the Windows menu on the menu bar has menu items for making each view visible (Figure 2-22). Notice there is a keyboard shortcut for each, and there is also a Layouts submenu that is identical to the layout menu inside the Editor.
You can also add and remove views in each area using the menu at the top right corner of the area (Figure 2-23). The Close Tab item removes the currently displayed view. The Add Tab item provides a list of new views for you to choose from.

Figure 2-23. Adding a view to an area
You may want to have different layouts for different target platforms, or different layouts for development vs. play testing, or even different layouts for different games. For example, I have a custom layout specifically for HyperBowl that preserves the Game View in a suitable portrait aspect ratio. It would be a hassle to manually reconfigure the Editor every time you start up Unity. Fortunately, you can name and save layouts by selecting the Save Layout option in the layout menu, which will prompt you for the new layout name (Figure 2-24).
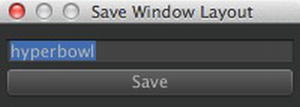
Figure 2-24. The Save Layout menu
After saving, the new layout will be listed in the layout menu and also in the list of layouts available for deletion if you select Delete Layout (Figure 2-25).

Figure 2-25. The Delete Layout menu
If you’ve messed up or deleted the original layouts, you can select the Restore Factory Settings option in the area menu (Figure 2-26). This will also delete any custom layouts.

Figure 2-26. The Restore Factory Settings prompt
If you change a layout and haven’t saved the changes, you can always discard them by just reselecting that layout in the layout menu.
The best view to describe in detail first is the Inspector View, since its function is to display information about objects selected in other views. It’s really more than an inspector, since it can typically be used to modify the selected item.
The Inspector View is also used to display and adjust the various settings that can be brought up in the Edit menu. For example, you might notice that the Assets folder in the Angry Bots installation has a lot of files with a .meta extension, as shown in Figure 2-27. In fact, there is one of these files for each asset file. Unity tracks the assets in a project using these meta files, which are in text format to facilitate use with version control systems like Perforce and Subversion (or newer distributed version control systems like Git and Mercurial).

Figure 2-27. The meta files in the Angry Bots project
But if you aren’t using a version control system (or if you are using the Unity Asset Server, which is a product from Unity Technologies and requires another license), you can turn off version control compatibility in the Editor Settings and get rid of those unsightly files. Bring up the Editor Settings by going to the Edit menu and selecting Editor Settings from the Settings submenu (Figure 2-28).

Figure 2-28. Bringing up the Editor Settings
Now the Inspector View displays the Editor Settings. If the project currently has meta files, then the Version Control Mode is set to Meta Files (and if you’re using the Asset Server, this option is set to Asset Server). To remove the meta files, set the Version Control Mode to Disabled (Figure 2-29).
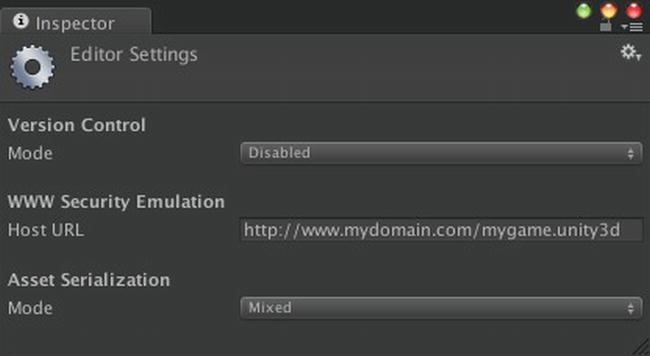
Figure 2-29. Editor Settings in the Inspector View
With the Version Control Mode set to Disabled, Unity will remove the meta files (Figure 2-30). The asset tracking is now handled within binary files inside the Library folder of the project.
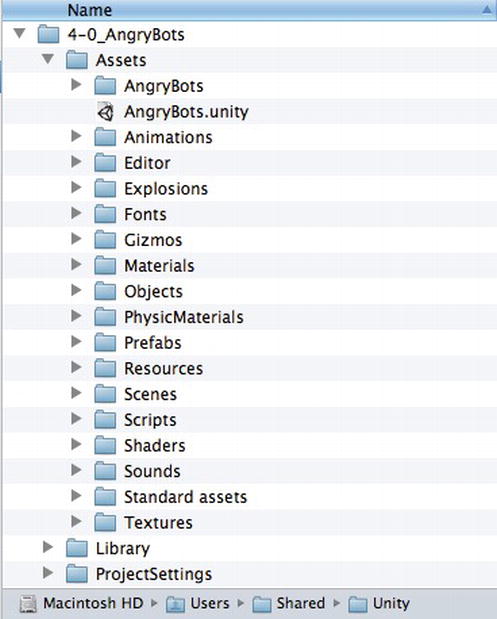
Figure 2-30. The Angry Bots project folder minus the meta files
Note Unity Pro users who are using meta files for version control support also have the option of setting Asset Serialization Mode to Force Text. In that mode, Unity scene files are saved in a text-only YAML (YAML Ain’t Markup Language) format.
Normally, the Inspector View displays the properties of the most recently selected object (when you bring up the Editor Settings, you really selected it). But sometimes you don’t want the Inspector View to change while you’re selecting other objects. In that case, you can pin the Inspector View to an object by selecting the Lock option in the menu at the top right of the view (Figure 2-31).

Figure 2-31. Locking the Inspector View
While the Inspector View can be thought of as the lowest-level view in the Editor, since it displays the properties of just a single object, the Project View can be considered the highest-level view (Figure 2-32). The Project View displays all of the assets available for your game, ranging from individual models, textures and scripts to the scene files which incorporate those assets. All of the project assets are files residing in the Assets folder of your project (so I actually think of the Project View as the Assets View).
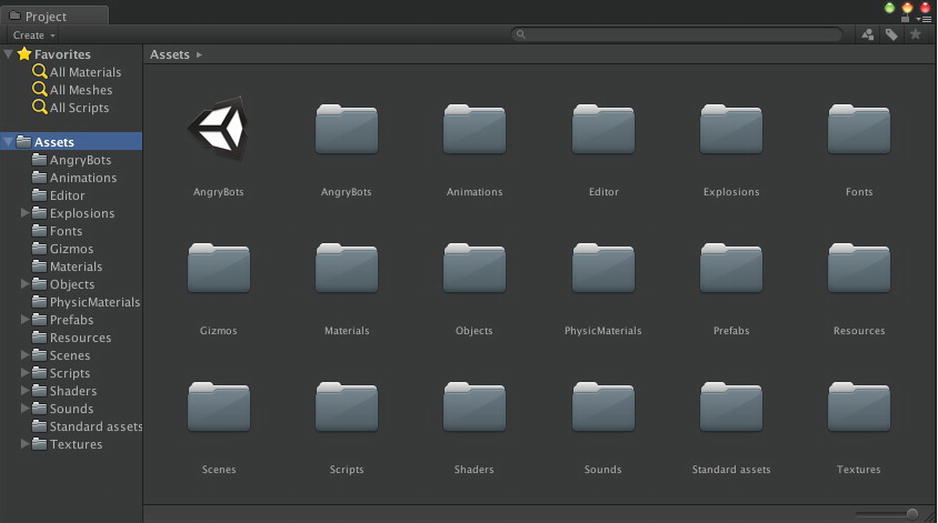
Figure 2-32. Top level of the Project view
Switch Between One-Column and Two-Columns
Before Unity 4, the Project View had only a one-column display. That option is still available in the menu for the Project View (click the little three-line icon at the top right of the view), so you can now switch between one and two columns.
Notice how the Project View of Angry Bots project (Figure 2-32) resembles how the project’s Assets folder looks in the Finder (see Figure 2-30). It actually looks more like a Windows file view, where you navigate the folder hierarchy in the panel on the left and view the contents of the selected folder in the right panel.
The slider on the bottom scales the view in the right panel—a larger scale is nice for textures and smaller is better for items like scripts that don’t have interesting icons. This is a good reason to partition assets by asset type (i.e., put all textures in a Textures folders, scripts in a Script folder, and so on). Chances are, a single-scale slider setting won’t be good for a mixture of asset types.
Selecting an asset on the right will display the properties of that asset in the Inspector View. For example, if you select a sound sample, the Inspector View displays information about the sound format, some of which you can change, like the compression, and it even lets you play the audio in the Editor (Figure 2-33). I’ll explain the sound properties in a later chapter, but for now feel free to select various types of assets in the Project View and see what shows up in the Inspector View.

Figure 2-33. Inspecting a selected asset in the Project View
In a large and complex project, it’s difficult to manually search for a particular asset. Fortunately, just as in the Finder, there is a search box that can be used to filter the results showing in the right panel of the Project View. In Figure 2-34, the Project View displays the result of searching for assets with “add” in their names.
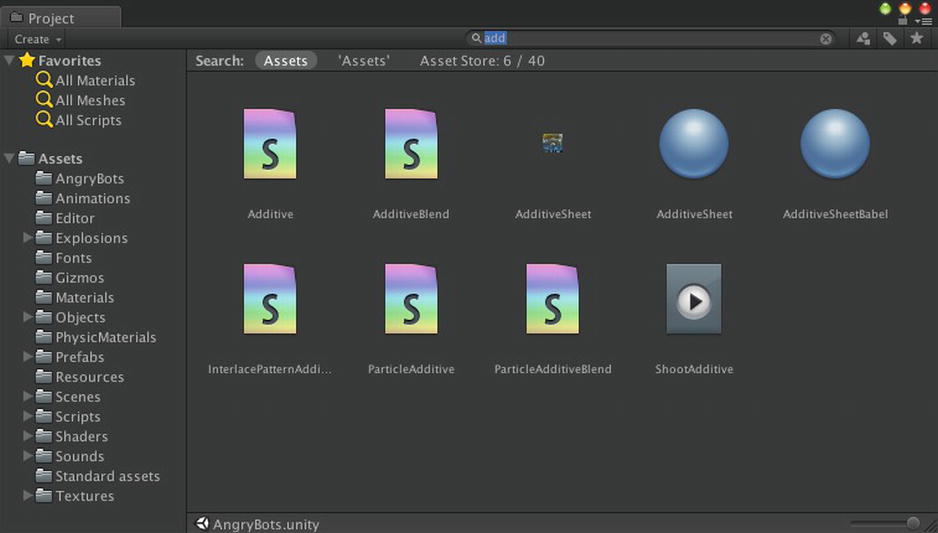
Figure 2-34. Searching for assets with “add” in the name
The right panel displays the search results for everything under Assets (i.e., all of our assets). The search can be narrowed further by selecting one of the subfolders in the left panel. For example, if you know you’re looking for a texture, and you’ve arranged your assets into subfolders by the type of asset, you can select the Textures folder to search (Figure 2-35).
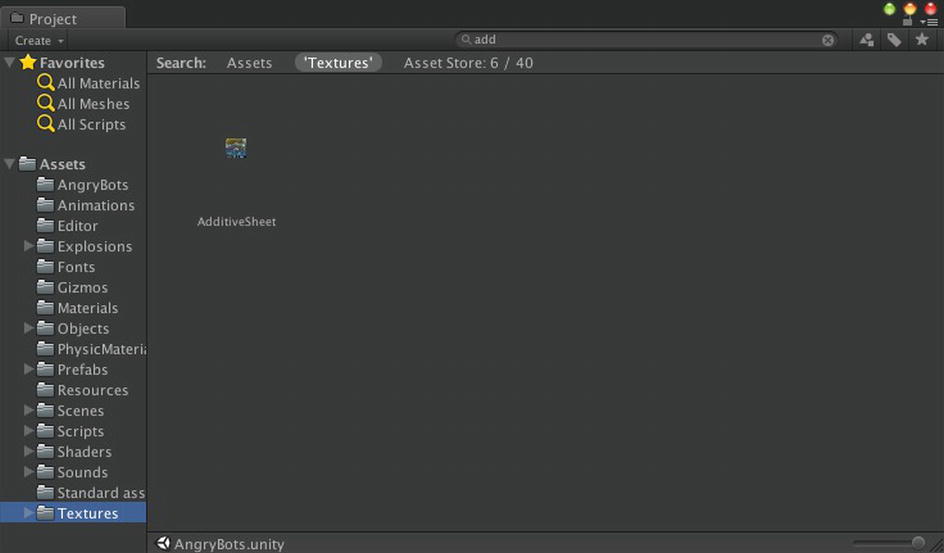
Figure 2-35. Searching assets in a folder
Notice just below the search, there is a tab with the name of the folder that was selected. You can still click the Assets tab to the left to see the search results for all your assets, both locally and on the Unity Asset Store, which we’ll make copious use of in this book.
You can also filter your search by asset type, using the menu immediately to the right of the search box. Instead of just searching in the Textures folder, you could have selected Texture as the asset type of interest (Figure 2-36). Notice how that resulted in “t:Texture” being added to the search box. The “t:” prefix indicates the search should be filtered by the following asset type. You could have just typed that in without using the menu.

Figure 2-36. A search filtered by asset type
The button to right of the asset type menu is for filtering by label (you can assign a label to each asset in the Inspector View), which is also pretty handy for searching the Asset Store. And the rightmost button, the star, will save the current search in the Favorites section of the left panel.
Assets in the Project View can be manipulated very much like their corresponding files in the Finder.
Double-clicking an asset will attempt to open a suitable program to view or edit the asset. This is equivalent to right-clicking the asset and selecting Open. Double-clicking a scene file will open the scene in this Unity Editor window, just as if you had selected Open Scene in the File menu.
You can also rename, duplicate and delete, and drag files in and out of a folder just as you can in the Finder. Some of the operations are available in the Unity Edit menu and in a pop-up menu when you right-click on an asset. You’ll get some practice with that in the next few chapters.
Likewise, in the next chapter you will work on adding assets to a project. That involves importing a file or importing a Unity package, using the Assets menu on the menu bar or just dragging files into the Assets folder of the project using the Finder.
Every game engine has a top-level object called a game object or entity (CryEngine, for example) or something else (Second Life has prims) to represent anything that has a position, potential behavior, and a name to identify it. Unity game objects are instances of the class GameObject.
Note In general, when we refer to a type of Unity object, we’ll use its class name to be precise and make clear how that object would be referenced in a script.
The Hierarchy View is another representation of the current scene. While the Scene View is a 3D representation of the scene that you can work in as you would with a content creation tool, and the Game View shows the scene as it looks when playing the game, the Hierarchy View lists all the GameObjects in the scene in an easily navigable tree structure.
When you click a GameObject in the Hierarchy View, it becomes the current Editor selection and its Components are displayed in the Editor. Every GameObject has a Transform Component, which specifies its position, rotation, and scale, relative to its parent in the hierarchy (if you’re familiar with the math of 3D graphics, the Transform Component encapsulates the transformation matrix of the object).Some Components provide a function for the GameObject (e.g., a light is a GameObject with a Light Component attached). Other Components reference assets such as meshes, textures, and scripts. Figure 2-37 shows the Components of the Player GameObject (in the Hierarchy View, the entire Player tree of GameObjects is displayed in blue because it’s linked to a prefab, a special type of asset that is used to clone a GameObject or group of GameObjects).

Figure 2-37. Hierarchy View and Inspector View
Notice that many of the GameObjects are arranged in a hierarchy, hence the name of this view (in computer graphics, this is commonly known as a scene graph). Parenting makes sense for game objects that are conceptually grouped together. For example, when you want to move a car, you want the wheels to automatically move along with the car. So the wheels should be specified as children of the car, offset from the center of the car. When the wheels turn, they turn relative to the movement of the car. Parenting also allows us to activate or deactivate whole groups of game objects at one time.
Whereas the Hierarchy View allows you to create, inspect, and modify the GameObjects in the current scene, it doesn’t provide a way to visualize the scene. That’s where the Scene View comes in. The Scene View is similar to the interfaces of 3D modeling applications. It lets you examine and modify the scene from any 3D vantage point and gives you an idea how the final product will look.
If you’re not familiar with working in 3D space, it’s a straightforward extension from working in 2D. Instead of just working in a space with x and y axes and (x,y) coordinates, in 3D space you have an additional z axis and (x,y,z) coordinates. The x and z axes define the ground plane and y is pointing up (you can think of y as height).
Note Some 3D applications and game engines use the z axis for height and the x and y axes for the ground plane, so when importing assets you might have to adjust (rotate) them.
The viewpoint in 3D space is usually called the camera. Clicking the x, y, and z arrows of the multicolored Scene Gizmo in the upper right corner is a quick way of flipping the Scene View camera so that it faces along the respective axis. For example, clicking the y arrow gives you a top-down view of the scene (Figure 2-38), and the text under the Scene Gizmo says “Top.”

Figure 2-38. A top-down view in the Scene View
The camera here is not the same as the Camera GameObject in the scene that is used during the game, so you don’t have to worry about messing up the game while you’re looking around in the Scene View.
Clicking the box in the center of the Scene Gizmo toggles the camera projection between perspective, which renders objects smaller as they recede in the distance, and orthographic, which renders everything at their original size whether they are close or far. Perspective is more realistic and what you normally see in 3D games, but orthographic is often more convenient when designing (hence its ubiquity in computer-aided design applications). The little graphic preceding the text under the Scene Gizmo indicates the current projection.
You can zoom in and out using the mouse scroll wheel or by selecting the Hand tool in the upper right toolbar of the Editor window and click-dragging the mouse while holding the Control key down. When the Hand tool is selected, you can also move the camera by click-dragging the view, and you can rotate (orbit) the camera by dragging the mouse while holding the Option (or Alt) key down, so you’re not restricted to just the axis camera angles, like in Figure 2-39.

Figure 2-39. A tilted perspective in the Scene View
Notice that when you’re looking from an arbitrary angle, the text under the Scene Gizmo says Persp or Iso, depending on whether you’re using perspective or orthographic projection (Iso is short for isometric, which is the tilted orthographic view common in games like Starcraft and Farmville).
The other buttons on the toolbar activate modes for moving, rotating, and scaling GameObjects. There’s no reason to change the Angry Bots scene, so those modes will be explained in more detail when you start creating new projects.
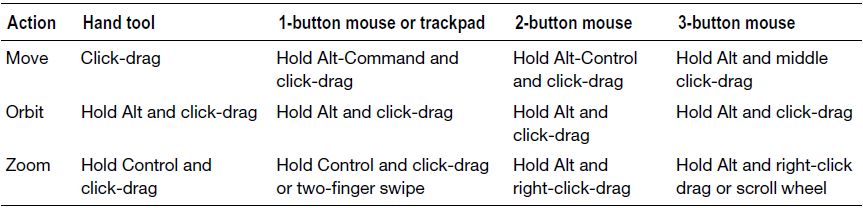
Tip If you accidentally make a change to the scene, you can select Undo from the Edit menu. If you made a lot of changes you don’t want to keep, you can just decline to save this scene when you switch to another scene or exit Unity. In the meantime, note that you can still move the camera while in those modes, using alternate keyboard and mouse combinations. Table 2-1 lists all the possible options.
Table 2-1. Available Scene View Camera Controls
There are a couple of other handy keyboard-based scene navigation features. Pressing the Arrow keys will move the camera forward, back, left, and right along the x–z plane (the ground plane). And holding the right mouse button down allows navigation of the scene as in a first-person game. The AWSD keys move left, forward, right, and back, respectively, and moving the mouse controls where the camera (viewpoint) looks.
When you want to look at a particular GameObject in the Scene View, sometimes the quickest way to do that is to select the GameObject in the Hierarchy View, then use the Frame Selected menu item in the Edit menu (note the handy shortcut key F). In Figure 2-40, I clicked on the x axis of the Scene Gizmo to get a horizontal view, then selected the Player GameObject in the Hierarchy View, and pressed the F key (shortcut for Frame Selected in the Edit menu) to zoom in on and center the player character in the Scene View.
You can also select a GameObject directly in the Scene View, but you have to exit the Hand tool first. Just as selecting a GameObject in the Hierarchy View will result in that selection displaying in the Scene View and Inspector View, selecting a GameObject in the Scene View will likewise display that selection in the Inspector View and display it as the selected GameObject back in the Hierarchy view. In Figure 2-40, after I invoke Frame Selected on the Player, I clicked the Move tool (the button directly right of the Hand tool button in the top right corner of the Editor window) and then clicked a GameObject near the Player in the Scene View. The Hierarchy View automatically updates to show that GameObject is selected, and the GameObject is also displayed in the Inspector View.

Figure 2-40. Selecting a GameObject in the Scene View
The buttons lining the top of the Scene View provide display options to assist in your game development. Each button configures a view mode.
The leftmost button sets the Draw mode. Normally, this mode is set to Textured, but if you want to see all the polygons, you can set it to Wireframe (Figure 2-41).
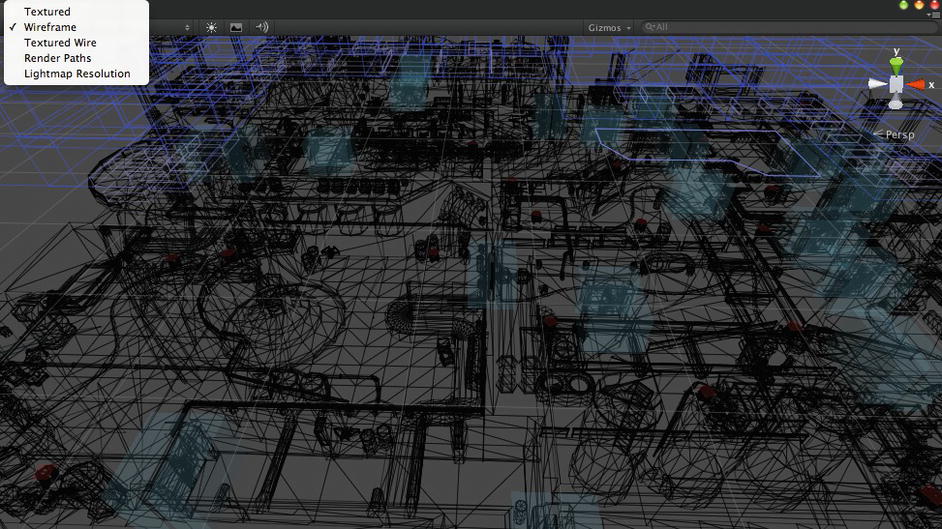
Figure 2-41. Wireframe display in the Scene view
The next button sets the Render Paths, which controls whether the scene is colored normally or for diagnostics.
The three buttons to the right of the Render Paths mode button are simple toggle buttons. They each pop up some mouse-over documentation (otherwise known as tooltips) when you let the mouse hover over them.
The first of those controls the Scene Lighting mode. This toggles between using a default lighting scheme in the Scene View or the actual lights you’ve placed in the game.
The middle button toggles the Game Overlay mode, whether the sky, lens flare, and fog effects are visible.
And finally, there is the Audition Mode, which toggles sound on and off.
The Gizmos button on the right activates displays of diagnostic graphics associated with the Components. The Scene View in Figure 2-42 shows several gizmos (not to be confused with the Scene Gizmo that controls the Scene View camera). By clicking the Gizmos button and checking the list of available gizmos, you can see those icons represent a Camera, a couple of AudioSources, and a few Lights.

Figure 2-42. Gizmos in the Scene View
You can select and deselect the various checkboxes in the Gizmos window to focus on the objects you’re interested in. The checkboxes at the top left toggles between a 3D display of the gizmos or just 2D icons. The adjacent slider controls the scale of the gizmos (so a quick way to hide all gizmos is to drag the scale slider all the way to the left).
Now let’s go back to the Game View, which you encountered when playing Angry Bots in the Editor. Like the Hierarchy View and Scene View, the Game View depicts the current scene, but not for editing purposes. Instead, the Game View is intended for playing and debugging the game.
The Game View appears automatically when you click the Play button at the top of the Unity Editor window. If there isn’t an existing Game View when you click Play, a new one is created. If the Game view is visible while the Editor is not in Play mode, it shows the game in its initial state (i.e., from the vantage of the initial Camera position).
The Game View shows how the game will look and function when you actually deploy it, but there may be discrepancies from how it will look and behave on the final build target. One possible difference is the size and aspect ratio of the Game View. This can be changed using the menu at the top left of the view. Figure 2-43 shows what happens when you switch from the Free Aspect ratio, which adjusts to the dimensions of the view, to a 5:4 aspect ratio, which results in the scaling down the game display so that it fits within the area and maintains the chosen aspect ratio.

Figure 2-43. The Game View
Clicking the Maximize on Play button will result in the Game View expanding to fill the entire Editor window when it is in the Play mode (Figure 2-44). If the view is detached from the Editor window, the button has no effect.

Figure 2-44. Game View with Maximize on Play
The Stats button displays statistics about the scene (Figure 2-45) that update as the game runs.

Figure 2-45. Game View with Stats
The Gizmos button activates displays of diagnostic graphics associated with the Components. The Game View in Figure 2-46 shows two icons that are gizmos for lights. The light gizmo located at the player’s position also reveals the light radius (i.e., the area affected by the light). The list to the right of the Gizmos button allows you to select which gizmos you want displayed.

Figure 2-46. The Game View with Gizmos
Both the Game View and Scene View are both depictions of the current scene. A Unity project consists of one or more scenes, and the Unity Editor has one scene open at a time. Think of the project as a game and the scenes as levels (in fact, some Unity script functions that operate on scenes use “level” in their names). Unity GameObjects are made interesting by attaching Components, each of which provides some specific information or behavior. That’s where the Inspector View comes in. If you select a game object in the Hierarchy View or Scene View, the Inspector View will display its attached components.
The remaining view in all the preset layouts, the Console View, is easy to ignore but it’s pretty useful (Figure 2-47).

Figure 2-47. The Console View
Informational, warning, and error messages appear in the Console View. Errors are in red, warnings in yellow, and informational messages in white. Selecting a message from the list displays it with more detail in the lower area. Also, the single-line area at the bottom of the Unity Editor displays the most recent Console message, so you can always see that a message has been logged even if the Console view is not visible.
Tip Warning messages are easy to ignore, but you ignore them at your peril. They are there for a reason and usually indicate something has to be resolved. And if you let warnings accumulate, it’s difficult to notice when a really important warning shows up.
The Console can get cluttered pretty quickly. You can manage that clutter with the leftmost three buttons on top of the Console View. The Clear toggle button removes all the messages. The Collapse toggle button combines similar messages. The Clear on Play toggle will remove all messages each time the Editor enters Play mode.
The Error Pause button will cause the Editor to halt on an error message, specifically when a script calls a Log.LogError.
While operating in the Editor, log messages end up in the Editor log, while messages generated from a Unity-built executable are directed to the Player log. Selecting Open Player Log or Open Editor Log from the view menu (click the little icon at the top right of the Console View) will bring up those logs, either in a text file or in the Console app (Figure 2-48).

Figure 2-48. The Unity logs in the Mac Console app
Explore Further
We’ve come to the end of this Unity tour and our play time with Angry Bots demo. Beginning with the next chapter, you’ll be creating Unity projects from scratch to learn the game engine features. But this won’t be the last you’ll see of Angry Bots, as we’ll return to that project in Chapters 10 and 11, repeating this process to introduce Unity iOS development. Until then, starting with the next chapter, you’ll be creating Unity projects from scratch and exploring general and mostly cross-platform Unity game engine features.
And from this point on, there are plenty of official Unity resources that expand on the topics I will be covering.
As you can see, there’s a lot of Unity user interface, and we’ve hardly covered it all. This is a good time to get serious about reading the Unity Manual, either from within the Unity Editor (the Welcome screen or the Help menu) or on the Unity web site (http://unity3d.com/) under the Learn tab in the “Documentation” section. The web version is pretty handy when you want to look something up or just read about Unity without having a Unity Editor running nearby.
Most of what was covered in this chapter matches topics in the “Unity Basics” section of the Unity Manual, particular the sections on “Learning the Interface,” “Customizing Your Workspace,” “Publishing Builds,” and “Unity Hotkeys” (although I think a better reference is just to check the keyboard shortcuts listed in the menus).
I did jump ahead into the “Advanced” section of the Unity Manual and touch on Unity’s support for version control. That’s covered more in depth with the Unity Manual’s page on “Using External Version Control with Unity.”
Besides the “Documentation” section, the Learn tab on the Unity web site also includes a “Tutorials” section that features an extensive set of Beginning Editor videos. As the name implies, these videos provide an introduction to the Unity Editor, and in fact the set of videos cover much of what was discussed in this chapter, including descriptions of the most important views (the Game View, Scene View, Hiearchy View, Inspector View and Project View) and even the process of publishing a build.
Although I only discussed version control briefly, in the context of explaining how to remove meta files, that topic is worth a little more discussion, since a VCS is so important to software development (which you’ll realize the first time you lose your project or can’t remember what change you made that broke your game!). If you already have a favorite VCS, you may want to use it with Unity, and if you haven’t been using one, then you may want to consider it if only to keep old versions of your project around in case you need to roll back, with the ability to check differences between versions.
Among version control systems, Perforce is a popular commercial tool used in game studios, and Subversion (svn) has a long history as an open source option. These days, distributed version control systems like Git and Mercurial are trending. I use Mercurial on Bitbucket (http://bitbucket.org/) for my internal projects and post public projects on GitHub, including the projects for this book (http://learnunity4.com/).
To say Unity VCS support is product agnostic is really another way of saying Unity doesn’t have any particular version control system integrated into the Unity Editor (although Perforce and Subversion integration is in-progress at the time of this writing). The meta files, and YAML scene files for Unity Pro users, simply provide better compatibility with text-oriented version control systems that are commonly used for source code. You still have to run the VCS operations yourself outside of Unity. You can find out more about YAML, by the way, on http://yaml.org/
In the meantime, I find it convenient to use the Mac GitHub app provided on the GitHub web site and similarly Sourcetree for Bitbucket, also available on that web site.
And as I mentioned while explaining the options for Version Control Mode in the Editor Preferences, Unity also offers a VCS designed specifically for Unity called the Unity Asset Server. It requires the purchase of a Unity Team License.