
Using Unity iOS
Congratulations! You now have a bowling game incorporating the basic features that typically comprise a 3D game: 3D graphics (of course), physics, sound effects, player control (of the bowling ball), camera movement, and a graphical user interface.
The default built target is listed on the title bar of the Editor window as PC, Mac and Linux Standalone. If you were to perform an OS X build of the bowling project right now, the game would run essentially the same as it does in the Editor. Same for Linux, Windows, and even a web player (although a web player build would require you to switch build targets first).
Targeting iOS is another story. You could change the build target for the bowling game to iOS right now and build it without any compiler errors. But the bowling ball control in FuguForce.js is designed for mouse input, so that would have to change. Besides reimplementing the input handling, adapting desktop PC games to mobile devices (a process called porting) often requires adjustments for the device display and compromises to achieve adequate performance.
Moreover, building an iOS app involves much more in the way of external procedures than the desktop standalone and web player targets. Due to Apple’s requirement that all iOS apps be compiled with Xcode, Unity iOS builds an app by first generating an Xcode project, which in turn is compiled by Xcode to create the final app. And to actually run the app on a test device and submit the app to the App Store, a rather complicated sequence of procedures is required, along with registration in Apple’s iOS Developer Program.
For now, let’s go back to our roots, so to speak, and temporarily return to the Angry Bots demo project that we started with in this book. Conveniently, Angry Bots is ready to run on iOS without modification. If you have an iOS device, go ahead and download Angry Bots from the App Store. A quick way to find the Angry Bots app is to enter “unity technologies” in the App Store search field, and Angry Bots will appear, along with other apps from Unity Technologies (Figure 10-1).

Figure 10-1. Example apps from Unity Technologies on the App Store
Besides Angry Bots, you should also download the Unity Remote app, which acts as a remote control for testing a Unit iOS game in the Editor. While you’re at it, you should download and try all the example apps from Unity Technologies. Many of them have not been updated in a while, but they do provide an idea of what kinds of games can be created with Unity.
Once you install Angry Bots from the App Store onto your iOS device and play the game, notice how the game features on-screen virtual joysticks (Figure 10-2) for player movement and weapon fire that up until now, we haven’t seen in Angry Bots.

Figure 10-2. The iOS version of Angry Bots with virtual joysticks
Although the iOS version of Angry Bots has different controls, it’s built from the same version of Angry Bots installed with Unity. So we’ll defer the iOS conversion work on our bowling game and spend these next couple of chapters getting reacquainted with Angry Bots so we can focus on the Unity iOS build and test process. In this chapter, specifically, you’ll learn how to test the Unity iOS version of Angry Bots with the Unity Remote and and with the iOS Simulator in Xcode.
Returning to Angry Bots, select Open Project from the File menu, and Angry Bots should be listed among the recent projects (Figure 10-3).
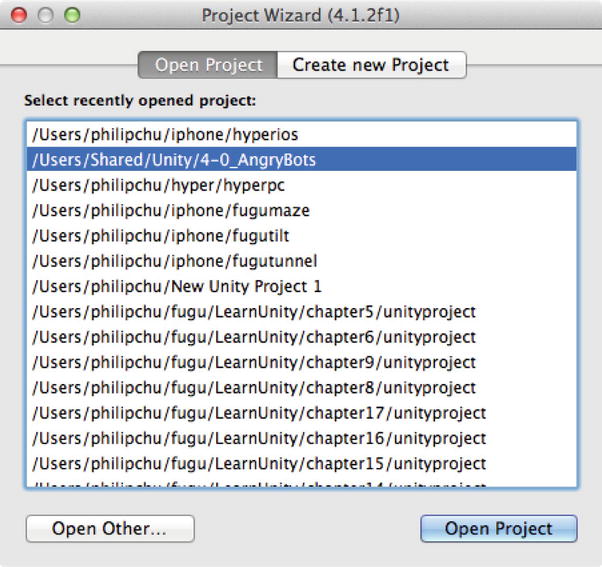
Figure 10-3. Angry Bots listed among recent projects
If Angry Bots is not listed, then click the Open Other button and look for Angry Bots under the Unity demo folder, Users ![]() Shared
Shared ![]() Unity (Figure 10-4).
Unity (Figure 10-4).

Figure 10-4. Opening the Angry Bots project
Now that we’re back in Angry Bots, let’s change the build target to iOS. Bring up the Build Settings window using the Build Settings command in the File menu. The available build targets are shown in the Platforms list on the left, with a Unity icon indicating the current build target, which should be PC, Mac & Linux Standalone (Figure 10-5).

Figure 10-5. Build settings with the default target platform
To build the game for iOS, select iOS in the Platform list and then click the Switch Platform button on the lower left to reimport the project assets in the proper formats for iOS. A progress dialog box will appear while the reimporting process is taking place (Figure 10-6).

Figure 10-6. The progress bar for reimporting assets while switching build targets
Projects with a lot of assets can take a while to reimport, and the Editor will be unresponsive during that period. But once the assets have been converted, the Build Settings will display the Unity icon next to iOS in the Platform list, indicating that iOS is now the build target (Figure 10-7).

Figure 10-7. Build Settings with iOS as the build target
Notice also that the Switch Platform button is now dimmed when you select iOS, indicating that the asset conversion has taken place.
Tip If you select iOS but neglect to click the Switch Platform button, the project assets will still be converted automatically the first time you perform a build. However, it’s best to convert the project assets immediately so you can examine and test the game within the Editor and catch platform-specific issues earlier.
And yet another indication that the build target is now iOS, the title bar of the Editor window, which formerly displayed PC, Mac & Linux Standalone, now sports iPhone, iPod Touch and iPad (Figure 10-8).

Figure 10-8. The Unity Editor window with iOS as the build target
Now that Angry Bots is configured for iOS, let’s open the AngryBots scene, if it’s not already open (and it probably isn’t, because you switched from the bowling project to the Angry Bots project).
Note When switching from one project to another, Unity tries to open a scene with the same name as the open scene in the previous project. If no such scene exists, the Editor will open a new scene, just as if you had selected New Scene in the File menu.
The AngryBots scene file is at the top level of the Assets folder (Figure 10-9), so you can double-click that file in the Project View to open the scene, as an alternative to using the Open Scene command in the File menu.

Figure 10-9. The Project View of the AngryBots scene file
And yet another clue that the current build target is iOS, the screen size menu at the top left of the Game View now lists iOS device resolutions (Figure 10-10).

Figure 10-10. iOS screen resolutions in the Game View
Moreover, when you click Play, the same virtual joysticks featured on the version from the App Store are now visible (Figure 10-11).

Figure 10-11. Playing Angry Bots in the Editor with virtual joysticks
Unfortunately, although you can watch the bots in Angry Bots move around, you can’t actually play the game, since the mouse and keyboard controls are deactivated, and the code is waiting for touch-screen input to operate the virtual joysticks. But no worries, there is a way to provide touchscreen input while testing in the Editor!
Unity has provided a very cool solution for in-Editor testing of Unit iOS projects in the form of the Unity Remote app, which runs on an iOS device and relays touchscreen and accelerometer data from that device over Wi-Fi to the Unity Editor. If you don’t have an iOS device, you can skip this section and still get some testing done using the iOS Simulator, described in the next section.
Unity Remote can be found on the App Store in the same way as the Angry Bots app, by entering “unity technologies” in the App Store search box (Figure 10-1). Entering “unity remote” works, too (Figure 10-12).

Figure 10-12. The Unity Remote app on the App Store
Once Unity Remote is installed on your iOS device, make sure the device is on the same Wi-Fi network as your Mac that’s running Unity. When you launch Unity Remote, the screen should display the name of that Mac (Figure 10-13). Select that computer, and if Unity is not in Play mode, the Unity Remote screen will just wait, displaying a reminder for you to click Play in the Unity Editor.

Figure 10-13. Computer selection in the Unity Remote app
When the Unity Editor is in Play mode, the graphics in the Game View will also appear in Unity Remote, and you can play the game on your device, using its touchscreen! It will look a bit coarse, because Unity is sending copies of the game screen over Wi-Fi to the device. You can improve the performance by minimizing the resolution of the Game View in the Unity Editor (Figure 10-14).

Figure 10-14. Minimized device resolution in the Game View
Regardless of the graphics quality, you are now able to play Angry Bots on an iOS device, although you’re really still playing in the Editor and just using the device as a controller. The touchscreen input is sent back to the Unity Editor over Wi-Fi and received by the game running in Play mode, so you still have all the debugging features of the Unity Editor at your disposal during the test run. It’s the best of both worlds!
At some point you have to leave the comforts of the Unity Editor and really start building for iOS. All iOS apps have to be built through Xcode, Apple’s official iOS development tool (and also their official OS X development tool), which is why a Unity iOS build first generates an Xcode project, which in turn is built by Xcode to create the app. Xcode is available free from the Apple Developer Site but conveniently also available on the Mac App Store. Search for “xcode” on the Mac App Store and click the Free button to download (Figure 10-15).

Figure 10-15. Xcode on the Mac App Store
After installation, you should see the Xcode application in your Applications folder. Now you’re ready to start performing iOS builds from Unity!
Unity iOS builds invariably require customization of the Player Settings in the Unity Editor (the Unity Player, as opposed the Unity Editor, is the deployed version of the Unity engine). Select Player Settings under the Edit menu, or click the Player Settings button in the Build window, and the Player Settings will show up in the Inspector View (Figure 10-16).

Figure 10-16. Selecting the Player Settings
The Player Settings are partitioned into Cross-Platform Settings at the top and Per-Platform Settings below. The only two Cross-Platform Settings that affect an iOS build are the Product Name and Default Icon, which provide the app name and icon, respectively, that appear on the device.
The Company Name, Default Cursor, and Cursor Hotspot properties are only used in desktop and web player builds, although you might as well provide the appropriate Company Name or your name, just so it’s there in the project. If you’re wondering why the Cross-Platform Settings aren’t entirely cross-platform, keep in mind Unity started out supporting just the web and desktop platforms, iOS support came a few years later (and Android support, even later).
Because we’re only interested in the iOS Player Settings now, click the Per-Platform Settings tab that somewhat resembles an iPhone to see the Settings for iOS (Figure 10-17).

Figure 10-17. Player Settings for iOS
The Player Settings are plentiful, so they are organized into several foldouts: Resolution and Presentation, Icon, Splash Image, and the catch-all Other Settings. Chapter 12 is devoted to presentation issues, including the Icon and Splash Image settings, so for now, we’ll focus on the Resolution and Presentation and Other Settings.
Most of the Resolution and Presentation settings have reasonable defaults (Figure 10-18), but I recommend always changing the Default Orientation from Landscape Left to Auto Rotation, since Apple requires iPad apps to autorotate, meaning the display is rotated automatically to stay upright. The other Default Orientation choices are Landscape Right, Portrait, or Portrait Upside Down.

Figure 10-18. Resolution and Presentation in the Player Settings for iOS
If Auto Rotation is selected, then the Allowed Orientations for Auto Rotation are displayed. Because Angry Bots is intended only to run in a landscape mode, select Landscape Left and Landscape Right. As a result, Angry Bots will flip between Landscape Left and Landscape Right as the device is turned around, but never to a portrait mode.
The Use Animated Autorotation option specifies whether the display visibly rotates or just switches instantly. I always opt for the animated rotation because it looks cool. The status bar options specify whether the iOS status bar is visible when the app launches, and if visible, in what style. The 32-bit display buffer dictates the color resolution. If this option is not selected, then 16-bit color is used.
Note The 32-bit display buffer option is marked with an asterisk. Any setting marked with an asterisk is shared among other mobile platforms, namely Android.
The Show Loading Indicator controls whether the iOS activity indicator, the little spinning graphic at the center of the screen, appears when the app launches. This setting is also covered among presentation options in Chapter 12.
It so happens that many important settings are collected under the generically titled Other Settings (Figure 10-19). The static and dynamic batching options under the Rendering settings are really optimization options, affecting whether and when Meshes are automatically combined for performance reasons. That will be discussed among optimization techniques in Chapter 16.

Figure 10-19. Other Settings in the Player Settings for iOS
There are two settings in the Identification section: the Bundle Identifier and the Bundle Version. They are not important for running in the iOS Simulator, but when it comes time for app submission, these settings must match the corresponding information for the app specified in iTunesConnect (covered as part of the app submission process in the next chapter).
The bundle ID is a unique identifier for your app, typically expressed like a URL in reverse. For example, all of my apps have bundle IDs of the form com.technicat.<appname>, so I would change com.unity.angryBots to com.technicat.angryBots.
The bundle version is the same app version number displayed for the app on the App Store. It’s usually formatted as two numbers, <major>.<minor>, or sometimes three, <major>.<minor>.<revision>. This number has to be incremented every time you submit an update for your app on the App Store.
Under Configuration, most of the settings have reasonable defaults, but you do need to decide whether your app will run on iPhones, iPads, or both by selecting the Target Device. Most 3D apps generally run well on a variety of screen aspect ratios, at least better than 2D apps, but iPhones and iPod Touches have narrower screens than iPads. And sometimes, for business reasons, you might want to release an app only for the iPad or only for the iPhone.
For Target Resolution, Native is usually what you want (Figure 10-20). It’s equivalent to Best Quality, while Best Performance specifies a lower screen resolution (not available on the iPhone 3GS and its iPod touch counterpart, as they have the lowest-resolution screens). The remaining options are fixed iPhone-only and iPad-only resolutions.

Figure 10-20. The Target Resolution options in the Player Settings for iOS
Scripting Define Symbols allows you to define your own preprocessor definitions, just like the UNITY_EDITOR and UNITY_WEBPLAYER definitions referenced in the FuguPause script in the previous chapter. For example, if you had some code that calls some functions only available in Unity Pro, then you might wrap the code with #if UNITY_PRO ... #endif and then add UNITY_PRO to the Scripting Define Symbols in projects that are running with Unity Pro.
Multiple definitions can be added using semicolons as a separator. If you also had a USE_ADS preprocessor definition to control whether ads are displayed, you might have USE_ADS;UNITY_PRO in the Scripting Define Symbols field.
Some of the Optimization settings have nothing to do with optimization. The application Api Compatibility Level (never mind the weird capitalization of API) specifies the version and extent of the .NET API you need. Usually you won’t need to change that.
AOT Compilation Options refers to the ahead-of-time compilation that takes place during a Unity iOS build, as opposed to just-in-time (JIT) compilation. This why #pragma strict is required in Unity iOS scripts. It gives the AOT compiler enough information to do its job.
The SDK Version has two options: Device SDK and Simulator SDK. When building for a test device or an app submission, covered in the next chapter, the default value of Device SDK is the correct choice, but in this chapter, Simulator SDK should be selected to run our game in the iOS Simulator.
Note SDK Version is an odd property name to distinguish between simulator and hardware builds, but it is a holdover from older versions of Unity iOS that required specifying the iOS SDK that was installed with Xcode.
The Target iOS Version specifies the minimum iOS version the app will run on. Leaving it on the default and minimum value, iOS 4.0, maximizes the number of compatible devices and thus potential customers. However, targeting any iOS SDK older than iOS 4.3 will result in a Unity warning of a potential App Store rejection (Figure 10-21).

Figure 10-21. Warning when submitting with a Target SDK older than version 4.3
This is only a potential Apple rejection issue if you happen to be upgrading an app already on the App Store that has support for ARMv6 processors, because Unity 4 dropped ARMv6 support and only supports the newer ARMv7 family. As the Unity warning recommends, targeting iOS 4.3 or later is safe, because Apple also dropped ARMv6 support starting with iOS 4.3 (which means they also dropped support for devices older than the iPhone 3GS).
Tip When I first tried to submit ARMv7-only updates to the App Store (in 2012), the apps were rejected, and eventually, targeting iOS 4.3 or later avoided that problem. Moreover, once an ARMv7-only update was approved on the App Store, I was able to target older versions of iOS again because I was no longer upgrading an ARMv6 app!
Finally, the Stripping Level, Script Call Optimization, and Optimize Mesh Data really are optimization settings, which will be covered among other optmization techniques in Chapter 16. But, briefly, Stripping Level is a Unity iOS Pro option that removes unused code (or if you’re unlucky, used code, which is why it’s optional), Script Call Optimization can speed up scripts by eliminating exception handling (exceptions, essentially, are errors or “exceptional” conditions that can be caught by calling code), and Optimize Mesh Data removes unused Mesh data (e.g., normals are not necessary when an unlit material is used).
As you can see, there are many options in the Player Settings that affect the appearance and performance of Unity iOS builds. After changing the Player Settings, it’s a good idea to save those changes by invoking Save Project or Save Scene (which implicitly performs a Save Project, too) from the File menu. Although many if not most of the Player Settings will be important at some point, the only change you have to make to get Angry Bots running on the iOS Simulator is setting the Device SDK to Simulator SDK.
Now that you have Xcode installed and have the Device SDK set to Simulator SDK, you’re ready to build and run Angry Bots on the iOS Simulator. The Build and Run command in the File menu and the Build and Run button in the Build Settings window will perform the Build phase, generating an Xcode project, and then perform the Run phase, invoking a build-and-run within the Xcode project.Normally, that is pretty convenient, but when working with the iOS Simulator, you have more control over the iOS Simulator when performing the Xcode build-and-run manually from Xcode. So let’s bring up the Build Settings window again (from the File menu) and click the Build button.
Tip Before performing a build, check in the Build Settings window that you have the correct set of scenes included.
Unity will bring up a Save As window prompting you for a location and file name of the soon-to-be-built Xcode project (Figure 10-22).

Figure 10-22. Build prompt for location and name of the Xcode project
It usually defaults to the top level of the Unity project folder. Let’s call the Xcode project AngryIOS.
Caution Be careful not to choose a build destination inside the Assets folder, or Unity will try to import an entire Xcode project as project assets.
If this isn’t the first time you built this project at this location, Unity will detect that an Xcode project with that name already exists and will ask if you want to replace the project completely or append the project changes (Figure 10-23).

Figure 10-23. Build Append or Replace dialog box
Appending is faster, but sometimes you need a fresh Xcode project. For example, if you change the bundle ID in the Player Settings, and definitely if you’ve upgraded either Unity or Xcode, you should build a new Xcode project.
Tip Build and Run from the File menu is not quite the same as the Build and Run button in the Build Settings. The command in the File menu assumes you want to append the build folder, if it already exists and doesn’t ask if you want to append or replace it. I prefer to stick with performing builds from the Build Settings window, so I always know what’s going on. I’ve had cases where I copied a project, and invoking Build and Run from the File menu still built to the original location!
In any case, after clicking Build, a progress bar will display during the build (Figure 10-24). As with asset reimporting, this can take a while for a big project, and the Editor will be unresponsive during the build.

Figure 10-24. The progress indicator during a build
When the build is complete, an Xcode project will folder appear in the location you specified (Figure 10-25).

Figure 10-25. An Xcode project folder generated by a Unity iOS build
The Xcode project file is named Unity-iPhone.xcodeproj and is located in the Xcode project folder. Double-click that file to open the project in Xcode (Figure 10-26).
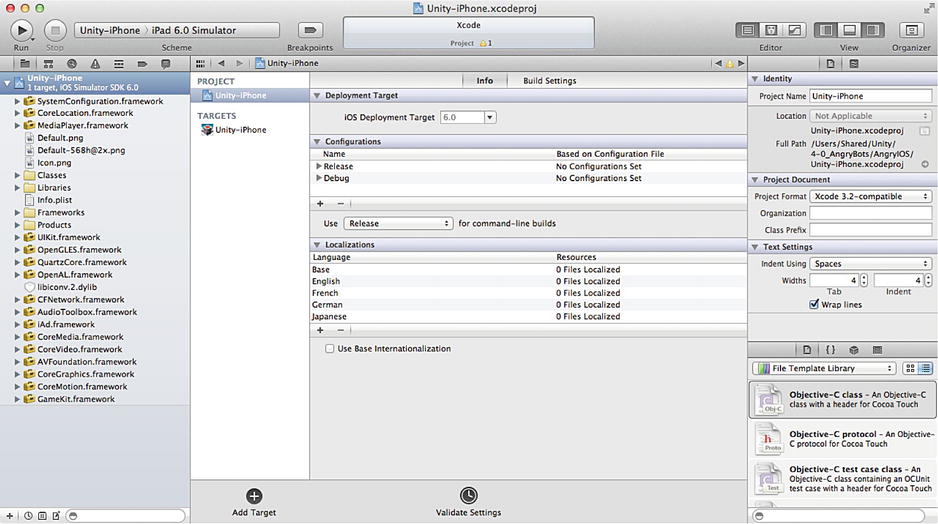
Figure 10-26. Xcode launched with a Unity iOS project
Notice how iPad 6.0 Simulator is displayed at the top left of the Xcode window. That is a menu for selecting the Xcode scheme, which is a collection of build rules in Xcode. The other available scheme is iPhone 6.0 Simulator (Figure 10-27).

Figure 10-27. Selecting the iPad or iPhone simulator
Performing a Build and Run from Unity would have launched the iOS Simulator automatically without first giving you a chance to choose between the iPad and iPhone simulators. For now, let’s stay with the iPad simulator and click the Run button at the top left of the Xcode window. The Run button is really a Build and Run button, as it compiles the project if necessary before attempting to run it. If successful, an iOS Simulator window matching the screen size of an iPad will appear, running Angry Bots (Figure 10-28).

Figure 10-28. Angry Bots running in the iOS Simulator
The iOS Simulator will interpret mouse input as touch-screen events, so you can click and drag on the virtual joysticks to play. In addition, the Hardware menu for the iOS Simulator simulates other device events (Figure 10-29).

Figure 10-29. iOS Simulator options
For example, the Rotate Left and Rotate Right commands simulate rotating the device orientation (try it out and see the autorotation in action), and invoking Home is the same as pressing the device Home button on a device, which will suspend or exit the app and display the Home screen of the device. The app icon should be there and can be clicked (simulated tap) to restart the app. The Hardware menu also allows you to select different devices and iOS versions to simulate.
Besides testing, the iOS Simulator is useful for taking screenshots, via the Save Screen Shot command in the Tools menu (Figure 10-30). Invoking that command immediately saves the screenshot to the Desktop. The App Store requires screenshots for the devices your app supports, so if you need an iPad screenshot, for example, and you don’t have an iPad, the iOS Simulator is a convenient tool for getting that screenshot.

Figure 10-30. The Save Screen Shot command in the iOS Simulator
The iOS Simulator window doesn’t have an operable close button, but the Simulator can be exited by the Quit iOS Simulator command in the iOS Simulator menu or its keyboard shortcut Command+Q (Figure 10-31).

Figure 10-31. Exiting the iOS Simulator
The iOS Simulator is fairly complete at simulating iOS features, including iAd and Game Center. So if you don’t have an iOS device available for testing, you can still get through the most of the rest of this book just using the iOS Simulator.
Explore Further
You might be experiencing deja vu, because we started with the Angry Bots demo as our first project and now we’ve returned. The difference of course is now we’re building the project for iOS. We’ve taken baby steps, changing the build target to iOS, testing in the Unity Editor with Unity Remote, and then building with Xcode to run in the iOS Simulator. The next step, building to run on a real iOS device, will take place in the next chapter, and then we’ll return to our regular programming, the bowling game. By then, hopefully, you’ll be comfortable with the build process and can concentrate on making the game an iOS game!
Because the discussion has returned to Angry Bots, it’s fitting that the first relevant section in the Unity Manual is the “Unity Basics” section, specifically the page on “Publishing Builds.”
The Unity Manual also includes several sections specifically about Unity iOS, although you may have to click the iPhone icon at the top of the manual to make that content visible. The section “Getting Started with iOS Development” is somewhat out of date as of this writing, but its page on the “Unity Remote” is still useful to explain how to set up and operate that app.
More recent documentation on Unity iOS is listed in the “Advanced” section of the Unity Manual, including a page on the “Structure of a Unity Xcode Project.” It’s a good idea to become familiar with the files in the generated Xcode project, but you won’t be messing with the Xcode files generated by Unity, except to enable the built-in profiler when you get to Chapter 16.
Most of the work in getting Angry Bots to build consisted of filling in appropriate values in the Player Settings. This chapter provided a cursory overview of the iOS-specific settings, and only the Default Orientation and Device SDK settings are important for running in the iOS Simulator, but the “Player Settings” page in the Reference Manual details each of the individual cross-platform and iOS-specific Player Settings, along with the settings for other platforms.
Download links and documentation for Xcode are available on the Xcode page at the Apple Developer site (http://developer.apple.com/xcode). One of the great things about using Unity for iOS development is that you can avoid needing to know much about Xcode and Objective-C. But still, learning your way around Xcode and understanding Objective-C code can only help.
In addition to the Xcode documentation you can find under its Help menu, there are links to developer documentation from the Xcode web site http://developer.apple.com/xcode. There are many other articles listed under the Xcode topic, and many are also available in the Xcode Help menu, including the Xcode User Guide and Xcode Basics Help.
The iOS Developer Library Lists Xcode under Topics, and most of the relevant “IDE” section of the Xcode topic can be found in the iOS Simulator User Guide. The guide is extensive, featuring multiple chapters that expand on the introduction in this book to the iOS Simulator, explaining how to launch the simulator from Xcode, how to operate the simulator, and how to invoke simulated device input.
Although, Unity does a lot to shield you from working in Xcode, and in this chapter you literally just had to click the Run button in Xcode to run the iOS Simulator, it’s a good idea to read up on the tool in preparation for the next chapter, where you’ll learn how to build and run our app for testing and build for submission to the App Store.