
Game Center: Leaderboards and Achievements
Now that we have a playable iOS game, it’s time to add some bells and whistles. We’ll start with one of the hot trends, social gaming, which, at the minimum, involves collecting high scores onto a global leaderboard and rewarding players with achievements.
Lucky for us, Unity provides a script interface to Apple’s Game Center social gaming platform. As an iOS user, you’ve most likely played many games that submit scores and achievements to Game Center, and maybe you’ve used the Game Center app included with iOS to view game recommendations, to “friend” other players, or to issue challenges to those friends. We’ll add Fugu Bowl to the ranks of those games by registering a Game Center leaderboard and a couple of achievements for the app and making the necessary script additions to submit those scores and achievements to Game Center.
As in previous chapters, if you’re coming in late, you can download and open the Unity project for this chapter from http://learnunity4.com/, keeping in mind the projects on that web site don’t include any packages from Standard Assets or the Asset Store. But for the purposes of this chapter, the project is ready to run and demonstrate its integration with Game Center.
So far, all of the iOS modifications to Fugu Bowl have been testable with the Unity Remote or iOS Simulator, and an Apple Developer membership hasn’t been necessary. But the free ride is over, since integrating Game Center functionality into an app requires configuring Game Center for the app on iTunes Connect. If you still don’t have an Apple Developer membership at this point, you can just read through this chapter and the next (which deals with iAds and also requires some set up on iTunes Connect), and then return here when you’re ready.
Set Up Game Center on iTunes Connect
To set up Game Center for the bowling game in iTunes Connect, you first need to add the app to iTunes Connect, repeating the steps we rehearsed with the Angry Bots demo. Assuming you’re a registered Apple Developer, go to http://itunesconnect.apple.com/, click Manage Apps, and add Fugu Bowl (remember to prepare some screenshots in advance, again as we rehearsed with Angry Bots). For the App Store icon, use the same Icon1024.jpg file we set as the app icon in the Player Settings. You’ll need to choose your own app identifier, of course. When you’re finished, click View Details for the app you’ve just created to see the App Information page (Figure 14-1).

Figure 14-1. The top portion of the App Information page in iTunes Connect
Once Fugu Bowl is set up in iTunes Connect, bring up the Game Center management page for the app buy clicking the Manage Game Center button at the top right of the App Information page.
The Game Center management page has three functions: it allows you to move the app into a Game Center group, manage the leaderboards for this game, and manage achievements for this game (Figure 14-2 shows the top of the page and the first two options, achievements are below).
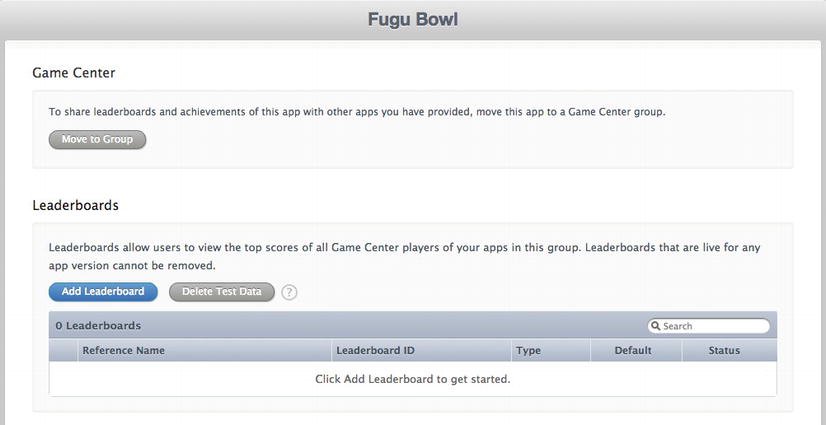
Figure 14-2. The top portion of the Manage Game Center page in iTunes Connect
Placing an app in a Game Center group allows the app to share leaderboards and achievements with other apps. As an example, HyperBowl has six bowling lanes, each with its own leaderboard. Each lane is also available as a free ad-supported app. Using Game Center groups, the same leaderboard is shared between the free lane and its equivalent in the full-paid app. So a player who attained a high score and some achievements in the free HyperBowl Classic lane will still see that score and those achievements after buying the full game, and from the developer’s point of view, it nicely augments the number of players shown in the leaderboard. Because we’re just dealing with one game for now, there’s no need to worry about groups (you can always move the app to a group later).
Create a new leaderboard by clicking the Add Leaderboard button. That brings up a window that presents the options to create a Single Leaderboard or a Combined Leaderboard (Figure 14-3). The latter combines the results from several leaderboards. Using HyperBowl as an example again, the combined leaderboard for that game lists high scores from the leaderboards for each of the six lanes.

Figure 14-3. Selecting a leaderboard type in iTunes Connect
You can always add a Combined Leaderboard later when it’s merited. In fact, Figure 14-3 shows the Combined Leaderboard option is dimmed until you actually have leaderboards that can be combined. So for now, just start by selecting Single Leaderboard, which will bring you to a page where you can fill out the leaderboard information (Figure 14-4).
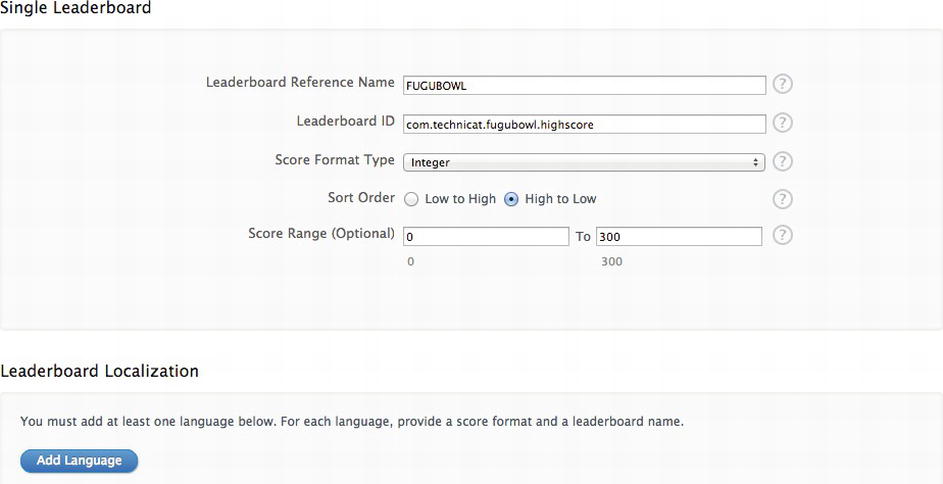
Figure 14-4. Creating a leaderboard in iTunes Connect
The Leaderboard Reference Name is the name displayed for the leaderboard within iTunes Connect. I like to use an entirely capitalized word for the reference name so I can tell immediately it’s not used anywhere else, e.g., as an ID or display text in code.
The Leaderboard ID is the identifier that will be referenced in code. It’s convenient to make that a variation of the app ID (but it doesn’t have to match exactly), so when you see the Leaderboard ID, you can tell immediately which app the leaderboard belongs to. This also helps ensure that the ID is unique.
The next three fields provide information about the scores submitted to the leaderboard. Choose Integer for the Score Format Type (you’ll never have a bowling score of 200.5, for example), and specify that the Sort Order is High to Low, meaning higher scores are better and the leaderboard should display the scores in descending order. Finally, indicate the range of possible scores as 0 to 300, so Game Center won’t display any score outside that range (for a while, I had HyperBowl submitting scores of -1 if the player quit the game prematurely).
Located below the fields you just filled out is the Leaderboard Localization section. Localization is the process of adapting a program for different regions of the world (or locales) and largely involves specifying which text should be used for the user interface in various languages. You need to add at least one language to this listing, so click the Add Language button to bring up the corresponding form (Figure 14-5).

Figure 14-5. Adding localization for a leaderboard in iTunes Connect
Specify the Language for this localization as English and the Name of the leaderboard in this language as High Scores. This is the name that will appear when viewing this leaderboard in the Game Center app or in a standard Game Center leaderboard display.
The Score Format specifies how the scores are displayed. Bowling scores never exceed 300, so it doesn’t matter whether commas or decimal points separate groups of digits.
A Score Format Suffix isn’t necessary, either, but if you did supply one, you might use Point as the Singular suffix and Points as the Plural.
For the image, which is displayed with the leaderboard Name, you can choose the Icon1024.jpg file again from the project’s Textures folder (like the app description icon, iTunes Connect wants a 1024 × 1024 image for Game Center icons). Ideally you would have a different icon custom designed for each leaderboard.
After the settings for this Language are saved, the Language will be listed in the Localization section of the page for this leaderboard (Figure 14-6).

Figure 14-6. Saved localization for a leaderboard on iTunes Connect
Now when you return to the Game Center management page for this app, the leaderboard will be listed, but you’re not done yet. You have to go back to the app description page (return to the App Information page for this app and click the View Details button). Near the bottom of the page, click the Enable Game Center button (Figure 14-7).

Figure 14-7. Enabling Game Center in iTunes Connect
Then click the Edit button, which will bring up a dialog box that allows you to select any new leaderboards that have been defined for this app (Figure 14-8).

Figure 14-8. Enabling leaderboards in iTunes Connect
Usually, you will want to add all the leaderboards displayed, except for any that are intended for future releases.
Now that you have a leaderboard, it’s time for achievements. The possibilities for achievements are plentiful. In HyperBowl, achievements are awarded for rolling spares, strikes, consecutive strikes, bowling a perfect game (300 points), even an achievement for each lane if the player completes a full game. For Fugu Bowl, let’s just define achievements for rolling a spare and rolling a strike, since the FuguBowl script already detects those situations.
The process of adding achievements is similar to that of adding a leaderboard. In iTunes Connect, go back to the Game Center page for this app (Figure 14-9).

Figure 14-9. The Add Achievement section in iTunes Connect
Beneath the section where you clicked Add Leaderboard (where now there is a leaderboards list consisting of the leaderboard that was just created), you will see the Achievements section. Click the Add Achievement button to bring up the Add Achievements page (Figure 14-10).

Figure 14-10. Adding achievement information in iTunes Connect
Just like a leaderboard, an achievement has a Reference Name that is used within iTunes Connect and an ID that will be referenced from scripts to refer to this achievement. Let’s use FUGUBOWLSPARE for the reference name and append .spare to the app ID to form the Achievement ID (again, it doesn’t have to be exact—this is just a convention).
Below the name and ID fields, specify a Point Value, which is the number of points that the Game Center awards to the player once this achievement has been completed. Let’s choose 10 points for rolling a spare.
Tip The total number of points allotted to achievements in this game cannot exceed 1000, so it’s a good idea to anticipate all the achievements you plan to add to a game and make sure you allocate points to them within that budget.
Below the Point Value field are two Yes or No options. Hidden specifies whether the achievement can be shown to the player before it has been earned. Achievable more than Once specifies whether the achievement can be earned multiple times (with points awarded each time). If you selected Yes for this option, then the player would receive ten points for each spare, rather than just ten points for just the first time a spare was rolled (Figure 14-11).

Figure 14-11. Adding a localization for an achievement in iTunes Connect
Just like the leaderboard, the achievement needs a Language added in the Localization section. Clicking the Add Language button brings up a window where you can specify the language (English), Title of the achievement (Spare), a Pre-earned Description, which will be displayed for the achievement before it’s been earned, and an Earned Description, which is displayed for the achievement after it has been earned (Figure 14-12).

Figure 14-12. A saved localization for an achievement in iTunes Connect
Again, for expedience let’s choose the Icon1024.jpg image in our project Textures folder as the achievement icon, but in a polished game you may have a different icon for each achievement.
When you click Save, the new Language will be listed in the Achievement Localization section. Click Save on the Achievement page, and the achievement will now be listed on the Game Center management page.
Repeat the process to create an achievement for rolling a strike. The only difference for a strike is that you’ll have a different reference name and ID, and you’ll award 20 points instead of ten. And you should provide different earned and pre-earned descriptions, too. When that’s done, visit the App Description page again, where Game Center was already enabled when you added a leaderboard, and click the Edit button above the Achievements section to add the available achievements.
At this point, you have a leaderboard and two achievements set up in Game Center. Now it’s time to get back to scripting!
Unity provides access to Game Center through static functions in the Social class, which provides a general interface to social gaming platforms. In principle, you could access other social gaming networks without even changing (much) code, but at this time, Social only supports Game Center.
Our game will be making calls to functions in the Social class to connect to Game Center and submit achievements and scores. We could place all of those calls directly in our game controller script, but we can minimize code bloat and maximize code reusability by with a new script.
From the Project View, create a new JavaScript, place it in the Scripts folder, and name it FuguGameCenter (Figure 14-13).

Figure 14-13. Creating a new FuguGameCenter.js script
In the new FuguGameCenter script, let’s place the Game Center initialization code in the Start callback (Listing 14-1), so the initialization will take place as soon as the script is enabled. The body of the Start callback is enclosed by an #ifdef UNITY_IPHONE so that any non-iOS build will treat the callback as empty.
Listing 14-1. Game Center Initialization in FuguGameCenter.js
import UnityEngine.SocialPlatforms.GameCenter;

var showAchievementBanners:boolean = true;

function Start() {
#if UNITY_IPHONE
        Social.localUser.Authenticate (function (success) {
        if (success && showAchievementBanners) {
        GameCenterPlatform.ShowDefaultAchievementCompletionBanner(showAchievementBanners);
                Debug.Log ("Authenticated "+Social.localUser.userName);
        }
                else {
                         Debug.Log ("Failed to authenticate "+Social.localUser.userName);
                }
        });
#endif
}
The function Social.authenticate performs the Game Center login of the player (prompting the player for login information if necessary) and takes a callback function as an argument. When Game Center reports a true or false result, indicating if the operation was a success, that value is passed to the callback function. Instead of defining the callback function as we’ve defined all our functions so far, separate with its own name, for convenience we pass the function definition directly as the argument, without a name. Functions passed in this manner are called anonymous functions. Our anonymous callback calls Debug.Logwith a message based on the success value. This gives us an easy way to check if the login has failed when we’re testing.
The callback also optionally activates achievement banners, which are briefly displayed notifications that an achievement has been awarded. This Game Center feature was introduced in iOS 5, so the feature is often referred to as iOS 5-style notification banners. I happen to like seeing them, but it’s a matter of preference, so we have a public boolean variable showAchievementBanners that we can select or deselect in the Inspector View.
If the callback was passed true for the authentication success value and showAchievementBanners is true, then the callback calls the static function GameCenterPlatform.ShowDefaultAchievementCompletionBanner, which takes a true or false argument to turn the banners on or off, and also takes a success callback function as an argument.The achievement banner function is not considered a cross-platform feature, which is why the function is not exposed in the Social class and instead has to be accessed from the GameCenterPlatform class. That class is in the UnityEngine.SocialPlatforms.GameCenter namespace, so we import that namespace at the top of the script to avoid typing out the entire namespace name when referencing GameCenterPlatform.
Submitting an achievement is as simple as calling the static function Social.ReportProgress. But that function also takes a success callback function, and we should first check if the player is actually logged into Game Center. To avoid duplicating all that in every piece of code that submits an achievement, we’ll add a wrapper function for Social.ReportProgress to the FuguGameCenter script (Listing 14-2).
Listing 14-2. Submitting an Achievement in FuguGameCenter.js
static function Achievement(name:String,progress:double) {
#if UNITY_IPHONE
        if (Social.localUser.authenticated) {
               Social.ReportProgress(name,progress, function(success) {
                      if (success) {
                              Debug.Log("Achievement "+name+" reported successfully");
                      }  else {
                              Debug.Log("Failed to report achievement "+name);
                      }
               } );
       }
#endif
}
This wrapper function which we’ll call Achievement, is a static function, so it can be called from any script as FuguGameCenter.Achievement. It takes an achievement ID and a progress number (in the range 0-100) and passes those along to Social.ReportProgress, along with a success callback that prints the result with Debug.Log.
Note The achievement progress is passed in as a double, not an int or float, just because that is what Game Center expects. A double is a double-precision floating point number (float is a single-precision floating point number). Game engines, including Unity, typically stick with single floats.
But first, Achievement checks Social.localUser.authenticated to see if the player is logged into Game Center before calling Social.ReportProgress.
The code for submitting a score to a Game Center leaderboard looks nearly identical to the code for submitting an achievement (Listing 14-3).
Listing 14-3. Submitting a Score in FuguGameCenter.js
static function Score(name:String,score:double) {
#if UNITY_IPHONE
        if (Social.localUser.authenticated) {
                 Social.ReportScore (score, name, function(success) {
                      if (success) {
                              Debug.Log("Posted "+score+" on leaderboard "+name);
                      }  else {
                              Debug.Log("Failed to post "+score+" on leaderboard "+name);
                      }
               } );
       }
#endif
}
The only difference between the static function FuguGameCenter.Score and the static function FuguGameCenter.Achievement is that one calls Social.ReportScore and one calls Social.ReportProgress. Off course, also, they have different Debug.Log messages and Social.ReportScore takes a leaderboard ID and score instead of an achievement ID and progress number.
You now have a very trim Game Center wrapper script with just a Start callback, one public variable, and a couple of static functions for use from other scripts. The FuguGameCenter script in its entirety is available in the project for this chapter on http://learnunity4.com/.
Because the Game Center initialization takes place in the Start callback of FuguGameCenter.js, the script has to be attached to a GameObject in the scene. Make sure you have the bowling scene open, create an empty GameObject, name it GameCenter, and drag the FuguGameCenter script onto it. The script has just one property that you can tweak in the Inspector View, the option to display iOS 5-style achievement banners (Figure 14-14).

Figure 14-14. The FuguGameCenter script in the scene
You could have attached the FuguGameCenter script to a GameObject in the splash scene instead, as the static functions defined in that file can be called whether or not the script is attached in any scene. Placing the script in the splash scene would have the advantage of initializing Game Center earlier, but it is less confusing if the FuguGameCenter script is in the same scene as the scripts that will call it (in this case, the FuguBowl script).
Although the FuguGameCenter script takes care of Game Center initialization and provides static functions to report scores and achievements, you still need the FuguBowl script to call those static functions. Fortunately, this part is really easy.
So far we’ve set up two achievements, one for rolling a spare and the other a strike, so now the game needs to report spares and strikes when they happen (at least the first time). This is where organizing the game controller as a state machine really pays off. There’s already a game state for a spare and a game state for a strike, so let’s just add calls in them to the FuguGameCenter.Achievement function (Listing 14-4).
Listing 14-4. Submitting Achievements in FuguBowl.js
var spareAchievementID:String = "com.technicat.fugubowl.spare";
var strikeAchievementID:String = "com.technicat.fugubowl.strike";

function StateSpare() {
       FuguGameCenter.Achievement(spareAchievementID,100);
       state="StateNextBall";
}

function StateStrike() {
       FuguGameCenter.Achievement(strikeAchievementID,100);
       state = "StateNextBall";
}
Instead of hardcoding the achievement IDs that are passed to FuguGameCenter.Achievement (your achievement IDs will likely be different from mine), declare public variables for spare and strike so you can customize them in the Inspector View.
Submitting the final game score is similar to submitting achievements. We were already printing the final score with Debug.Log in the game-over state, so that’s an obvious place to submit the final score to Game Center (Listing 14-5).
Listing 14-5. Submitting a Game Score in FuguBowl.js
var leaderboardID:String = "com.technicat.fugubowl.highscore";

function StateGameOver() {
       Debug.Log("Final Score: "+player.GetScore(9));
       FuguGameCenter.Score(leaderboardID,player.GetScore(9));
       yield WaitForSeconds(gameOverTime);
       state="StateNewGame";
}
Again, the leaderboard ID is declared as a public variable, so it can be customized in the Inspector View (Figure 14-15).

Figure 14-15. Custom Game Center IDs in the FuguBowl script
This was such a small change to our game controller code, just two additional lines (and it could easily have been one), so I won’t bother listing the entire FuguBowl script again, but the modified script is of course available in the project for this chapter at http://learnunity4.com/.
Until the app is released on the App Store, the achievements and leaderboards are only available in the Game Center Sandbox, which is basically an alternate universe for Game Center, with its own user IDs and leaderboard and achievement data. When an app in development (a version that has not been approved yet for the App Store) attempts to connect to Game Center the player will be prompted to log in to or create a Sandbox account, and the outside world won’t see any scores and achievements you earn in the test session, since they are only recorded in the Sandbox.
Tip If you seem to be stuck in the Sandbox version of Game Center or stuck in the non-Sandbox version, try bringing up the iOS Game Center app and then logging out (tap your Apple ID).
When you build and run Fugu Bowl on the iOS Simulator or on a device (but not in the Editor) and play a whole game, you should have a score on the leaderboard and up to two achievements, if you bowled a strike or a spare. At this point, Fugu Bowl should be visible in the Game Center app (Figure 14-16), and when you tap on it, you’ll see the scores and achievements that have been submitted (Figure 14-17).

Figure 14-16. Fugu Bowl listed in the Sandbox version of Game Center

Figure 14-17. Test results in the Game Center Sandbox
Scores and achievements don’t always show up in Game Center in a reliable or timely manner, particularly when testing in the Sandbox, so check the Xcode debug area to see if Game Center operations succeeded (remember, we added logging functions in all of the FuguGameCenter functions).
Although the Game Center app’s display of the achievements and leaderboard looks pretty nice, players of the bowling game might not bother checking the Game Center app, or they might not even know about it. Ideally, the player would be able to view the leaderboard and the achievements within the game, so let’s add a couple buttons to the main pause menu in the FuguPause script for that purpose (Listing 14-6).
Listing 14-6. Buttons to Show Achievements and High Scores in FuguPause.js
function ShowPauseMenu() {
       BeginPage(150,300);
       if (GUILayout.Button ("Play")) {
               UnPauseGame();
       }
        if (GUILayout.Button ("Options")) {
               currentPage = Page.Options;
       }
        if (GUILayout.Button ("Credits")) {
               currentPage = Page.Credits;
       }
#if UNITY_IPHONE
       if (GUILayout.Button ("High Scores")) {
               Social.ShowLeaderboardUI();
       }
       if (GUILayout.Button ("Achievements")) {
               Social.ShowAchievementsUI();
       }
#endif
#if !UNITY_IPHONE && !UNITY_WEBPLAYER
        if (GUILayout.Button ("Quit")) {
               Application.Quit();
       }
#endif
        EndPage();
}
The code for those two buttons are wrapped with #if UNITY_IPHONE, so they will only appear on iOS builds. They’re labeled High Scores and Achievements (Figure 14-18).

Figure 14-18. Pause menu with buttons for the leaderboard and achievements
The Social class provides functions to query Game Center for leaderboard and achievements information that can be used to construct custom displays. But it’s easier to just call the functions Social.ShowLeaderboardUI and Social.ShowAchievementsUI to bring up the standard Game Center presentation of leaderboards and achievements, respectively. So the High Scores button calls Social.ShowLeaderboardUI and the Achievements button calls Social.ShowAchievementsUI.
When you run Fugu Bowl and connect successfully to Game Center and tap one of the new Game Center buttons, a standard Game Center interface appears. Figure 14-19 shows the results of tapping on the Achievements button.

Figure 14-19. In-game achievements displayed with Social.ShowAchievementsUI
The display is similar to the one in the Game Center app but simpler. For example, the in-game display doesn’t need all the navigation buttons that switch its view to other portions of the Game Center app. Also, the iPad version of this display is much different because the iPad has a lot more screen space to work with.
You might think we should have added wrapper functions for these two calls in FuguGameCenter, but these functions are so simple there’s no real need to. They don’t take success callback functions as arguments, and it’s not necessary to check Social.localUser.authenticated beforehand. In fact, it’s better not to, as both Social.ShowLeaderboardUI and Social.ShowAchievementsUI will provide a user-friendly alert to the player if there is no current Game Center login.
As with the change to the game controller code, the enhanced pause menu only required a couple of additional lines and doesn’t warrant a complete relisting of FuguPause.js here. The modified script is in the project files for this chapter at http://learnunity4.com/.
Explore Further
This has been one of the more efficient scripting chapters. With just a few lines of code, our game is now connecting to Game Center, submitting achievements and scores, and displaying the achievements and the leaderboard from the pause menu!
The bulk of the work was spent in the Game Center setup on iTunes Connect. Even there, designing the leaderboard and set of achievements for a bowling game is straightforward, since the rules and traditions are so well-defined. Chances are, if you design a new game, you’ll have to put some thought into what leaderboards and achievements you want in your game, and you should probably think about that early in the design process.
This chapter used the “Social” class almost exclusively to access the Game Center features used in this chapter. The Scripting Reference page for that class explains its role in encapsulating access to Game Center and potentially other social gaming platforms (although for now, Game Center is the only one).
We made do with the minimum set of functions required to report scores and achievements and display the results: accessing “Social.localUser” to connect to Game Center, calling “Social.ReportProgress” and “Social.ReportScore” to submit achievements and scores, respectively, and calling “Social.ShowAchievementsUI” and “Social.ShowLeaderboardUI” to bring up the Game Center display for the player’s achievements and game’s leaderboards. The documentation for the Social class lists several other functions that allow finer-grained control, for example, to retrieve information from Game Center to populate a custom leaderboard display.
We bypassed Social and accessed the “GameCenterPlatform” class directly to invoke its “showDefaultAchievementsCompletionBanner” function, enabling iOS 5-style achievement banners. The page for the GameCenterPlatform class explains what namespace it’s in and includes some notes on the Game Center Sandbox.
The Game Center chapter of the iTunes Connect Developer Guide is the definitive source on setting up achievements and leaderboards. The Guide is available within the iOS Developer Library (available on http://developer.apple.com/library/ios or in the Xcode Organizer).
The inner workings of Game Center are explained in the Game Center Programming Guide in the iOS Developer Library, under the “Networking and Internet” topic. The portion of the Game Center that can be integrated into apps, as opposed to the server portion operated by Apple, is actually called Game Kit and also features support for networked multiplayer gaming.
Game Center isn’t the only social gaming platform available for iOS. Many have come and gone (OpenFeint, Agon Online), but there are still some other options. Under its Services category, the Asset Store offers plug-ins for PlayHaven (http://playhaven.com/) and Swarm (http://swarmconnect.com/), both offering leaderboards, achievements, and other social gaming features. Another Game Center plugin, from Hippo Games, is listed under Scripting/Integration.
Before Unity had built-in Game Center support, Prime31 Studios provided a Game Center plugin, which is still available at http://prime31.com/ (but not on the Asset Store) and is an option for developers who need some features not provided by Unity. For example, the Prime31 plugin includes a function for issuing achievement challenges (a feature of iOS 6). Prime31 also offers a Game Kit plugin for multiplayer gaming support that is on the Asset Store.