
Building for Real: Device Testing and App Submission
Running an iOS version of Angry Bots turned out to be amazingly easy. It was just a matter of switching the build target to iOS, then immediately playing the game in the Editor using the Unity Remote app as the input device, or, to run the game in the iOS Simulator, performing a build with the Target SDK set to Simulator SDK in the Player Settings.
That might seem too easy to be the end of it, and it is. The next step is the painful part, building the Unity project so that it installs and runs on real iOS hardware. The Unity part of this procedure is easy, nearly identical to building a project to run on the iOS Simulator. But to install an app on a test device requires that the app be built with a mobile provisioning profile that is also installed in Xcode and on the test device. Before that, the profile has to be created in Apple’s Provisioning Portal using a development certificate associated with the test device and the app’s bundle ID. So before that, the test device and bundle ID have to be registered on the Provisioning Portal, and the development certificate has to be generated after creating a certificate request.
And that’s just for testing. A similar process is required when building apps for submission to the App Store, but with a separate distribution provisioning profile and corresponding certificate. Furthermore, submitting an app to the App Store also requires adding the app to iTunes Connect, a separate web site for managing apps on the App Store.
If dealing with provisioning profiles sounds like a hassle, you may be tempted to skip this chapter and return later. And in fact, the iOS adaptation of our bowling game in the next couple of chapters can be tested with the Unity Remote (for the input code in Chapter 13) and iOS Simulator (the icon, splash screen, and screen size set in Chapter 12), as we did with Angry Bots in the previous chapter. Plus, access to the Provisioning Portal and iTunes Connect, and the associated nonpublic documentation, requires membership in the iOS Developer Program, so if you haven’t acquired that yet, then you’ll have to wait anyway.
But you will need an iOS Developer membership to set up Game Center leaderboards and achievements (which I will cover in Chapter 14) and an iAd banner and interstitial ads (which I will cover in Chapter 15), and the performance measurement (which I cover in Chapter 16) won’t be very interesting without it being able to run on real hardware. So at the very least, it’s best to get the iOS Developer registration process started as soon as possible!
Register as an iOS Developer
As you might expect, the Apple Developer web site (http://developer.apple.com/) is the place to find most of the official Apple developer resources (iTunes Connect is an exception), including all of the Apple developer programs—the Mac Developer Program, the Safari Developer Program, and the one we’re interested in, the iOS Developer Program.You can register in the iOS Developer Program as an individual or a company. Registering as an individual is fairly straightforward, as long as you have a credit card and are prepared to pay the $99 yearly fee. Signing up as a company requires the same, but it also requires an actual legal company entity and supporting information about the company, including a DUNS (Data Universal Numbering System) number, which is a unique identifier assigned to a company by Dun & Bradstreet. Both individual and company accounts have to be approved by Apple, but approval for company accounts can take longer than individual accounts (the approval for my company, Technicat, LLC, took three months).
The only additional feature for company accounts is the ability for the account administrator to add team members, so in this book we’ll assume we’re working with an individual account or, equivalently, as the administrator of a company account.
Once you’ve been approved as an iOS developer, you’ll have login access to the Apple developer site and and also iTunes Connect (http://itunesconnect.apple.com/) using your Apple ID. ITunes Connect is the site where you manage all your apps that are on or being prepared for the App Store.
But before working in iTunes Connect, we’ll be logging in to the Apple developer site and working in the Provisioning Portal to create development and distribution provisioning profiles, which are required for test and distribution builds, respectively.
The Provisioning Portal
Assuming you have an iOS Developer Membership (if not, you can skip this chapter and return later), log in to http://developer.apple.com/ and enter the Provisioning Portal.
Note The Apple developer site has several areas that you can log in to—the Member Center, iOS Dev Center, and Developer Forums—and you can reach the Provisioning Portal from either the Member Center or iOS Dev Center (at this time, the organization is a bit confusing).
Detailed documentation is available on the site once you log in (the Provisioning Portal is one area where Apple doesn’t have much in the way of public screen-to-screen documentation), but I’ll briefly outline the steps that are involved and the information you need to provide.
Register Test Devices
A development provisioning profile is valid only for a specified set of test devices, so the first thing to do is register in the Provisioning Portal the iOS devices you want to use for testing. You will need to supply the unique device identifier (UDID) for each device. The UDID of a device can be found with iTunes or Xcode. In iTunes, when an iOS device is connected to your Mac, the UDID can be found by clicking the serial number of the device, which switches the serial number display to a UDID display. But that display cannot be copied and pasted, so a better option is to obtain the number from Xcode.
When an iOS device is connected to your Mac, the UDID will show up in the Xcode Organizer window. To bring up the Organizer window in Xcode, launch Xcode if it’s not running already, then select Organizer from the Window menu (Figure 11-1).
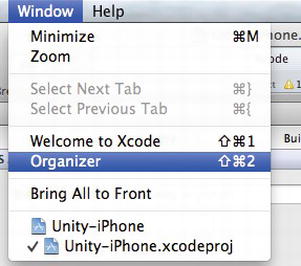
Figure 11-1. Bringing up the Organizer from the Xcode Window menu
Once the Organizer window is up, all connected iOS devices should be listed in the left panel. Select the device you want to register for testing, and the device information, including the UDID, listed as the Identifier, will be displayed (Figure 11-2).

Figure 11-2. Obtaining a device ID from the Xcode Organizer
You can then copy and paste the UDID into the Provisioning Portal to register your test device.
Once you’ve registered your test devices, you need to register app identifiers, because each provisioning profile is only valid for a single app ID. An app ID corresponds to a bundle ID (the same one specified in the Unity Player Settings for your app) or matches many bundle IDs when it ends with an asterisk (then it’s called a wildcard app ID). For example, I registered an app ID com.technicat.* that I can use in a single provisioning profile for all my apps, such as com.technicat.fugubowl and com.technicat.hyperbowl.
Tip Create a wildcard app ID that matches all or most of your bundle IDs, so you don’t have to create a new app ID for every bundle ID.
Development Provisioning Profiles
To create a development provisioning profile, you need to generate a development certificate that is associated with the profile. The Provisioning Portal has instructions on how to generate and upload a certificate request, which will in turn result in a new development certificate. Then you can create a development provisioning profile associated with that certificate.
Actually, once you have generated a development certificate, the Provisioning Portal will automatically generate a Team Provisioning Profile for you that uses the asterisk * as an app ID and thus matches any of your bundle IDs, which is a real convenience. But you can also generate any number of other development provisioning profiles with the same certificate and the app ID you specify.
Distribution Provisioning Profiles
Creating a distribution provisioning profile is similar to creating a development provisioning profile. You’ll need to create a distribution certificate and then a distribution provisioning profile associated with that certificate.
Tip You can save a little time by reusing the same certificate request file to create both the development and distribution certificates.
The Xcode Organizer
When your development provisioning profiles are available, you can download them into Xcode. Bring up the Xcode Organizer window (from the Xcode Window menu), select Provisioning Profiles in the sidebar, and click the Refresh button on the lower right of the profiles list. After prompting you for your Apple developer login, the Organizer will retrieve and display all the provisioning profiles you've created in the Provisioning Portal.
Figure 11-3 shows all four of my provisioning profiles. Notice all the app IDs are prefixed with a number. That’s generated by the Provisioning Portal and called the bundle seed ID. For our purposes here, you can ignore it.

Figure 11-3. Provisioning profiles listed in the Xcode Organizer
The first provisioning profile, named La Petite Baguette Distribution, is a distribution provisioning profile that only matches an app called La Petite Baguette (a restaurant app). Notice that the app ID is fully specified, exactly matching the bundle ID for the La Petite Baguette app. Notice also that the provisioning profile has expired.
The second profile, iOS Team Provisioning Profile, is a development provisioning profile automatically created by the Provisioning Portal. It matches any app’s bundle ID.
The third profile, named techdev, is a development provisioning profile I created that will work with any of my apps, as it will match any bundle ID starting with com.technicat.
The fourth profile is my sole distribution provisioning profile. It also matches any app that has a bundle ID starting with com.technicat.
It’s not enough for the development provisioning profile to be in Xcode; it also has to be installed on your test devices. With a test device connected to your Mac and listed in the sidebar of the Xcode Organizer, just drag the profile from the Provisioning Profiles list to the device. To verify the profile is installed on the device, launch its Settings app, select the General category, and within that, select Profiles and see if the profile is listed there (Figure 11-4).

Figure 11-4. Provisioning profiles on a test device
Notice the expiration date. Certificates, and thus their associated provisioning profiles, expire after a year, at which point you’ll have to replace the expired profile with a new profile created with a new certificate.
You can also create a new provisioning profile within the Xcode Organizer by clicking the + button on the lower left and then, after being prompted for a Provisioning Portal login, filling out the information as shown in Figure 11-5.

Figure 11-5. Creating a provisioning profile from the Xcode Organizer
This is the same information you would provide in the Provisioning Portal to create a development provisioning profile. Once you have provided enough information (don’t forget to enter a name!), the Finish button will be enabled, and after clicking Finish, the new provisioning profile will show up in the list of all your provisioning profiles (Figure 11-6).
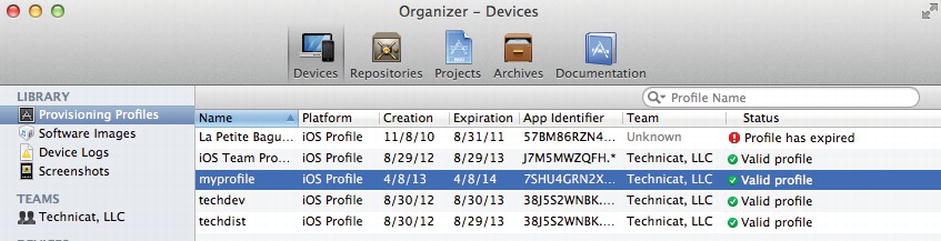
Figure 11-6. A newly created provisioning profile in the Xcode Organizer
If you happen to be working in Xcode and need to create a development provisioning profile, this is a convenient option. But I prefer to create my provisioning profiles directly in the Provisioning Portal, because requesting certificates, registering test devices, and creating distribution provisioning profiles have to take place there. And working directly in the Provisioning Portal avoids some flakiness I’ve encountered from time to time when managing provisioning profiles in the Organizer.
Build and Run
Now you’re ready to start testing your device. The process is exactly the same as building and running for the iOS Simulator, except first you will need to go to the Unity Player Settings and set the SDK Version to Device SDK instead of Simulator SDK (Figure 11-7).

Figure 11-7. The Player Settings for a device build
Before starting a build, because you’re building for real hardware, you should make sure the Target iOS Version is compatible with your test device (or vice versa), meaning the Target iOS Version should be at least as old as whatever version of iOS your test device is running. But really, it’s a deployment decision, too. Supporting older versions of iOS increases the potential number of customers, but may increase your support burden and prevent use of features available only in later versions of iOS. It turns out there is data on iOS hardware and versions currently running Unity-based apps, collected by Unity at http://stats.unity3d.com/ Any Unity app you create will contribute to this data, as long as the Submit HW Statistics option is selected in the Player Settings.You can perform a Build and Run, which is equivalent to performing a Build, manually opening the generated Xcode project by double-clicking the project file (Figure 11-8), and then clicking the Run button in Xcode.
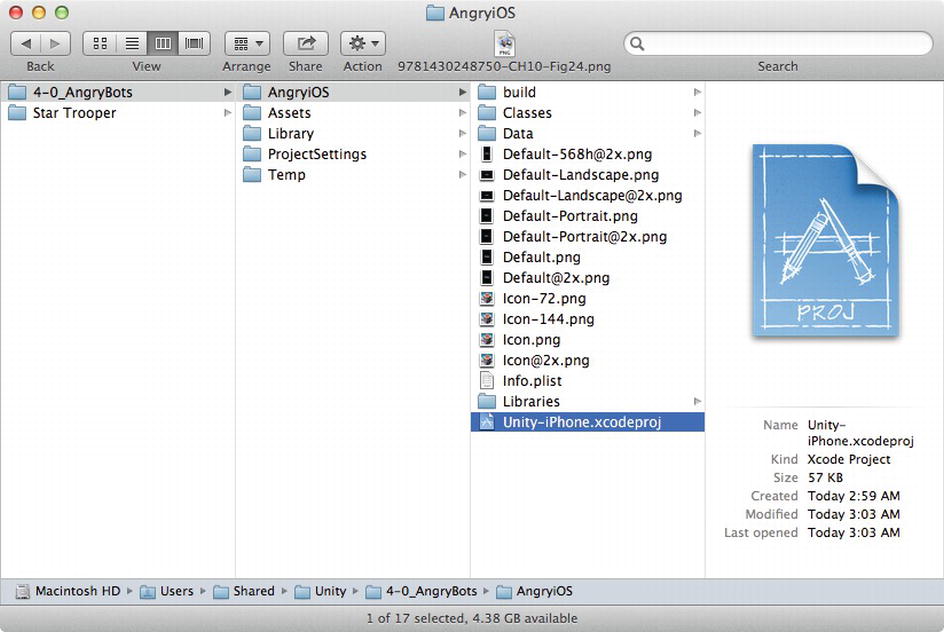
Figure 11-8. An Xcode project generated by a Unity iOS build
Either way, instead of building and running in the iOS Simulator, Xcode will build, install, and run on the connected test device.
Tip It’s best to disable screen lock completely while using a device for testing. Initiating a run from Xcode will fail if the connected device has the screen locked.
As with the iOS Simulator, any Unity debug text will show up in the Xcode debug area (Figure 11-9) instead of the Console View as in the Unity Editor.

Figure 11-9. Xcode running an app on a test device
Note The Xcode equivalent of views in the Unity Editor are called areas. Unlike views, Xcode areas are spelled in lowercase, e.g., the navigation area, the editor area and the debug area.
You can also make use of the MonoDevelop debugger, although there's more setup involved to debug an iOS app than a game running in the Unity Editor. To enable the app for remote debugging with MonoDevelop, select the Development Build option in the Build Settings window (Figure 11-10). After the Development Build option is enabled, the Script Debugging option becomes available, and you should select that, too.
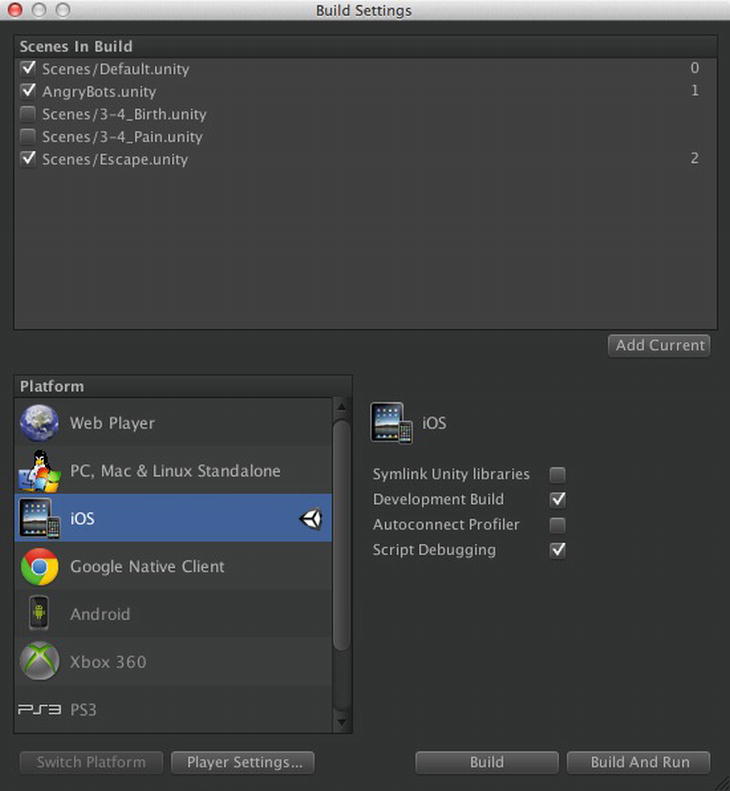
Figure 11-10. Creating a development build with script debugging enabled
Remote debugging has problems interacting with Xcode, including the inability to resume after breakpoints, so first perform a Build and Run to get the app installed on the test device. Click Stop in Xcode to halt the test run, and then manually restart the app on the device (i.e., tap the app’s icon just like you would to start the app normally). Finally, in MonoDevelop, perform an Attach to Process, only instead of attaching to the Unity Editor, attach it to the test device (Figure 11-11).

Figure 11-11. Attaching the MonoDevelop debugger to the iOS player
After you’re satisfied with the device testing, it’s time to submit your app to the App Store. This doesn’t require any change within Unity; you only need to rebuild the app within Xcode using a distribution provisioning profile instead of a development provisioning profile. But first, you need to create an App Store entry for the app in iTunes Connect. And before you create the iTunes Connect entry, you should have some graphics ready for the App Store.
You’ll need two kinds of graphics for the App Store: an app icon and a set of screenshots for all the devices that you’re targeting. iTunes Connect has a tendency to log out after a period of idleness and lose all changes, so you don’t want to be messing around with creating an icon and taking screenshots while logged in there.
Create an Icon
iTunes Connect will ask for a 1024 × 1024 version of your app icon, either in .png or .jpeg format, that will accompany the App Store description of your app. If you planned ahead when creating the app icon, you’re all set. Otherwise, you’ll have to create it now before proceeding to iTunes Connect.
Ideally, you’d have a professional icon designer create the icon, but if you’re low on both funds and art skills, you can do what I do in a pinch—grab a large screenshot from the Unity Editor game view and scale it to 1024 × 1024. It's better to scale from large to small. Scaling up a smaller existing icon usually doesn’t create good results and is discouraged by Apple, although it probably happens a lot because until fairly recently apps were submitted with a 512 × 512 icon uploaded.
Caution Apple may reject an app if the App Store icon does not match any of app’s icons that are displayed on a device. So if you create an entirely new 1024 × 1024 for the App Store, you should set that as the default icon in the Unity Player Settings.
Take Screenshots
iTunes Connect will also ask you for screenshots in three sizes: matching the iPhone 4 (640 × 960 or 960 × 640), iPhone 5 (640 × 1136 or 1136 × 640), and iPad (768 × 1024 or 1024 × 768 or double that for the new iPad). That’s assuming you selected iPhone + iPad as the supported hardware in the Unity Player Settings. If you only selected iPhone, then you don’t need to supply the iPad screenshot, and if you only selected iPad, then you only need to supply the iPad screenshot.
There are three fairly convenient ways to take screenshots: using the iOS Simulator, from a device using the Xcode Organizer window, and on the device itself by pressing some buttons.
Taking screenshots with the iOS Simulator is easy. Use the Screenshot command in the Edit menu, and the resulting screenshot is saved on the Desktop. It may be inconvenient to use the iOS Simulator if your game does not play well with the limited iOS Simulator input. But if you don’t have an iPhone 4 and 5 series, plus an iPad, this is one way to get screenshots.
Taking Xcode screenshots is almost as simple. With a device attached to your Mac, select the Screenshots panel of the device as it appears in the Xcode Organizer window (all attached devices will display with a green dot).
Then click the New Screenshot button on the lower right when you see a screen you like, as you play your game on the test device. The screenshot will appear in the Screenshots panel (Figure 11-12), and you can drag any screenshot from there (the smaller preview on the left or the big one on the right) to the Desktop for easy access.

Figure 11-12. Taking device screenshots in the Xcode Organizer
Otherwise, if you need to access them in the Finder, the screenshots are in the Library ![]() ApplicationSupport
ApplicationSupport ![]() Developer
Developer ![]() Shared
Shared ![]() Screenshots folder.
Screenshots folder.
Tip OS X normally hides the Library folder. You can unhide it by opening the Terminal application and entering chflags nohidden ∼/Library.
My favorite way to take a screenshot is directly on the device by pressing the Home and Power buttons simultaneously. The resulting screenshot is saved to Photos on the device, which can later be synced to iPhoto on the Mac and accessible in the Finder from there. This method allows me to take screenshots at my leisure, and anywhere I want, like on the sofa, instead of being tethered to a Mac. And it’s easier to quickly take a screenshot at a propitious moment than trying to grab a mouse and quickly click the New Screenshot button in the Xcode Organizer.
Add an App on iTunes Connect
Now that you’ve got your icon and screenshots ready, you can start adding your app information to iTunes Connect. Log in to http://itunesconnect.apple.com/ and you’ll see the main menu, as shown in Figure 11-13.
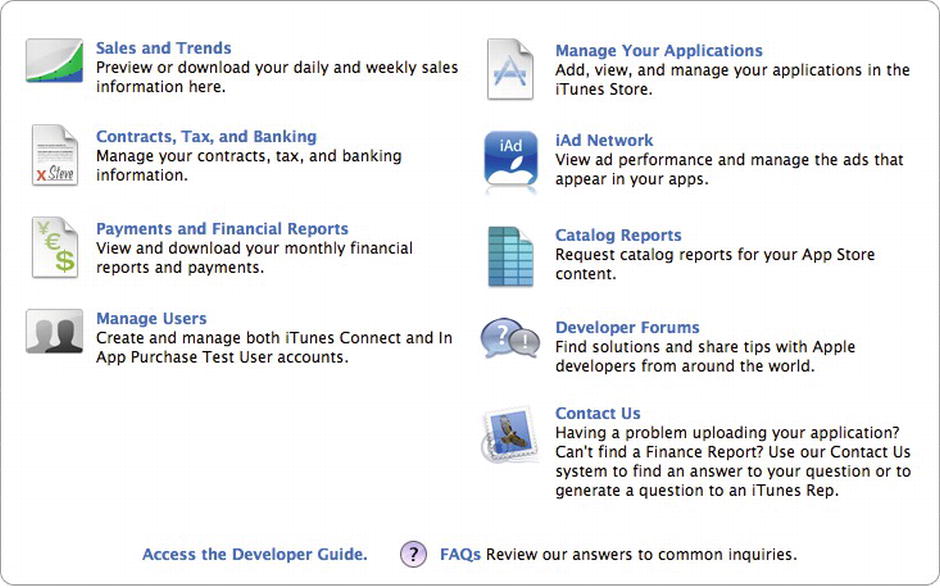
Figure 11-13. The main menu in iTunes Connect
Click Manage Your Applications to get started. Now you’ll see a list of apps that you’ve already added and an Add New App button. Figure 11-14 shows this page in my iTunes Connect account, displaying some of my apps, each with a version number and a dot that is color coded according to the app’s status.
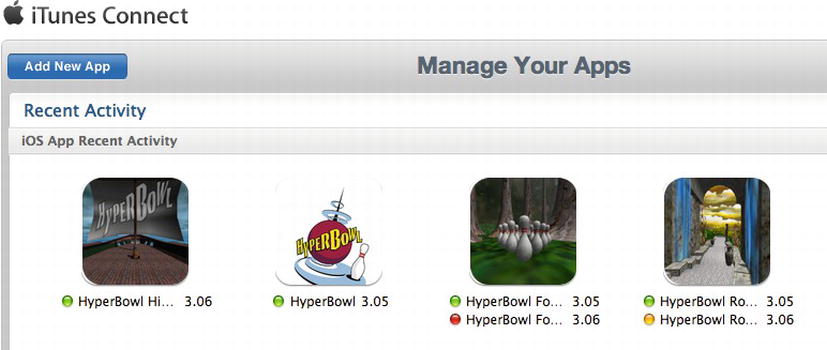
Figure 11-14. Add or manage apps in iTunes Connect
A green dot means the app is live on the App Store, and red means it has been rejected. Yellow has all kinds of meanings, but often means the app has not been uploaded yet. An app that is already live and has an update submitted or in progress will list the status of both. If this is your first app, of course, no apps will be listed.
Select App Type
When you click Add New App, the next page (Figure 11-15) asks you to select an app type, either an iOS App for the App Store or a Mac OS X app for the Mac App Store.

Figure 11-15. Selecting the new app type in iTunes Connect
Clicking iOS App will bring up a series of web pages, each with a form to fill out, and advance to the next page or form by clicking the Continue button.
App Information
After selecting iOS as the app type, you’ll be presented with a page for entering the app name and bundle ID. These should match the Product Name and bundle ID specified in the Player Settings of the Unity Editor. The list of bundle IDs is taken from the list of app IDs you added to the Provisioning Portal. If you added a wildcard app ID, you can select that and then the suffix of the specific bundle ID for the app you’re adding.
For example, in Figure 11-16, I have the info for our modified Angry Bots project, renamed Fugu Bots. The wildcard ID com.technicat.* and suffix FuguBot matches the bundle ID com.technicat.FuguBot I have in the Unity Player Settings.

Figure 11-16. Specifying the app name and bundle ID on iTunes Connect
The default language indicates the primary language you’ll be using for all the assets and descriptions you’re submitting with this app.
The SKU Number can be anything you want, but it has to be unique among your apps and should be readily identifiable with your app if you see it in reports.
Availability and Price
Upon continuing from the App Information page, iTunes Connect will ask you to specify the price of the app and when you would like the app to become available on the App Store (Figure 11-17).
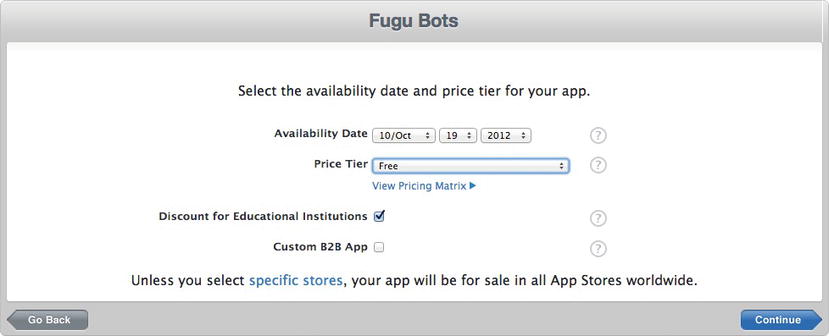
Figure 11-17. Setting the app availability and price on iTunes Connect
The availability is contingent on when Apple approves the app, so if you specify an availability date one week from the day the app is submitted and the approval takes two weeks, then it will be made available on the approval date. If you want the app released as soon as possible, just use the default date, which is the day you’re entering this information.
The prices range from free to $.99 to $1.99 to $2.99 and so on. There’s no need to worry too much about charging the right price, it can be changed anytime later.
The next page is the kitchen sink of this process. Most of the app information is added here, and, fortunately, this huge form is broken into sections.
Version, Category, and Copyright
The first section is the version number, copyright, and category information (Figure 11-18).

Figure 11-18. The app version, category, and copyright information on iTunes Connect
The version number must match the version number specified in the Unity Player Settings.
The copyright field should be filled in with the name of the copyright holder, normally you or your company. Don’t add any extraneous Copyright text; that will be added automatically in the App Store.
Select the appropriate category and subcategories. You might as well also select a secondary category to increase the exposure of your app.
Rate the App
The Rating section is pretty straightforward (Figure 11-19). Fill it out, it’s all mandatory.

Figure 11-19. Setting the app content rating in iTunes Connect
If the ratings don’t match the content, at least in Apple’s eyes, the app may be rejected. For example, I tried submitting a version of Angry Bots and had the app rejected because the game has shooting, albeit against irate automata, and according to Apple that qualifies as Realistic Violence that should be marked as Frequent/Intense.
Metadata
The Metadata section is the most important for marketing (Figure 11-20).

Figure 11-20. The product description for the app in iTunes Connect
This section includes the description of your app as it will appear on the App Store and keywords that help your app show up in searches on the App Store .
Upload the Icon and Screenshots
Finally, this is where you upload the icon and screenshots you prepared earlier (Figure 11-21). The icon must be 1024 × 1024 and resemble the app icons that are built into the app or the app may get rejected by Apple.

Figure 11-21. Uploading the app icon and screenshots in iTunes Connect
iTunes Connect will not allow us to proceed without uploading the icon and at least one screenshot, although we really need to upload a screenshot for each screen type (aspect ratio) that the app will run with. If a Unity iOS app is built for the iPhone and iPad, then we need to upload screenshots for all three categories, basically corresponding to the iPhone 4, iPhone 5, and iPad.
Caution iTunes Connect will time out pretty quickly. If it times out before you complete this page, the entire app description disappears, and you’ll have to start over. That’s why we prepared the icon and screenshots beforehand.
Prepare for Upload
After filling out the data in the previous section and then advancing to the next page, we’re almost done. The app status is now Prepare to Upload (Figure 11-22).
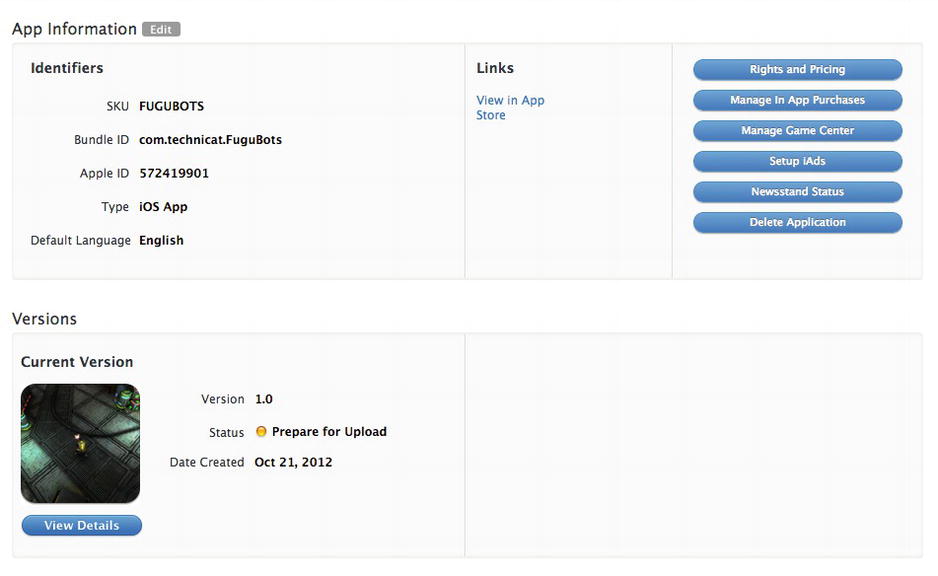
Figure 11-22. The app in Prepare for Upload status
Before you can submit your app you have to click the View Details button, which returns to the Version Information page (Figure 11-23).

Figure 11-23. The Ready to Upload Binary button in iTunes Connect
That page now has a Ready to Upload Binary button in the upper right. Click that and iTunes Connect will ask you if the app uses cryptography, for consideration of export laws (Figure 11-24).

Figure 11-24. Checking if the app has encryption in iTunes Connect
Finally, iTunes Connect will present you with a message saying you can upload the app using a program called Application Loader. Ignore that—you can upload the app directly from Xcode (and the message is obsolete anyway). After that, you’re back in the app page, now showing Waiting for Upload as the app’s status (Figure 11-25).
Caution The status colors for Prepare to Upload and Waiting for Upload are indistinguishable, so it’s easy to forget to go through the Prepare for Upload steps.

Figure 11-25. An app in Waiting for Upload status in iTunes Connect
Submit the App
Now you’re ready to submit your app. Go back to Xcode and select your project and the build target. In Build Settings, scroll down and select the Distribution Provisioning Profile (Figure 11-26).

Figure 11-26. Selecting a distribution provisioning profile for a Release build in Xcode
From the Project menu in the menu bar, select Clean, which will ensure that you rebuild everything with the Distribution Provisioning Profile (Figure 11-27).

Figure 11-27. Clean the build before archiving in Xcode
Then select Archive, which will build a distribution version of the app (Figure 11-28).

Figure 11-28. Archiving a build for distribution in Xcode
When the build is complete, the Organizer window will appear showing the app, with buttons to Validate and Distribute (Figure 11-29).

Figure 11-29. An archived distribution build in the Xcode Organizer window
Notice there is also an Estimate Size button. Your app will be processed by Apple before showing up on the App Store, which will increase the app size. Clicking this button will give you an idea what the final size of the app will be.
Clicking the Validate button will check if the app would be immediately rejected for various build or packaging problems (e.g., if the app was built using a development profile instead of a distribution profile).
Tip I don’t find that using the Validate button saves me any time, since any errors reported by Validate are quickly reported by the app submission process anyway. Overall, it’s more efficient to just go ahead and submit the app.
Clicking the Distribution button will initiate the app submission process, consisting of a series of pop ups (Figure 11-30).
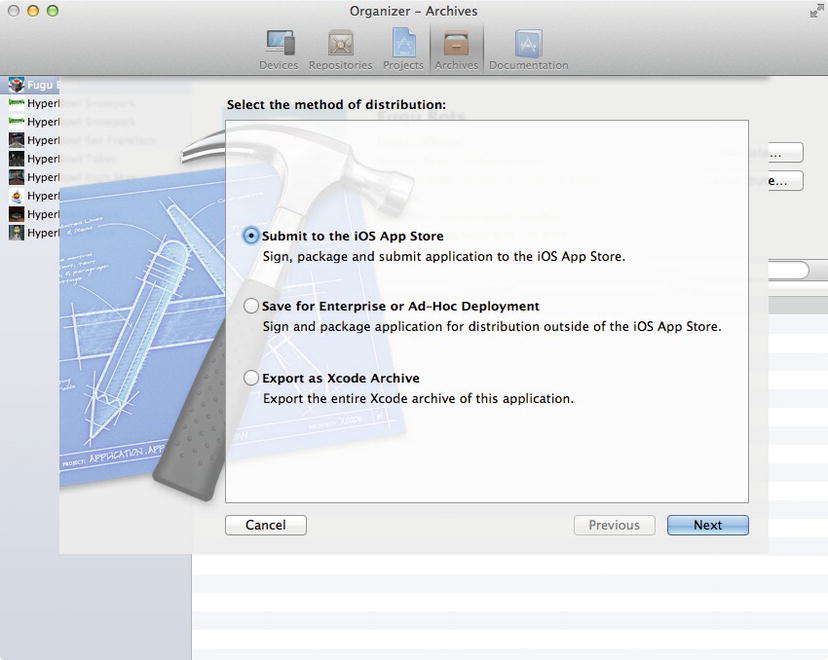
Figure 11-30. The first popup window when submitting an app to the App Store in the Xcode Organizer
The first pop up basically asks what you want to do with this app. The default selection, Submit to the iOS App Store, is what you want, so just click Next, which brings you to another pop up that asks which app you’re submitting and what distribution provisioning profile you used for the app (Figure 11-31).

Figure 11-31. The app and provisioning profile selection for an app submission in the Xcode Organizer
The pull-down list of apps includes all your apps that are in Waiting for Upload status on iTunes Connect. Select the app that you're submitting (and if it’s not in the list, you probably forgot to hit the Ready to Upload button for that app in iTunes Connect).
After selecting the matching app and provisioning profile and then clicking Next, the app will be uploaded to Apple for submission. If all goes well, the final screen will say your app has been submitted to the App Store (Figure 11-32).

Figure 11-32. A successful app submission in the Xcode Organizer
Then it’s a matter of waiting for Apple to approve or reject it.
Tip It’s a good idea to log back into iTunes Connect after your submission and verify the app status is Waiting for Review. Even if the app binary is valid, the review may be held up because of a missing screenshot, for example.
You’ll eventually receive an e-mail notifying you that the app is available on the App Store, that it’s been rejected, or that Apple needs more time to review it. This response usually arrives within a couple of weeks after submission, but I’ve had apps accepted within twenty-four hours or rejected after two months. When the review period is extended, Apple will typically send an e-mail stating they need more time to review your app.
Be Prepared for Rejection
If the app is rejected, then the e-mail will tell you to return to your app in iTunes Connect and click the Resolution Center button to view and optionally respond to the rejection reasons, which may include technical issues, crash bugs, or violations of Apple’s App Store Review Guidelines (which you can read on the Apple Developer Site after becoming an registered iOS Developer).
If you elect to revise your app, you will have to click Reject Binary and Ready for Upload again before uploading. The Resolution Center also allows you to file an appeal to the App Review Board if you feel the rejection is unreasonable.
If accepted, the app will appear shortly on the App Store if you selected the automatic release option in iTunes Connect. Otherwise, the app is placed in Pending Developer Release status until you log in to iTunes Connect, click View Details on the app, and click the Release this Version button.
Update the App
After an app has been approved, you can always return to the iTunes Connect page for the app and click View Details to edit the app description, and the modified text will show up on the App Store within a few hours. The iTunes Connect page will also display an Add New Version button. Clicking this will lead you through a condensed version of the original submission process to submit an update of the app. You can change nearly all the details except the bundle ID, but the only required change is an increment of the bundle version.
Tip When updating apps, remember to increment the bundle version both in iTunes Connect and in the Unity Player Settings.
Note the period-separated components of the bundle ID are treated as numbers, rather than strings, so updating version 247 to 2.049 is (surprisingly) okay because it’s comparing the numbers 47 and 49 (Figure 11-33).

Figure 11-33. Successfully upgrading the app version number from 2.47 to 2.049 in iTunes Connect
But updating version 1.65 to 1.7 compares the numbers 65 and 7, which results in a submission error message (Figure 11-34).

Figure 11-34. Unsuccessfully updating an app version number from 1.65 to 1.7 in the Xcode Organizer
Track Sales
After the first version of an app appears on the App Store, you can track its downloads and revenue (if it’s a paid app) by logging on to iTunes Connect and clicking the Payments and Financial Reports link. The resulting page displays a time-based graph of sales, a breakdown of sales per country, and the option to generate reports (Figure 11-35).

Figure 11-35. The Payment and Financial Reports page in iTunes Connect
Issue Promo Codes
For each version of an app, Apple provides 50 promo codes that can be used to download the app free on the App Store (the promo codes are available even for free apps, although there’s not much point in using them in that case). To obtain the promo codes for an app, click View Details for that version of the app in iTunes Connect and then the Promo Codes button on the top right (Figure 11-36).

Figure 11-36. Clicking View Details on a live app in iTunes Connect
After agreeing to a contract, you’ll be presented with a download button and field to specify the number of codes to download (Figure 11-37).

Figure 11-37. The entry form for the number of promo codes to download
After clicking Continue, you’ll be presented with an App Store Volume Custom Code Agreement governing the use of the codes and then a download button for the codes. Clicking the button will download a text file with the number of codes you requested (Listing 11-1 shows some example promo codes) and it will e-mail you a copy of the agreement you just agreed to (if that sounds awkward, it’s similar to Apple’s phrase by the confirmation checkbox, “agree to the agreement”).
Listing 11-1. A Promo Code File with Five Promo Codes
XY9LJRKMN7JM
TANFXAHR9EM9
XP6TMAFFHFLT
TXJ44ELTHETL
F9W3WEK7JL4Y
Once downloaded, the codes are valid for 28 days, even if the app is updated in the meantime.
Tip Since the expiration date of the codes is based on their download dates, you can conserve the codes by only downloading them from iTunes Connect as needed, instead of all 50 at the same time.
The codes no longer allow users to write reviews for the app on the App Store, but the codes are ideal for sending out to sites that host their own reviews.
Explore Further
Testing Unity iOS apps in the Unity Editor and in the iOS Simulator is convenient, but there’s no substitute for the real thing! The good news is that building for real hardware doesn't change much on the Unity side (really, just setting the SDK Version to Device SDK in the Player Settings). The bad news is that you have to go through the entire Apple developer registration, Provisioning Portal setup for your test devices and provisioning profiles, and iTunes Connect setup for all your apps. In a sense, this is the chapter where you became an iOS developer!
Now that we’ve got that out of the way, we can leave the Angry Bots project again and return to our bowling game and spend the remainder of this book adapting the game for iOS. However, we haven’t seen the last of iTunes Connect. We will use iTunes Connect later when we incorporate Game Center (Chapter 14) and iAd (Chapter 15).
Unity Manual
Since the the simulator and device builds for Unity iOS involve nearly identical steps, the Unity Manual sections mentioned in the previous chapter also apply to this chapter. In addition, the “Getting Started in iOS Development” section of the Unity Manual has a page that briefly lists the steps required by Apple for submitting an app to the App Store, and the “Debugging” page in the “Advanced” section explains how to attach a MonoDevelop debugging session to a Unity iOS app running on a device.
Apple Developer Site
The road to all Apple developer information begins at the Apple Developer site (http://developer.apple.com/), so that should be your first stop. From there, you can find descriptions of the iOS Developer Program (and other Apple developer programs) and commence the registration process.Even before the registration is complete, you can explore the iOS Dev Center, which includes the iOS Developer Library, which in turn contains the iTunes Connect Developer Guide (listed under Languages and Utilities).
Tip The documentation in the iOS Developer Library is also available in the Xcode Organizer. As you might gather from all the work that takes place in the Organizer (provisioning profiles, screenshots, app submissions), you'll be spending a lot of your Xcode time there!
Once your registration is approved, you can access the iTunes Connect site and the Provisioning Portal on the Apple Developer Site to complete the mobile provisioning and app submission steps covered in this chapter.