In case you choose to use the more powerful SU-800 Commander unit, instead of the built-in D700 Commander mode, I’ve included some information on it here. Figure 9-27 shows a front/back picture of the SU-800 Wireless Speedlight Commander unit.

This small unit is less costly than buying an SB-800 Speedlight. It is considerably lighter and smaller, and has twice the commander-to-slave range: 66 feet compared to 33 feet (20 m versus 10 m).
Most professionals will purchase this unit if they are interested in doing professional flash output since the SU-800 does not use pre-flash to control the flash units in its groups. It uses infrared instead. This doubles the range and does not output an unnecessary flash burst that wastes battery power.
The SU-800 uses a small CR-123 type photo lithium battery that lasts a long time. This saves considerable weight compared to using alkaline batteries.
Our primary concern in this section is using Commander units to control groups of Speed-lights to light up large and small areas. For that reason, we will focus our discussion on Commander mode shooting. I will briefly discuss a couple of other modes that are available with the SU-800, in case you are interested. The following is a brief discussion of two of the SU-800’s modes—Close-up and Repeating—and a very detailed discussion of our main concern, Commander mode. I wish that we had room for considering the additional functionality; however, CLS is a very complex subject, and this chapter couldn’t begin to cover it all.
Close-up Mode Shooting: If you are a heavy macro shooter. you can purchase one of two Nikon kits, which vary in what they contain. The R1C1 Close-up Speedlight Commander Kit and the R1 Close-up Speedlight Remote Kit (both of which include two SB-R200 Speedlights) give your D700 complete control of various macro shooting arrangements. The close-up mode is beyond the scope of this chapter, since macro shooting is a highly specialized and less-used functionality.
The R1C1 kit includes an SU-800 Wireless Speedlight Commander Unit, but the R1 kit does not. The R1 kit relies on the camera to provide one of the various commander devices.

When using the SU-800 for macro shooting with the kits and their SB-R200 Speedlights, you’ll need to take your SU-800 out of Commander mode by flipping a small switch just inside the battery cover (see Figure 9-28), which puts the SU-800 into Close-up or macro mode, allowing the SU-800 to continue to function as a commander device for the SB-R200 units.
Repeating Mode Shooting: There is another mode in your SU-800 that is enabled by turning the unit on, then holding down the SEL button for several seconds. This is called RPT, or repeating flash, mode. It allows you to cause your Speedlight flash units to pulse their flashes in various output levels and frequencies. You can set the SU-800 unit to cause the Speedlights to output anything between 1/8 power and 1/128 power, flashing or pulsing from 1 to 100 times per second, resulting in repeating the flashes from 1 to 90 times for each image. The SB-800 Speedlight, in M mode, also provides this stroboscopic flash. I have no idea what this type of flash photography is used for, but if you need it, it’s there. In any case, it is beyond the scope of this chapter.
Commander Mode Shooting: Since we’re concerned with using the SU-800 as a camera-attached commander device, let’s consider its configuration and use in detail.
The primary purpose of the SU-800 is to be used as a controller for groups of Speedlights, supporting up to three groups (A, B, C) and up to four communication channels (1, 2, 3, 4). You can set up “groups” of an unlimited number of Speedlights to light up large areas, like a factory, or just a few for product shots or portraits. The SU-800 is limited to firing Speedlights located up to 66 feet (20.1 meters) away.
When you plug an SU-800 unit into the hotshoe of your D700, you can rest assured that it becomes the Speedlight “boss”.
The SU-800 is designed to let you control individual groups right from the back of the unit. You don’t have to walk to each Speedlight and set light values or use a light meter. Instead, you simply take a picture, zoom in and look at it on the Monitor LCD of your camera, then adjust the power of individual groups from the SU-800 until you have just the light balance you want. Very convenient!
Turn your SU-800 unit on and verify that the LCD panel looks similar to the Commander mode image in screen 1 of Figure 9-29 and shows groups A, B, C. If not, your unit is probably in Close-up mode (screen 2) or repeating flash (RPT) mode (screen 3).
The reason I mention this is that my SU-800 came from the factory switched to Close-up mode, and I was quite confused trying to figure out why my screens didn’t work like Commander mode on my SB-800 Speedlight and Nikon D700. Later, in the manual, I found out about the little hidden Close-up/Commander switch and set it to the correct mode.
If your SU-800 is in Close-up mode (as shown in screen 2 of Figure 9-29), be sure to open the battery compartment and flip the switch to Commander mode. See Figure 9-28 for the location of the switch.

Open the battery door on the front lower side of the SU-800, and find the switch on the left. Flip it toward the bottom of the Commander unit, away from the “Close-up” flower symbol. The symbol you want looks like a small SU-800 Commander unit blasting a wave of light.
To get out of repeating flash mode, simply hold down the SEL button until the screen looks like the Commander mode screen in Figure 9-29.
Now that the unit is configured for Commander mode, let’s configure it as if we had two groups of Speedlights. We’ll use groups A and B, and channel 3. Get your SU-800 so that you can follow the instructions with an actual unit, which makes it much easier to understand and remember.
We’ll need to consider setting the following items at least once before using the SU-800 as a controller.
Overview of Settings:
Flash Mode
TTL
AA (with SB-800 slaves and CPU lenses only)
M
--- (means No Flash for this group; disables the group)
Group Name
A, B, C
Flash Output Level
Varies according to flash mode
Channel Number
1, 2, 3, 4
Detail of Settings: Flash Mode:
We’ll set the A group initially. Press the SEL button on the back of the SU-800 until the group’s row starts blinking. Now press the MODE button repeatedly to scroll through the various flash modes. Once selected, wait a second or two until the group stops blinking, or immediately press the arrow buttons, < left or right >, to set the compensation value. If you wait too long, you’ll have to press the SEL button again to use the arrow buttons. Press the SEL button to tab between the groups and repeat for groups B and C.
Look at the first screen in Figure 9-30. See how the A group is now set to AA mode and the compensation is set to +1.3 Ev? Now look at the second screen in Figure 9-30, and notice how the A group is now set to M mode, and ![]() of full power output. Groups B and C are still at the default of TTL with no compensation set, in both screens.
of full power output. Groups B and C are still at the default of TTL with no compensation set, in both screens.
Group Name: This is where you’ll set the number of groups you want to use in this session. Select the triple-dash --- mode for any groups you do not want to use. If there are any Speedlights on that group, they will no longer fire. See, in Figure 9-31, how A and C have TTL mode selected and 0.0 EV compensation values, while B is set to --- mode and is now disabled.


Flash Output Level: This varies according to which flash mode you have selected. Look at Figure 9-32 as we work through the various output levels.
TTL Mode: You can set the following compensation levels using the SEL and < arrow > buttons. These go in a +EV direction with the right > arrow button and a –EV direction with the left < arrow button. “+” means more light, “-” means less light. So +1.3 EV means you are adding one and a third stops of light to that group (1.3 stops). Here are the available EV steps <-/+>:
0.0, 0.3, 0.7, 1.0, 1.3, 1.7, 2.0, 2.3, 2.7, 3.0
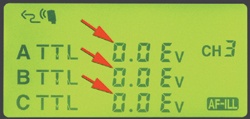
Look at the screen in Figure 9-32. See how the compensation (or flash output level) is set to +0.0 EV on all three groups? This means that the flash will use whatever output it needs to make a proper exposure. There is no compensation applied, so a normal flash output level is being used. Notice there is no + or – sign between TTL and 0.0!
AA Mode: If you are using SB-800 Speedlights and CPU lenses, you can use this mode to set the following compensation levels using the SEL and < arrow > buttons. Like TTL earlier, these go in a +EV direction with the right > arrow button and a–EV direction with the left < arrow button:
0.0, 0.3, 0.7, 1.0, 1.3, 1.7, 2.0, 2.3, 2.7, 3.0
In Figure 9-33, notice the plus “+” sign is between the AA and 1.3 Ev, which means this is a +EV operation and that 1.3 stops more light are being applied.
M Mode: This works similarly to TTL and AA. You’ll use the SEL and < left- and > right-arrow buttons to select the group and set the compensation level. This is a manual mode, which means you can control the group in fractions of full-power light values. For instance, the default is 1/1, which means full power output, while ![]() means one-half of full-power output for the whole group. If you use either the < left or right > arrow buttons you can scroll through the following power output values:
means one-half of full-power output for the whole group. If you use either the < left or right > arrow buttons you can scroll through the following power output values:
Notice in Figure 9-34 how the flash output level is set to ![]() of full-power output.
of full-power output.
I think they left this mode in our CLS system since so many people have used this very method to control various flash units for so many years. It is second nature to some, especially those who like to use a handheld flash meter to critically control light values on the subject. The cool thing is that your Speedlights will obey you from the SU-800 unit without having to go to each flash unit and set up ![]() or
or ![]() flash power.
flash power.

--- (triple-dash): This is the simplest of all settings. It means “do nothing!” Any groups you set to this value do not fire their flash output at all. With this setting, you could use all three groups at once, then select any two, or just one. You can vary your flash output for testing or creative purposes. This acts like a light switch for an entire group of Speedlights: on or off!
Channel Number: This is pretty simple, since you only have four choices. Press the SEL button until the CH number starts blinking. Only the number will blink. Use the arrow buttons to scroll through the four available channels. Available selections are as follows:
CH 1, CH 2, CH 3, CH 4
Each of these numbers represents a communications channel. You can use only one communications channel per session. This is a very similar idea to the channels on the portable phones we carry around the house. I suppose one could use a different channel if there were several people using CLS in the same area. It certainly would be aggravating if every time your neighbor pressed his shutter release, all your groups of Speedlights fired too.

Notice in Figure 9-35 how I normally leave my SU-800 set to Channel 3 and have my flash units programmed to receive commands on that channel too. You choose your favorite channel, and make sure that your SU-800 and Speedlights are on the same one.
Invariably, if one of my Speedlights is not firing, I find that it is no longer on its assigned channel for some reason. Once you have found the channel number you want to use, you’ll need to program that number into your external Speedlights.
At this point, you should understand how to configure your SU-800. It is not all that hard, and all this instruction becomes unnecessary after you’ve done it a couple of times.
Just be sure that all your Speedlights are on the same communications channel. You can set your Speedlights to groups A, B, or C, according to how you have the SU-800 configured. You can vary the output of any of the groups by EV stop values in TTL and AA modes, or by fractions of full power in M mode. You can even turn a group off with --- mode.
Experiment with this as soon as you can and you’ll have a better understanding of the configuration steps.