(User’s Manual page 264)
This selection allows you to customize how the D700 displays all those histogram and data screens for each image. If you want to see a lot of information on each image, you can select it here. Or, if you would rather take a minimalist approach to image information, turn off some of the screens.
If you turn off certain screens, the camera still records the information for each image, such as lens used, shutter speed, and aperture. However, with no data screens selected you’ll see only two screens. One is the main image view, and the other is a summary screen with a luminance histogram and basic shooting information. I have not found a way to turn this summary screen off. You get to the screens by using the Multi Selector to scroll vertically. I leave my camera set so that I can scroll through my images by pressing left or right on the Multi Selector. Then I can scroll through the data screens by scrolling up or down with the Multi Selector.

Here are the selections found in this menu item, and a description of what each does:
Basic photo information
Focus point
Detailed photo information
Highlights
RGB histogram
Data
When you make changes to these selections, be sure to scroll up to the word Done and press the OK button to save your setting. I keep forgetting to do this when I make changes. (See Figure 7-6.)
Basic photo information
Focus point – If you are curious about which AF sensor(s) focused on your subject during the exposure, this mode makes it easy to see. As shown in Figure 7-7, if you are using Single-point AF or Dynamic-area AF, you’ll see a single red AF indicator where the camera was focused when you took the picture. (If you are using Single-servo autofocus and Auto-area AF, you’ll see each of the AF sensors that were providing autofocus in your image.)
This is a useful function for reviewing how the camera’s AF system performs in different imaging situations.

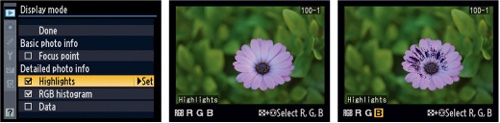

Detailed photo information Highlights – If you put a check-mark next to the Highlights selection, as shown in Figure 7-8, you will turn on what I call the “blinky” mode of the camera.
You’ll see the word Highlights protruding slightly into the bottom left of the image. When any part of the image is overexposed, that section will blink an alternating original-color and black. This is a warning that certain areas of the image are overexposed and have lost detail. You will need to use exposure compensation or manually control the camera to contain the exposure within the dynamic range of the camera’s sensor.
Blinking indicates the areas of the image that have lost all detail, or have been “blown out”. If you examine the histogram for the image, you’ll see that it’s cut off, or “clipped”, on the right side. Current software usually cannot recover any data from the blown-out sections. The exposure has exceeded the range of the sensor and the image has become completely overexposed in the blinking area. In the third screen of Figure 7-8, I’ve attempted to capture the ‘blinking’ black indicators resulting from over exposing some portions of the petals, but this is apparent only after I selected the blue portion of the RGB spectrum! If you look down to the second screen of Figure 7-9, you’ll see that the full-spectrum “luminance” histogram—the white histogram—does not seem to show any loss of highlights, but the blue histogram definitely shows loss at the right edge. Using the combination of the Checkered thumbnail button and the Multi Selector, I selected just the blue portion of the RGB spectrum, and the third screen in Figure 7-9 shows the petals blinking
Blinky mode is an immediate way to allow your camera to warn you when you have surpassed what its sensor can capture and you are therefore losing image data.
RGB histogram – I like this feature, because it allows me to view, not just a basic luminance histogram (which is a combination of all three color channels) but all three color histograms and a luminance histogram in one screen (Figure 7-9).
Each color channel—red, green, and blue—is displayed with its own small histogram. This is quite useful, since it is possible to over-expose, or “blow out”, only one color channel, as often happens with the red channel in my case.
You can view the three individual color histograms on the right and see the small combined luminance histogram on the bottom-left with a small version of the image on the top-left.
Data – Checking this setting will give you as many as four additional image data screens to scroll though. The data found on these screens is quite detailed and includes the following information:
Image data, Figure 7-10 screen 2
Light meter in use (matrix, spot, or averaging), shutter speed, and aperture
Exposure mode (P,S,A,M) and ISO
Exposure mode fine-tuning
Lens focal length
Lens overview (e.g, 18–70 mm f/3.5–4.5)
AF/VR
Flash mode and compensation
Image data, Figure 7-10 screen 3
White balance
Color space (sRGB, Adobe RGB)
Picture control detail (Base, Neutral, Standard, Vivid, Monochrome), sharpening, contrast, brightness, saturation, and hue
Image data, Figure 7-10 screen 4
Noise reduction
Active D-Lighting (Off, Low, Normal, High)
Vignette control
Retouching
Comment
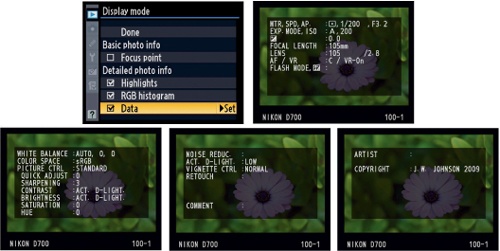
Image data, Figure 7-10 screen 5 (displayed only if Copyright information has been specified in Setup Menu).
Artist
Copyright
This large array of screens to scroll through provides a great deal of information on the image. Look how far we’ve come from the old film days of writing some date information on the lower right of the image, permanently marking it, or between the frames on the pro-level cameras.
Including the two standard display screens, there are seven screens just brimming with data if you enable all the Display modes (eight, if you used a GPS). Or, you can get by with the main image display and one summary display. Complex control at your fingertips!