
Custom settings f1 to f12
(User’s Manual pages 318–330)
Custom setting f1 – Switch
(User’s Manual page 318)
Figure 6-57 show the screens that are used to select backlighting when the power switch is rotated to the light bulb icon, as shown in Figure 6-56.
The LCD backlight option will turn on only the Control Panel LCD’s backlight when the power switch is fully rotated.
The Both option will turn on the Control Panel LCD’s backlight and will display the Shooting information screen in the Monitor LCD.
Custom setting f2 – Multi selector center button
(User’s Manual pages 318 and 319)
Custom setting f2 concerns how the Multi Selector’s center button works. This setting comes in two parts, according to what mode the D700 is currently using. The two modes are as follows:
Shooting mode
Playback mode
Shooting mode is when you are actually using the camera to take pictures.


Playback mode is when you are examining pictures on the Monitor LCD.
First, let’s examine how pressing the Multi Selector’s center button works in Shooting mode. Figure 6-58 shows the screens used to configure Custom setting f2 in Shooting mode.
There are three selections in Shooting mode.
Select center focus point (default)
Highlight active focus point
Not used
Select center focus point – Often when shooting, you’ll be using your thumb to move the selected focus point (AF sensor bracket) around the viewfinder. You’ll be using the spot meter or AF sensor to focus on the most appropriate area of your subject. When you are done, you have to scroll the AF sensor back to the center. Not anymore! If Select center focus point is selected, the focus point pops back to the center point of the viewfinder when you press the Multi Selector’s center button. This is the default action of the button.
Highlight active focus point – Sometimes, when viewing certain subjects, it may be a little hard to see the small black AF sensor bracket in the viewfinder. When Highlight active focus point is selected and you press the Multi Selector’s center button, the AF sensor lights up in red for easy viewing of its current location. Careful, though, because the Multi Selector button is sensitive to sideways movement and it is easy to move the sensor while trying to find it.
Not used – This does what it says, and nothing happens when you press the Multi Selector button. When I first saw this setting, I thought it was a reserved setting for some future use. Finally, I realized that it means that the Multi Selector’s center button is disabled when Not used is selected.
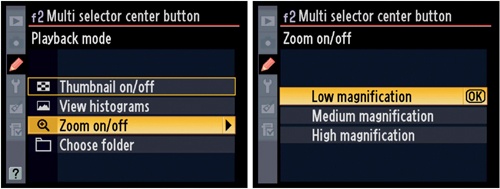
Now, let’s look over how the Multi Selector’s center button can be used in Playback mode. Figure 6-59 shows the screens used to configure Custom setting f2 in Playback mode.
Thumbnail on/off
View histograms
Zoom on/off
Choose folder
Thumbnail on/off – This feature allows you to switch from viewing one image on your camera’s Monitor LCD to viewing multiple thumbnails instead. It’s a toggle, so you can press the Multi Selector’s center button to turn thumbnail view on and off.
View histograms – I discovered this really cool feature while I was writing this book and immediately switched to it as my default setting. I love this! It shows a yellow “luminance” histogram, which seems to most closely represent the green channel of the RGB. When f2 is set to View histograms, I can have an image open on my monitor, then press and hold the Multi Selector’s center button to view the histogram. This saves a lot of scrolling around through the data, RGB histograms, and information screens. It’s a quick histogram view that disappears when the Multi Selector’s center button is released. Great feature!


Zoom on/off – If you regularly want to zoom into your image on the monitor without using the normal zoom in and out buttons, this is a good feature for you. If you have a monitor image showing and Zoom on/off is selected, when you press the Multi Selector’s center button the image zoom jumps immediately to one of three levels of zoom, skipping the middle steps. Here are the three levels shown in Figure 6-60:
Low magnification
Medium magnification
High magnification
Low magnification seems to be the same as viewing the image at 100% pixel-peeping level. Medium magnification is two levels deeper magnification, past 100%. And, finally, High magnification is as far in as the zoom will go, the highest point of magnification, which is way past 100%. The zoom display centers on the focus point used to take the image.
If you are using thumbnail view, you can select from a series of images on the monitor. When you have one of the images selected, even though it is not full size, you can press the Multi Selector’s center button and the image first goes to full size, then zooms to whichever of the three zoom magnification levels you selected previously. When you press the button again, it switches back to thumbnail view.
Choose folder – Some photographers like to use the multi-folder capability of the D700. (See Chapter 5 in the section Shooting Menu’s 20 Item Review for more information.) If you have images in multiple folders on the current CF memory card in your D700, have the All option selected for Playback Folder in the Playback Menu, and have Choose folder selected in Custom setting f2, then when the Multi Selector’s center button is pressed in Playback mode, the camera will present you with a menu of folders (those in addition to the current folder) to choose from (Figure 6-61).

If your current CF card has only one folder, or all other folders on the CF card are empty, this setting will have no effect; pressing the Multi Selector’s center button will appear to be ignored.
There’s quite a flexible series of functions all imbedded in the Multi Selector’s center button, as controlled by Custom setting f2.
Custom setting f3 – Multi selector
(User’s Manual page 319)
The screens used to configure Custom setting f3 are shown in Figure 6-62.
Reset meter-off delay
Do nothing (default)
Reset meter-off delay – This setting is a handy way to turn the exposure meter on without pressing the shutter-release button halfway down. Maybe you’d like to meter the subject but not cause autofocus to start, so instead of using the shutter release to turn the meter on, you can use the Multi Selector instead.
I find this to be a useful function for another reason. I’ll often want to move the AF sensor’s focus point around the viewfinder, but the light meter has gone off, so it won’t move. I have to press the shutter release halfway to activate the meter, then scroll the AF point around the viewfinder. When Reset meter-off delay is selected, any usage of the Multi Selector causes the light meter to come on. Custom setting c2 controls how long it stays on; the default is 6 seconds.


Do nothing – If the light meter is off, and you press the Multi Selector button, it stays off.
Custom setting f4 – Photo info/playback
(User’s Manual page 320)
Figure 6-63 shows the screens used to configure Custom setting f4.
Info (left-right) / Playback (up-down) (default)
Info (up-down) / Playback (left-right)
Info (left-right) / Playback (up-down) This is the default value for Custom setting f4. When you are viewing a series of pictures, you can press the Multi Selector button left/right to scroll through your images or up/down to view each data screen and its histogram on a single screen.
Info (up-down) / Playback (left-right)
If you prefer scrolling through your memory card’s images by pressing the Multi Selector button up/down, this is the setting to use. Left/right takes you through each data screen and its histogram on a single screen.
Nikon seems to want to make the D700 very flexible so that it can meet the needs of a wide range of user preferences.


Custom setting f5 – Assign FUNC button
Custom setting f6 – Assign preview button
Custom setting f7 – Assign AE-L / AF-L button
(User’s Manual pages 320–325)
These three separate custom settings are discussed in this one section. All three work essentially the same, so instead of repeating the same instructions three times, I chose to explain them together. When I speak of the Selected button, I am talking about the FUNC. (Fn) button, the Preview button, or the AE-L / AF-L button.
Figure 6-64 shows the screens used to configure Custom setting f5
(User’s Manual page 320).
Figure 6-65 shows the screens used to configure Custom setting f6
(User’s Manual page 324).
Figure 6-66 shows the screens used to configure Custom setting f7
(User’s Manual page 325).
Custom setting f7 is designed to let you customize the usage of the Selected button alone, or the Selected and command dials combination. There are many different functions to select from.
Carefully review the following list, paying close attention to the functions marked with a double asterisk (**). Setting those functions will disable functionality in another part of the D700.
Custom settings f5, f6, and f7:
f5 – FUNC button press
f6 – Preview button press
f7 – AE-L / AF-L button press
Preview** – Normally, the depth of field function is controlled by the Depth of field preview button. Some users may not like the location of the Depth of field preview button, and since it is configurable too, they may decide to switch the Fn button with the Depth of field preview button. When Preview is selected in one of these custom settings, the Selected button will activate depth of field preview. Setting this function disables other functionality in the D700 (see note at end of this list). Preview is the default for Custom setting F6
FV lock** – If you set f5, f6, or f7 to FV lock, the Selected button will cause the built-in Speedlight, or the external Speedlight, to emit a monitor pre-flash and then lock the flash output to the level determined by the pre-flash until you press the Selected button a second time. (See page 192 in the D700 User’s Manual for more information on FV lock.) Setting this function disables other functionality in the D700. (See note at end of this list.)
AE / AF lock – Enabling this function causes AE (exposure) and AF (focus) to lock on the last meter and AF system reading while the Selected button is held down. AE / AF lock is the default for Custom setting F7.
AE lock only – This allows you to lock AE (exposure) on the last meter reading when you hold down the Selected button.
AE lock (Reset on release)** – Enabling this function causes AE (exposure) to lock on the last meter reading when the Selected button is pressed once. It stays locked until the shutter is released, the exposure meters turn off, or you press the Selected button again. In other words, the Selected button can be used to toggle AE lock. Setting this function disables other functionality in the D700. (See note at end of this list.)
AE lock (Hold)** – This function is identical to AE lock (Reset on release) except the lock is not released when the shutter is released. Setting this function disables other functionality in the D700. (See note at end of this list.)
AF lock only – When set, this function locks the AF system (focus) on the last autofocus reading while you hold down the Selected button.
Flash off – This is a temporary way to disable the flash for when you want to leave your flash turned on and still be able to take a non-flash picture. When you hold down the Selected button, the flash is disabled.
Bracketing burst – Normally during a bracketing sequence with the shutter release set to Single Frame Release Mode (the S next to CH and CL on the Release mode dial), you have to press the shutter release once for each of the images in the bracket; the only way to shoot all the images in the bracketed series without letting up on the shutter release is to set the Release mode dial to CL or CH. If you set Bracketing burst in Custom setting f5, f6, or f7, then you can hold down the Selected button while holding down the shutter release and the camera will take all the images in the bracket without letup. This seems a bit redundant to me. I think I’d rather just set my Release mode to CL or CH and not fool with this additional complexity. This applies to both exposure and white balance bracketing.
Matrix metering – If you do not use matrix metering as your primary metering system but want to use it occasionally, this setting allows you to turn matrix metering on while you hold down the Selected button. When you release the Selected button, the camera returns to your normally selected metering type, such as spot or center-weighted.
Center-weighted – If you normally use matrix metering or even spot metering as your primary metering system, you can temporarily use center-weighted metering by setting f5, f6, or f7 to Center-weighted, then holding down the Selected button. When you release the button, the camera returns to your customary meter type, such as spot or matrix.
Spot metering – I personally use Matrix metering as my normal light meter. However, I often want to use the spot meter to meter more difficult subjects. I assigned my Fn button to Spot metering here in setting f5. Now I shoot normally, and whenever I want my spot meter, I just hold down the Fn button. Easy and fast! You can, of course, use any of the Selected buttons instead of the Fn button, if you wish.
Access top item in My Menu** – If you frequently access your My Menu screen, this can be a real time-saver. Once this option is assigned, you need only to press the Selected button and the My Menu screen is immediately displayed in the Monitor LCD, with the first item selected and ready for you to navigate to other My Menu options if necessary.
Live view** – This is a quick and easy way to grab that infrequent Live View shot. With this option assigned to a Selected button, pressing that Selected button turns Live View on, so long as the Release mode dial is not set to LV or MUP; pressing that button again turns Live View off.
+NEF (RAW)** – When you have Image quality set to JPEG Fine, JPEG Normal, or JPEG Basic, but you wish to record an NEF (RAW) image as well, then press the Selected button before pressing the shutter-release button; both the JPEG version and the NEF (RAW) version of the image will be stored.
Virtual horizon** – With this option enabled, you can press the Selected button to display an analog chart to assist in establishing a level horizon, a difficult task when the real horizon is not level! As shown in Figure 6-67, the Control Panel LCD and the viewfinder will both indicate the camera’s state; arrows point in the direction the camera body should be rotated to bring the camera to level. Always there; no need to fish for that bubble level. The D700 also provides an aircraft-style Virtual horizon facility, accessible from the Setup Menu; see Chapter 8 for further information.
None – When this setting is enabled, the Selected button does nothing. None is the default for Custom setting F5.


Custom settings f5, f6, and f7:
f5 – FUNC button + dials
f6 – Preview + command dials
f7 – AE-L / AF-L + command dials
Choose image area
Shutter spd & aperture lock
1 step spd/aperture (does not apply to f7)
Choose non-CPU lens number (default)
Auto bracketing
Dynamic AF area
None
Choose image area – When this option is assigned to a Selected button, you can press the Selected button, then rotate either command dial to choose between the FX Image area and the DX Image area. Shutter spd & aperture lock – By assigning this option to a Selected button, you can press that button and rotate the Sub-command dial to lock/unlock the aperture, or rotate the Main command dial to lock/ unlock the shutter speed. Once locked, the aperture and/or shutter speed settings are locked until unlocked by repeating the procedure.
1 step spd/aperture – If you have Custom setting b2 set to ![]() EV steps like most photographers, you can change your D700’s shutter speed and/or aperture in
EV steps like most photographers, you can change your D700’s shutter speed and/or aperture in ![]() EV steps while in A-Aperture priority, S-Shutter priority, and M-Manual. However, you may want to use larger EV steps occasionally. By setting 1 step spd/aperture in f5 or f6 (it cannot be set in f7), you can hold down the Selected button and the camera will then allow you to change the shutter speed or aperture in one-stop increments (1 EV step) instead of the normal
EV steps while in A-Aperture priority, S-Shutter priority, and M-Manual. However, you may want to use larger EV steps occasionally. By setting 1 step spd/aperture in f5 or f6 (it cannot be set in f7), you can hold down the Selected button and the camera will then allow you to change the shutter speed or aperture in one-stop increments (1 EV step) instead of the normal ![]() EV steps. Example shutter speeds in
EV steps. Example shutter speeds in ![]() EV steps are
EV steps are ![]() ,
, ![]() ,
, ![]() ,
, ![]() . Example shutter speeds in 1 EV step are
. Example shutter speeds in 1 EV step are ![]() ,
, ![]() ,
, ![]() ,
, ![]() .
.
Choose non-CPU lens number – If you have configured non-CPU lenses under the D700’s Setup Menu – Non-CPU lens data, then you’ll be able to hold down the Selected button while rotating the Sub-command dial to scroll through a list of up to nine non-CPU lenses.
Auto bracketing – This is the default action of Custom setting f5 – FUNC. button + dials. This works quite well for me, since I can hold the Fn button down with a finger while rotating the Main command dial to set the number of shots, then rotating the Sub-command dial to set the bracketing EV value. Nikon was wise to provide this functionality after removing the BKT button from the D700. I use bracketing quite often for High Dynamic Range (HDR) images. This is not quite as good as a BKT button, but works well enough. If you choose to, you can use any of the Selected buttons to do auto bracketing instead.
Dynamic AF area – This function only works under specific circumstances:
Continuous-servo AF must be on. (Focus mode selector is on C.)
Dynamic-area AF is selected. (AF area mode selector is in middle position.)
If you have chosen to use the Dynamic-area AF and you set Custom setting f5, f6, or f7 (Selected button + dials), you can rotate either of the command dials on the camera’s front or back and it will change the number of AF points to one of these four available settings:
9 points
21 points
51 points
51 points (3D-tracking)
(See Chapter 3, for details on these point selections.)
None – Nothing happens when you hold down the Selected button and rotate the command dials.
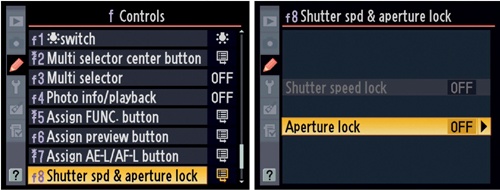
Custom setting f8 – Shutter speed and aperture lock
(User’s Manual page 326)
Figure 6-68 shows the screens used to configure Custom setting f8. For frequent, short-term locking of shutter speed and/or aperture, using Custom setting f5, f6, or f7 may prove the better choice. But for studio work in which you want to ensure that a particular shutter speed and/or aperture is consistently used and cannot be readily—or accidentally—changed, Custom setting f8 is the tool to use.

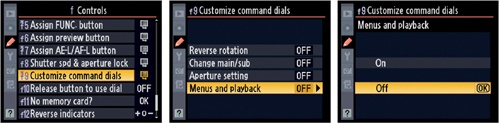
Custom setting f9 – Customize command dials
(User’s Manual page 326)
Figure 6-69 shows the screens used to configure Custom setting f9.
There are four settings under Custom setting f9, as follows.
Reverse rotation
Change main/sub
Aperture setting
Menus and playback
Reverse rotation – This setting allows you to change the functionality of the rotation direction of the command dials. There are two selections:
Yes – The command dials are reversed. Here’s an example: Normally when the D700 is set to A – Aperture Priority mode and you rotate the Sub-command dial to the right (clockwise), it changes the aperture in a smaller direction, like f/5.6 to f/6.3 to f/7.1, etc. If you set Yes, then the direction of aperture changes will be reversed when you turn the Sub-command dial to the right, like this: f/5.6 to f/5 to f4.5, etc. Instead of getting smaller, the aperture gets larger. It is reversed.
No – The direction of the command dials is set to the factory default.
Change main/sub – This setting allows you to swap the functionality of the two command dials. The Main command dial will take on the functions of the Sub-command dial and vice versa. There are two settings:
On – When this is set to Off, the Main command dial controls shutter speed while the Sub-command dial controls aperture. By selecting On, you reverse the functionality so that the Sub-command dial controls shutter speed while the Main command dial controls aperture.
Off – The functionality of the command dials is set to the factory default.
Aperture setting – Figure 6-70 shows the two selections that allow you to modify how the D700 treats CPU lenses that have aperture rings on the lens (non-G lenses):

Sub-command dial – This is the factory default setting. The aperture is set using the Sub-command dial.
Aperture ring – This setting allows photographers with older non-G type lenses with a CPU to use the lenses’ aperture ring to adjust the aperture instead of using the Sub-command dial. The EV increments will only display in 1EV steps when this is active.
Menus and playback – As shown in screen three of Figure 6-71, there are two selections for how the menus and image playback works when you would rather not use the Multi Selector:
On – While viewing images during playback, turning the Main command dial to the left or right scrolls through the displayed images. Turning the Sub-command dial left or right scrolls through the data and histogram screens for each image. While viewing menus, turning the Main command dial left or right scrolls up or down in the screens. Turning the Sub-command dial left or right scrolls left or right in the menus. The Multi Selector button works normally, even when this is set to On. This setting simply allows you to have two ways to view your images and menus.
Off – This is the default action. The Multi Selector button is used to scroll through images and menus, as normal.
When using either of these settings, you can press OK or press the Multi Selector’s center button to make a selection.
Custom setting f10 – Release button to use dial
(User’s Manual page 328)
Figure 6-72 shows the screens used to configure Custom setting f10.
This custom setting allows those who hate holding down buttons and turning command dials at the same time to change to a toggling method.
Yes – This setting changes a two-step operation into a three-step operation. Normally, you will press and hold down a button while rotating a command dial. When you select Yes, the D700 allows you to press and release a button, rotate the command dials, then press and release the button again. The normal (No) action is (1) press and hold a button, turn a command dial. The Yes actions are (1) press and release button, (2) turn dial, (3) press and release button. The initial button press locks the button, so that you do not have to hold your finger on it while turning the command dial. Once you have changed whatever you are adjusting, you must press the button a second time to unlock it.
No – This is the default setting. You must press and hold down a button while rotating the command dials in order to change camera functionality.

If the exposure meter turns off while the Yes operation is active, you must press it again to lock the action.
Custom setting f11 – No memory card?
(User’s Manual page 329)
Figure 6-73 shows the screens used to configure Custom setting f11.
This setting defaults to enabling the release of the shutter when you try to take an image without a CF memory card inserted in the camera. By enabling it, you can take pictures without a memory card. Here are the two settings.
LOCK – Release locked – When you choose this setting, your camera will refuse to release the shutter when there is no memory card present.
OK – Enable release – Use this setting if you simply want to preview a set of shots on the Monitor LCD without recording any images to the memory card. Note that a small red box containing the word Demo will appear in the upper-left corner of the displayed image.

Custom setting f12 – Reverse indicators
(User’s Manual page 330)
In Figure 6-74 we see the screens used to configure Custom setting f12.
Normally, anytime you see the exposure indicators in your D700’s Control Panel LCD, viewfinder, or the Monitor LCD’s info display, the “+” is on the left, and the “–” is on the right. See Figure 6-75 where I show the info screen and the exposure indicator.
If you want, you can reverse this indicator so that the “–” is on the left and the “+” is on the right. Notice how the second screen of Figure 6-75 has the exposure indicator reversed. Here are the two settings.
+o– : This is the normal polarity (+/–) of the exposure indicator.
–o+ : This is the reversed polarity (–/+) of the exposure indicator.
Select your favorite indicator direction for maximum camera comfort!

