Let’s start by looking at the Reset custom settings screen. Then we’ll proceed through all 50 of the individual custom settings.
Reset custom settings
(User’s Manual page 282)
Be careful with this selection. It does what it sounds like and resets the menu for the currently selected Custom setting bank back to factory default settings. Page 420 of the User’s Manual shows the default settings.
This is a rather simple process. As seen in screen two of Figure 6-3, simply scroll to Yes or No and press the OK button or scroll to the right. That’s about it. If you select Yes, the Custom setting bank you’re currently using will be reset to factory defaults.

(User’s Manual pages 283–291)
Custom settings a1 and a2 – AF-S and AF-C priority selection
Shown in Figure 6-4 and Figure 6-5 are the screens used to configure Custom settings a1 and a2. I have combined these two settings into one section since they are closely related and work basically the same way.
These particular settings help control how your camera’s autofocus works in Continuous-servo AF or Single-servo AF. (For a review of these focus modes, see Chapter 3.)


Focus – This setting is designed to prevent your D700 from taking a picture with the viewfinder’s green in-focus indicator off. In other words, if the picture is not in focus, the shutter will not release. It does not mean that the camera will always focus on the correct subject. It simply means that when your camera has focused on something out there, it allows the shutter release to activate. Nikon cameras do a very good job with autofocus, so you can usually depend on the AF Module to perform well. Focus will drastically increase your chances that your image is in correct focus.
Release (AF-C and AF-S) or Release + focus (AF-C only)
If the image must be taken, no matter what, then you will need to set a1 and/or a2 to Release, or Release+focus (AF-C only). Release allows the shutter to fire every time you press it, even if the image is not in focus. Release+focus slows the frame rate for improved focus when the light is low or the subject has little contrast with its surroundings, but still allows the shutter to fire even if it cannot find a good focus point. Just be aware that if you select either of these settings, your D700 will take the picture even if the focus is not sharp. If you are well aware of the consequences of shooting without a focus guarantee, then use these settings to make your camera take a picture every time you press the shutter release or AF-ON button (see Custom setting a5). Your camera will shoot at its maximum frames per second (FPS) rate since it is not hampered by validating that each picture is in correct focus. You’ll need to decide whether taking the image is more important than whether the image is in focus.
Custom setting a1 – AF-C priority selection
(User’s Manual page 283)
Release (default) – Photo can be taken at any time, even if not in focus.
Release+focus – Photo can be taken at any time, even if not in focus. The camera will slow down its maximum FPS rate when the subject is in low light or low contrast.
Focus – The image must be in focus or the shutter will not release. This also means that the shutter will not release unless the little green viewfinder light is on. This is the closest thing to a guarantee that your image will be in focus when you press the shutter-release button.
Custom setting a2 – AF-S priority selection
(User’s Manual page 284)
Release–Photo can be taken at any time, even if not in focus.
Focus (default) – The image must be in focus, or the shutter will not release. This also means that the shutter will not release unless the little green viewfinder light is on. This is the closest thing to a guarantee that your image will be in focus when you press the shutter-release button.
Custom setting a3 – Dynamic AF area
(User’s Manual page 285)
Figure 6-6 shows the screens used to configure Custom setting a3.
This custom setting is designed to assist you with how Dynamic-area AF works. See the section AF-Area Modes in Detail in Chapter 3 for more information on Dynamic-area AF.
9 points (default) – Use this setting when your subject is moving predictably. This uses an array of eight AF sensors surrounding your selected and viewable AF sensor in the viewfinder. Examples might be subjects in a car race or airshow.
21 points – If your subject is moving unpredictably, this may be your best choice. This uses 20 sensors surrounding your viewable sensor in the viewfinder. A good example for this pattern setting might be players in a football or basketball game.
51 points – This is for worst-case scenario subjects that are small or moving rapidly and unpredictably, to the point that it is even hard to keep them in the viewfinder. All 50 sensors surrounding your selected sensor are active. An example might be a bird in flight.
51 points (3D-tracking) - This mode is intended for the most extreme cases, such as when the subject is unpredictably moving back and forth (think of a tennis player in a singles match). Using the colors of the focused subject, the camera will track those colors to follow the subject.
In Figure 6-6, notice the asterisk above the a3 menu listing. Such an asterisk is used in Custom Setting Menus to indicate that option has been set to a value other than the default.

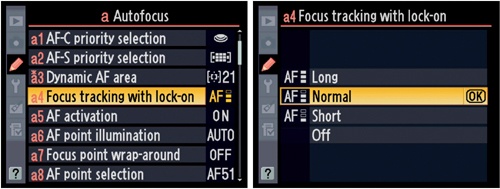
Custom setting a4 – Focus tracking with lock-on
(User’s Manual page 287)
Figure 6-7 shows the screens used to configure Custom setting a4 and its “Lock-On” time-out period.
Custom setting a4 allows you to select the length of time that your camera will ignore an intruding object that blocks your subject. The a4 setting specifies the following:
Long (about two seconds)
Normal (about 1.5 seconds). This is the default setting
Short (about one second)
This allows you to fine-tune how you want Focus tracking with lock-on to work. It can ignore an intruding subject for a second or more.
With Single-point AF, the camera will start the lock-on time-out as soon as the single AF sensor is unable to detect the subject.
With Dynamic-area AF or Auto-area AF and Focus tracking with lock-on enabled, I was amused at how adamant the camera was about staying with the current subject. I’d focus on a map on the wall and then cover most of the focusing sensors with the D700 manual. As long as I allowed at least one or two AF sensors to remain uncovered so it could see the map, the focus did not switch to the manual. I could just hear the D700 muttering, “Hah, you can’t fool me. I can still see a little edge of that map there, so I’m not changing focus!”
Only when I stuck the D700 manual completely in front of the lens, covering all the sensors, did the D700 decide to start timing the a4 lock-on time-out. After a second or two, the D700 would give up on the map and focus on the manual instead.
Try this yourself! It’s quite fun and will teach you something about the power of your camera’s AF system.
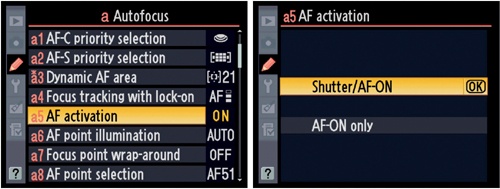
Custom setting a5 – AF activation
(User’s Manual page 287)
Figure 6-8 shows the screens used to configure Custom setting a5.
This setting allows you to choose whether you want the shutter-release button to actually release the shutter. If you leave this setting at the factory default, the AF system will be activated when you press the shutter-release button half-way down or if you press the AF-ON button. You can also select the setting that only allows the AF-ON button to initiate autofocus and the shutter release will not cause autofocus to happen.
Shutter / AF-ON (default) – Autofocus will happen if you press the shutter-release button halfway or if you press the AF-ON button.
AF-ON Only – Autofocus only works when you press the AF-ON button. The shutter-release button will not cause autofocus but will only start metering and release the shutter.
Custom setting a6 – AF point illumination
(User’s Manual page 288)
Figure 6-9 shows the screens used to configure Custom setting a6.
This is a control that helps you see the little AF sensor when you first start autofocus. You have seen this little square in your viewfinder when it briefly highlights itself in red and then turns black. Sometimes the background is dark, and it might be difficult to see the black square. If that is the case, and setting a6 is turned off, you will still have the black square, showing your selected AF sensor, but may not be able to see it. I leave this set to Auto on my D700, which is the factory default. See the following descriptions:
Auto (default) – If your background is dark, so that it might be difficult to see your AF sensor in use, it will briefly flash red when you start autofocus by pressing the shutter release or AF-ON button. If the background is bright, and you’ll have no trouble seeing your AF sensor’s little black square, it does not flash red when you start autofocus.
On – The selected AF sensor is always highlighted in red when you start autofocus, regardless of the light level of the background.
Off – The selected AF sensor does not light up in red when you start autofocus. It always stays black.
Custom setting a7 – Focus point wrap-around
(User’s Manual page 288)
Figure 6-10 shows the screens used to configure Custom setting a7.
When you are scrolling your selected AF sensor to the right or left, or even up and down, in the array of 51 sensors, eventually it will come to the edge of the sensor area. The setting allows you to set whether the AF sensor simply stops when it gets to the edge or scrolls to the other side. So if you are scrolling the AF sensor to the left and come to the edge, it will stop, unless you have a7 set to Wrap, in which case it will not stop and will reappear on the right side of the screen. It “wraps” around. It works the same way in an up and down motion. If you scroll off the top of the sensor area, the AF sensor will reappear on the bottom.

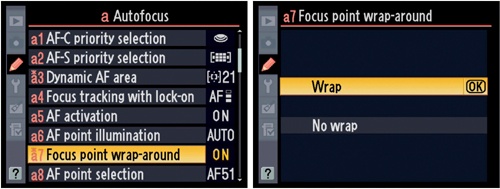
Wrap – This setting allows the selected AF sensor to scroll off of the viewfinder screen and then reappear on the other side.
No wrap (default) – If you scroll the AF sensor to the edge of the viewfinder screen, it stops there! You’ll have to press the thumb button in the opposite direction to go back toward the middle.
Custom setting a8 – AF point selection
(User’s Manual page 289)
Figure 6-11 shows the screens used to configure Custom setting a8.
If you scroll your AF sensor often, it might get tiring to scroll through the full 51 focus points. In our older Nikon cameras, we had a maximum of 11 sensors to scroll through, so it wasn’t too bad. However, with 51 AF sensors, it could take longer than you want to scroll from one side of the viewfinder to the other. Or, you might just like the old ways better! Nikon has given you a choice. If you’d rather not scroll through 51 sensors, you can set a8 to 11 sensors instead.
This does not modify the fact that there are 51 sensors available in Dynamic-area AF or Auto-area AF. It just means that your Multi Selector will make the selected sensor move farther with each press. It skips over sensors when you scroll in Single-area AF and Dynamic-area AF. This means that you cannot select “in-between” sensors as selected AF points, so you have a limited choice of sensors to start autofocus.

If you are not happy scrolling through 51 sensors, change it to 11. You can always change it back! Here are the details:
51 points (default) – Choose from any of the 51 focus points (AF sensors) when you are scrolling through them.
11 points – Choose from only 11 focus points (AF sensors) when you are scrolling through them. The other AF sensors are still available for autofocus, you just can’t scroll directly to them as some are skipped. That means the Multi Selector will move the selected AF sensor around more quickly.
Custom setting a9 – Built-in AF-assist illuminator
(User’s Manual page 290)
Figure 6-12 shows the screens used to configure Custom setting a9.
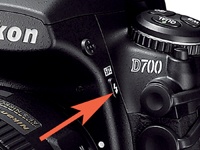
You’ve seen the little autofocus assist light on the front of the D700, near the grip. Well, this setting allows you to control when that little light comes on. Nikon calls this the Built-in AF-assist illuminator, and it lights up when low-light conditions are sensed, and when using certain AF-area modes (not all) to help with autofocus.
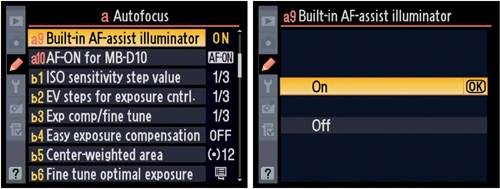
On (default) – If the light level is low, the AF-assist illuminator lights up to help light the subject enough for autofocus. This only works in certain modes, though:
Single-servo AF as a Focus mode at any time it’s needed
Auto-area AF as an AF-area mode any time it’s needed
Single-point AF and Dynamic area AF as an AF-area mode if you are using only the center AF sensor as the selected sensor
Off – The AF-assist illuminator does not light up, so it cannot help you in low-light autofocus situations. The camera may not be able to autofocus in low light.
Custom setting a10 – AF-ON for MB-D10
(User’s Manual page 291)
Figure 6-13 shows the screens used to configure Custom setting a10.
This custom setting will only be used by those who have an MB-D10 Battery Pack attached to their D700 camera bodies. It modifies how the AF-ON button on the MB-D10 works and provides some additional and useful functionality for MB-D10 users. This setting does not modify the functionality of the AF-ON button found on the D700 body.

Be aware that using the AF-ON button on the MB-10 Battery Pack will not activate the vibration-reduction feature on a VR lens.
AF-ON (default) – This setting means that the AF-ON button on the MB-D10 Battery Pack will work exactly like the regular AF-ON button on the D700 body.
AE/AF lock – Selecting this means that the MB-D10’s AF-ON button executes focus and exposure lock instead of normal AF-ON.
AE lock only – Selecting this means that the MB-D10’s AF-ON button executes exposure lock instead of normal AF-ON.
AE lock (Reset on release) – When the MB-D10’s AF-ON button is pressed, it executes an exposure lock. The exposure lock stays active until the AF-ON button is pressed a second time, the exposure meter shuts off, or the shutter is released.
AE lock (hold) – When the MB-D10’s AF-ON button is pressed, it executes an exposure lock. The exposure lock stays active until the AF-ON button is pressed a second time or the exposure meter shuts off.
AF lock only – Focus locks while the MB– D10’s AF-ON button is held down.
Same as FUNC button – The MB-D10’s AF-ON button performs whatever function has been selected in Custom setting f5 (see User’s Manual page 320).
The Low-Down on EVs
What is an EV? EV simply means exposure value, which is an agreed-upon value of exposure metering. It is spoken of in full or partial EV steps, like ![]() ,
, ![]() , or 1. It simply means different combinations of shutter speeds and apertures that give similar exposures. An EV step corresponds to a standard base-2 logarithmic exposure step, commonly referred to as a “stop”. So, instead of saying “1 EV” you could substitute “1 stop”. EV 0 (zero) corresponds to an exposure time of 1 second at an aperture of f/1.0, or 15 seconds at f/4. EV can be positive or negative. EV -6 equals 60 seconds at f/1.0. EV 10 equals
, or 1. It simply means different combinations of shutter speeds and apertures that give similar exposures. An EV step corresponds to a standard base-2 logarithmic exposure step, commonly referred to as a “stop”. So, instead of saying “1 EV” you could substitute “1 stop”. EV 0 (zero) corresponds to an exposure time of 1 second at an aperture of f/1.0, or 15 seconds at f/4. EV can be positive or negative. EV -6 equals 60 seconds at f/1.0. EV 10 equals ![]() at f/1.0 or
at f/1.0 or ![]() at f/4. The EV step system was invented in Germany back in the 1950s. Interesting, huh?
at f/4. The EV step system was invented in Germany back in the 1950s. Interesting, huh?
Custom settings b1 to b6
(User’s Manual pages 292–295)
The next three custom settings (b1, b2, b3) affect how your camera views steps in its EV sensitivity. Most people might like to have their camera work very precisely, so they will use the 1/3 step EV selection of b1, b2, or b3.
Others might not be as selective, and would prefer to change sensitivity in ![]() EV, or even whole EV steps.
EV, or even whole EV steps.
Custom setting b1 – ISO sensitivity step value
(User’s Manual page 292)
Figure 6-14 shows the screens used to configure Custom setting b1.
The D700’s ISO “step” value is set with this custom setting. As mentioned above, you can control the steps in the following values:
If you are concerned with maximum ISO sensitivity, then use the ![]() step setting. It takes longer to scroll through the ISO selections if you manually set your ISO value in
step setting. It takes longer to scroll through the ISO selections if you manually set your ISO value in ![]() steps. The 1/3 step setting is the factory default value for b1.
steps. The 1/3 step setting is the factory default value for b1.
With b1 set to 1/3 step, hold down your D700’s ISO button on the top left of the camera and turn the rear Main command dial to the right. If your camera was set to ISO 200 initially, you’ll see that the ISO number in the Control Panel LCD changes in this pattern:
200, 250, 320, 400, 500, 640, etc.
These are ![]() steps of ISO sensitivity.
steps of ISO sensitivity.
Now, if you set b1 to 1/2 step instead, the pattern changes to:
200, 280, 400, 560, 800, 1100, etc.
These are ![]() step sensitivity changes.
step sensitivity changes.
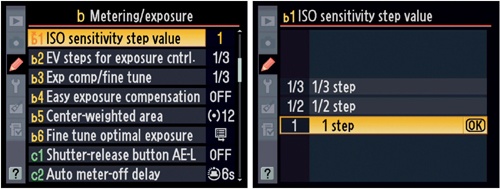
Finally, if you set Custom setting b1 to 1 step, the pattern of changes are like this:
200, 400, 800, 1600, 3200, 6400, HI 1 (12800), and HI 2 (25600).
Clearly, these are full step (or stop) changes in ISO sensitivity values.
You can be as precise as ![]() step EV, or as loose as 1 step EV when you change sensitivity.
step EV, or as loose as 1 step EV when you change sensitivity.
Custom setting b2 – EV steps for exposure cntrl
(User’s Manual page 292)
Figure 6-15 shows the screens used to configure Custom setting b2.
EV steps for exposure cntrl refers to the number of the steps in your shutter speed and aperture, since those are your main exposure controls. It also encompasses the exposure bracketing system.
Here are the three settings available for exposure control:
All this really means is that when you are adjusting the shutter speed or aperture manually, they will work incrementally in the following steps.

Nikon chose to lump shutter speed, aperture, and bracketing all under this one custom setting. 1/3 step is the factory default value for setting b2.
Custom setting b3 – Exp comp/fine tune
(User’s Manual page 292)
Figure 6-16 shows the screens used to configure Custom setting b3.
Custom setting b3 is concerned with exposure compensation or flash compensation. Most of us will, at one time or another, use the exposure compensation or flash compensation system. The exposure compensation adjustments are made with the Exposure compensation button on the top right of the D700. The Flash compensation button is right below the button that opens the pop-up Speedlight flash on the D700 (Figure 6-17).

Holding the Exposure compensation button and turning the Main command dial allows you to adjust the exposure compensation. Holding the Flash compensation button and turning the Sub-command dial allows you to adjust flash compensation.
Maybe Matrix Metering, or your popup flash, is giving you a little less exposure than you’d like, so you “fine-tune” by adding a little extra exposure with the Exposure compensation / Flash compensation buttons. These buttons can be configured by setting b3 so that they work in a finer or coarser way for the exposure fine-tuning. Compensation can be added or subtracted in ![]() ,
, ![]() , or 1 EV steps, up to 5 EV (five stops).
, or 1 EV steps, up to 5 EV (five stops).
1/3 step:
+/− Exposure/Flash EV compensation of 0.3, 0.7, 1.0, 1.3, 1.7, 2.0, 2.3, 2.7, 3.0, etc. (up to 5.0), plus or minus
1/2 step:
+/− Exposure/Flash EV compensation of 0.5, 1.0, 1.5, 2.0, 2.5, 3.0, 3.5, 4.0, etc. (up to 5.0), plus or minus
1 step:
+/− Exposure/Flash EV compensation of 1.0, 2.0, 3.0, 4.0, 5.0, plus or minus
The factory default for Custom setting b3 is 1/3 step. Most shooters will leave it set to ![]() , since that allows fine control over the amount of exposure or flash compensation.
, since that allows fine control over the amount of exposure or flash compensation.
Custom setting b4 – Easy exposure compensation
(User’s Manual page 293)
Figure 6-18 shows the screens used to configure Custom setting b4.
It took me a bit of thinking to wrap my brain around this particular series of settings. The bottom line is that you can set the D700’s exposure compensation without using the +/−Exposure compensation button.
There are three settings in b4, as follows:
On (Auto reset)
On
Off
If you set the D700 to On (Auto reset) or simply to On, you can use the command dials to do exposure compensation instead of the normal +/− Exposure compensation button. Off means what it says. If you use the normal +/−Exposure compensation button, it overrides the settings of b4.
Each exposure mode (P,S,A,M) reacts somewhat differently to Custom setting b4. Let’s consider how the P-Program, S-Shutter Priority, and A-Aperture Priority modes act when you use the three settings above. The M-Manual mode does not seem to be affected by Custom setting b4, although it does work with the normal +/− Exposure compensation button.
Notice in Figure 6-19 how the Control Panel LCD uses the +/− icon to show the compensation value you’ve dialed into the D700. Here are the values, and how they work.
On (Auto reset)
Using the Sub-command dial in P-Program or S-Shutter Priority mode or the Main command dial in A-Aperture Priority mode, you can dial in exposure compensation without using the normal +/– Exposure compensation button.

Once you allow the meter to go off, or turn the camera off, the compensation value you dialed in is “reset” back to 0. That’s why it’s called “Auto reset”.
If you already have a compensation value set, using the normal +/– Exposure compensation button, then the process of dialing in compensation with the Sub-command dial simply adds more compensation to what you originally put in with the +/– Exposure compensation button. When the meter resets, it only returns back to the compensation value you added with the normal compensation button and not to 0.
On
This works the same way as On (Auto reset) except that the compensation you’ve dialed in does not reset but stays in place, even if the meter or camera is turned off.
Off
Only the normal +/– Exposure compensation button applies exposure compensation.
Custom setting b5 – Center-weighted area
(User’s Manual page 294)
Figure 6-20 shows the screens used to configure Custom setting b5.
Years ago, our cameras didn’t have matrix metering. Back in the good old days, we all had averaging, or partially averaging meters or none at all. If you prefer not to use Nikon’s built-in database of image scenes, otherwise known as matrix metering, and you only use spot metering as needed, you are most likely using the center-weighted area meter. It’s cool that Nikon gives us a choice. You have three meter styles in your D700, thereby adding to its chameleon status.

Note on Custom Settings
The granularity of Custom setting b4’s EV step fine-tuning is affected by Custom setting b3’s ![]() ,
, ![]() , or 1 step setting. Also, the command dials used to set compensation can be swapped in Custom setting f9, which we will consider later in this chapter (pages 293 and 326 of your D700 User’s Manual).
, or 1 step setting. Also, the command dials used to set compensation can be swapped in Custom setting f9, which we will consider later in this chapter (pages 293 and 326 of your D700 User’s Manual).
Figure 6-21 is a picture of the control used to set the metering mode types.
The center-weighted meter can be configured to use a central area of the viewfinder to do most of its metering, with less attention paid to subjects outside this area, or it can be set up to simply average the entire frame.
Here are the five settings used by the D700’s Center-weighted area metering system:
8, or 8 mm
12, or 12 mm
15, or 15 mm
20, or 20 mm
Avg, or Average
Using this mode, the metering system uses an invisible circle in the center of the viewfinder to meter the subject. Setting it down to 8 mm makes it almost small enough to be a spot meter, since the real spot metering mode of the D700 uses a 4 mm circle surrounding the currently selected AF sensor.
The center-weighted meter does not appear to move around with the currently selected AF sensor point as the true spot meter does. Instead, it assigns the “greatest weight” to the center of the viewfinder frame, and everything outside the circle in the center is not as important.
How large is the invisible circle? Well, from my own experimentation, I’ve noticed that the 20 mm setting brings the edges of the best metering to about where the big circle shows in the viewfinder. Experiment for yourself to see if your D700 notices when brighter light passes that circle in 20 mm mode. So, the 8 mm setting would be about 40% of the diameter of that big visible circle on the viewfinder. Each size increase from 8, 12, 15, to 20 will of course increase the sensitivity of the center of the screen, so that more emphasis is given to a larger area in the middle.

Except when Custom setting b5 is set to Avg, if a non-CPU lens is attached to the camera, the center-weighted area is set to 12 mm, regardless of any settings for non-CPU lens data in the Setup Menu.
If you select the Avg – Average setting, then the entire viewfinder frame is used to meter the scene. The D700 takes an average of the entire frame by including all light and dark areas mixed together for an averaged exposure.
Personally, I use 3D matrix metering, and have my FUNC (Fn) button set up to switch to the spot meter temporarily. That way, I am using Nikon’s incredible 3D Color Matrix system, with its ability to consider brightness, color, distance, and composition. It gives me the best metering I’ve had with any camera yet!
Custom setting b6 – Fine tune optimal exposure
(User’s Manual page 294)
Nikon has taken the stance that most major D700 systems should allow the user to fine-tune them. The exposure system is no exception. Custom setting b6 allows you to fine-tune the matrix, center-weighted, and spot metering systems by +1/–1 EV in ![]() EV steps.
EV steps.
In other words, you can force the three metering systems to add or deduct a little exposure from what it normally would use to expose your subject. This stays in effect with no further notice until you set it back to zero. It is indeed fine-tuning, since the maximum 1 EV step up or down is divided into six parts (![]() EV). If you feel that your D700 is too conservative with the highlights, mildly underexposing, and you want to force your D700 to add
EV). If you feel that your D700 is too conservative with the highlights, mildly underexposing, and you want to force your D700 to add ![]() step exposure, you simply add
step exposure, you simply add ![]() EV to the compensation system for that metering system.
EV to the compensation system for that metering system.
This works like the normal compensation system, except it only allows you one EV of compensation. As screen three of Figure 6-22 shows, an ominous looking warning appears, telling you that your D700 will not show a compensation icon as it does with the normal +/− Exposure compensation button when you use the metering fine-tune system. This simply means that while you have this fine-tuning system dialed in for your light meter, the D700 will not keep reminding you that it is fine-tuned by showing you a compensation icon. If it did turn on the compensation icon (+/− on the Control Panel LCD and in the viewfinder), then how could it show you the same icon when you were using normal compensation at the same time as meter fine-tuning?

This light meter fine-tuning applies only to the custom setting bank you are currently working with. If you are working in bank A, banks B through D are not changed.
In Figure 6-22 we see the steps to fine-tune your favorite metering system.
Select setting b – Metering/exposure from the Custom Setting Menu.
Select b6 – Fine tune optimal exposure from the screen.
Select Yes from the warning screen and scroll right.
Select the metering system you want to adjust. In Figure 6-22, I have Matrix metering selected.
Scroll up or down in
 EV steps until you reach the fine-tuning value you would like to use.
Press the OK button.
That’s all there is to it! Since the D700 will not remind you, just remember that you have “optimal exposure” fine–tuning turned on. Watch your histogram to make sure that you’re not regularly underexposing or overexposing images once you have the fine-tuning adjustment in place. If so, just go back in and adjust the fine-tuning up or down, or turn it off.
Custom settings c1 to c4
(User’s Manual pages 296–297)
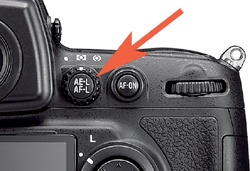
Custom setting c1 – Shutter–release button AE-L
(User’s Manual page 296)
Figure 6-23 shows the screens used to configure Custom setting c1.
There are only two selections in Custom setting c1:
On
Off (default)
This feature is designed to allow you to lock your D700’s exposure when you press the shutter-release button down halfway. Normally that type of exposure lock only happens when you press and hold the AE-L / AF-L button.
However, when you have it set to On, your D700 will act like you have pressed the AE-L / AF-L button every time you start autofocus and take a picture.
This function allows you to meter from one area of the scene and then recompose to another area without losing the meter reading from the first area. For sunset shooters who like to include the sun in their image, this is a nice function. I don’t think I’d leave it turned on all the time, since I might be holding the shutter-release button halfway down to track a moving subject through light and dark areas. I only use this feature when I really need it, then turn it off. The rest of the time, I just use the AE-L / AF-L button to lock my exposure.

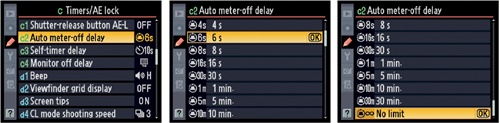
Custom setting c2 – Auto meter-off display
(User’s Manual page 296)
In Figure 6-24 we see the screens use to configure custom setting c2.
The default amount of time that your D700’s light meter stays on after you press the shutter-release button halfway is 6 seconds. If you would like your light meter to stay on longer for whatever reason, such as multiple exposures, you can adjust it to the following settings:
4s – 4 seconds
6s – 6 seconds (default)
8s – 8 seconds
16s – 16 seconds
30s – 30 seconds
1m – 1 minute
5m – 5 minutes
10m – 10 minutes
30m – 30 minutes
∞ – No limit (Meter stays on until camera is turned off.)
There are times when you want the light meter to stay on longer, or shorter, than normal. When I’m shooting multiple exposures, I leave mine set to No limit, but when shooting normally it stays at 8 seconds. You can adjust it from 4 seconds to no limit. Easy enough!
The longer the light meter stays on, the shorter the battery life, so extend the meter time only if you really need it.
Custom setting c3 – Self-timer delay
(User’s Manual page 297)
Figure 6-25 shows the screens used to configure Custom setting c3.
When you set your self-timer for those groups shots or self-portraits, do you find yourself running around wildly trying to get in position before the camera fires? Have you ever knocked anyone or anything down, or tripped and made a fool of yourself in the process? Come on now, admit it. I know I have!
Well, those problems are solved with the D700’s adjustable self-timer delay. Whether you are shooting a group shot or just using the self-timer as a cheap cable release, it’s good to be able to adjust the time before release—up to 20 seconds, or down to two.

2s – 2 seconds
5s – 5 seconds
10s – 10 seconds (default)
20s – 20 seconds
Often, if I don’t want to take the time to plug in a remote release cable, I’ll just put my D700 on a tripod and set the self-timer to 2 or 5 seconds. This lets me make a hands-off exposure to keep from shaking the camera or tripod.
Custom setting c4 – Monitor off delay
(User’s Manual page 297)
In Figure 6-26 we are shown the screens used to configure Custom setting c4.
When I take a picture, I like to review it on the monitor. I admit I am a shameless “chimper” (slang for “checking image preview”). In the old film days, one could not tell whether the image was just right. Now that I have an opportunity, I love to look at each image. If it looks good, I then move on to another image opportunity. The Monitor LCD on the D700 is one of the best ever invented for a camera, with better than VGA resolution. It is like a small computer monitor. You can really zoom in and see how sharp a portion of the image is.
This setting allows a unique time to be specified for each of the four different types of information that can be displayed in the Monitor LCD: Image review, Menus, Playback, and Shooting info display, and each has its own default value.
4s – 4 seconds (default for Image review)
10s – 10 seconds (default for Playback and Shooting info display)
20s – 20 seconds (default for Menus)
1m – 1 minute
5m – 5 minutes
10m – 10 minutes
I set my Image review option to 1 minute, since I often want to show the image to someone. If you want to conserve battery power, change it to 20 seconds, or leave it at the default of 4 seconds. If you want, you can eliminate image reviewing after each shot for maximum battery life. Simply go the Playback Menu, which is the top menu on the D700, and select Image review. You can set the review on or off there.
The longer the monitor stays on, the shorter the battery life, so only extend the monitor time if you really need it (using the EH-5 or EH-5a AC adapter avoids the depletion of the battery and effectively sets the Monitor off delay value to 10 minutes for all the options). Like a small notebook computer screen, that big luxurious 3-inch Monitor LCD pulls a lot of power. This screen and the Control Panel backlight are probably the biggest power drains in the entire camera.
