
The time entry form, which is used to add time entries to Redmine, can be accessed from several places. Thus, users get redirected to this form when they click the Log time link in the top-right contextual menu on the issue page:

The same Log time link is also available on the spent time report page, which will be reviewed later in this chapter.
The time entry form can also be opened by clicking the Log time item in the drop-down menu, which can be invoked by right-clicking on an issue in the issue list, as shown in the following screenshot:

Also, this form is partially available within the issue edit form, which is shown when we click the Update link on the issue page, as shown in the following screenshot:

Tip
Bulk time entries
You can install the Bulk Time Entry plugin, which was originally authored by Eric Davis to make it possible to add several time entries at a time. This plugin adds the Bulk time entries item to the top-left menu which is shown on every page, https://github.com/spilin/redmine-bulk_time_entry_plugin.
The full-time entry form, that is, the form without unmodifiable values (such as project), looks like the following screenshot:
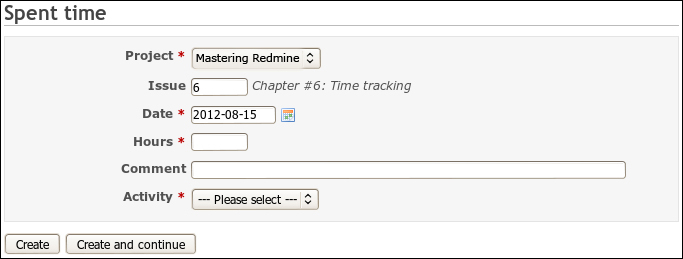
As you can see, the Issue field is optional, that is, you can add spent time directly to the project. This can be useful if, for example, you track time spent on meetings or similar stuff, which do not have associated issues.
The Date field in this form should contain the date when you spent time working on the issue and/or project. By default this field contains today's date.
The Hours field should contain the number of hours that you have spent doing the work. The value of this field can be decimal.
While the Comment field is optional, in most cases, it's highly recommended to describe here shortly what exactly you were working on during those hours. In fact, this field distinguishes time entries in addition to the Activity field but this one, unlike the latter, is of free form. The comment is for your managers, so if they do not need such details, you can leave the Comment field empty.
The Activity field in this form should be set to the type of work you were doing for the task. If you were doing various work, you should create separate time entries for each type.
Tip
Time Tracker plugin
The Time Tracker plugin originally authored by Jérémie Delaitre can simplify the process of logging time by adding Start and Stop links into the account menu (which is located in the top-right corner) , see a https://github.com/martinllanos/redmine_time_tracker.
When you have filled in the form, you can either click on the Create button and be redirected to the previous page, or click the Create and continue button and get this form again to add another time entry.
Tip
Time tracking from mobile
To track time from iPhone, you can use RedmineApp by going to http://getredmineapp.com. This is a full-featured Redmine client which also supports adding time entries.
For Android phones, you can use the dedicated time-tracking client RedTime by going to http://redtime.ubicoo.com.
When reviewing Administration | Settings | Repositories (we did it twice in Chapter 3, Configuring Redmine and in Chapter 4, Issue Tracking), I skipped part of the form. Refer to the following screenshot:
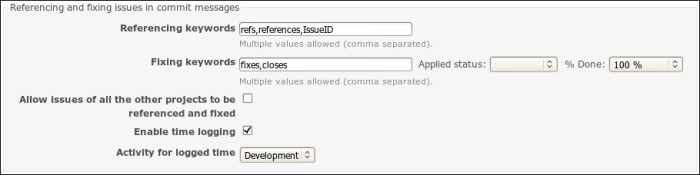
I skipped the Enable time logging and the Activity for logged time fields as at that time we knew nothing about time entries. So, let's see what we can do with these settings now.
If the Enable time logging option is checked, and the Activity for logged time field is set to some value, you can add time entries from repository commit messages. For example, if you run $ svn commit -m 'Finished controller, refs #1554 @4:30', Redmine will add a time entry for the issue #1554 with the Hours field set to 4 hours and 30 minutes. This time entry will use the activity selected in the Activity for logged time field. The comment of the time entry will be "Applied in charset R" changeset R, where R is a revision number. The date of the time entry will be the date when the commit has been done.
A commit message, which adds a time entry, should have the following format:
refs #N @HM
Following are the parts of the format:
refs: This is a referencing keyword, which is specified in the Referencing keywords field (it can be omitted, if the Referencing keywords was set to "*")#N: This is an issue number, for example, #1554@HM: This specifies the time spent.HMcan be 1h30m, 5hours, 1hour5min, 20min, 1:30, 1.5h, 2, 8h, and so on