Now we are going to discuss topics solely intended for Redmine project managers, that is, for users having permissions allowing them to edit project properties or properties related to projects. If you are the one who created the project, most likely, you have such permissions. Anyway, it's easy to check, if you see the Settings tab in the project menu, you can manage this project (or at least some of its properties).
So let's move to this tab now:
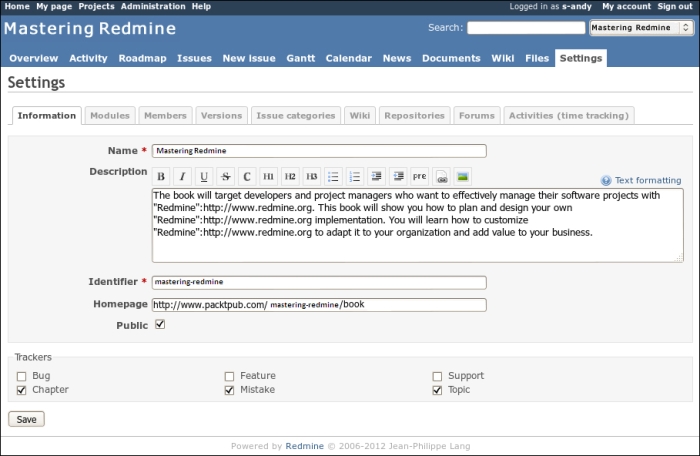
Under this tab, you see the project's settings menu, which also has tabs.
Note
We will skip the Issue category tab as it has been discussed in the previous chapter, we will also skip the Repositories and Forums tabs as they have been reviewed along with the appropriate modules. We will not review the Activities (time tracking) tab as it's going to be reviewed in the next chapter.
The first tab which gets opened automatically, the Information tab, contains generally the same fields that are found in the new project form.
The second Modules tab also contains fields, which can be seen on the new project form. These fields allow you to choose modules for the project:
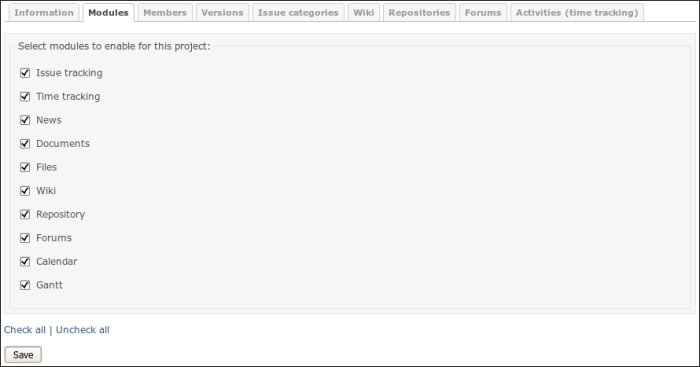
Using this tab, you can enable modules anytime you need them or when you are ready to populate the module's pages.
The next tab is the Members tab, seen in the following screenshot:
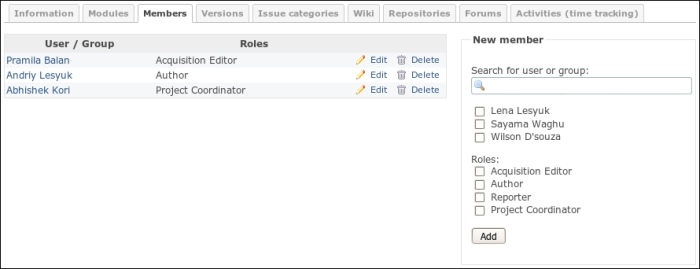
This is the tab where we add members to a project. Here we can also see the list of current members.
The New member block allows you to choose many users and many roles at the same time (a user can have several roles in a project). The user list will also contain group names, if Redmine has user groups defined. The search field can be used to filter users and groups by a part of their name, thus, if I typed so in the search field the user list would contain only Wilson D'souza. Selected users get added to the member list after you click on the Add button.
The user list inside the New member block contains only users which are not members of the project yet. In other words, to assign a different role to a project member, you need to click on the Edit link in this member's row. When you do this, the following form gets opened in place:

After applying changes or clicking on the Cancel link this form disappears and the member's row gets updated accordingly.
Now, let's see what's under the Versions tab:

So here we manage project versions.
Project versioning is extremely important for software projects. Thus, in Redmine project versions can be used by issues (to specify in what version the issue is going to be fixed), project files can be uploaded to a specific version, the project roadmap shows versions, the calendar can show version dates along with issue dates, Redmine Wiki syntax supports version links, custom fields support Version type, and so on. In other words, by not adding a version, you literally limit the functionality that is available for your project in Redmine.
For this reason it is important to manage versions correctly. Let's check the new version form, which becomes available when you click on the New version link:
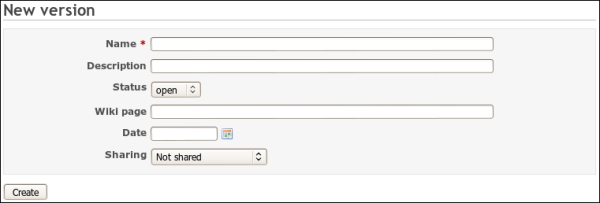
In the preceding screenshot, Name is actually the version number which can be just a string (such as 1stDraft in my case). But it's not recommended to use strings for versions as you can end up with broken sorting for versions (which can be corrected using the Date field though).
The Description field is optional and should contain a very short description of what is special about this version, for example, Maintenance release. This description will be shown on the roadmap and on the version page.
The value of the Status field can be open, locked, or closed, where locked means that the project is in a frozen state, that is, all issues have been fixed but not tested. Thus, you can't change the Target version of an issue to a locked or closed version.
The Wiki page field contains a Wiki page name that describes the changes made in this version. The content of this page will be embedded into the version section on the roadmap page and into the version page. Such Wiki page should contain a changelog for the version.
When you save a version, the value which has been specified for the Wiki page field, becomes a link pointing to the associated Wiki page (see the 1stDraft link in the previous screenshot). The same Wiki page also gets opened when you click on the Edit associated Wiki page: 1stDraft link on the version page.
Despite how it may seem, the Date field is not just used to show the due date of the release. In particular the value of this field affects the order of versions:

Usually more recent versions are shown at the bottom of the list but, if the Date is specified, such versions get moved to the top and others appear as newer versions. In other words, the empty Date field is treated as distant time in future.
The value of the Date field is also used to determine whether the version is completed. But let's get back to this a little bit later in this topic.
The last field on this form, the Sharing field, accepts the following values which have the following meanings:
- Not shared: This version won't be shared. That is, it will be available only to this project.
- With subprojects: This version will be available to all subprojects of this project to any nesting level.
- With project hierarchy: This version will be available to all subprojects as well as to all parent projects of the current project (but not to other subprojects of parent projects). To be able to choose this option, a user must have the Manage versions permission for the parent project as well.
- With project tree: This version will be available to all subprojects of the current project as well as to all subprojects of all parent projects of the current project. It will also be available to all parent projects of the current one. Like for the previous option, to be able to set this option a user must have the Manage versions permission for the parent project.
- With all projects: This version will be shared among all projects which are hosted on this Redmine installation! As this is a very wide sharing method, this option is available only to administrators. You have to be extremely careful when you choose this option.
Any of these fields can be modified later by clicking on the Edit link next to the version in the version list. This link opens the same form that we have just reviewed. You can also remove the version by clicking on the Delete link.
Now let's speak about the Close completed versions link which can be found on the right-hand side under the version list. A completed version can be considered to be a not-yet-closed version which, however, meets all conditions to be closed. When reviewing the Date field from the version form I promised to get back to this field. That's here! The value of the Date field along with the number of open issues in the version are used to determine if a version is completed. If the date is in the past, and there are no open issues in the version, such a version is considered to be completed. So by clicking on the Close completed versions link, you just close all such versions.
The last tab in the project's settings that we will review in this topic, is the Wiki tab:

The value Wiki is the default name of the starting Wiki page in the project. Using this form you can change this name (for example, if you have prepared another Wiki page for the next release). After modifying this value, when users click on the Wiki tab in the project menu they will get the Wiki page with the name that has been specified here.
The Delete link in the bottom-right corner allows you to delete the start page. It not only deletes the Wiki page itself but also the start page name! After this, the Wiki tab in the project menu (not in the project's settings menu) disappears as the start page no longer exists as well as the name for the start page. Actually, I believe, the more gracious method to achieve the same is just by disabling the Wiki module.
