Having checked the issue creation and issue view pages, let's now move to the Issues tab in projects menu where all the issues get listed. Just like the issues view page, the issues list has UI elements intended to assist in manipulating issues and the list. The following screenshot shows how the Issues page looks:

The sidebar content is generally the same as you have seen on the issues page. The View all issues link opens the listing with all view parameters reset to default values. The form under the Issues title and above the list is the one you can actually use to customize the list parameters. Let's discuss it in detail.
By default issues are filtered by their status and only open issues are listed. But you can add other filters as well. Thus, you can filter issues listing also by Tracker, Priority, Author, Assignee, Category, Target version, Subject, Start date, Due date, Completion, Relation, and much more. The following screenshot shows some filters that are available:

Many filters define their own conditions: for example, issues can be filtered by a part of a subject; the Tracker filter can include several trackers (the little plus icon enables the multiselect mode); date filters support relative conditions for example, less than days ago, this week, in more than (days); and so on. The best way to learn the filters is, perhaps, to play with them. Do it now if you have enough issues, and if you don't, you can play with them on www.redmine.org.
You must have noticed the Options label. After clicking on it the following options (shown in the following screenshot) appear:

In the Options tab, we can choose which columns to show in the issue list. Thus, for adding a column we select it in the Available Columns box, click on the right arrow button and then click on the Apply button. You can optionally use the top arrow button to move the columns to get your desired column alignment.
The Group result by option is even more powerful. To show you what it does let me select the Status value.

In the previous screenshot, as you see, the listing gets divided into groups, each group label includes the count of issues in the group and each group can be collapsed or expanded (using the gray plus/minus icon).
The Show option, if Description is enabled, adds the issue description to the list as a separate row below the main issue row.
Every time you click on the Apply button to apply your listing parameters they also get saved into your browser's cookies. This way, whenever you load the list again, you get the same customized view. To clear the cookies, you need to use the Clear link or the View all issues link that is available on the sidebar.
All new users, who have come to your Redmine site, despite their roles will see the same issue list. It's fine, unless you want them to be able to get the list of issues that they are interested in with just one click. Thus, having defined the parameters for the issue list you can: show issues which should be tested to your testers; show features in future versions to public users; show features to developers; and so on.
All this can be done with the same dialog we just used. Choose your issue list parameters that you want to share with others or want to save for later use and click on the Save link.

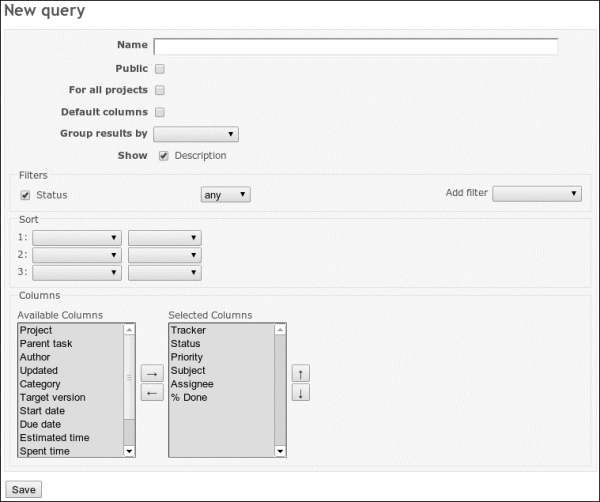
The preceding screenshot shows the page that lets you save issue list parameters and create a custom query.
The Public checkbox will make this query available for everyone, including anonymous users.
The For all projects checkbox will make this query available for all projects.
Saying you have chosen columns, that fit your needs better, but they are unlikely to be useful for others. If you check Default columns, it will not include your columns selection into the custom query.
The options Group results by, Show (Description), and Filters are already known to you so we skip them here.
The Sort option allows you to choose three sorting levels. Thus, for example, you can sort first by assignee, then by priority, and then by status.
And the Columns block allows to choose, which columns should be shown for the custom issue list.
After clicking on the Save button the newly created query gets added to the sidebar:

When you are viewing the query (and the current query is saved into the browsers cookies just like the list parameters) it is highlighted on the sidebar and its name appears as a title instead of just "Issues". Also, the Edit and Delete links appear in the top-right corner of the main content area. You can use these links to modify or delete the query.
