
For installing Redmine from a package we will use Ubuntu Server 12.04 LTS. Why Ubuntu? Because it's one of the most popular Linux distributions nowadays and Ubuntu is widely used along with Redmine (for example, the TurnKey Linux is also based on Ubuntu).
Assuming you have already installed Ubuntu Server 12.04 LTS (or a more recent version). If not, please do it! Assuming also that this is a clean installation, so we will need to install, Apache, MySQL, and so on, all software needed to run Redmine. If some software is already installed it's not a problem as it is still safe to execute the commands given. The Ubuntu (and Debian) package manager is smart enough to skip already installed software.
Now let's execute the following command in the console:
$ sudo apt-get install redmine redmine-mysql mysql-server
Instead of redmine-mysql and mysql-server, you can use redmine-pgsql and postgresql or redmine-sqlite and sqlite3 here. However, remember that neither PostgreSQL nor SQLite3 is reviewed in this topic.
This command will install Redmine and MySQL as well as many dependency packages including Ruby and Rails. Before doing this, the Apt-Get package manager will ask you to confirm:

On the screen, type y and press Enter.
After this it will download all the packages and start the installation process. Soon you will get the screen:
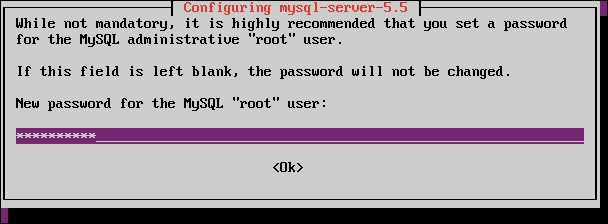
This screen asks you to enter a new password for the MySQL superuser. The same password will be used later to set up the Redmine database. After entering the password press Tab to switch to the Ok button and then press Enter.
You will be redirected to the password confirmation screen. Enter the same password again, press Tab (to move to the Ok button) and then press Enter.
After that it will take some time to install packages. In particular, it will install MySQL server and, when ready, initiate Redmine configuration.
The Debian/Ubuntu Redmine package supports many instances of Redmine. Several instances, for example, can be used to run Redmine in "production" and "development" modes at the same time (two instances for example, at different ports). The configurator of the package, however, will ask you to configure only one "default" instance.

On this screen the configurator suggests its assistance in creating and configuring the database for Redmine. Unless you are willing to configure the database by yourself just press Enter here.
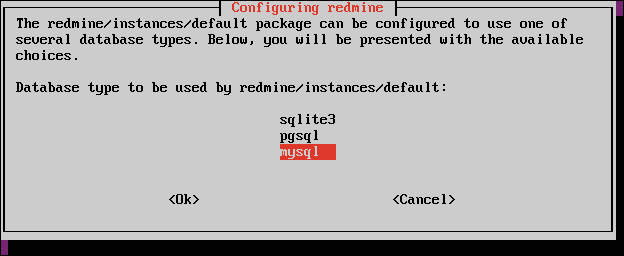
The next screen, which appears immediately, asks you to select the database backend. It has nothing to do with database servers. This screen configures the Redmine database client. As we selected MySQL at command line just press Enter.
And here comes the screen, which has already been mentioned:

Enter here the MySQL superuser password which you specified before. This password will be used to create, configure and populate the Redmine database. When finished press Tab to switch to the Ok button and press Enter.
Now the final screen of the Redmine database configuration comes:
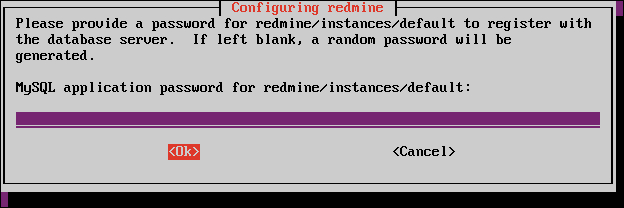
The password, what this screen asks, will be used by Redmine to access its database. It is unlikely that this password will be used elsewhere, moreover, it should not be used elsewhere! So this password should be as complex as possible. Therefore it is, perhaps, better to just press Enter here and let the configurator generate the password for you.
After this screen the Redmine package configurator will perform some finalizing work and return to the shell prompt.
That's it! Redmine has been installed and configured and is ready to run. But the system is not yet ready to run Redmine. We need a web server to do this. As a web server we will use Apache. Besides Apache, as you should remember from Chapter 1, Getting Familiar with Redmine, we need something to run a Ruby application and this is going to be the Passenger module for Apache.
So let's now install Apache and Passenger:
$ sudo apt-get install apache2 libapache2-mod-passenger
As before you will be asked to press Enter. After this the package manager will download the specified packages and their dependencies, will install them and start Apache:

If everything has gone well, you should see [ OK ] to the right from Starting ... and Reloading ... messages, as seen on the screenshot. You may also get the warning you see on the screenshot, but do not worry, it just means you need to set Apache's ServerName property to a proper value.
Now, if you load the newly installed website using an URL for example, http://127.0.1.1, you should get:

This is the default webpage of Apache web server.
But, wait, where is Redmine? Right now Redmine is not connected to Apache. Unfortunately, despite the power of Debian package management software this part should be configured manually. Luckily it's not so complex: the Debian Redmine package contains sample configuration files for Redmine under /usr/share/doc/redmine/examples directory. In this directory you will find sample configurations for Apache and FastCGI or Passenger, Lighttpd, Nginx and Thin. In this directory we have two sample files for Apache2 and Passenger: apache2-passenger-alias.conf and apache2-passenger-host.conf. The former should be used if you want to run Redmine under some URL path for example, www.yourdomain.com/redmine. The latter should be used if you want to run Redmine under subdomain or as the primary application on your domain.
Assuming that you have installed a clean Ubuntu (as I did) especially for Redmine, that is, that you want to use the server only for Redmine or for Redmine as the primary application. Let's copy apache2-passenger-host.conf to /etc/apache2/sites-available/ (the path for site configurations on Debian/Ubuntu).
$ sudo cp /usr/share/doc/redmine/examples/apache2-passenger-host.conf /etc/apache2/sites-available/
Actually this file contains configurations for two Redmine instances, "default" and "instance2", and on two different ports, 3000 and 3030. Let's clean it up to get a configuration for the "default" instance only and for the default port. We should get something like:
# These modules must be enabled : passenger
<VirtualHost *:80>
        # ServerName my.domain.name
        # this is the passenger config
        RailsEnv production
        # create a link in /var/lib/redmine/default/passenger to /usr/share/redmine
        PassengerAppRoot /var/lib/redmine/default/passenger
        SetEnv X_DEBIAN_SITEID "default"
        Alias "/plugin_assets/" /var/cache/redmine/default/plugin_assets/
        DocumentRoot /usr/share/redmine/public
        <Directory "/usr/share/redmine/public">
                Order allow,deny
                Allow from all
        </Directory>
</VirtualHost>Before we proceed we need to do what is advised in the configuration file. To create symbolic link passenger in /var/lib/redmine/default pointing to /usr/share/redmine (the directory Redmine was installed into).
$ sudo ln -sf /usr/share/redmine /var/lib/redmine/default/passenger
Now we need to "apply" our new site. Remember we have copied apache2-passenger-host.conf to /etc/apache2/sites-available/? This directory stores available sites' configurations, as it comes from the name, and enabled sites configurations are stored in /etc/apache2/sites-enabled/. So we need to "move" our new configuration file into the latter directory. Let's do it in the correct Debian/Ubuntu way:
$ sudo a2ensite apache2-passenger-host.conf
The e2ensite script creates symbolic links in /etc/apache2/sites-enabled/ pointing to sites configuration files in /etc/apache2/sites-available/. The similar script e2dissite can be used to disable sites. So let's now disable the default site which comes with Apache in Debian/Ubuntu (the one displaying It works!):
$ sudo a2dissite default
Let's now reload Apache to activate the new configuration:
$ sudo service apache2 reload
Now when we load the site we get:
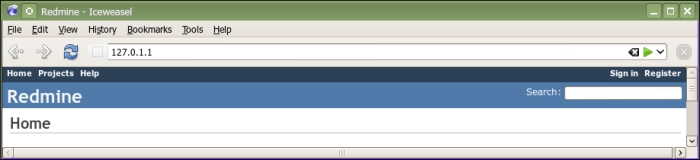
Congratulations! We have successfully installed Redmine. But still there are things we need to do before making a break for coffee and moving ahead.
Click on the
Sign in link in the top-right corner to log in to our Redmine. Use admin as a login and as a password.
After you have signed in, click on the new item Administration on the top dark blue menu bar. Administration sections will appear on the right sidebar. Select the Information section.

The above screenshot shows the screen one should always check after installing Redmine! As you see it contains the checklist that should be used to verify the installation. Changing administrator account is a common procedure for any type of installation while installing RMagick is specific, that's why we came to this screen.
So to install RMagick execute the following command:
$ sudo apt-get install ruby-rmagick
Now reload Apache again to apply:
$ sudo service apache2 reload
After Apache reloads, we get the green checkmark to the right from RMagick.
The only procedure left is changing the administrator account. To do this click on the Users link on the administration sidebar, open profile of the admin user (the only user available) and change login and password to some other values.
As you see this type of Redmine installation is quite easy and involves a few commands. Besides easiness, I believe, it has the following benefits:
- The installed Redmine conforms to FHS (Filesystem Hierarchy Standard), that is, configuration files are located in
/etc/redmine, Redmine itself in/usr/share/redmine, cache in/var/cache/redmine, logs in/var/log/redmine, and so on. That is, any administrator, who is aware of FHS (even if he/she is not aware of Redmine), will be able to understand the Redmine file structure, and system tools, such as log analyzers, will be able to pick up and process Redmine files. - As Redmine was installed as a part of the Linux distribution, the system will be able to maintain it. Thus Redmine can be updated with the rest of the system and other system updates are unlikely to break Redmine.