Brief introduction to Photoshop CS5
Reasons to use Photoshop CS5
New features introduced in Photoshop CS5
If you are reading this book, you likely have access to one of the most complicated and complex software applications available. Don't let that discourage you though. Photoshop is also a powerful and extremely fun application to use. Photoshop has throngs of fans all over the globe. Over the years, Photoshop has become the pinnacle software application for image editing. In fact, if you look up Photoshop at wiktionary.org, you find the term photoshop is actually a verb meaning "to digitally alter a picture or photograph."
Photoshop draws such a big crowd because it provides amazing results when you are editing images and yet is fairly intuitive to use such that even casual users can get pretty good results without much effort. Also, as digital imaging has advanced over the years, Photoshop has kept pace and even led the advancements in many areas.
The purpose of this chapter is to give you a brief introduction to Adobe Photoshop CS5, when to use it, and what new features have been added since CS4. Chapter 2 dives into the nuts and bolts of Photoshop's application workspace.
The simplest description of Photoshop is "a digital image-editing application." That description doesn't come close to Photoshop's capabilities. Photoshop provides the standard color and lighting correction capabilities historically associated with photo editing, but it also provides filtering, painting, masking, layering, and many more tools that allow you to take image editing to the next level.
Photoshop comes in two versions. The standard Photoshop edition provides all the functionality you need to create, enhance, and correct digital images. The extended edition, which costs more, provides additional functionality to work with 3D objects, video, and digital animation. The extended edition is worth the money if you are working with 3D objects or need to add color/lighting corrections and artistic effects to video. If you are not working with 3D objects or video, the standard edition is all you need.
The following sections discuss the uses of Photoshop as well as a few times where you need to use additional applications with Photoshop. The purpose of the section is to give you a glimpse of what Photoshop is for before diving into using it. Of course, the only real way to understand Photoshop's capabilities is to delve into them as you follow along with the next 30 chapters in this book.
Photoshop has so many tools and so much power that it can do an almost unlimited number of things. The following list describes the most common tasks that Photoshop is used for to help you get an idea of when to use it:
Photo corrections: Photoshop's strength lies in the ability to correct digital images to restore the original color and lighting as well as to correct problems introduced by camera lenses. These features of Photoshop are covered in Chapter 13.
Photo enhancements: Photoshop also provides tools that allow you to enhance photos. For example, you can add a blur to soften a portrait or use a sharpening filter to remove motion blur. Photoshop also is great at fixing scratches and dust marks on older images. These concepts are discussed in Chapters 14 and 15.
Photo compositions: One of Photoshop's strengths is the ability to combine multiple images to create a single image or composition. A common use of Photoshop is to take a headshot from one image and place it into another. Photoshop also allows you to merge several photos that were taken at different horizontal angles from the same spot and turn them into a single panoramic image. Photo compositions are discussed in Chapter 21.
Artistic effects: One of the most fun features of Photoshop is the ability to use different filters and warping tools to apply artistic effects to images. The combination of numerous tools and filters in Photoshop means that the only limitation you have with adding artistic effects is your own creativity. The tools used for artistic effects are covered in Chapters 19 and 20.
Painting: Photoshop has always been a fairly good painting application, but with the addition of the wet brush capability in CS5, Photoshop is now one of the best applications available to create digital painting. What puts Photoshop ahead of the competition is that many of the powerful features, such as the layers and masks, also are available for use with the painting tools. Also, the painting brushes are integrated into many of the other tools in Photoshop. Chapter 16 discusses the painting tools.
Creating vector artwork: Photoshop also is an excellent application to use when creating vector artwork. The path tools allow you to quickly create and manipulate vector artwork. You also can add vector artwork to raster images. Vector artwork, including vector text, is discussed in Chapters 17 and 18.
Adding text to images: Photoshop provides tools that allow you to add text to images. The text can be resized, warped, and adjusted to provide some stunning visual effects to images. Chapter 18 discusses adding textual elements to images.
Creating Web images: Another area where Photoshop excels is preparing images for the Web. Photoshop provides utilities that allow you to quickly format images with the appropriate size, file format, and colors for use in Web pages. Photoshop also provides some tools you can use to slice an image into clickable sections and provides the HTML code necessary to utilize the slices in a Web page. Outputting to the Web is discussed in Chapter 30.
Print preparation: Photoshop often is used to prepare images for printing by converting the color mode to CYMK, adding spot colors, and creating color separations. These topics are covered in Chapters 11 and 29.
Creating 3D objects: Photoshop has the capability to create and manipulate 3D objects. Although it is not the best utility for creating 3D objects, it is very good at manipulating them and then applying them to 2D images. The 3D capabilities of Photoshop are covered in Chapters 22, 23, and 24.
Adding textures to 3D objects: Photoshop has a big advantage over other 3D applications at applying textures to 3D objects. With Photoshop's filter and painting capabilities, you can edit the textures of your 3D objects in ways that you may not have thought possible. Chapter 23 discusses creating and enhancing 3D textures.
Video corrections: Just as with 3D modeling, Photoshop should not be your choice for creating video projects; however, using Photoshop's color, lighting, and filter effects, you can quickly apply corrections to video and even add some artistic effects. Chapter 27 discusses applying corrections and effects to video files.
Animating images: Another fun feature of Photoshop is the ability to add animation to your images. Animated images can give life to Web pages and allow you to create short animated movies. Chapter 28 discusses animating images.
Believe it or not, Photoshop is not designed to do everything, and you should use a different application for those tasks after you have created/adjusted the image in Photoshop. For example, use another program for the following:
Word processing: Most word processing applications allow you to add images to documents created with those programs, and although Photoshop supports adding text to images, it doesn't support text editing all that well and can't handle text flowing from one page to another. You should use Photoshop to work with the images and then import them into the word processor.
Business graphics: Photoshop doesn't do charts and presentations very well, but you can create great images in Photoshop and then use them in business applications.
Page layout: Applications such as Adobe InDesign are much better adept at laying out most brochures, flyers, and documents that are mostly textual. You should create the images in Photoshop and then import them into the layout application.
Vector art: Although Photoshop has a lot of capability when it comes to creating vector paths, Illustrator is much better application for working with clipart and designing advertisements, flyers, and one-page layouts that have multiple vector objects.
Adobe has added several great new features to Photoshop CS5 that make tools easier to use, extend capabilities, and add lots of justification for upgrading. These new changes are discussed throughout the book. The purpose of this section is to describe the biggest changes and let you know where in the book you can find more information about them:
Sticky Workspaces: The workspaces in Photoshop now save themselves when you switch between them. That way, your panels and other settings stay the same way you left them when you come back. Photoshop also provides a reset option to reset the workspace to the default. See Chapter 2.
Workspace Switcher: Adobe has modified the method to switch between workspaces with a new option in the application bar that allows you to access workspaces more easily. See Chapter 2.
Mixer Brush: One of the coolest features in Photoshop CS5 is the addition of the Mixer Brush to the painting tools. The Mixer Brush mixes colors in the brush and on the canvas as you apply strokes to the document, allowing you to create realistic painting effects. This one new feature makes Photoshop CS5 worth the upgrade. Chapter 16 covers the Mixer Brush in detail. Figure 1.1 shows an example of using the Mixer Brush to add brush strokes to a photograph to create a paint effect. Notice that by using the Mixer Brush, the colors in the image have been spread like brush strokes.
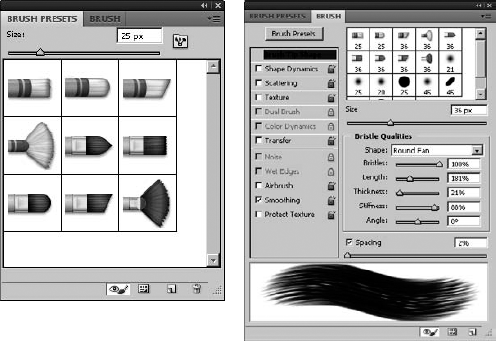
Bristle Brushes: Another feature that adds to the painting functionality in Photoshop is the addition of realistic paint brushes. The new Bristle Brush tips allow you to define paint stroke behavior that mimics real paint brushes by allowing you to define the number of bristles, stiffness, shape, and other behaviors that simulate real-life brushes. Combined with the Mixer Brush tool, the Bristle Brushes elevate Photoshop CS5 to one of the premier digital art applications. See Chapter 16. Figure 1.2 shows the various new Bristle Brushes.
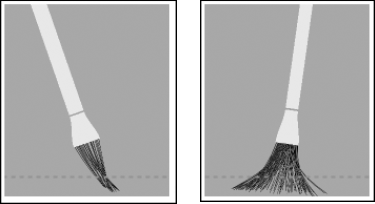
Bristle Brush Preview: The new Bristle Brushes also come with a preview window that simulates the movement and pressure of the brush as you apply brush strokes. As you put more pressure on the brush, the preview shows the bristles as they fan out. The preview is especially useful if you are using a stylus that supports tilt and pressure, because the preview shows you the behavior of the brush when it is tilted and as you apply more pressure. Figure 1.3 shows some examples of the Bristle Brush preview window.
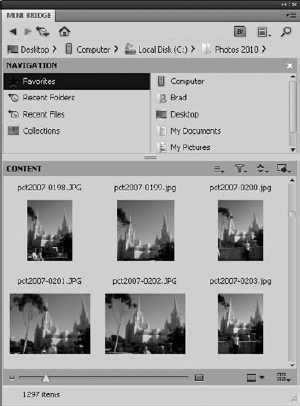
Mini Bridge: A new Mini Bridge panel has been added to Photoshop. The Mini Bridge panel allows you to quickly find and open files in Photoshop using Navigation and Content panes similar to those in Bridge. You no longer need to switch between Photoshop and Bridge to find files. See Chapter 6. Figure 1.4 shows the look of the Content and Navigation panes in the Mini Bridge panel.
Puppet Warp tool: The Puppet Warp tool is another fun feature in Photoshop CS5. Using the Puppet Warp tool, you can lock pieces of the image to remain static and then adjust points in the no static sections. As you adjust the points, the image is warped as if you were pulling on a piece of cloth. The result is that you can take an object such as a person and warp only the arms or legs as you would a puppet. See Chapter 19. Figure 1.5 shows an example of using the Puppet Warp tool to change the position of a spider's legs. Notice how the locking pins hold the rest of the image in place while the spider's legs are warped.
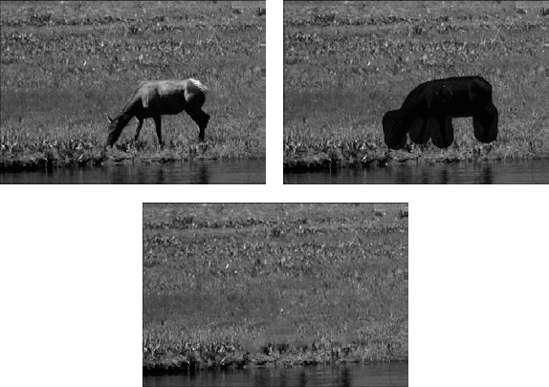
Content-Aware Fill and Spot Healing: Adobe has enhanced the Spot Healing Brush tool so you can enable the Content-Aware feature. This feature takes into account the pixels in the area being healed and tries to match other similar patterns in the image. You also can create a Content Aware Fill that replaces a selection with a content aware patch. The result is that you can quickly remove content from an image without the anomalies that you used to get. It's a situation of "now you see it, now you don't." See Chapter 15. Figure 1.6 shows an example of removing an elk from an image using the Content-Aware Spot Healing. Using the Content-Aware Spot Healing feature, you can simply paint loosely over an object and Photoshop does the rest. Notice how cleanly the animal is removed and replaced with grass similar to the content around it.
Repoussé: Another major advancement in Photoshop CS5 is the addition of the Repoussé tool. Repoussé allows you to take a 2D vector path and turn it into a 3D vector object. This is a huge bonus to the extended edition, because you can now create a variety of 3D shapes by utilizing vector paths. A great use of the Repoussé tool is to create 3D text art from vector text layers. Repoussé is covered in detail in Chapter 22. Figure 1.7 shows the Repoussé tool along with an example of turning 2D text into a 3D object.
3D tools: The 3D tools and 3D panel have been reworked in Photoshop CS5. They are now easier to use and have more robust features. For example, the Scene Panel tools can now be accessed at all times. See Chapter 22 for a more detailed description of the 3D tools.
3D axis widget: The coolest advancement in the 3D toolset is the new 3D axis widget. This new widget allows you to move, scale, and rotate 3D objects, lights, cameras, and meshes. See Chapter 22 to learn more about the 3D axis widget. Figure 1.8 shows the new 3D axis widget.
Adobe Camera Raw 6.0: Photoshop CS5 comes with a new version of Adobe Camera Raw that has lots of behind the scenes enhancements to improve the adjustments that are made. See Chapter 7.
Protect detail in the Sharpen tool: A new option has been added to the Sharpen tool that allows you to sharpen images with high-frequency details, such as stripped ties, without introducing unwanted artifacts. See Chapter 14.
Character Styles: A new Character Styles panel has been added to Photoshop CS5 that allows you to define type styles as presets that can be saved and reused later. You can save details such as the font, size, tracking, color, and kerning. See Chapter 18 for more details.
Paragraph Styles: A new Paragraph Styles panel has been added to Photoshop CS5 that allows you to define paragraph styles as presets that can be saved and reused later. You can save most of the settings available in the Paragraph Styles panel such as the indent, spacing, justification, and much more. See Chapter 18 for more details.
Grid Options in the Crop tool: The Crop tool now displays new Crop Guide Overlay settings that allow you to display a grid in the cropped area so you can more easily see the spatial composition of the area that will make up the new image. You can select None, Rule of Thirds, or Grid, where Grid specifies the spacing between grid lines. See Chapter 3 for more information about using the Crop tool.
Drag-and-Drop document to create a layer: In Photoshop CS5, you can now drag an open document window onto a PSD document window and the file is added as a new layer.
Straighten image in the Ruler tool: A Straighten button has been added to the options bar for the Ruler tool. When you draw a line with the Ruler tool and then click the Straighten tool, the canvas is rotated to match the angle of the ruler measurement and the excess corners are clipped.
Sampling ring in the Eyedropper tool: The Eyedropper tool now has an additional option in the options bar that enables a sampling ring when you drag the Eyedropper onto the document. The bottom of the ring shows the original foreground color, and the top of the ring shows the color of the pixel directly below the Eyedropper. See Chapter 4 for more information about the Eyedropper tool.
Scrubby Zoom option in Zoom tool: The Zoom tool now has a Scrubby Zoom option that, when enabled, allows you to zoom in and out by clicking the image, holding down the mouse button, and dragging the mouse to the left or right. See Chapter 2 for more info about the Zoom tool.
HDR Toning: A new option, Image

Nest layer groups: Photoshop CS5 now supports nested layer groups ten levels deep instead of just five.
Delete All Empty Layers command: You can now delete all empty layers by selecting File

Modify opacity and fill of multiple layers: Photoshop CS5 allows you to change the opacity and fill values for multiple selected layers. This has been a needed feature for a long time. Layers are discussed in Chapter 10.
Layer Mask from Transparency: Photoshop CS5 includes a new menu command, Layer

Sticky Layer Style settings: The settings that you configure in the Layer Styles dialog box are now sticky, which means that they are automatically saved when you leave the dialog box. That way, the modified settings are preserved the next time you open the Layer Style. Photoshop provides Make Default and Reset to Default buttons to handle returning the settings to the original values. See Chapter 10 for more information about layer styles.
Refine Edge algorithm: A new algorithm is used in edge refinement that is controlled by a Thickness slider. This new algorithm captures more detail on the edges of a selection or mask allowing for improved mask shaping around finely detailed image subjects like hair, grass, treetops, and so on.
Refine Mask views: Two new view modes have been added to aid in the visual representation of the mask as the user refines it:
On Layers: The On Layers view shows the unmasked image data with the data of the revealed composite layers that appear below it.
Reveal Layer: The Reveal Layer view disables your layer mask so you can see the entire active layer, providing a quick way to see all the masked image data in your selected layer.
Refine Edge—Edge Detection: The Refine Edge feature also includes another new feature, Find Hard Edges, that automatically adjusts the level of refinement that occurs around localized areas of the mask edge, helping to remove background noise that can get picked up by the refined mask.
Refine Edges—Color Decontamination: The Refine Edge feature also includes another new feature, Color Decontamination, that allows you to remove color fringing around the edges of your masked image by replacing the original color with that of the subject. Using the Color Decontamination, you can more easily extract an item or person in an image from its background.
Refine Edges—Add and Subtract Brushes: The Refine Edge tool also provides two new brushes, Refine Radius and Erase Refinements, that add to and subtract refinement of the edges of selections. These brushes allow you to make localized refinements to the edges of your mask.
Paste in Place: In Photoshop CS5, the Edit

This chapter introduced Photoshop CS5 by discussing the general uses of Photoshop and the new features in Photoshop CS5. Photoshop can be used for a variety of purposes from photo editing to digital art to adding artistic effects.
In this chapter, you learned the following:
Photoshop can be used to edit, enhance, and create images in several ways.
Photoshop CS5 includes a new painting tool and brushes that allow you to treat an image as if it were a wet paint canvas.
Adobe has improved the set of 3D tools that allow you to use Photoshop's editing capabilities on 3D objects.


