
Using sharpening filters to sharpen images
Applying an unsharp mask to sharpen images
Using blurring filters to soften the background in an image
Simulating a lens blurring effect in a photo
Reducing noise in images
Removing dust and scratches from images
A common problem to overcome when working with photos is correcting blurriness and noise. Photoshop provides three classes of filters to overcome these problems: the sharpen, blur, and noise filters. It is important to remember that when you apply filters to an image, you are altering the pixels based on computer algorithms and not optical data. Therefore, the adjustments that Photoshop can make are limited in their effectiveness.
This chapter discusses using the sharpening filters to enhance blurry images and make edges stand out, using blur filters to apply softening effects to images, and using noise reduction filters to remove noise and unwanted artifacts from images.
Note
Sharpening, blurring, and noise reduction are done through the use of filters. Filters are discussed in much greater detail in Chapter 20. Because the use of filters is a fairly destructive adjustment, you should at least review the section in Chapter 20 that discusses creating and using non-destructive Smart Filters before getting too far in this chapter.
Note
When you apply the sharpening, blurring, and noise reduction filters in this chapter as Smart Filters, you can use Blend modes to really change how the filters are applied. Chapter 10 discusses Blend modes in much better detail. You should look at that section before reading this chapter so you will understand some of the additional options available by blending the filters rather than just applying them normally.
The best way to get a sharp photo is to shoot a sharp photo in the first place. Nothing can take the place of an optically sharp image. Unfortunately, shooting perfectly sharp photos doesn't always happen. And even if you do, you may lose some sharpness when making adjustments to the photo in Photoshop.
For these reasons, Photoshop includes some powerful sharpening filters that make your images look better. To sharpen the photo, Photoshop uses some algorithms that analyze the image and find edges of objects and then adjusts the pixels in the image to maximize the contrast between the edges with minimal impact on the overall appearance of the photo.
Tip
The best way to apply sharpening filters is to create a duplicate layer of the background and then turn that layer into a Smart Object. Then apply the filter to the Smart Object so you can add several filters, turn them on and off, and try different settings.
Keep in mind that the more sharpening you do, the more anomalies you introduce, such as false edges and ringing artifacts in your images. The amount of sharpening you can do is limited by the amount of detail in your image as well as the size of the image; when it comes to sharpening, bigger is better.
Note
Ringing artifacts can appear in images when you sharpen areas with abrupt transitions. They show up as "echos" radiating away from the transition, almost like ripples in a pond.
This section discusses using the basic sharpening tools in Photoshop as well as some of the more advanced ones.
Note
The sharpening filters alter the pixels in the image quite a bit. You should always apply the sharpening filters after you have made all other adjustments to avoid spreading some of the anomalies caused by sharpening the image through the other adjustments.
The simplest way to sharpen images is to use one of the three basic filters supplied by Photoshop. These filters apply slightly different techniques to sharpen images. The basic sharpening filters perform a predefined amount of sharpening to the image and do not provide an interface to customize the amount of sharpening that takes place.
The following list describes the basic sharpening filters available by selecting Filter
Sharpen: Performs a simple sharpening on an image. The filter scans the pixels in the image looking for boundaries denoted by a pixel not matching adjacent pixels in one direction or another. The filter then changes the value around the boundaries to increase the contrast and make the edge more definable.
Sharpen Edges: Works similarly to the Sharpen and Sharpen More filters except that the Sharpen Edges filter is even more aggressive when it finds areas of higher contrast. It sharpens those areas even more than the Sharpen More filter. This filter is great if you have items in the image that have edges that contrast highly against the surrounding background.
Sharpen More: Works the same way as the Sharpen filter except that the Sharpen More filter is much more aggressive about finding edges and how much to increase the contrast. This has the effect of increasing the sharpness around the edges, but it can introduce a considerable amount noise in images.
Smart Sharpen: Gives you more control over the sharpening effect by allowing you to set the sharpening amount, method, radius, and angle.
Unsharp Mask: Uses a different method of sharpening by finding pixels that are different from the surrounding pixels and then increasing the contrast in the surrounding pixels. Unsharp masks will be discussed in the next section.
The following example takes you through the process of using the basic sharpening filters to sharpen an image:
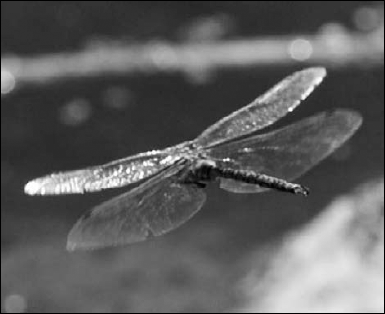
Open the image in Photoshop as shown in Figure 14.1.
Notice that the image is fairly blurry.
Right-click the background layer, and select Duplicate Layer from the pop-up menu, as shown in Figure 14.2.
This displays the Duplicate Layer dialog box.
Name the duplicate layer in the Duplicate Layer dialog box, shown in Figure 14.2, and click OK to create the layer.
The new layer is added to the Layers panel.
Right-click the new layer, and select Convert to Smart Object from the pop-up menu, as shown in Figure 14.3.
Select Filter

Select Filter
Select Filter
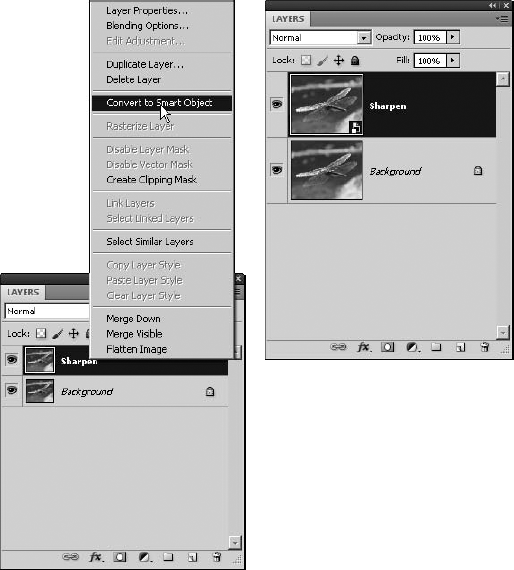
Figure 14.3. Making the duplicate layer a Smart Object allows us to apply the filters as Smart Filters.
The Sharpen, Sharpen More, and Sharpen Edges filters are applied as Smart Filters to the Smart Object, as shown in Figure 14.4.

The results of applying the Sharpen, Sharpen More, and Sharpen Edges filters are shown in Figure 14.5. Notice that the Sharpen filter does not make nearly as drastic of an effect on the image as the Sharpen More filter and that the Sharpen Edges filter applied even more sharpness to the image.
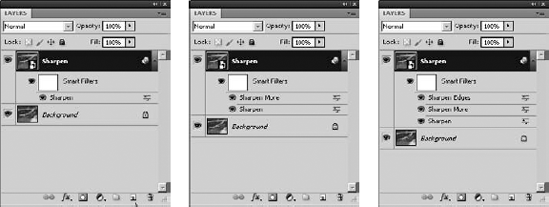
Figure 14.4. Applying the Sharpen, Sharpen More, and Sharpen Edges filters as Smart Filters to the blurry image
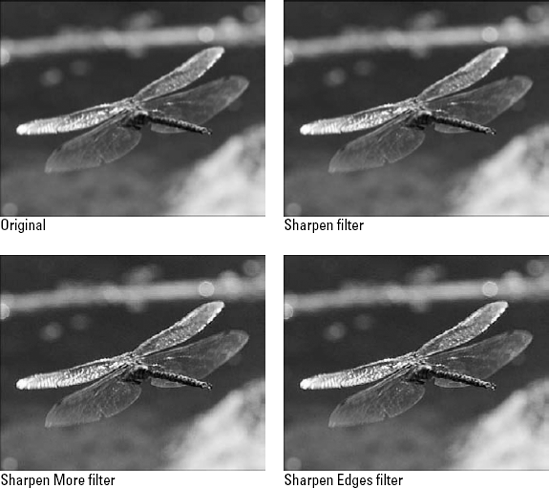
Figure 14.5. Notice the results of the Sharpen, Sharpen More, and Sharpen Edges filters on the image. Sharpen More makes a much bigger difference than Sharpen, and the Sharpen Edges changes mostly around the edges of the wing and body.
Note
The project file used to create the image shown in Figure 14.5 can be found on this book's Web site as Figure 14-5.psd. You can open it in Photoshop and see the effects of the Sharpen, Sharpen More, and Sharpen Edges filters. The sharpen filters are applied as a separate layer, so you can delete that layer or hide it and try to make your own adjustments as you follow along with the exercises.
The Unsharp Mask filter is a bit more advanced method of sharpening images. Unsharp masking is different than the basic sharpening methods. Instead of detecting the edges in the image, the Unsharp Mask filter finds pixels that are different from the surrounding pixels by a specified threshold. Then it increases the contrast in the surrounding pixels in a specified neighborhood. In other words, if a pixel is darker than the surrounding neighborhood, then the neighborhood is lightened even more.
Figure 14.6 shows the Unsharp Mask filter dialog box that is displayed when you select Filter
Preview Size: The minus and plus buttons adjust the size of the image in the preview window of the Unsharp Mask dialog box. You can drag on the image inside the preview window to adjust the position of the preview or simply click the preview image itself.
Amount: This specifies the amount used to increase the contrast of the pixels in the neighborhood when sharpening. A greater value here creates a more dramatic sharpening effect in the image.
Radius: This specifies the size of the neighborhood to use when calculating whether a pixel doesn't match the surrounding pixels. A greater radius means that a larger area of the image is affected by the sharpening, so the edge transitions are more gradual. A smaller radius means that a smaller number of pixels is affected, so the edge transitions are more abrupt.
Threshold: This specifies the threshold used to calculate whether a pixel matches the surrounding neighborhood. A larger value here means that only significant differences between a pixel and its neighbors are sharpened. Typically, you want to use a threshold value between 4 and 20 pixels.
Use the following steps to apply an Unsharp Mask filter to an image in Photoshop:
Open the image in Photoshop.
Right-click the background layer and select Duplicate Layer from the pop-up menu to display the Duplicate Layer dialog box.
Name the duplicate layer in the Duplicate Layer dialog box, and click OK to create the layer.
The new layer is added to the Layers panel.
Right-click the new layer, and select Convert to Smart Object from the pop-up menu, as shown in Figure 14.3.
Select Filter
The Unsharp Mask dialog box is displayed, as shown in Figure 14.6.
Adjust the size of the preview using the plus and minus buttons and drag the image until you have a preview area that includes the part of the image you are most interested in sharpening.
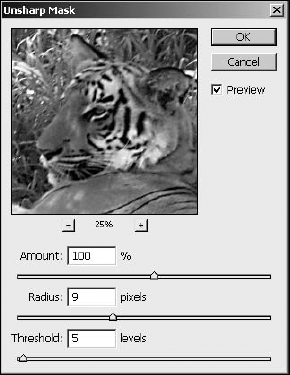
In Figure 14.6, we adjusted the size and dragged the image so that the tiger's face is visible in the preview area.
Adjust the Amount value to set the amount of sharpening to take place.
In the example, we set the value to 100% to make a large change.
Adjust the Radius to include enough of the surrounding pixels to detect the change and provide a smooth transition along edges.
In the example, we set the radius to 9 pixels so we can get enough of the surrounding pixels.
Adjust the Threshold value until only the areas you want sharpened are being sharpened by the filter.
You may need to go back and adjust the Amount and Radius values if you don't get a threshold setting that you like.
Click OK to apply the Unsharp Mask filter as a Smart Filter to the layer.
The results of applying the Unsharp Mask filter are shown in Figure 14.7.

Figure 14.7. Notice the results of the Unsharp Mask filters on the image. The grass and stripes on the tiger have been sharpened by the filter.
Note
The project file used to create the image shown in Figure 14.7 can be found on this book's Web site as Figure 14-7.psd. You can open it in Photoshop to see the effects of the Unsharp Mask filter and try making your own adjustments.
The most powerful tool that Photoshop has to sharpen images is the Smart Sharpen filter. The Smart Sharpen filter uses the same algorithm as the Unsharp Mask filter. However, the Smart Sharpen filter also includes the ability to fine-tune the amount of sharpening that takes place in the highlights and shadow areas of the image. The Smart Sharpen filter also allows you to specify the type of blurring to sharpen in the image.
Figure 14.8 shows the Smart Sharpen filter dialog box that is displayed when you select Filter
Preview Size: The minus and plus buttons adjust the size of the image in the preview window of the Smart Sharpen dialog box. You can drag on the image inside the preview window to adjust the position of the preview or simply click the preview image itself.
Settings: This allows you to save the current settings as a preset filter and select it later. This allows you to perform the same filter on several images to correct similar blurring caused by lens or camera issues. You also can delete a preset filter by clicking the trash can.
Amount: This specifies the amount used to increase the contrast of the pixels in the neighborhood when sharpening. A greater value here creates a more dramatic sharpening effect in the image.
Radius: This specifies the size of the neighborhood to use when calculating whether a pixel matches the surrounding pixels. This value also is used to determine the size of the area affected by the Smart Sharpen filter. A greater radius means that a larger area of the image is affected by the sharpening, so the edge transitions are more gradual. A smaller radius means that fewer pixels are affected, so the edge transitions are more abrupt.
Remove: This specifies the type of blur you are trying to remove from the image. You can specify Gaussian, Lens, or Motion. Gaussian Blurs are introduced into images when you make image adjustments such as noise reduction or image resizing. Lens Blurs are introduced in the image due to focus problems. Motion problems are introduced into images by either camera or subject motion.
Angle: This allows you to select the angle of motion when you select the Motion option in the Remove setting. This gives Photoshop an idea of the motion of the target in the image and allows the algorithms to be much more aggressive in fixing motion blur.
More Accurate: When you select the More Accurate option, Photoshop takes much more time processing the Smart Sharpen filter, but it gives you a much better sharpening effect.

Figure 14.8. The Smart Sharpen filter allows you to set the amount of sharpening, the radius of the neighborhood to sharpen, and the type of blur to be corrected by the sharpening filter.
To fine-tune the sharpening that takes place in the shadows of the image, select the Advanced option in the Smart Sharpen dialog box, and then click the Shadow tab to set the following options shown in Figure 14.9:
Fade Amount: Specifies the amount used to increase the contrast neighboring pixels when sharpening pixels in the shadows range.
Tonal Width: Adjusts the range of tones that are included in the shadows range. Moving the slider to the left decreases the maximum value that is considered to be in the shadows.
Radius: Specifies the size of the neighborhood to use when calculating whether a pixel belongs to the shadows range.
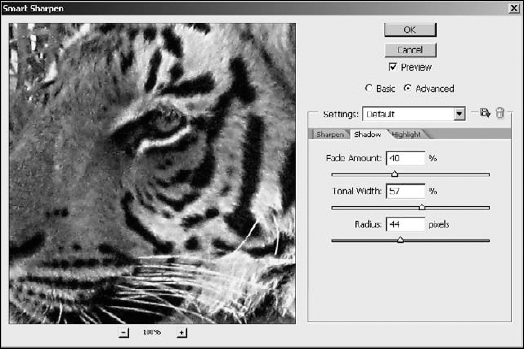
Figure 14.9. The Smart Sharpen filter allows you to fine-tune the filter to set the amount of sharpening that takes place in the shadows range.
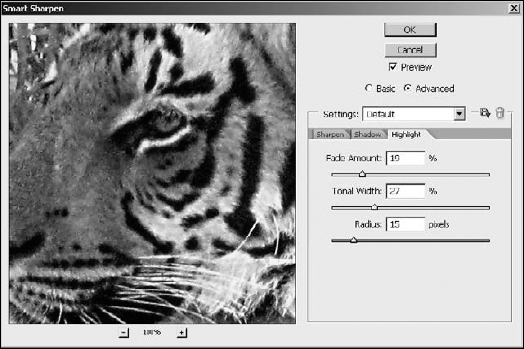
To fine-tune the sharpening that takes place in the highlights of the image, select the Advanced option in the Smart Sharpen dialog box and then click the Highlight tab to set the following options shown in Figure 14.10:
Fade Amount: Specifies the amount used to increase the contrast neighboring pixels when sharpening pixels in the highlights range.
Tonal Width: Adjusts the range of tones that are included in the highlights range. Moving the slider to the left decreases the maximum value that is considered to be in the highlights.
Radius: Specifies the size of the neighborhood to use when calculating whether a pixel belongs to the highlights range.
Blurring applies the opposite effect to images that Sharpening does. Instead of finding edges and adding contrast, blurring reduces the contrast, making edges softer. Photoshop has 11 Blur filters.
Warning
Blurring images is done by smoothing out some of the details. The detail is permanently lost. You likely want to apply the blurring filters on a separate duplicate layer to avoid data loss problems.
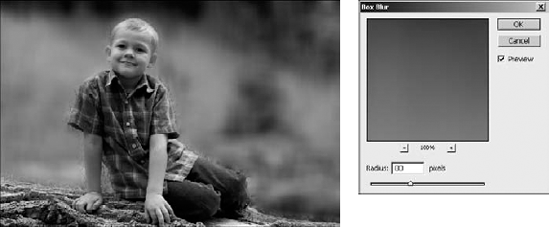
Each Blur filter reduces the contrast at different levels and in different ways. If you choose a Gaussian Blur, for example, each pixel is compared to pixels around it in an even radius, and pixels that are closer receive higher weight than pixels that are farther away. Choosing the Blur filter softens the edges in your image by blurring only those pixels that are in high contrast areas. If you choose a Box Blur, each pixel is compared to pixels around it in a box shape, giving the end result an edgier appearance. If you really want an interesting result, choose a Shape Blur, where you can choose from dozens of shapes to use for the pixel comparison.
The first three Blur filters on the Filter
Average: Takes the average color of the frame (or selected area) and fills the entire frame with that color. It's not a great photo enhancer, but it could be useful for creating matching backgrounds when placing odd-sized photos in a video file.
Blur: Automatically smoothes the color transitions in an image to soften the edges.
Blur More: Works the same as the Blur filter by smoothing the color transitions in an image to soften the edges. The Blur More filter is three or four times stronger than the Blur filter, although it is still very subtle.
The Gaussian Blur, Box Blur, and Shape Blur filters blur all the pixels throughout an image or selection rather than selected pixels in high contrast areas, as the Blur and Blur More filters do. The pixels are blurred by reducing the contrast between each pixel and surrounding pixels. The surrounding pixels are determined by which one of these filters you use and the Radius setting.
The Gaussian Blur compares the pixels in an even radius around each pixel and applies a weighted average to each pixel to reduce its contrast to the surrounding pixels. Its effects are a general softening of the image. You can apply a Gaussian Blur filter by choosing Filter
A Box Blur compares the pixels in a box shape rather than the feathering out comparison of the Gaussian Blur. The result is a blur with edges. The Box Blur can be applied by choosing Filter
As if having a soft blur or an edgy blur weren't enough, Photoshop gives you the choice of literally dozens of shapes to use when comparing pixels. This works in just the same way as the Gaussian Blur and Box Blur, except the pixels are compared to one another in the shape chosen. Maybe someone at Adobe had too much time on his hands, but the result can create some very interesting blur effects.
Open the Shape Blur dialog box by choosing Filter
Note
The project file used to create the image shown in Figures 14.11, 14.12, and 14.13 can be found on this book's Web site as Figure 14-11.psd. You can open it in Photoshop to see the effects of the Blur filters. Each of the Gaussian, box, and shape filters is in its own Smart Object layer, so you can turn the blurs on and off to see the different effects.

The Motion Blur and Radial Blur filters create the illusion of motion in your image. These filters are very useful in adding a motion effect either to the entire image or a specific selection. A Motion Blur adds directional blur that moves across the 2D plane of the image. A Radial Blur adds blurring that radiates outward from a central point in the image.
The Motion Blur simulates movement in a straight path, determined by setting the angle in the dialog box. The following example takes you through the process of adding a Motion Blur to an image:
Open the image in Photoshop.
Select the area of the image where you want to add the Motion Blur, and use Ctrl (

Add a new layer to the image using the Layers menu.
Paste the contents of the clipboard into the newly created layer, as shown in Figure 14.14.
Right-click the new layer, and select Convert to Smart Object.
Select Filter
The Motion Blur dialog box is displayed, as shown in Figure 14.15.
Adjust the Angle to match the relative direction of the motion you want in the image.
In the example, we adjusted the angle to 10 to match the slope of the field.
Adjust the Distance to the desired number of pixels.
A small number of pixels blurs the image only slightly. Adjusting the Distance up a larger amount increases the amount of movement in the subject and makes the image more blurry. In the example, we increased the distance to 50 to make the runner look like he's moving faster.
Click the OK button to apply the Motion Blur filter to the image.
In the final image in Figure 14.16, notice that the runner now looks like he's moving quickly while the background remains stationary.

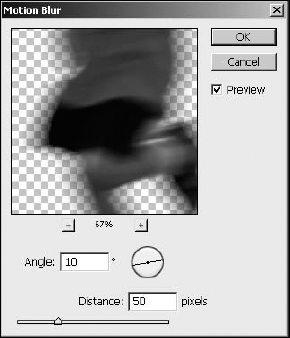
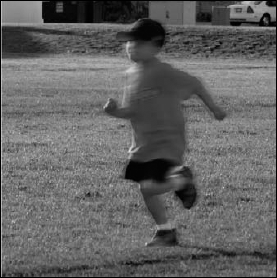
Figure 14.16. Adding a Motion Blur filter to an image can give the appearance that an object is in motion or, in this case, in faster motion than the original image.
Note
The project file used to create the image shown in Figure 14.16 can be found on this book's Web site as Figure 14-16.psd. You can open it in Photoshop to see the effects of the Motion Blur filter.
The Radial Blur filter allows you to add blurs that radiate outward from a center point. To apply a Radial Blur, select Filter
Amount: Specifies the amount of blur to apply to the layer.
Spin: Gives the image the illusion that it is spinning in a circular motion.
Zoom: Blurs the edges of the image a greater amount than the center, creating the illusion that the image is moving rapidly toward or away from the viewer.
Quality: Allows you to specify either Draft, Good, or Best. The better the quality, the better the results look; however, the Radial Blur filter takes lots of processing power, so you should try it out in Draft mode first and then increase the quality after you get the desired results.
Blur Center: Allows you to drag the center of the blur to any location in the image. The lines show the amount of blurring that will take place.

Note
The project file used to create the image shown in Figure 14.17 can be found on this book's Web site as Figure 14-17.psd. You can open it in Photoshop to see the effects of the Radial Blur filter and play around with the direction and amount of the blur.
The Surface Blur filter is the opposite of the Blur and Blur More filters. Rather than softening the edges, the Surface Blur works by softening the midtones, leaving the edges sharp and crisp. This is perfect for smoothing out slight imperfections or noise in an image without losing the crispness of the file.
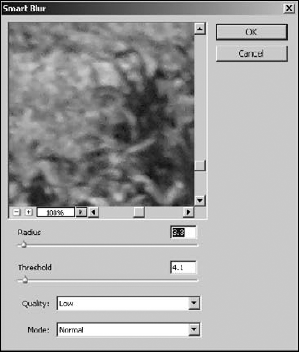
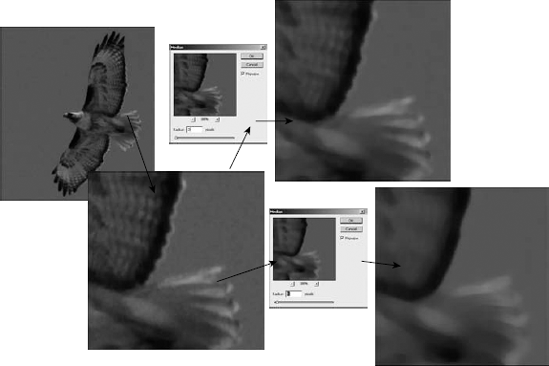
The Smart Blur allows you to blur with more precision using radius and threshold settings that allow you to specify the number of pixels involved and what the difference in the pixels should be before the filter is applied to them. To apply a Smart Blur, select Filter
Radius: Specifies the area of pixels searched to determine whether a pixel is dissimilar to its neighbors and should be blurred.
Threshold: Specifies the amount of dissimilarity a pixel must have with its neighbors before it is considered dissimilar.
Quality: Allows you to specify either a Low, Medium, or High quality. The better the quality, the better the results look; however, the Smart Blur filter takes lots of processing power, so you should try it out in Low mode first and then increase the quality after you get the desired results.
Mode: Allows you to specify a Normal, Edge Only, or Overlay Edge blur. The Normal setting gives you basic blurring results. The Edge Only setting turns the image entirely black and creates white edges. The Overlay Edge overlays the edges in the image with white.
The Lens Blur is by far the most advanced Blur filter available. It includes a very involved dialog box that allows you to change the field of depth to the specular highlights of your image. The whole point of the Lens Blur is to allow you to blur parts of your image while leaving other areas in sharp focus.
The Lens Blur dialog box shows a full preview of your image by default. Because the changes you make probably affect different areas of your image differently, you can see the effects your changes have on your full image. Because the precise changes made by the Lens Blur can take time, you have the option of choosing between a faster or more accurate preview. The following sections discuss the adjustments that can be made in the Lens Blur dialog box shown in Figure 14.19.
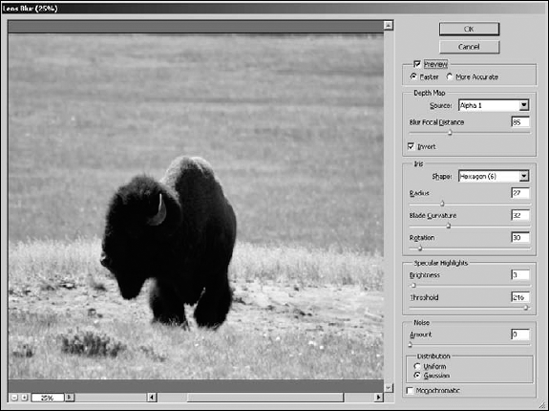
The preview for the lens blur is very big and can be slow when rendering large images. To help out, Photoshop provides the Faster and More Accurate options. The faster preview renders more quickly but is less like the actual filter than the more accurate setting. Which option you use is entirely dependent on whether you have time to wait or not.
An image or video file in Photoshop is just a pixel map. Photoshop can't determine which areas of an image should be in focus and which shouldn't be, unless you show it. Setting the Depth Map tells Photoshop which pixels to keep sharp and which ones to blur. You can create a Depth Map in several ways. Selecting None from the Source drop-down blurs the pixels in your image indiscriminately. Choosing Transparency blurs the pixels based on their Transparency values. If you select Layer Mask, the blurring is based on the grayscale values in the layer mask. If you create a gradient layer mask, for example, the lighter areas of the gradient are less blurry than the darker areas.
The best way to create a Depth Map is to create and load an alpha channel. (See Chapter 11 for more information on creating an alpha channel.) The dark areas of the alpha channel are treated as the foreground of the image, and the light areas are treated as the background. Figure 14.20 shows an alpha channel that matches the shape of the bison in the Lens Blur dialog box (refer to Figure 14.19). When you've created an alpha channel, it appears in the Source drop-down menu, and you can use it to determine which pixels are blurred. Click anywhere on your image to choose the pixel brightness that determines which areas of your picture stay in focus.

If you select a source other than None, you can choose the focal distance of the blur by adjusting the slider. As the focal distance changes, the area inside of the alpha channel becomes sharper and the area outside the alpha channel becomes more blurred. You also can invert the effects on the respective parts of the alpha channel by selecting the Invert option.
The Iris determines the size and shape of the aperture of a camera. The Iris settings in this dialog box allow you to simulate the different types of irises found in different cameras. The Iris setting allows you to change the following options:
Shape: Allows you to specify the shape of the iris in terms of number of blades from 3 to 8.
Radius: Determines the number of pixels sampled to create the blur effect.
Blade Curvature: Specifies the curvature of the blade in a range between 0 and 100. The curvature of the blade affects the amount of blurring around the edges in the image.
Rotation: Specifies the rotation of the Iris in degrees. This allows you to apply the filter at different rotations that affect the results of the blur.
When you blur a photograph using a mathematical formula, your whitest whites tend to dissipate and get replaced with duller tones. This would never happen in a real photo, no matter how blurry it became. You can readjust the whites in your image by using the following settings to add Specular Highlights:
Noise is found in a true photograph, even a blurry one. To create a more realistic blur, you can add noise to your image using the following settings:
Amount: Specifies the amount of noise to add when blurring.
Uniform: Adds noise uniformly to the image in a linear fashion, so the effect is consistent.
Gaussian: Adds noise based on the amount of sharpening or blurring occurring in the pixels. The Gaussian effect appears more natural but does occasionally create some artifacts in the image.
Monochromatic: Adds noise as gray instead of based on the color of the surrounding pixels. This can appear more natural, but the overall effect is typically better by not selecting this option.
Noise results from any pixels in the image that don't belong. Types of noise include things such as excessive grain, pixelization, and half-toning. Excessive grain can be caused by low lighting, high ISO settings, and even by some adjustments in Photoshop. Pixelization is artifacts left over when an image is resampled to a higher resolution, rotated, or transformed in other ways. Half-toning is an artifact most commonly generated when a scan is made of a printed image.
The two basic types of noise are color (chroma) noise and luminance noise. Color noise manifests itself as colored artifacts that don't match the image and become more apparent the farther you zoom in on the image. Typically, color noise is more visible in one color channel than the others. Luminance noise manifests itself as bright gray pixels, such as grainy images or halos.
Reducing noise and removing dust and scratches can improve the look of images. This section discusses some of the methods of reducing noise in images using the noise filters found in the Filter
The Despeckle filter is much like the Surface Blur. It detects the edges in your image by finding high contrast areas and blurs the areas in between the edges, reducing the overall noise in the image. The Despeckle filter is applied to the image or layer by selecting Filter
The Despeckle filter has no dialog box to control the amount of blurring that takes place, so it is fairly limited in what it can do. However, you can apply the Despeckle filter as many times as you want to the image. Each time you apply the Despeckle filter, more smoothing occurs.
The Median filter removes noise from the images by searching the radius of each pixel to find pixels that are a similar brightness. If it finds pixels that are different from their surrounding pixels, it replaces them with a pixel value that is determined by the median brightness value of the pixels around it. Pixels that vary too much from the rest of the neighboring pixels are ignored when calculating the median, so they don't skew the median value.
The Median filter allows you to specify the radius of the area to use when calculating the median. The best value of the radius varies depending on the variance of pixels in the image. You can use a higher radius value for images that contain little variance.
To add a Median filter to an image, select Filter
You can reduce the imperfections in your video file by choosing Filter
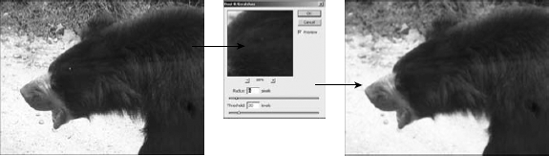
Figure 14.22. Getting a good result from the Dust & Scratches Filter is a balancing act between the Radius and Threshold settings.
Note
Using the Clone and Heal tools is usually a much better method of removing dust and scratches from images. We discuss the Clone and Heal tools in much more detail in Chapter 15.
The Reduce Noise filter provides the most flexibility of all the Noise filters. The different settings in the Reduce Noise dialog box help you customize the Reduce Noise filter to best match the needs of each specific image.
To use the Reduce Noise filter, choose Filter
Basic/Advanced: Toggles between Basic and Advanced modes. In Basic mode, you change the settings for all channels at once. In Advanced mode, you adjust settings to reduce noise in each channel individually.
Presets: The drop-down menu allows you to select the default option or one of the previously saved presets. Presets can be saved by clicking the Save button and deleted by clicking the Trashcan button.
Strength: Specifies the amount to reduce the luminance noise in the image when the filter is applied by increasing or decreasing the intensity of the overall noise reduction.
Preserve Details: Specifies the percentage of detail that must be preserved. To reduce noise, you must sacrifice some detail lost. Use this setting to make certain you maintain at least the minimum amount of detail in the image. Typically, you should set this option at least 60% or higher.
Reduce Color Noise: Specifies the percentage of color noise to remove from the image. If this value is set too high, Photoshop has a hard time distinguishing between color noise artifacts and simple variations in the image. This option is necessary only if color noise exists in the image.
Sharpen Details: Specifies the percentage of detail to try to gain back during the filter process. This is a great feature in the Reduce Noise tool. Noise reduction is done by blurring and results in lost detail. This option specifies the amount of sharpening to take place after the blurring to get back some of that lost detail. Be careful not to set this value too high or you introduce new noise into the image.
Remove JPEG Artifact: Causes the Reduce Noise filter to reduce the blocky image artifacts and halos that can be created when a JPEG file is resampled and then saved again.
Per Channel: Allows you to select specific color channels so you can individually customize the Strength and Preserve Details options differently for each color channel.
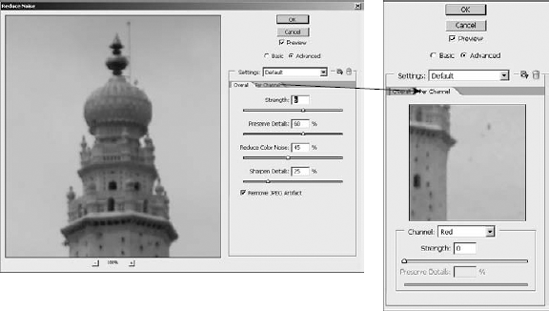
Figure 14.23. The Reduce Noise dialog box allows you to balance the strength of the noise reduction with preserving detail. You also can fine-tune the noise reduction based on color channel.
Tip
Removing the noise blurs your picture. Photoshop built the Sharpen Details setting into this feature to counteract that. You can use this setting or use a more powerful sharpening filter after you have reduced the noise.

Using the Photoshop filters allows you to correct problems with blurriness or noise in images and make adjustments to soften harsh areas of a photo. This chapter discussed using the sharpening filters to fix blurry images and enhance edges, blurring filters to apply softening effects, and noise reduction filters to remove noise and unwanted artifacts from images.
In this chapter, you learned about these things:
The Smart Sharpen filter allows you to fine-tune the sharpening effect to match the type of blurring problems in the photo.
Using an Unsharp Mask filter can add missing detail in an image.
Applying a blurring filter to the background of a photo softens the overall appearance of the image.
Using Motion Blur can make an object in a photo appear in motion.
Applying a noise reduction filter removes unwanted noise from images.
How to remove dust and scratches from damaged images.
How to remove the JPEG artifacts caused by the compression algorithm used when saving JPEG images multiple times.