
Most of the filters in Photoshop are just for fun. They don't correct lighting or color, take out unwanted elements, or even change your photo into a black and white image—all fixes that are common to a photo correction workflow. Instead, they add fun, artistic elements to your photo, making it look like a watercolor painting, a stained-glass window, or an image embossed into metal.
Many of these filters are added to an image using the Filter Gallery, a tool that allows you to preview the filter effect, change the filter settings, and add multiple filters at once. Other filters must be added using the Filter menu.
Most of the filters can be added as Smart Filters that are non-destructive and editable. Understanding Smart Filters and how they work gives you the flexibility to add multiple filters, change the order they are applied, edit their settings, create a blending option for the filter (an option you don't have in any other way), disable their effects, or delete them.
In this chapter, I focus on the fun, artistic filters as I show you how to use these powerful tools to add them to an image and modify their effects. With dozens of creative filters that can be combined, modified, and customized, the possibilities are endless.
Most of the filters create artistic effects; they take your image and change it in a way that enhances its artistic value, at least for the project you are working on. These filters take a photograph and make it look like everything from a painting to a rubber stamp. These filters are divided into categories based on their relative properties and are found in the Filter menu. This is a comprehensive list of the artistic effects filters and what they do.
Note
This list doesn't include the corrective filters—namely the Sharpen, Blur, Noise, and Lens Correction filters, which are covered in Chapter 14. Liquify is covered in Chapter 19. The Video filters are covered in Chapter 26. Vanishing Point is covered in Chapter 24.
These filters replicate effects that are usually achieved by hand rather than digitally. Although they don't always do a realistic job of this, they sure give freehand-challenged artists like me options for creating drawing effects. All these options are available in the Filter Gallery:
Colored Pencil: This filter makes your image look as if the hard edges have been sketched using a colored pencil. This effect uses your background color as the color of the paper, so if your background is the default, you may get an image that is more gray than colorful. Change it to white or any other color to change the look.
Cutout: Like a mosaic made from cut paper, this effect makes your image look as if it has been constructed of roughly cut paper.
Dry Brush: This filter makes your image look as if it was painted using a dry brush technique. This filter is subtle, although it reduces the colors in your image.
Film Grain: This filter adds a grainy look to your image by blending the shadows and midtones.
Fresco: This filter creates a rough image that mimics coarsely applied paint.
Neon Glow: This filter uses your foreground color and mixes it with a specified glow color to create a glow and soften your image.
Paint Daubs: This filter lets you choose from several brushes to create a painting from your image. The brush used and the settings applied can make your image range from a slightly softer look to an impressionistic look.
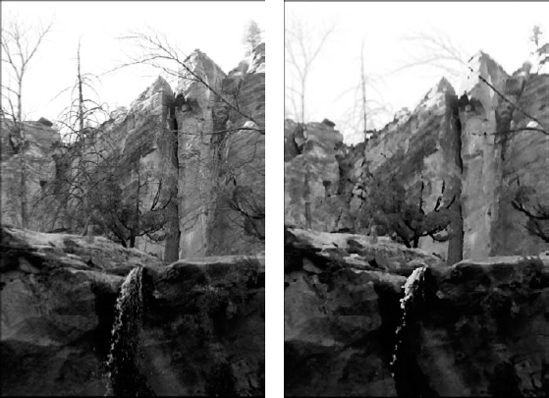
Palette Knife: This filter smoothes your image and introduces texture that simulates the canvas underneath. You can see an example of the Palette Knife effect in Figure 20.1.
Plastic Wrap: This filter makes your image look as if it's been embossed and shrink-wrapped.
Poster Edges: This filter introduces banding in your image by significantly reducing the colors and creates black strokes along the harder edges of your image.
Rough Pastels: This filter simulates a drawing made with pastel chalk. You have lots of control over the texture applied to your image in this filter, with several textures to choose from and settings that increase the dimension and light of the texture chosen.
Smudge Stick: This filter softens an image by reducing the colors and smudging them.
Sponge: This filter introduces regular patches of missing color, as if the painting had been sponged while it was still wet.
Underpainting: This is another filter primarily for adding texture, although you can make a significant difference to the look by adjusting the brush strokes as well. It simulates painting your image over a textured background (the underpainting) and then reapplying the image over the top.
Watercolor: This filter simulates your image being painted with watercolors, giving it a soft, muted look. You can add contrast by increasing the shadow intensity.
The Brush Strokes filters make your image look different by changing the way the brush strokes are applied to it. Just like the Artistic effects, these effects are meant to mimic fine art:
Accented Edges: This filter adds highlights or shadows to the edges of your image, accentuating them and giving your image ultra-sharp edges while smoothing out the other areas.
Angled Strokes: This filter creates the impression that your image is painted using diagonal strokes. The lighter strokes are painted in a different direction than the darker strokes, creating a crosshatched appearance in areas of high contrast.
Crosshatch: This filter adds a crosshatch texture to your image. This effect creates a cleaner look than the angled strokes because the crosshatches are kept within the bounds of the colors contained in your image.
Dark Strokes: This effect creates more detail and darkness in the dark areas of your image because it creates short, tight strokes in those areas. It also softens the lighter areas in your image by using long, white strokes.
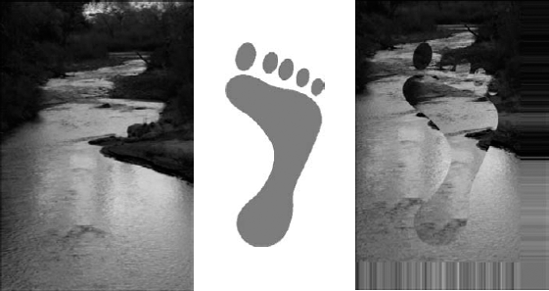
Ink Outlines: This filter simulates a picture drawn with ink, giving your image a contrasty, textured look. You can see an image before and after Ink Outlines has been applied to it in Figure 20.2.
Spatter: This filter gives your image the look of a painting that was created using a spatter airbrush, including lots of splotches and texture.
Sprayed Strokes: This effect is very subtle, especially if your image is high resolution. It simulates the effect of having your image painted by making strokes with a spray brush. You can determine which direction you want the strokes to run.
Sumi-e: In true Japanese style, the Sumi-e effect simulates a painting on rice paper using a heavily saturated brush. The end result is a rich painting with deep shadows.

The Distort filters change the way your image looks by reshaping it in different ways. Most of these filters are not available in the Filter Gallery simply because the dialog boxes have more intensive settings than the other filters. You can find the Diffuse Glow, Glass, and Ocean Ripple filters in the Filter Gallery. Here's what the Distort filters do:
Diffuse Glow: This filter is great for creating the effect of an image taken with a soft diffusion filter popular with portrait and wedding photography. The effect is a soft, ethereal look.
Displace: For this filter, you need an image to specify as a displacement map. Any PSD will do. The Displace filter use the hard edges in the image specified to warp your original image around, as shown in Figure 20.3. Although I used a simple shape in this figure, you should try using another image just for fun. The results are interesting.
Glass: You can make your image look as if it's being viewed through glass with this filter. Several settings simulate all different types of glass.
Ocean Ripple: This filter gives your image the illusion that it is being viewed through water.
Pinch: A mini-warp or liquify, this filter creates only one kind of distortion—a pinch to the center of your image that either pinches it in or bubbles it out.
Polar Coordinates: The idea behind this very interesting-looking filter is that after it has been applied, you can place the resulting image in a mirrored cylinder to create a cylinder anamorphosis. When you look into the cylinder, the image appears not only undistorted but in 3D. If you happen to have a mirrored cylinder handy, you can see if it works with Figure 20.4.
Note
For some very interesting information on the cylinder anamorphosis art form, look up anamorphosis on Wikipedia.
Ripple: Like disturbing water in the middle of a pond, you can create ripples in your image using this filter.
Shear: This filter allows you to distort your image using a curve.
Spherize: This filter wraps an image around a sphere, giving it a 3D effect.
Twirl: This filter twists an image around a point in the center of your image. You can choose how far to twist and in what direction.
Wave: Just as if the surface of your image were the surface of a swimming pool, you can create waves in it with several controls that let you customize a specific look. The results are similar to the Ripple filter, but you have much more control over the results using the wave settings.
ZigZag: This filter creates zigzag waves in an image starting in the center and gradually decreasing as the effect moves outward.

The Pixelate filters are filters that create different types of pixilation in your file. The dialog boxes are simple, focusing on the size of the pixilation. Some of the filters, such as the Fragment filter, don't have a dialog box at all. None of these filters are in the Filter Gallery. Here's what you can expect from the Pixelate filters:
Color Halftone: This filter takes each color channel, divides it into rectangles, and changes the rectangles into circles. The effect is similar to watching an old television set where the colored pixels were easy to pick out, except the pixels are round in this case.
Crystallize: This filter combines several adjoining pixels together to create hard-edge polygon shapes reminiscent of crystal formations.
Facet: This filter combines pixels in the same area to soften the look of the image.
Fragment: This filter adds texture to an image by averaging adjoining pixels and then offsetting them from one another. The Facet and Fragment filters don't have dialog boxes but work with a set number of pixels. This means that if your images are high resolution, you probably won't see a distinct difference when using either one of these filters.
Mezzotint: This filter can create a very cool color effect by creating strokes that are randomly assigned to be black, white, or a fully saturated color. The effect is an almost Art Deco effect that can really make your image pop. Although the resulting image is distinctly uninspiring in grayscale, you can see the dialog box in Figure 20.5.
Mosaic: This filter makes your image look as if it were created from square tiles of pixels. You can determine the number of pixels that are grouped into each tile, which makes it possible to create a visible effect with a high-resolution image.
Pointillize: With this filter, you can turn your image into a painting that looks like it could have been created by George Seurat. This filter creates solid color points throughout your image.

The Render filters range from the simple Clouds filter that creates clouds from the foreground and background colors without any input from the user, to creating a Lighting Effects filter that can require detailed input. These filters are not in the Filter Gallery.
Clouds: This filter uses the foreground and background colors in a blend that resembles blotches more than clouds. You want to create a new layer on which to create the clouds, because the effect replaces anything that was on the layer before the clouds were rendered.
Difference Clouds: This filter creates clouds using the foreground and background colors just like the Clouds filter and then blends them with the existing pixels using the Difference Blend mode. This filter can be applied multiple times for a different effect each time.
Fibers: This filter creates streaks of color from the foreground and background colors that intermix to resemble fibers. This filter also replaces the pixels on the selected layer.
Tip
Not only can filters be added on top of one another to create unique effects, filters such as clouds and fibers, which can be placed on their own layer, can be used with the Blend modes to create unique effects on the layers beneath them.
Lens Flare: This filter does a pretty good job of creating a realistic lens flare in your image. You can choose one of several flares and place it anywhere in your image.
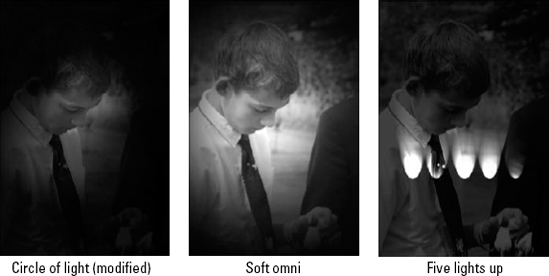
Lighting Effects: This filter adds unlimited lighting effects to your image to create dramatic results. You can create several lights, place them anywhere in your image, and change their properties so they resemble different types of light from spotlights to gel lights. Several presets are previewed for you in Figure 20.6. You also can create your own lighting effects and save them as additional presets.
The Sketch filters use the edges in an image to create texture, giving the image a rough, hand-drawn look in many instances. Many of these filters reduce your image to two or three colors, so simple images with a few distinct lines look better than images that have more detail. Keep an eye on your foreground and background colors (found in the Toolbox), because they are used to create most of the effects found in this menu. All of these filters are applied using the Filter Gallery:
Bas Relief: This filter creates a low-relief carving of your image using the foreground and background colors.
Chalk & Charcoal: This filter changes the background to a basic gray and roughly draws the highlights and midtone areas of your image in chalk that is the same color as the background. Using the foreground color as charcoal, the shadows are filled in. The right foreground and background colors are vital to achieving an aesthetically pleasing result.
Charcoal: This filter is made up of basically two colors with very little variance between them; the foreground color becomes rough charcoal strokes that trace major edges and fill in the midtones. The background color becomes the color of the paper.
Chrome: This filter gives your image a liquid metal look, as if it had been embossed in chrome, but with very smooth edges. Figure 20.7 gives an example of an image of a rose rendered in chrome.
Conté Crayon: Conté crayons are made from a mix of clay and natural coloring agents such as iron oxide and charcoal; they are square and used to create rough, boldly lined sketches on rough paper. The Conté Crayon filter uses the foreground color to fill in the darker areas of your image and the background color for lighter areas. Because Conté crayons are usually black, sepia, or sanguine-colored, using these colors for your foreground and background creates a truer effect.
Graphic Pen: This filter reduces your image to two colors: the pen, which uses the foreground color to create fine, linear strokes to bring out the detail of an image, and the background color, which is used for the paper.
Halftone Pattern: This filter simulates the effect of using a halftone screen, adding a specified texture to your image and again reducing it to a blend of your foreground and background colors. It can have a subtle texture or a very marked one, depending on the settings.
Note Paper: Similar to the Cutout filter, this filter creates an image that looks like it was constructed of handmade paper. Unlike the Cutout filter, it uses the foreground and background colors to determine the color of paper used, again creating an image from two colors.
Photocopy: This filter simulates a rough photocopy of your image, using the foreground and background colors as the paper color and toner.
Plaster: This filter simulates a plaster cast, smoothing the edges of your image and using the foreground and background color to give the image a 3D effect.
Reticulation: This filter creates a grain over your image after reducing it to the foreground and background colors. This adds more texture and dimension.
Stamp: This filter gives the impression that your image has been applied with a rubber or wooden stamp, with the foreground color as the paper and the background color as the ink that the stamp has been dipped in. Images with simple lines make the best stamps.
Torn Edges: This filter is similar to the Note Paper filter, but it doesn't contain the texture that simulates the handmade paper in the Note Paper filter. Instead, the effect of this filter is very smooth.
Water Paper: This filter uses the colors in your image and "waters them down" to make your image look softer.

The Stylize filters work primarily by using the edges in your images to create interesting 3D effects from embossing to using the Extrude filter to make your image look like it was created with building blocks. Other Stylize filters mix up the pixels in your image to look like they've been diffused or hit by a high wind. Here's what you can expect:
Diffuse: This filter softens the focus of your image by scattering pixels in a miniscule style. This effect is hardly noticeable on high-resolution photos, because no setting allows you to increase the amount of diffusion. Instead, you get a different kind of blurring filter.
Emboss: This filter gives your image the look of having been pressed or embossed onto a gray sheet of paper. This filter uses the image colors for the raised outlines, giving this effect the look of a unique piece of art.
Extrude: This filter makes your image look as if it were constructed of building blocks and you are looking down at it from the top. Using pyramids for your extrusion method gives your image a more impressionistic feel than using blocks, as you can see in Figure 20.8.
Find Edges: This simple filter doesn't use a dialog box; it simply finds the edges of your image and places them on a white background. It is not only useful for finding edges in your image, but because it uses the image colors for the edges, it is a beautiful effect all on its own.
Glowing Edges: This is the only Stylize filter found in the Filter Gallery. It finds the edges of your image and applies a neon glow to them on a black background. You can increase the effects of this filter by applying it more than once.
Solarize: This filter blends a negative image and a positive image to create an interesting dreamlike image made up of the correct colors blended with the eerie negative colors.
Tiles: This filter makes an image look like it was made of large, square tiles.
Trace Contour: This filter creates a contour map effect by tracing a brightness transition in each of the color channels.
Wind: This filter simulates your image being hit by wind while the paint was still wet. Several settings allow you to customize the wind-blown look.

The Texture filters create heavy, very obvious, texture effects. Most of these filters are self-explanatory. They can all be previewed in the Filter Gallery:
Craquelure: This filter simulates an image painted on cracking plaster.
Grain: Ten different types of grain can be added to your image to create texture. Some of these grain types, such as Soft, create a muted look. Others, such as Vertical, change the look of your image dramatically.
Mosaic Tiles: This filter creates an image that looks as if it were created with irregular-shaped tiles with grout between them.
Patchwork: This filter simulates a patchwork quilt by creating squares that are solid colors and giving them the illusion of depth.
Stained Glass: This filter breaks an image into glass cells, with a lead border between them made up of the foreground color and a light source to give it the illusion that it is backlit. It can create a beautiful effect, as seen in Figure 20.9.
Texturizer: This filter applies one of four basic textures to your image: brick, burlap, canvas, or sandstone. You can choose several settings for each, customizing the size and depth.

These filters do all sorts of different things, which is why they got lumped into the catchall "Other" category:
Custom: You can create your own custom filter. I show you how to do this later in this chapter.
High Pass: This filter removes low-frequency detail in an image, retaining the edges and smoothing the other areas into a medium gray color. It is commonly used in conjunction with other filters or adjustments to apply sharpness to an image or to delineate the edges for a continuous-tone filter or image. For instance, many of the Sketch filters use only two colors. Figure 20.10 is an example of an image with the Note Paper filter applied to it both before and after applying the High Pass filter.
Maximum and Minimum: These filters affect black and white areas in your image. The Maximum filter spreads the white areas and reduces the black areas in an image; Minimum does the opposite. Although these filters are used mainly to modify masks, they can have a unique effect on images as well, giving them either a bright or dark impressionistic look.
Offset: This filter is used with an image that has a selection created over it. It has the effect of moving the selection a specified amount within the image and replacing the moved pixels with transparent pixels, repeating edge pixels, or wraparound pixels. If no selection is created in the image, the entire image is offset.

The Filter Gallery contains many of the artistic filters that are available in Photoshop. It is an incredibly useful tool because it provides the capability to preview the filters, change their settings, and add multiple filters to the same image before closing it.
To open the Filter Gallery, as shown in Figure 20.11, choose Filter
The Filter Gallery contains three panes: the preview pane, the filter thumbnail pane, and the options pane.
The left pane contains a preview of your image, showing you what it will look like after the filter or filters added to it are applied. You can move your image around inside the preview pane by using the hand (displayed whenever you hover over your image) to drag it around.
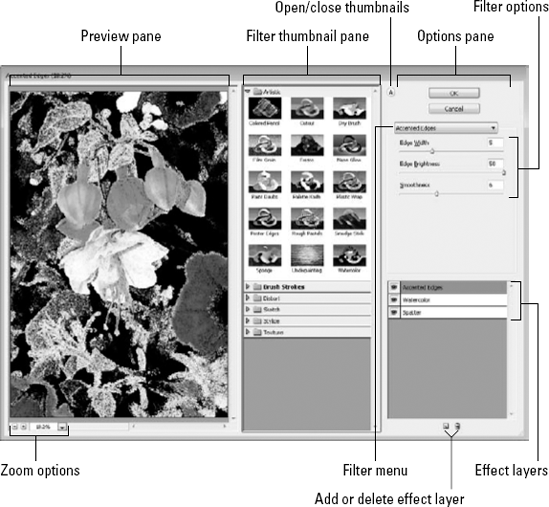
Figure 20.11. The Filter Gallery is like the filter fun house for images, containing a good portion of the artistic filters available in Photoshop.
You can zoom in or out of your image using the + or − buttons at the bottom left of the preview pane or use the drop-down menu to choose a zoom percentage. If you choose Fit in View from the zoom options, your document is resized to fit into the preview pane. If you choose Fit on Screen, the Filter Gallery is resized to fit your entire screen and the image is then resized to fit into the preview pane, giving you the largest possible view of your entire image.
The central window of the Filter Gallery contains the folders for the filter. Click the triangle next to each folder to display thumbnails of the effects contained in the Filter Gallery. These folders correspond with the Filter menu, but they are not comprehensive; they leave out the corrective filters as well as some of the artistic filters that either require no input or require more specialized input than is available in the Filter Gallery.
Each of the thumbnails of the individual filters found in the filter thumbnail pane demonstrates a basic preview of what the filter does. As you click each, the image in the preview pane also takes on the characteristics of the selected filter.
Note
Most of the filters in the Filter Gallery are memory-intensive and take a few seconds to preview, especially if you have more than one applied.
You can close and reopen the filter thumbnail pane by clicking the double-arrow icon in the options pane. Closing the filter thumbnail pane makes your preview pane larger and gives you a better view of your image. You can still choose filters from the drop-down filter selection menu in the options pane.
The last window in the Filter Gallery contains the settings for the selected filter. Beneath the OK and Cancel buttons is a drop-down list that contains all the filters in the Filter Gallery. Whether you use this list or click the filter thumbnails, the options for the selected filter are displayed, and you can make changes to the way the filter is applied to your image, sometimes with dramatic results.
Back in Figure 20.11, three filters are applied to my image preview. Each is listed in the order it is applied, the most recent filter on top. You can create a new filter effect layer by clicking the icon at the bottom of the third window labeled New Effect layer. When you have more than one, you can change the order in which they are applied by dragging and dropping them in a different order, as seen in Figure 20.12. To see what the preview would look like without one of the filters, just toggle the eye off, and the visibility of that filter is turned off.
Note
If you opened the Filter Gallery using Filter

Applying filters directly to your images changes the actual pixel values and modifies the original data. Although you can use the History option to get back to the original state, after you save your file, those pixels have been altered beyond recovery. Additionally, you may need to try several filter methods and sometimes combinations of filters to get the adjustment you are looking for, which is hard to do when you are trying to apply more than one filter, especially if some of your filters are not found in the Filter Gallery.
That is where Smart Objects can make a huge difference. When you apply a filter to a Smart Object, it is applied as a Smart Filter that can be turned on and off, adjusted, reordered, and easily removed without destroying the underlying pixel data.
The best way to apply filters to images in a non-destructive way is to create a duplicate layer of the background and then turn that layer into a Smart Object. You also can simply turn the background layer into a Smart Object layer, but if you keep the background layer around, you can always create a new duplicate layer later to try another set of Smart Filters on. Use these steps to create a duplicate of the background layer and then apply Smart Filters to it:
Open the image in Photoshop.
Right-click the background layer, and select Duplicate Layer from the pop-up menu shown in Figure 20.13.
This displays the Duplicate Layer dialog box.
Name the layer in the Duplicate Layer dialog box, shown in Figure 20.13, and click OK to create the layer.
The new layer is added to the Layers panel.
Right-click the new layer, and select Convert to Smart Object from the pop-up menu shown in Figure 20.14.
The layer is converted to a Smart Object, and the layer thumbnail includes a Smart Object icon as shown in Figure 20.14.
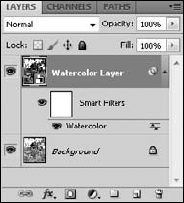
Select Filter

The Watercolor filter is applied as a Smart Filter to the Smart Object, as shown in Figure 20.15.
Select Filter
The Accented Edges filter is applied as a Smart Filter above the Watercolor filter, as shown in Figure 20.16.
Drag and drop the Accented Edges filter below the Watercolor filter to change the look of your image, as shown in Figure 20.17.
Make other changes to your filters as you desire by right-click any Smart Filter to display the menu shown in Figure 20.18.
You can choose any of these menu options, or you can perform these functions by doing the following: Edit the filter settings by double-clicking the filter name. Double-click the Blending Options icon (to the right of the filter name) to change the Blend mode of that filter over your image. You also can disable the filter by clicking the "eye"-con. Or you can delete the filter entirely by dragging the filter to the trash icon.


One of the most powerful filters Photoshop provides is the Custom filter. The Custom filter gives you the ability to define most of the behavior of Photoshop's filter algorithms. Most of Photoshop's filtering algorithms work by focusing on one pixel at a time. Photoshop evaluates the color/brightness of the surrounding pixels and uses various algorithms to calculate what the new color/brightness of the current pixel should be. Then the algorithm moves to the other pixels until it has filtered every pixel in the image.
Note
Many of Photoshop's filtering algorithms apply multiple filtering effects and even additional algorithms that are not available through the Custom filter. You can get some pretty good results with the Custom filter, but you cannot duplicate the results you can get in some of the other filters in Photoshop.
Applying a Custom filter is done by selecting Filter
In addition to the weight for neighboring pixels, you can specify scale and offset values:
Scale: The Scale value allows you to control the weight ratio between the center pixel and the surrounding pixels. Photoshop reduces the resulting pixel value by dividing it by the value of the scale. This allows you to apply filters that scale pixel values out of the 0–255 range by scaling them back in.
Offset: The Offset value allows you to give an overall offset in brightness that is applied to the resulting pixel. Increasing the offset can compensate filters that tend to make the image too dark; decreasing the offset can compensate for filters that make the image too light.

Figure 20.19. Using the Custom dialog box in Photoshop allows you to define filters by setting weights for surrounding pixels, a scale value, and an offset value.
Here's how it all works. Photoshop selects a pixel, multiplies it by the center value in the Custom filter, takes the surrounding pixels defined in the Custom filter, and multiplies them by the corresponding values. Then it adds them all up, divides by the scale, and adds the offset to that number.
This might be a bit confusing at first, but look at the example filter shown in Figure 20.19; consider a pixel with the value of 100, one pixel up is 200, one pixel down is 200, one pixel left is 150, and one pixel right is 150. This equation is used to calculate the value that replaces the current pixel:
(100×10+200×−1+200×−1+150×−1+150×−1)/5 + 0 = 60
Tip
A good rule of thumb when creating Custom filters is to try to make the value of the equation equal 1 if all of the pixel values are set to 1. From there, you can tweak the values a bit and use the offset to adjust any major problems.
As you play around with the Custom filter tool, you start to realize the limitless possibilities of filters you can create with it. The following are some examples of different types of filters that can be created with the Custom filter tool shown in Figure 20.20:
No Filter: Applying a value of 1 for the current pixel applies no filter.
Sharpen: Applying negative values symmetrically to the surrounding pixels and a positive value to the current pixel sharpens the image.
Blur: Applying positive values symmetrically to the surrounding pixels and a positive value to the current pixel blurs the image and removes dust.
Directional Blur: Applying positive values in only one direction to the surrounding pixels and a positive value to the current pixel blurs the image only in the direction of the pixel changes.
Enhance Edges: Applying positive values symmetrically to the surrounding pixels and a negative value to the current pixel enhances edges in the image.
Highlight Edges: Applying negative values symmetrically to corner pixels and a negative value to the current pixel highlights the edges in the image.
High Contrast: Applying extremely high values for both the surrounding pixels and the current pixel results in a high-contrast effect.

This chapter presented a comprehensive listing of the artistic filters and learned how to apply them through the Filter menu and the Filter Gallery. You learned more about Smart Filters and how they work to create a non-destructive sublayer on your image that can be edited, moved, or deleted. And if being able to use more than a hundred filters, add them to each other, and change their settings and blending modes doesn't give you enough options, you can use the Custom filter settings to create just the look you want. You should know how to do these things:
Find the right artistic filter to get your desired results
Use the Filter Gallery to apply a filter or multiple filters
Create a Smart Object in order to add Smart Filters