
The Healing Brush tools
Content Aware fill
The Clone Stamp
Advanced cloning techniques
Even the best photos can have common problems that keep them from being perfect: dust and scratches, unsightly backgrounds, or just the presence of an ex-boyfriend. Even the most beautiful photo models can have blemishes, bulges, or cellulite. Family pictures are only as good as the family member talking or the person with his eyes closed. The Healing Brush tools and the Clone Stamp are designed to correct these problems and make bad photos good and good photos great.
You can use these tools to create artistic effects as well, adding elements to your photos that wouldn't normally be there and blending images together seamlessly. I show you how these tools work in depth, and before you know it, your ex will be history.
I wish I had a Healing Brush that worked in real life. From acne to carpet stains, my life would sure be much easier. The idea behind the Healing Brushes is to take a flaw—such as acne, lens spots, or even unknown people—and remove it by covering it with a patch made by subtly copying and blending the surrounding areas of the image. The Healing Brushes blend the pixel information of the sampled area with the lighting, texture, and transparency information of the target area, so the finished product is an area that blends better than a straight clone. This is especially useful for areas that are similar but consist of many different tones, like a face.
The Spot Healing Brush works automatically, choosing which areas to blend. The Healing Brush tool allows you to choose which area is used to create the patch, and you can use the Patch tool to create a selection around the targeted area and preview the resulting fix. The Red Eye tool doesn't really fit in with the description of the Healing Brushes, because the patch it creates is just dark pixels, but it is a fast fix for a common photographic problem, so it is grouped in the Toolbox with the Healing Brushes.
Access the Healing Brushes, the Patch tool, and the Red Eye tool by clicking and holding the triangle at the bottom of the Toolbox icon, as shown in Figure 15.1, or by typing J (Shift+J to toggle through the tools).
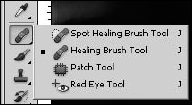
Figure 15.1. The Spot Healing Brush, the Healing Brush, the Patch tool, and the Red Eye tool are all found together in the Toolbox.
Sometimes I wonder if Adobe didn't feel like they acted too soon when they named the Magic Wand. The Quick Selection tool is definitely more magical, and the Spot Healing Brush makes things disappear faster than you can say "abracadabra!"
The Spot Healing Brush is primarily used for targeting small blemishes or spots that are surrounded by areas free of defect. Because it doesn't allow you to manually set a sample area, it's a hit-and-miss tool. When it works, it's a one-click-wonder, and when it doesn't, the results are usually extremely bruised and smudged pixels. Thank goodness for the Undo option and the History panel!
You can change options to determine how the Spot Healing Brush works by setting the Type Option in the options bar, as shown in Figure 15.2. The options are Proximity Match, Create Texture, and Content Aware.
The Spot Healing Brush, when set to its default option of Proximity Match, uses the areas in or around the targeted area to replace the target area. If these areas aren't consistent with what you want your end result to be, you can end up with a very interesting patch.
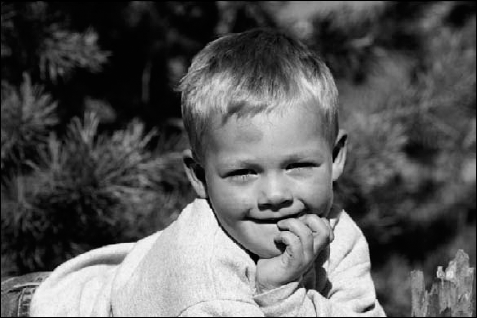
To show you what I mean, look at Figure 15.3. Cleaning the spots off this boy's nose by just clicking them with the Spot Healing Brush is easy, and presto—they disappear! Try that with the spots around his mouth, however, and you can see in the second photo that he starts to acquire an extra body part.
In areas that are surrounded by variance like this, you can use the pixels inside of the targeted area by choosing the Create Texture option to create the patch with the pixels inside of the targeted area instead of the areas outside of it. The third photo in Figure 15.3 shows the end result using this option, and it looks much better.

The Content-Aware option is new in Photoshop CS5 and actually samples multiple areas to create a patch that matches a background with distinctly different areas. Although it doesn't work with body parts very well, it seems to do a fair job with rough borders, such as the one created by the surf in Figure 15.4. You can see that the ocean and the sand were not only cloned to create the new patch, but cloned in a way that they lined up with the rest of the photo.
Using the Spot Healing Brush is as simple as using the cursor to paint over the area you want to remove from your image. Photoshop then creates a blended patch based on the options you select to cover the targeted blemish.
Note
You can find the photos shown throughout this section saved as Figure 15-3, Figure 15-4, and Figure 15.5 on the Web site. Use Figure 15.5 to follow along with the exercise.
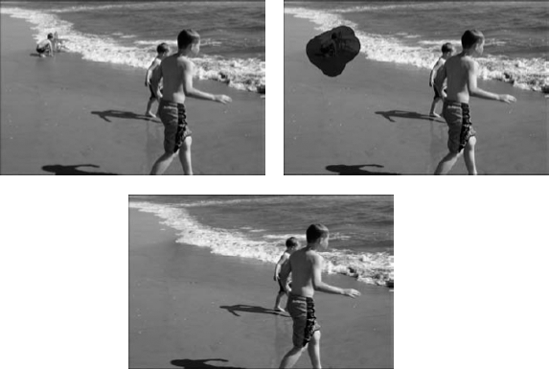
Figure 15.4. The new Content-Aware option makes easy work of taking objects out of a variegated background.
Follow these steps to use the Spot Healing Brush to correct a spot or blemish in an image:
Open an image that has one or more spots that need correcting.
Figure 15.5 is a great photo, but there is a fly in the boy's hair. Zoom closer to the blemish if you want a better view.
Click the Spot Healing Brush to select it.
Change the brush size to slightly larger than the area you want healed.
Note
If your blemished area is elongated, you can use a smaller brush size, but you must cover the blemish in one stroke by holding down the left mouse button and dragging to mark the entire blemish before releasing it so the blemish outside the stroke isn't used to heal the area inside the stroke.
Choose a healing mode from the Mode drop-down list in the options bar.
The Normal healing mode creates the blended patch that I described to you. The Replace mode works like the Clone Stamp to actually replace the selected area by copying and pasting the source exactly how it appears, not blending the pixels at all. This option is rarely a good idea with the Spot Healing Brush because you don't get to pick the replacement pixels. The other modes correspond to the blending modes and create lighter or darker versions of the patch.
Choose a Type of correction from the options bar.
For the photo in Figure 15.5, I selected Proximity Match because I want the color and texture of the surrounding hair to become the patch.
Choose Sample All Layers if you are using a second, empty layer, as shown in Figure 15.6, to make the healing changes.
Tip
Using a second layer to create changes on is always an excellent idea. It gives you a canvas to work with and erase changes from as well as leaving your original image unchanged.
Click the blemish with the Spot Healing Brush, as shown in Figure 15.7.
You can click and drag if needed to cover the entire blemish.
Photoshop processes the patch and places it. If you used the Content Aware option, this might take some time. Your results may or may not be satisfactory. Continue with the following steps to see how the Spot Healing brush works differently each time it is used.
Undo and then use the Spot Healing Brush several times over and over to see several different results.
You probably see a different result every time. In other words, if at first you don't succeed....
Make a second pass and even more if necessary.
Sometimes making two or three passes cleans up edges left by the initial pass. If the Spot Healing Brush worked, you should get results similar to Figure 15.8.

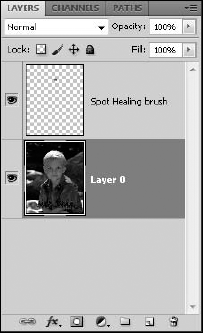


Figure 15.8. When the Spot Healing Brush works, it's almost impossible to tell that your image ever had a blemish.
If you don't get the results that you want, you can move on to the more advanced tools.
The Healing Brush tool works very similarly to the Spot Healing Brush tool, with the added feature that you get to set the sample point—choose the area where the fix comes from. For instance, Figure 15.9 could be a fantastic silhouette if the light poles in the background could be removed. As I patch over the areas where the light poles are, I want the patched areas of the sky to follow the gradient created by the setting sun rather than having the splotchy fix that would be created by the Spot Healing Brush. The Clone Stamp also would leave splotchy, unblended areas. The Healing Brush is the perfect tool.

Figure 15.9. Although you can't tell in black and white, this sky is a soft gradient blending from orange to blue. The Healing Brush is the best option for blending the light poles out of this image.
Follow along to use the Healing Brush to correct this image:
Note
Use Figure 15.9 to follow along with this exercise.
Open an image in need of the Healing Brush tool to correct it.
If necessary, change the background to a layer by double-clicking and renaming it.
Select the Healing Brush from the Toolbox, or type J (Shift+J to toggle to it if it is nested behind another tool).
Select a brush size from the options bar.
Alt/Option-click to set the sample point.
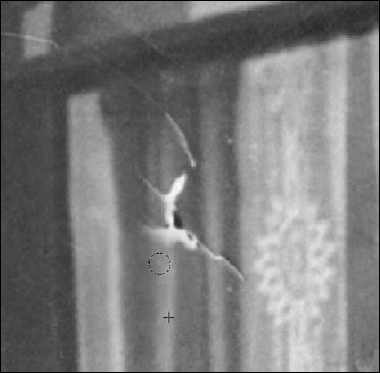
In Figure 15.10, the crosshair shows that I have chosen the clean line of sky between the light poles. You can reset the sample point as many times as you need to throughout the healing process by repeating this step.
Drag over areas that you want to be healed, as shown in Figure 15.10.
Unlike the Spot Healing Brush, you can make several passes to completely cover an area if you need to. As you drag, notice that the sample point moves along with your cursor, sampling areas in line with what you need to heal. If you have the Aligned option deselected, releasing the mouse returns the sample point to the original starting point. If Aligned is selected, the sample point remains the exact same distance from your Healing Brush tool, no matter how many times you release your mouse.
Make as many passes as necessary to clean up any dark pixels left by residue from the light poles.
When you are finished, your photo should look like Figure 15.11.

Tip
I noticed that the darker light poles were more difficult to get a clean fix on in the first pass. I used the Clone Stamp to remove the dark pixels entirely in these areas and then used the Healing Brush to blend the pixels.
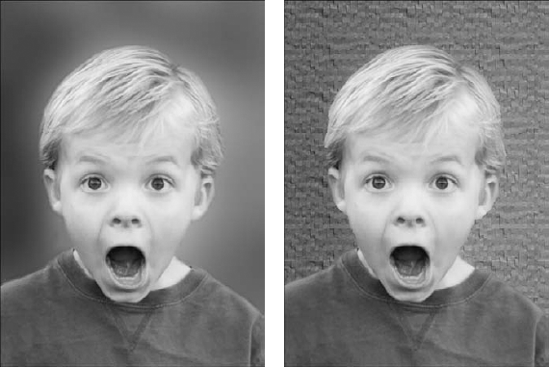
Instead of using a sampled area, you also can use a pattern with the Healing Brush tool. This fix takes the texture of the pattern you choose and adds it to the color of the area you pass the Healing Brush over. To use a pattern, choose Create Texture from the Healing Brush options bar. In Figure 15.12, I used the Healing Brush to give the background of this photo dimension.
Another benefit of the Healing Brush is that you can use the Clone Source panel to create multiple samples, sample from different files, and modify the size and rotation of the source. The Clone Source panel is an important tool in creating the best fixes with the Healing Brush or Clone Stamp, but it is an integral part of the Clone Stamp and is covered in detail in that section of this chapter.

The Patch tool allows you to heal larger areas easily and preview the target area being used. It also uses the source more strongly to completely cover the area that needs fixing, so color is not left behind as frequently as it is with the Healing and Spot Healing Brushes.
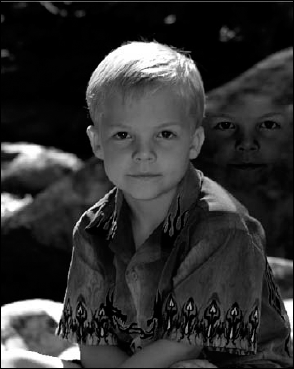
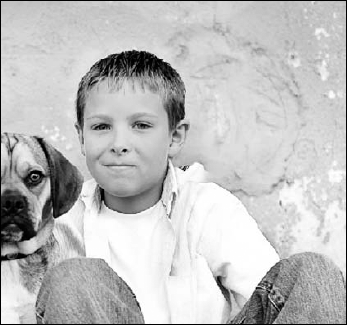
The boy in Figure 15.13 has a skinned area on his forehead that needs to be fixed. The Healing and Spot Healing Brushes leave such a big area smudged and with pink highlights. The Patch tool is ideal.
The Patch tool is extremely easy to use; follow these steps to get the best results:
Note
Use Figure 15-13 to follow along with this exercise.
Open an image that needs patched.
Select the Patch tool from the Healing Brush tools flyout in the Toolbox.
Select the Patch option from the options bar.
If you want to make a selection around the area that needs correcting, select Source. If you want to make a selection around the area you are using to correct the image, select Destination. For this example, I selected Source.
Note
If you choose Transparent in the Patch options, the patch has a transparent background and simply creates an overlay over the patched area.
Draw around the area that needs to be healed, as shown in Figure 15.14.
The Patch tool creates a selection much like the Lasso Selection tool. Draw around the area you want selected, and close the selection. You can use the Selection options in the options bar to add to or subtract from the selection, but it doesn't have to be very exact.
Note
The Patch tool uses a selection to replace the targeted area. It doesn't matter if you've used the Patch tool to create the selection. You can make a selection with any Selection tool and use the Patch tool to move and replace the selection.
Click and drag the selection over the area that you want to use to fix the patch.
The selection itself won't move, as you can see in Figure 15.15, but an identical selection shows the area you are using. Additionally, the pixels inside your original selection change to preview the fix. This preview is not the final result; after you release the mouse button, the two areas are blended to create a seamless patch.
Use Ctrl/


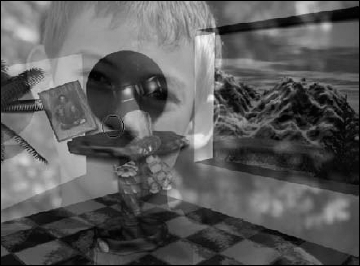
Don't get caught up in the idea that the Patch tool is only for fixes. You can create some great artistic effects very quickly using the Patch tool. Its targeting and blending capabilities make it perfect for creating fun images like the one shown in 15.16. I used the Destination option to select the face and then dragged it to the rock on the right. The entire process took less than 15 seconds!
The Content-Aware fill isn't found with the Healing tools, but it works to take unwanted elements seamlessly out of an image. The Content-Aware feature is new with Photoshop CS5 and uses an amazing new algorithm that works to fill in a selected area of a photo seamlessly in a relatively short amount of time.
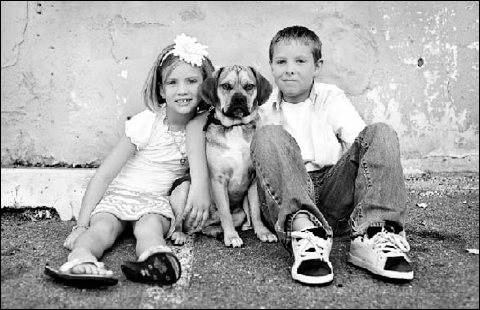
Because the Content-Aware tool works with the Selection tools, it is possible to make precise selections. For instance, the second boy in Figure 15.17 doesn't look like he wants to be in this photo. Using the Quick Selection tool, I can select areas that need to be precise, such as those bordering the first boy. I left the other areas with a rough selection on purpose so the Content Fill didn't take on the look of a silhouette.
Note
You can try using the Content-Aware fill on this image. Download Figure 15-17 from the Web site.
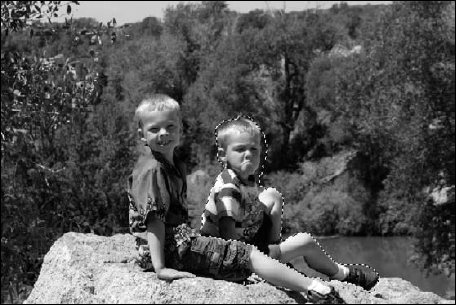
Figure 15.17. Using the Selection tools allows you to target precise areas on which to use the Content-Aware fill.
After you've made a selection in an image, choose Edit
Note
The Content-Aware algorithm is memory intensive. Large files can take several minutes and use a considerable amount of RAM. Be sure to make allowances for this.
Tip
The Content-Aware tool, much like the Healing Brushes, doesn't return the same results every time you use it. If you're not happy with the first results you get, try again.

The Red Eye tool is easy to use. Click and hold the arrow on the Healing Brush icon in the Toolbox to open the other choices, and click the Red Eye tool. Your cursor turns into a crosshair. You can adjust the pupil size and darken amounts in the options bar. Center the cursor on the eye, and click. Photoshop takes it from there, darkening the red in the targeted area, as shown in Figure 15.20.

Note
Sometimes a subject's red eyes are so washed out that it is difficult to get a good fix with the Red Eye tool. When that happens, the next step is to select the red-eye using the Elliptical Marquee. Using a Hue and Saturation adjustment, target the red in the eye and desaturate it. If that doesn't work, the last resort is to actually paint (or clone) new pixels into the eye area.
The Clone Stamp tool is the miracle worker that takes off ten pounds, performs head swaps, and adds improbable elements (like giant spiders) to ordinary photos. Knowing how to use this tool effectively gives you the power to create great images from photos that were originally so-so.
The Clone Stamp tool looks like a rubber stamp in the Toolbox, as you can see in Figure 15.21. It is nested with the Pattern Stamp tool, which allows you to brush patterns into your image and is covered in Chapter 16. The Stamp icon also opens the Clone Source panel.

Cloning is a method of copying an area from an image and painting it in the same image or a different one. This can be done to remove unwanted elements in an image or to add elements to an image. When you use the Healing Brushes to fix an image, they can leave smudgy looking areas due to over-blending. The Clone Stamp tool doesn't blend at all (except around the edges, if you choose a soft brush). Because of this, it is more precise than the Healing Brushes, but it can leave obvious edges. It is a powerful tool that takes practice and a measure of creativity.
In this section, I show you how to use the Clone Stamp tool and the Clone Source panel and provide several examples that demonstrate different ways of using the Clone Stamp and tips and tricks for creating a fantastic end result.
Just like every tool in the Toolbox, when you select the Clone Stamp, the options bar changes to display the particular options for the Clone Stamp. As you can see in Figure 15.22, they are similar to the options for the Healing Brushes, with a few added in.

Here are the options and what they do:
Tool Presets: This creates a tool preset for the Clone Stamp or loads a preset you have already created.
Brush Presets: This displays a list of Photoshop presets for the brush that will be used with the Clone Stamp. Use one of these or create your own.
Toggle Clone Source panel: Click to open or close the Clone Source panel.
Mode: This sets the blending mode for the new pixels added to your image. Using a blending mode other than normal can create some great artistic effects.
Opacity: This controls the opacity of the pixels added to your image.
Tablet pressure controls opacity: If you are using a tablet rather than a mouse, you can change the opacity based on the pressure you exert. This overrides the opacity setting.
Flow: This controls the rate at which new pixels are applied.
Enable Airbrush: When the airbrush is enabled, pixels continue to appear around the brush as long as you hold down the left mouse button, creating a pooling effect.
Aligned: When this option is selected, the Clone Source is locked with the very first brush stroke and doesn't move even when you release the mouse. This is ideal when you are cloning very specific areas, such as a face or other object that you don't want to move. If you are cloning a fix, however, and you want to reset the Clone tool every time you release the mouse button, deselect this option.
Sample: This lets you choose which layers to sample while cloning.
Ignore Adjustment layers: If you've already applied adjustment layers to your image and you don't want to add them to the cloning mix, select this option.
Table pressure controls brush size: Again, if you use a tablet, you can choose this option to let the pressure determine the brush size. This overrides the size in your brush presets.
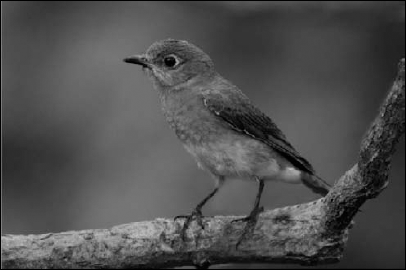
Before I show you the more advanced cloning techniques, let's start with an exercise that demonstrates the basic use of the Clone Stamp. Look at the amazing shot of a bluebird in Figure 15.23. Removing the branch in front of him makes this shot phenomenal.
Note
Can you clone out the branch? Follow along by downloading Figure 15-23.

You can use the Clone tool to erase an object from an image by following these steps:
Open an image with an area you want to change.
Click the Clone Stamp tool in the Toolbox.
Select a brush from the options bar.
A soft brush usually works best for blending in edges.
Place the cursor over an area that you want to clone.
It's usually better to choose an area that's as close as possible to the area being fixed. Even though this photo contains lots of green, you won't believe until you try to clone it how much variance it has.
Hold the Alt key as you click the image.
This sets the Clone Source of the image.
Drag over the area where you want to place the clone.
The Clone Source is copied to that area. The crosshair shows the area that is currently being cloned, as you can see in Figure 15.24.
Reset the Clone Source as needed by holding the Alt key and clicking your image.
Repeat Steps 4 through 7 until the object is gone from your image.
Don't forget the bird poop on the branch! Don't worry about the over-hanging branch; the Spot Healing Brush can take care of that with no problem. If you've taken your time and been careful, you'd never know there was more to your image, as shown in Figure 15.25.

Figure 15.24. Dragging over your image with the Clone Stamp copies the area the crosshair is over exactly.
That's it for the basics of using the Clone Stamp. Are you ready to make it lots more fun? The Clone Source panel gives you the capability to use a different image, resize your clone source, or even to tilt the clone source.
You can open the Clone Source panel in three ways: Use the toggle button for the Clone Source panel in the options bar, use the Clone Source icon in the panel, or choose Window
I introduce you to the options in the Clone Source panel and then show you how they work by taking you through an exercise that utilizes many of the options.
You find these options in the Clone Source panel:
Clone Sample: The Clone Source panel includes five Clone Sample icons. They give you the capability of setting and storing five different clone sources. These sources can be created in any document and used in any document.
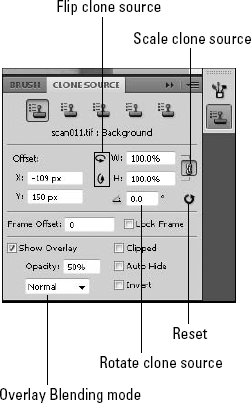
Offset: The offset values indicate how far you've moved the clone source from its original position.
Flip the clone source: You can flip the clone source vertically or horizontally using the rotating arrows next to the Width and Height percentages.
Set the scale of the clone source: This option is incredibly useful, especially when you are cloning specific objects from one file into another. Often the clone source needs to be resized to fit into the new document appropriately. Type a percentage or use the scrubby slider that appears when you hover over the W or H. Be sure to use the link icon to maintain the aspect ratio, or not, as you choose.
Rotate the clone source: Type a rotation degree or use the scrubby slider to rotate your source.
Reset Transform: Use this button to change the settings of the Clone Source panel back to default.
Frame Offset: When you are cloning from one frame to another frame using a video file, the frame offset indicates how many frames you are from the clone source.
Lock Frame: This locks the clone source in a video file to the original frame it was created on. With this option unselected, as you move frame to frame cloning a video, your clone source also moves the same number of frames, so the frame offset is consistent. If you want to use the original frame, even while you move through different frames, select Lock Frame.
Show Overlay: This creates an overlay with the clone source so you can preview the changes you are making with the Clone Stamp.
Overlay Opacity: This sets the opacity of the overlay. The default setting of 50 percent allows you to clearly see the background at the same time as the clone source and in most cases determine where to place your first stroke.
Overlay Blending mode: If you find it hard to distinguish between the overlay and the original image, you can set the blending mode of the overlay to lighten or darken it so it is more easily distinguishable.
Clipped: By default, the clone source overlay is clipped to the area indicated by your Brush tool. This is great for fix-ups where you aren't cloning specific items, but you'll find yourself toggling this option back and forth frequently as you work with specific objects.
Auto Hide: This option shows the overlay when your mouse button is released and hides the overlay as you paint in cloned areas.
Invert: This inverts the overlay so it is easier to distinguish from the background image.
Tip
If you are planning to use the Clone Source panel frequently, or at least for an extended period of time, you might want to dock it with the main panels to keep it out of your work area. Drag it into place and drop it when you see a blue highlight indicating it is linked to the other panels in the main area.
Now that you've had a rundown of what these options are, I show you a real-world example that demonstrates the usefulness and scope of the Clone Source tools. In this example, I use a video file instead of an image, not because it's necessary, but simply to demonstrate that image files are not the only files that can be changed with the powerful Photoshop tools.
Figure 15.27 is a frame of a 3D video I created years ago. The photo in the file is very outdated, and I want to replace it with a newer one. The Clone Stamp is just the tool I need.
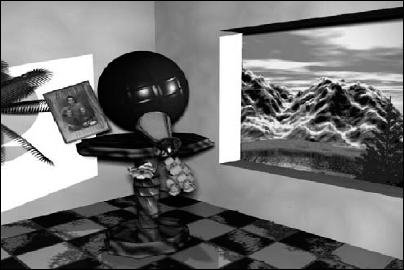
Figure 15.27. I can use the options in the Clone Source panel to change the photo in this video frame.
Note
The video for this exercise is available on the Web site as Figure 15-27.avi, but if you prefer to do this exercise with an image file, the JPEG of this frame is available as Figure 15-27.jpg. You also can find the clone source file saved as Figure 15-28. This file has a skew transformation to make it proportional to the falling frame and a bevel and emboss effect added to give it dimension inside the frame. These changes weren't strictly necessary, but they make the switch more realistic. You learn how to make these changes in Part VI.
Follow these steps to use the options found in the Clone Source panel:
Open the file you are using for a clone source.
My file is shown in Figure 15.28.
Select the Clone Stamp tool from the Toolbox.
Open the Clone Source panel, and select the first Clone Source icon.
Alt/Option-click inside the clone source file to set your clone source.
Open the file you want to clone into.
I used the video file shown in Figure 15.27. If you want to use the video file, use frame 0;00;07;08.
Note
If you use the video file, Photoshop asks you if you want to correct the aspect ratio when you open it. Click Yes. You are informed that the aspect correction is for preview purposes only. Click OK.
Deselect the Clipped option in the Clone Source panel, revealing the full overlay, as shown in Figure 15.29.
If the opacity of your overlay is too high, reduce it so that you can see through to the underlying image. Wow! The image is much larger than the video file.
Resize the clone source so it fits into the photo frame.
It took me a bit of trial and error, but I'll clue you in: I set my Width and Height at 2.8 percent.
Rotate the clone source so it lines up with the photo frame.
I set my angle at −22.2 degrees.
Select the Invert option.
Now that the photo file lines up so well with the original and they are both a bit pixilated, it is harder to see the overlay. Selecting the Invert option makes it easier to line them up.
Clone in the new image.
After you've lined them up, click to anchor the clone source and make as many passes as needed to clone in what you want. In this case, I cloned the entire source image, so I cheated and made my clone brush huge so I could accomplish the clone in just one click, as you can see in Figure 15.30. With other images, you may have to be much more precise, but our next exercise demonstrates that.
Note
You need to deselect the Invert option to see your results.

Now that you have a feel for how the Clone Stamp and Healing Brushes work, I show you a couple of examples of advanced techniques that are frequently used, so you can see not only the steps that make up the process, but how using the Clone Stamp and Healing Brush tools together create the best effects.
I start with an old photograph that has missing areas and scratches and move on to arguably the hardest cloning technique, head swapping.
Most of us treasure old photos of long-gone loved ones. Being able to scan them and preserve them digitally is wonderful. Being able to correct them digitally is even better. Figure 15.31 shows an old photo with a scratch and a discolored area that need to be repaired.

I wanted to try out the Content-Aware fill and see how well it fixes the areas. I was surprised because it did a half-decent job and certainly looks much better than the original, as you can see in Figure 15.34. Let's see if we can do a better job with the Clone Stamp and Healing Brush tools.
Note
Can you fix the worn and torn areas of this photo? Follow along by downloading Figure 15-31.
Follow these steps to repair this old photo:
Open the image from the Web site.
Zoom into the scratch over the window.
It's hard to make precise changes unless you can see what you're doing.
Click the Clone Stamp tool to select it.
Choose a soft brush so the edges of your fix blend well. Size it so it covers just one seam of the curtain because you want to maintain control of individual areas.
Enable the Airbrush in the options bar.
This allows you to hold down the mouse button long enough to fill in the pixels that will start out soft because of the soft brush.
Select the Clipped option in the Clone Source panel.
Because you are cloning small areas, this should be adequate to see what you are doing without being distracting.
Alt/Option-click one of the seams created by the curtains.
Because the area has so many seams, cloning takes several steps. The best areas to clone are either directly over or under the scratch.
Drag slowly over the scratch, being careful to keep the seams in line, so that the curtain runs continuously. Pause long enough in each area to fill in the pixels fully, as shown in Figure 15.32.
Repeat Steps 7 and 8 until you've filled in the area damaged by the scratch.
Be sure to use a seam whenever possible so the lines stay consistent. Finish when your result looks like Figure 15.33.
Zoom back out, and then zoom in on the discolored area by the boys' legs.
Repeat Steps 7 and 8 for this area as well.
It doesn't have as many seams, but making sure they line up makes your results look all the better.
When you are finished with these two areas, use the Spot Healing Brush to target white flecks and other areas of the photo that need a little cleanup.
You may need to use the Clone Stamp in one or two areas that have seams, such as the siding. When you are finished, you should have a result similar to Figure 15.34.


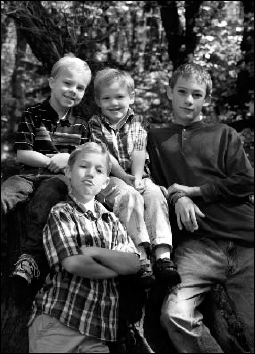
With four boys, being able to swap faces is the only way we ever get a decent family picture. These days, face-swapping is used often to get the perfect shot. Some face swaps are easier than others. If the shots are nearly identical and the background is just right, it may just be a matter of replacing the expression on one face for another. But even when the circumstances seem ideal, as you see in this next exercise, it's the little things like posture and the tilt of the head that can make this technique complicated.
Figure 15.35 shows two photos that were taken in the same photo shoot of the same kids with the same lighting and the same background. In this exercise, I am replacing the head of the boy in the second photo with his head in the first.

Figure 15.35. Ready for a head swap? Let's take the head of the boy in the first image and clone it into the second.
Note
Follow along by opening Figure 15-35a and Figure 15-35b from the Web site.
Follow these steps to create the perfect head swap:
Open Figure 15-35a from the Web site.
Choose the Clone Stamp from the Toolbox.
Choose a soft brush and set it to a size you are comfortable with.
Select the First Clone Source icon in the Clone Source panel.
Alt/Option-click directly above the boy's nose.
Open Figure 15.35b from the Web site.
Create a new layer by clicking the New Layer icon in the Layers panel.
Use this layer to clone into.
Deselect Clipped in the Clone Source panel.
This displays the entire image as an overlay. Right away, you can see that the source is too big to paint into the second image. If the opacity of your overlay is too high, reduce it so that you can see through to the underlying image.
Reset the scale of the clone source to 89 percent.
Line up the ears of the overlay with the ears of the original image.
Click once to lock the clone in place.
Select Clipped in the Clone Source panel.
This allows you to clearly see the areas that have been changed and the areas that still need work.
Drag over the boy's face to change it.
Be sure there are no soft areas where the pixels aren't filled in completely. Do the best you can with the edges so the two photos blend seamlessly wherever possible. Don't worry; your results right now will be far from perfect, as demonstrated in Figure 15.36.
Use either the History Brush or the Eraser tool to change any areas back to the original photo that you shouldn't have cloned over.
In Figure 15.36, the dog's ear is starting to look transparent, and the boy seems to have two collars on the other side.
Note
The History Brush can be softened so the changes blend in. This isn't always the best option; the dog's ear, for instance, needs to have a hard line drawn back in, but as you change areas with the wall as the background, a soft brush works best. The Eraser works only if you are using a second layer, and you can't make it soft.
Repeat Steps 12 and 13, paying attention to each area to note any aberrations.
Doing your best, you won't end up with a perfect result, as you can see in Figure 15.37. There is no easy way to get rid of the two collars or line up the shirt so that it matches.
Click the second Clone Source icon in the Clone Source panel.
You want to keep the original clone in place so you can use it for repairs.
Warning
It is so easy to forget to change between the two clone sources. If you accidentally reset the first clone source, you can't recover it; you have to reset it again as closely as possible to use it again to make changes, so be cautious.
Use the second Clone Source to make small repairs.
Alt/Option-click on the shoulder line on the right side and clone it over the second collar. Be sure to fix the inside of the shirt too, blending the collar and shirt line so it looks natural. Use all the tricks I've shown you so far. Double-check and triple-check areas you have cloned for seams that are out of place, smudges, or unnatural areas. When you are finished, your results should resemble Figure 15.38.

Tip
To create a clean seam for the shoulder, I cloned the boy's arm and rotated the source to replace the seam in the shoulder area.
In this chapter, you learned how to use the Healing Brushes and Clone Stamp to correct and modify your images. You read about the new Content Aware tools. Using the Clone Source panel, you should be able to make adjustments that make your clone source fit the image you are working with.
At this point, you should be familiar with these tools:
The Spot Healing Brush
The Healing Brush
The Patch tool
The Content-Aware fill
The Red Eye tool
The Clone Stamp