
Painting in Photoshop
Using brush-style editing tools to edit photos
Painting with brush and non-brush tools
Using Photoshop's new wet paint capabilities
Customizing paint brush settings
Painting and tracing techniques
Although Photoshop is typically thought of as a photo-editing package, it also includes an arsenal of tools that makes it one of the premier painting applications as well. In fact, painting in Photoshop means much more than in most other painting applications.
What makes painting so effective in Photoshop is that Adobe combined the powerful photo-editing tools with the paint brush tools so you can use paint brush strokes to apply localized photo editing and you can apply photo editing techniques to your painting.
This chapter discusses the Brush tools available in Photoshop for both editing and painting purposes. It also covers how to configure custom brushes to increase the capability of those tools. Before you begin painting in Photoshop, you likely want to switch to the Painting workspace by selecting Window
Painting in Photoshop means much more than just painting colors onto a blank document with a brush. Painting means using brushing techniques to apply effects to fix problem areas of photographs, retrace history, blend layers, apply color, and mix colors.
In this chapter, we discuss the tools and techniques that you can use to apply some specific changes to images, create artwork, and create dramatic artistic effects. Before we start, though, you should know a few things about painting:
Brushing techniques are applied by selecting the tool, setting the brush and tool options, and then dragging the cursor on a specific area of the document using a mouse or stylus pen.
Painting is applied to the currently selected layer in the Layers panel, although some of the tools sample from all the layers to apply the painting effect.
When you have a selection active, the painting effect applies only inside the selection. This allows you to use Photoshop's powerful Selection tools to fine-tune your painting.
Painting is a destructive task that alters pixels. It is a good idea to paint from a copy of the background layer if you are altering a photo and then apply the change only when you feel that the painting is finished.
You can paint on vector layers, but you need to convert them to Smart Object layers first.
Painting is not an exact science. You may need to try different brush styles, sizes, settings, and strokes to achieve the results you are looking for.
The best way to understand painting in Photoshop is to look at the brush-based tools that Photoshop provides. Understanding how these painting tools work can make you more effective at both editing photos and applying artistic effects. This section discusses the painting tools and how to use them.
You use three types of tools to paint in Photoshop: editing, painting, and mixing. Editing tools paint by adjusting the pixels directly beneath the tool. Painting tools paint by applying color to the pixels directly beneath the tool. Mixing tools paint by mixing color with the pixels directly beneath the tool.
Tip
When you are using any of the painting tools, keep in mind that holding down the Shift key while dragging the cursor results in applying the stroke in a straight horizontal or vertical line. You also can hold down the Shift key as you click the painting tool in two different locations in the image to create a straight paint stroke between the two points.
Many of the painting tools provide blending modes that define the behavior and look of the effect and how it blends to the pixels beneath. Blending modes are computer algorithms that define methods to combine two pixels into one pixel. The idea is that instead of using one pixel or the other, you can define several ways to combine the two to create a different outcome.
As you begin using the painting tools, you'll notice that many of the tools offer a blending mode setting of some sort. The painting tools use blending modes for a variety of purposes. For example, the Brush tool allows you to set a blending mode that defines how the paint from the brush interacts and blends with the pixels below. And when adding a texture to a brush, a blending mode is used to define how the pixels from the pattern blend with the paint in the brush to create the texture.
The following sections describe the different blending modes and how they relate to the painting tools. For the sake of the descriptions, we refer to the pixels below the brush as the base pixels.
These are the basic blending modes that can be used when painting:
Normal: This is the default option for most of the Brush tools. No blending is applied; instead the value of the new pixels is the value created by the paint brush. When painting tools use the Normal mode, the foreground color that is applied is based on the opacity, flow, and airbrush settings. When editing tools use the Normal mode, the tool manipulation is applied using the normal editing algorithm.
Dissolve: The blend is applied by randomly replacing the pixels with either the paint brush value or the pixels beneath, depending on the pixel location and the opacity setting. Using this option allows you to dissipate the effect of the painting effect, more than just changing the opacity.
Behind: The painting effect is applied only on the transparent areas of the layer. This mode works only when the Lock Transparency option is deselected for the layer.
Clear: This applies the painting effect as transparency. It's similar to the Eraser tool, but it works with the Shape, Paint Bucket, Brush, and Pencil tools to apply the transparency. This mode works only when the Lock Transparency option is deselected for the layer.
The next group within the blending modes menu contains darkening effects. These five blending filters reduce the painting effect in the darker areas and apply more paint to the lighter pixels below. The result is that the effects tend to darken the overall image:
Darken: The blend is applied by replacing the pixels with the darker of the base value or the paint brush value. In other words, the painting effect is only applied to pixels in the underlying pixels that are lighter than the value of the brush pixel. This has the effect of darkening the image.
Multiply: The blend is applied by multiplying the base value of each pixel by the paint brush pixel value. Multiplying a pixel by black always produces black, and multiplying a pixel by white leaves the pixel value unchanged. This mode has the overall effect of darkening the image.
Color Burn: The blend is applied by darkening the base channel based on the brush color by increasing the contrast between the two. This has the effect of darkening the image as well as increasing color contrasts.
Linear Burn: This darkens the image as it applies the blend by decreasing the brightness based on the value of paint brush pixel.
Darken Color: The blend is applied by replacing each of the channels of a pixel with the darker between the base pixel channel and the paint brush pixel channel. This option works a bit better than using the Darken mode because it uses the darkest values from each of the channels to create the resulting color. For example, this mode may use red and green from the base pixel and blue from the paint brush pixel.
The Lightening blending modes work opposite of the darkening blending modes. As the painting effect is applied, the results tend to lighten darker areas of the image while not impacting the lighter areas of the image as much:
Lighten: The blend is applied by replacing the pixels with the lighter of the base value or the paint brush value. This has the effect of lightening the image and can be extremely useful if applying filters to underexposed images.
Screen: The blend is applied by multiplying the inverse of the channel values of the paint brush and base pixels. This results in a lighter color than either the paint brush value or the base value. This has the same effect as projecting multiple photographic slides on top of each other.
Color Dodge: This applies the blend by decreasing the contrast between the color of the channels in the paint brush pixel and the base pixels. This lightens the base pixels using the paint brush pixel values.
Linear Dodge (Add): This lightens the images as it applies the blend by increasing the brightness based on the paint brush pixel value of each channel.
Lighter Color: The blend is applied by replacing each channel of a pixel with the lighter between the base pixel channel and the paint brush pixel channel. This option works a bit better than using the Lighten mode because it uses the lightest values from each channel to create the resulting color.
These blending modes create contrast between the paint brush effect and the base pixels, making the lighter areas lighter and the darker areas darker:
Overlay: This applies the blend by mixing the paint brush values with the base pixels while preserving the shadows and highlights. This reduces the effect of extreme layer adjustments that dramatically reduce the detail in the original image.
Soft Light: This applies the blend based on the gray value of the paint brush pixel. If the value of the paint brush pixel is darker than 50 percent gray, the base pixel is darkened using a multiplying method. If the value of the paint brush pixel is lighter than 50 percent gray, the base pixel is lightened using a dodging method. This has a similar effect to shining a diffused spotlight on the image.
Hard Light: This applies the blend based on the gray value of the paint brush pixel. If the value of the paint brush pixel is darker than 50 percent gray, the base pixel is darkened using a multiplying method. If the value of the paint brush pixel is lighter than 50 percent gray, the base pixel is lightened using a screening method. This has a similar effect to shining a harsh spotlight on the image. This option is great for adding shadows while applying the filter.
Vivid Light: This applies the blend based on the gray value of the paint brush pixel. If the value of the paint brush pixel is darker than 50 percent gray, the base pixel is darkened by increasing the contrast. If the value of the paint brush pixel is lighter than 50 percent gray, the base pixel is lightened by decreasing the contrast.
Linear Light: This acts as a combination of the linear dodge and linear. If a paint brush pixel is darker than 50 percent gray, then the pixels in the image are darkened by the brush stroke. If a paint brush pixel is lighter than 50 percent gray, then the pixel in the image is lightened by the brush stroke.
Pin Light: This applies the filter based on the gray value of the paint brush pixel. If the value of the paint brush pixel is darker than 50 percent gray, the darker of the paint brush pixel and base pixel is used. If the value of the layer pixel is lighter than 50 percent gray, the lighter of the paint brush pixel and base pixel is used.
Hard Mix: This adds the value of each RGB channel in the paint brush pixel to the corresponding RGB channel in the base pixel. The values above 255 and below 0 are clipped, so this can result in a large loss of detail.
The Difference, Exclusion, Subtract and Divide blending modes blend the layers based on the difference between the two layers:
Difference: This applies the blend by setting the resulting pixel to the value of the difference between the paint brush pixel and the base pixel. Blending white inverts the pixel value, and blending black results in no change.
Exclusion: This works similar to the Difference blend mode, but generates less contrast.
Subtract: This applies the blend by subtracting the pixel value in the paint brush from the corresponding pixel in the image. The resulting pixel value is divided by a scale factor and then added to an offset to make certain it still falls in the 0–255 range. The result is that the darker the paint brush pixel is, the less effect it has on the image pixel.
Divide: This works that same way that the subtract blend mode does, but instead the image pixel is divided by the paint brush pixel. This increases the range of variance in changes in the image pixels.
The final group of blending modes gives the selected layer a color influence over the layers under it:
Hue: This applies the blend by creating the resulting pixel using the luminance and saturation of the base pixel but the hue of the paint brush pixel. This reduces the blend to affect only the hue of the base pixels.
Saturation: This applies the blend by creating the resulting pixel using the luminance and hue of the base pixel but the saturation of the paint brush pixel. This reduces the blend to affect only the saturation of the base pixels.
Color: This applies the blend by creating the resulting pixel using the luminance of the base pixel but the hue and saturation of the paint brush pixel. This limits the blend so it doesn't affect the brightness of the base pixels.
Luminosity: This applies the blend by creating the resulting pixel using the hue and saturation of the base pixel but the luminance of the paint brush pixel. This allows you to apply it so it affects only the brightness of the base pixels.
Painting tools, shown in Figure 16.1, paint by applying new color to the pixels in a specific region under the tool. This is a pretty basic concept that has been around for decades. Photoshop enhances the paint technique by allowing you to select specific brush styles, sizes, and settings that control how pixels are painted in almost unlimited ways.
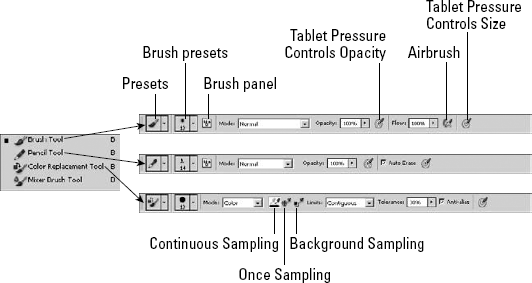
Figure 16.1. The Painting tools allow you to apply color to images using a variety of brush and pencil strokes.
Tip
You can select the Painting tools using the B hotkey, and you can toggle through the Brush, Pencil, Color Replacement, and Mixer Brush tools by using the Shift+B hotkey sequence on the keyboard.
The following list describes the Painting tools that you use to add color to your images:
Brush and Pencil tools: The Brush and Pencil tools work basically the same way with one distinct difference. Brush tool strokes have a soft edge that is created by anti-aliasing the edges of the stroke so the edge blends slightly with the surrounding document. Pencil tool strokes have a crisp, hard edge that is not blended with the surrounding document. Figure 16.2 shows an example of the Brush and Pencil tool strokes applied with the same brush style.
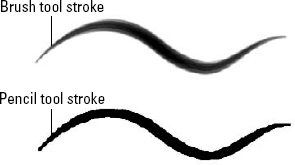
Figure 16.2. The Brush applies the stroke with soft edges, and the Pencil tool applies the stroke with hard edges.
Even though the concept is simple, the Brush and Pencil tools provide an incredible range of results. Using the Brush and Pencil tools, you can configure the following settings in the tool menus that control how the Brush and Pencil strokes are applied to the image:
Presets: As with all presets in Photoshop, the Presets option allows you to quickly save the tools settings and then load and select them later.
Brush Preset Picker: The Brush Preset Picker drop-down box allows you to select the style of brush to use for the tool. You also can set the size and hardness of the brush.
The size of the brush determines the area of pixels that are affected by the brush stroke, and the hardness of the brush determines the intensity of the stroke. When painting, harder brushes mean more color is added; when editing, harder brushes mean that a more dramatic effect is applied.
Note
The settings that you apply using the Brush panel add to or override the settings you set in the Brush Preset Picker menu. You likely want to use a combination between selecting the brush using the Brush Preset Picker option, the Brush panel, and the Brush Presets panel.
Using the Brush Preset Picker side menu, you can manage the set of brushes listed. You can rename and remove brushes, load different sets of brushes, and even manage the appearance of the lists, as shown in Figure 16.3.
Brush panel: Selecting the Toggle the Brush Panel option displays the Brush panel that allows a variety of options to control every aspect of the brush behavior. The Brush panel needs much explanation and is covered later in this chapter.
Mode: This specifies the blending mode used to apply the brush stroke to the pixels below. The blending mode can have a major impact on how the brush strokes look. Instead of just applying the brush stroke to the pixels below, Photoshop blends the pixel data in the brush stroke with the pixel data in the selected layer, based on the blend mode algorithm. Blend modes are covered in more detail later in this chapter.
Opacity: This allows you to specify the opacity of the painting tool. A larger amount of opacity means the underlying pixels are affected more by the painting stroke. A value of 100% means that all pixels are affected; 0% means that none of the pixels are affected.
Tablet Pressure Controls Opacity: When this option is set, the pressure on the stylus tip defines the percentage of opacity involved when painting. This is a great option to fine-tune your strokes using a more realistic effect, if you have a stylus pen.
Flow: The Flow option controls the rate that the tool effect is applied to the pixels below. A value of 100% means that the pixels are affected immediately. Adjusting the flow lower applies the effect more slowly, allowing you to move the brush before the full effect of the tool is applied to the underlying pixels. Using this option, you can give your stroke effect a more realistic look just as if you were painting at different speeds with a real brush.
Airbrush: When this option is selected, the stroke is applied in gradual tones to the image. This option typically works better when used in conjunction with a reduced flow setting.
Auto Erase: This allows you to use the Pencil tool to paint over areas containing the foreground color using the selected background color. When this option is selected and the cursor is over the foreground color when you begin dragging, the area is painted with the background color. When this option is selected and the cursor is not over the foreground color when you begin dragging, the area is painted with the foreground color.
Tablet Pressure Controls Size: When this option is selected, the stylus pressure overrides the brush or pencil size when painting.
Color Replacement Tool: The Color Replacement tool works similar to the Brush tool except that it applies the paint, specified by the foreground color in the Toolbox, only to a specified color. This is a great way to replace one color in the image with another without affecting the surrounding pixels. A sample color is selected, and as the Color Replacement tool is applied, Photoshop analyzes the pixels below the tool, determines which pixels match the sample color, and paints only those pixels. Only the pixels that match the sampled color are replaced, as shown in Figure 16.4.
Using the Color Replacement tool, you can configure the following settings in the Tool menu, shown in Figure 16.1, that control how the Color Replacement strokes are applied to the image:
Continuous Sampling: When this option is selected, the Color Replacement tool continuously samples the pixel directly beneath it to determine what color of pixels to paint. When this option is set, it behaves close to the Brush tool, depending on the other settings.
Once Sampling: When this option is selected, the color to replace is determined by the pixel directly below the tool when you first click and begin to drag the mouse. This option is great for quickly selecting the color to replace directly from the image.
Background Sampling: When this option is selected, the color to paint is determined by the background color in the Toolbox.
Limits: This allows you to set the limit of erasing to Discontiguous, Contiguous, or Find Edges. Discontiguous replaces the pixels wherever they occur. Contiguous replaces only the pixels that are immediately adjacent to the first selected pixel. Find Edges replaces pixels while trying to keep the edges in the image distinct.
Tolerance: This specifies the tolerance to use when determining whether a pixel matches the sample color and should be replaced.
Anti-alias: When this option is selected, Photoshop uses anti-aliasing to soften the edges around the pixels being replaced.
Mixer Brush tool: The Mixer Brush tool is a bit different from the Painting tools and is covered in a later section in this chapter.

Figure 16.4 shows an example of using the Color Replacement tool to paint a different color onto a flower. Notice that only the petals of the flower are affected. We used the Sampling options to sample a petal, so only the pixels that are similar to the color of the petals are altered, leaving the others alone.

Editing tools paint by using different algorithms to manipulate the pixels in a specific region under the tool instead of the laying down a new color. These tools allow you to control the shape and the size of the area of pixels affected by the tool. Pixels are manipulated by dragging the mouse or using a stylus pen.
The editing tools allow you to fix or enhance problems spots in images. For example, you can use the Spot Healing Brush tool to remove blemishes or the Sharpen tool to enhance the sharpness of a specific area of a photo.
The following sections discuss the editing tools that you use to paint edits on photos in Photoshop.
The Healing tools shown in Figure 16.5 allow you to quickly fix problem areas of photos, such as scratches, red-eye, or even the removal of unwanted objects. These tools are covered in detail in Chapter 15, so we don't cover them here.
Note
For a more detailed explanation of how to use the Healing tools to edit photos, see Chapter 15.

The Clone Stamp tool shown in Figure 16.6 allows you to quickly fix problem areas of photos, such as scratches and unwanted objects, by using other areas of the photo as a source to replace pixels using a Stamp brush. This tool is covered in detail in Chapter 15, so we don't cover it here.
Note
For a more detailed explanation of how to use the Clone Stamp tool to edit photos, see the section on cloning in Chapter 15.
The Pattern Stamp tool works similar to the brush tool except that it paints a pattern instead of a color. The options for the Pattern Stamp tool include the following:
Pattern Picker: Allows you to select a pattern to paint from the drop-down menu.
Aligned: When this option is enabled, the pattern in each new brush stroke is aligned with the previous brushstroke. This allows you to keep the pattern aligned as you paint multiple strokes.
Impressionist: Softens the pattern to give it an artistic effect rather than a crisp pattern.

The History tools shown in Figure 16.7 allow you to use brush effects to paint previous edit states of the document onto the current state. This allows you to use a painting effect to reveal effects from previous edit states. This tool is covered in more detail in Chapter 5, so we don't cover it here.
Note
For a more detailed explanation of how to use the History tools to revive effects from previous states, see Chapter 5.
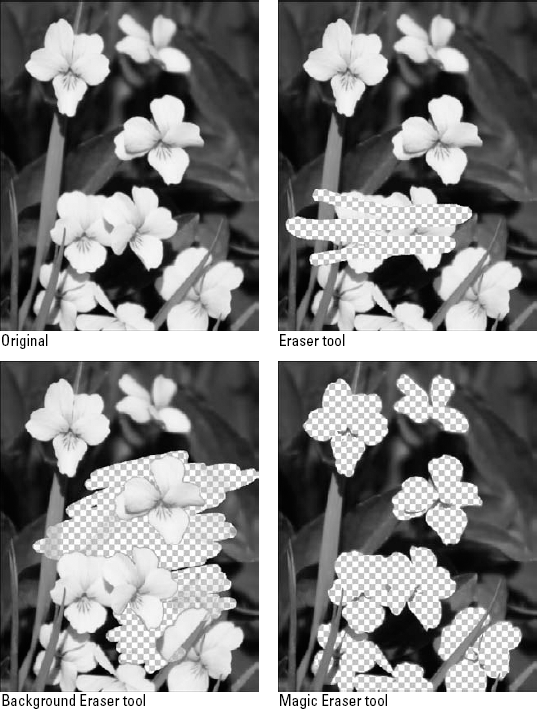
The Eraser tools, shown in Figure 16.8, are designed to do just that—erase pixels from the image. However, the Eraser tools provide several settings that provide lots of flexibility when removing pixels. Eraser tools apply to the selected layer in the Layers panel, so you can restrict the erasing to a specific layer.
Tip
You can select the Eraser tool using the E hotkey, and you can toggle through the Eraser tools by using the Shift+E hotkey sequence on the keyboard.

Figure 16.8. The Eraser tools allow you to remove pixels from a layer in the image and replace them with transparency or background color.
You can use three types of Eraser tools, as shown in Figure 16.8:
Eraser: The Eraser tool is designed to remove pixels from the current layer and replace them with transparency or the background color using the following options:
Mode: This allows you to erase using a Brush, Pencil, or Block tool. The Block mode is simply a square tool that's useful in hard erasing in corners. The Pencil mode allows you to select the pencil tip, but the edges are hard for crisp erasing. The Brush mode enables erasing using all the functionality of brush strokes, so you can smooth the edges of the area being erased.
Opacity: This allows you to specify the opacity of the Eraser tool. The more the opacity, the more the underlying pixels are removed as you paint on them.
Tablet Pressure Controls Opacity: When this option is set, the pressure on the stylus tip defines the amount of opacity involved when erasing.
Erase to History: When this option is set, instead of erasing to transparent or background pixels, the Eraser tool erases to a previous history state, as described in Chapter 5.
Flow: The Flow option controls the rate at which the erase effect is applied to the pixels below. A value of 100% means the pixels are erased immediately. Adjusting the flow lower applies the erasure more slowly, allowing you to move the brush before fully erasing the underlying pixels.
Airbrush: When this option is selected, the erasure is applied gradually to the image to soften the edges of the area being erased. This option typically works better when used in conjunction with a reduced flow setting.
Tablet Pressure Controls Size: When this option is selected, the stylus pressure overrides the brush or pencil size when erasing.
Background Eraser tool: The Background Eraser tool is designed to erase a specific color from the layer instead of just erasing everything. This is an extremely useful tool to remove monotone elements from images or to clean up a specific color from a layer. The Background Eraser tool provides the following options:
Continuous Sampling: When this option is selected, the Background Eraser tool continuously samples the pixel directly beneath it to determine what color of pixels to erase. When this option is set, it behaves close to the regular Eraser tool, depending on the other settings.
Once Sampling: When this option is selected, the color to erase is determined by the pixel directly below the tool when you first click and begin to drag the mouse. This option is great for quickly selecting the color to erase from the image.
Background Sampling: When this option is selected, the color to erase is determined by the background color in the Toolbox.
Limits: This allows you to set the limit of erasing to Discontiguous, Contiguous, or Find Edges. Discontiguous erases the pixels wherever they occur. Contiguous erases only the pixels that are immediately adjacent to the first selected pixel. Find Edges erases pixels while trying to keep the edges in the image distinct.
Tolerance: This specifies the tolerance to use when determining whether a pixel matches the sample color and should be erased.
Project Foreground Color: When this option is selected, the color in the foreground of the Toolbox is protected from erasure. This option is typically used to erase everything but one color, as shown in Figure 16.9.
Magic Eraser tool: The Magic Eraser tool is a fast way to erase similar pixels throughout your image. Simply click a pixel in the image, and Photoshop scans the rest of the image and automatically removes all pixels that are similar using the following options:
Tolerance: This allows you to set the tolerance that Photoshop uses when determining whether the pixel matches the selected pixel and should be erased.
Anti-alias: When this option is selected, Photoshop uses anti-aliasing to smooth the edges between the pixels being erased and the pixels remaining.
Contiguous: When this option is selected, only pixels that are contiguous in similar color to the selected pixel are erased.
Sample All Layers: When this option is selected, pixels in all layers are sampled to determine the color to be used when erasing pixels. When this option is not selected, the Magic Eraser tool samples only from the selected layer. This can be useful in removing pixels from one layer that match the pixels in another layer without affecting the second layer.
Figure 16.9 shows an example of how each Eraser tool works. Notice that the Eraser tool erases all the pixels, but because we have set the foreground color to the color of the flowers, the Background Eraser tool does not erase the flowers. Also notice that the Magic Eraser tool erases most of the color of the flowers from the image.
The Sharpen and Blur tools, shown in Figure 16.10, allow you to use Brush tools to apply sharpening and blurring techniques to specific areas of the image. The Smudge tool samples the pixels in the image below the tool and applies those pixels as you drag the mouse or stylus across the image. The result is that the pixels in the image are combined with the sampled pixels and a smudging effect is produced.
Note
For a more detailed explanation of sharpening and blurring images, see Chapter 14.
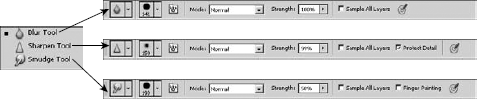
Figure 16.10. The Sharpen and Blur tools allow you to use brushing techniques to apply sharpening and blurring to specific areas of the image. The Smudge tool allows you to use brush techniques to smudge areas of an image.
The following list describes some of the specific options available in the Tool menu for the Sharpen, Blur, and Smudge tools:
Mode: This allows you to set the blending mode to use when applying the sharpen, blur, or smudge effect. The options are Normal, Darken, Lighten, Hue, Saturation, Color, or Luminosity.
Strength: This allows you to set the strength of the effect from 0 to 100 percent. Applying a higher strength makes the sharpen, blur, or smudge effect more dramatic.
Sample All Layers: When this option is set, Photoshop uses all layers to calculate the effect that is applied to the current layer. Keep in mind, though, that only the current layer is affected.
Protect Detail: When this option is selected, the Sharpen filter tries to protect the detail in the image.
Finger Painting: When this option is selected, instead of sampling the image to fill the Smudge tool, Photoshop uses the foreground color. The effect is similar to dipping your finger in paint and then dragging it across a wet image.
Figure 16.11 shows an example of how the Blur, Sharpen, and Smudge tools work. Notice that the Blur tool can blur out the center of the image without affecting the detail of the rest, just as the Sharpen tool can sharpen just the center. The Smudge tool has a completely different effect in that it smudges the pixels around in the center just as if they were wet paint on a canvas.

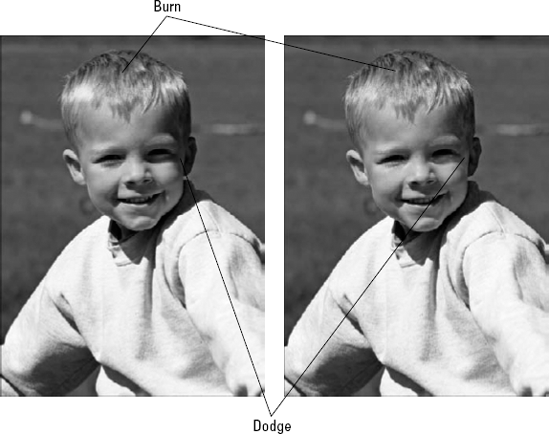
The Dodge, Burn, and Sponge tools, shown in Figure 16.12, allow you to use brush techniques to apply lightening, darkening, and saturation adjustments to specific areas of the image. The Dodge tool applies a lightening effect to the pixels as you drag the mouse or stylus across the image. The Burn tool applies a darkening effect to the pixels as you drag the mouse or stylus across the image. The Sponge tool either saturates or desaturates the pixels as you drag the mouse or stylus across the image.
Tip
You can select the Dodge, Burn, and Sponge tools using the O hotkey, and you can toggle through them by using the Shift+O hotkey sequence on the keyboard.
Note
Lighting and saturation corrections are discussed in more detail in Chapter 13.

Figure 16.12. The Dodge, Burn, and Sponge tools allow you to use brush techniques to apply lightening, darkening, and saturation adjustments to specific areas of the image.
The following list describes some of the specific options available in the tool menu for the Dodge, Burn, and Sponge tools:
Range: This specifies the tonal range to apply the Dodge or Burn effect to. The available tonal ranges are Shadows, Midtones, and Highlights.
Exposure: This allows you to set the amount of exposure applied with the Dodge or Burn tool. A larger percentage in the Exposure setting results in a more dramatic effect.
Protect Tones: When this option is set, Photoshop limits the amount of adjustment in the Dodge and Burn tools so they have a minimal effect on the color tones.
Mode: This allows you to specify whether to apply a color saturation or desaturation effect with the Sponge tool.
Flow: The Flow option controls the rate at which the saturation/desaturation effect is applied to the pixels below. A value of 100% means the pixels are affected immediately. Adjusting the flow lower applies the affect more slowly.
Vibrance: When this option is selected, the effect of the Sponge tool is limited to keep as much of the vibrance of tones as possible.
Figure 16.13 shows an example of applying the Dodge and Burn tools to help the look of a photo that was taken at the wrong angle during a sunny day. Notice in the original that the hair shines too brightly and a bad shadow appears on the other side of the face. Using the Dodge tool, we lightened the face a bit to restore some of the detail, and using the Burn tool, we darkened the highlight in the hair.
The Mixer Brush tool is different than all other painting tools in that it is designed to mix the paint in the brush with the pixels below to produce as close of an effect of using real paint as possible. The Mixer Brush tool is extremely dynamic and versatile in how it mixes the paint with the pixels below.
The Mixer Brush tool lets you use paint from the color palette to mix paint into the image, use a dry brush to mix the paint on the image, set how much paint is applied to the brush, and much more to make it as close to painting with actual wet paint on a physical medium.
The Mixer Brush is available in the painting tools set in the Toolbox and can be selected by using Shift+B to toggle through the painting tools. The following list describes some of the options in the Tool Options menu, shown in Figure 16.14, when the Mixer Brush tool is selected (for descriptions of the other options not listed, see the painting tools section earlier in this chapter):
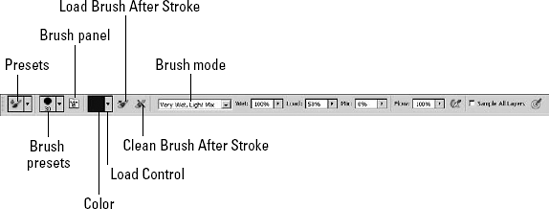
Figure 16.14. Tool options for the mixer brush allow you to set the color and control the paint mix, color, and cleaning of the brush.
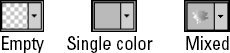
Color: This displays the current paint that's loaded in the brush. This feature is critical when you are painting with wet paint so you can see what colors of paint will be applied with the brush strokes. The area in the center is the area of the brush at the tips that most affects the pixels. The area to the outside corresponds to the area of the bristles farthest from the tips and does not affect the pixels as much.
When the brush is clean, this displays a transparent pattern. When the brush is full of a single color, this displays a solid color. When the brush is mixed, it displays the mix of colors as shown in Figure 16.15. When the outside area is transparent, only the tip of the brush is wet. When you click the Color option, it launches a color chooser that allows you to set the color of paint that is applied using the brush strokes.
Load Control: This allows you to quickly load or clean the brush. You also have the option of setting the Load Solid Colors only. This loads the brush with a solid color only. If you use this option with the Clean Brush After Stroke option, the brush is loaded with a single color only.
Load Brush After Stroke: When you use this option, the brush is reloaded with the foreground color after each stroke. This is a great way to paint a large area, but it can result in more paint added to the canvas than you may think, because the paint in the brush is constantly being replenished.
Clean Brush After Stroke: When you use this option, the brush is cleaned after each stroke. If you use this option with the Load Brush After Stroke option, the brush is always loaded with the foreground color only.
Brush Mode: This allows you to quickly set the wetness, load, and mix of the brush stroke to preset values. Essentially, it's the same thing as defining how thin the paint is and the heaviness of the mixture of paints as the stroke is applied to the canvas. You can specify wetness levels between dry and very wet, where dry means a solid stroke and very wet means the paint is very thinly applied to the pixels. You can specify mixture levels of light or heavy. You also have the option of selecting custom and setting specific values. Figure 16.16 shows an example of some of these settings.
Wet: This specifies the exact percentage to use for the wetness of the paint on the brush. The wetter the paint, the thinner the amount of paint applied.
Load: This allows you to specify the percentage of paint to place into the brush each time the brush is loaded.
Mix: This specifies the percentage of mixing that occurs between the paint in the brush and the pixels below when the brush stroke is applied to the image.
Sample All Layers: When this option is selected, the Mixer Brush tool samples all the layers in the document when applying paint. Keep in mind that the resulting painting effect is applied only to the selected layer.

Tip
Using the Sample All Layers options, you can create a blank layer to paint on that makes the painting effect non-destructive. You can even paint on multiple new layers, so you can try different techniques until you find one you like.
The Brush panel is by far the most complex and capable tool in defining how painting strokes are applied to an image. The Brush panel has two purposes: to select the type of brush and to define the behavior of the brush when applying brush strokes.
Using the options available in the Brush panel, you can define the shape, bristle length, stiffness, texture, and many more features of the brush used to apply the painting effects to the image. At any time, you can reset the settings used in a brush by selecting Reset Brush Controls from the Brush panel menu.
The Brush panel can be opened by pressing F5 on the keyboard, selecting the Brush panel option from one of the painting tools, or selecting Window
The shape of the brush tip controls the actual pixels that are changed during each movement of the brush stroke. Different brush shapes can result in very different effects. You may need to play around with a few of the shapes until you get the hang of the effect that different shapes have.
The brush tips are displayed and selected when the Brush Tip Shape option is selected, as shown in Figure 16.17. The brush tips available are based on the currently selected set from the Brush Presets panel, which is discussed later in this chapter. To change the set of bushes displayed in the Brush Tip Shape list, click the Brush Presets button and select a different list from the panel.
You can select from two types of brush tips: flat and bristle. Flat brush shapes are the traditional shapes that Photoshop has had for years. Flat brushes define a set of pixels that get affected. Bristle brushes are simple shapes with bristling behavior that provide an experience much closer to using a physical brush. The following sections describe these brush tips in more detail.
Note
You can save the settings for a brush that you have configured in the Brush panel by selecting New Brush Preset from the Brush panel menu or by clicking the Create New Brush icon at the bottom of the Brush panel. You then name the brush, and it is available in the brush list.
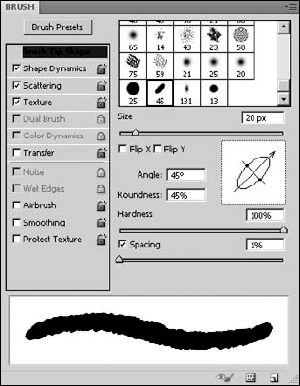
Flat brush shapes are based on rasterized shapes, as you can see in Figure 16.17. The solid pixels in the shape are used to sample and apply the painting effect during each movement of the mouse. Many different tip shapes can be applied to your images, and the more you play with them, the better you understand how they can be applied.
In addition to selecting the brush tip shape, you also can configure some additional properties of the brush tip shape:
Note
As you change any of the brush settings that apply to how the stroke will look, the display at the bottom is altered to reflect the new look. This allows you to understand better what effect that setting changes have on the actual brush stroke.
Shape: This allows you to select one of the brush shapes from the current list selected in the Brush Presets panel.
Size: This adjusts the size of the brush.
Flip X/Flip Y: This flips the brush tip shape along the X or Y axis. This allows you to create mirror images of the brush either vertically or horizontally. Using mirrored brush techniques can help if you are using very large brush strokes to create symbols or characters.
Angle: This sets the angle of the brush from 0 to 360 degrees. Tilting the angle of the brush has an effect on how the stroke looks, especially at the beginning and end.
Roundness: This sets how round the brush is. Round brushes paint much more evenly than thin brushes. However, thin brushes can paint into corners and generate angled effects that round brushes cannot.
Hardness: This sets the hardness of the brush. Hard brushes are much more dramatic in the painting effect than soft brushes. When working with wet paint, high hardness can result in the skipping effect where the bristles skip instead of smoothly flowing.
Spacing: This specifies the spacing of the brush stroke from 1 percent to 1000 percent. Using a spacing of 1 percent makes the stroke flow smoothly. Using a high spacing value results in the stroke being applied at intervals. Typically, you want this to be set very low unless you are trying to scatter the effect of the brush stroke.
Bristle brush shapes are based on computer algorithms that calculate how to apply the paint based on a set of digital bristles. Using the Brush Tip Shape settings shown in Figure 16.18, you define the shape and nature of the bristles. When you use the bristle brush to apply the painting strokes, Photoshop uses the bristle brush settings to determine how the painting effect is calculated during each movement of the mouse.

The available bristle brush shapes are shown at the top of the list in Figure 16.18. In addition to selecting the brush tip shape, you can configure some the following settings to define the nature of the bristle brush:
Shape: This specifies the shape of the bristle brush tip. You can select Blunt, Curve, Angle, Fan, or Point. You also can select round or flat versions of these brush tips.
Bristles: This specifies the amount of bristles present in the brush tip. More bristles give you a smoother effect, and fewer bristles give you more textured strokes.
Length: This specifies the length of the bristles from 1 percent to 500 percent. The longer the bristles, the more paint the brush holds and the more sweeping the strokes are.
Thickness: This specifies the thickness of the bristles. A bigger thickness value results in a more textured effect because the bristles show up better, whereas thinner bristles result in smoother effects.
Stiffness: This specifies how flexible each bristle is. More flexible bristles allow for more sweeping strokes, a softer look, and more sensitive effects. Stiffer bristles provide more dramatic effects and a greater amount of texture to the stroke.
Angle: This allows you to set the angle of the brush as you apply the stroke. Adjusting the angle changes the shape of the brush stroke, especially at the end.
Photoshop provides a Bristle Brush preview that allows you to see the shape of the bristle brushes. The Bristle Brush preview can be toggled on and off by using the button on the bottom of the Brush panel (refer to Figure 16.18). Figure 16.19 shows some of the sizes and shapes available using different settings for the bristle brush.
Note
Enable OpenGL Drawing must be enabled in the Performance tab of the Preferences panel for the Bristle Brush preview to be enabled. To open the Preferences panel press Ctrl(
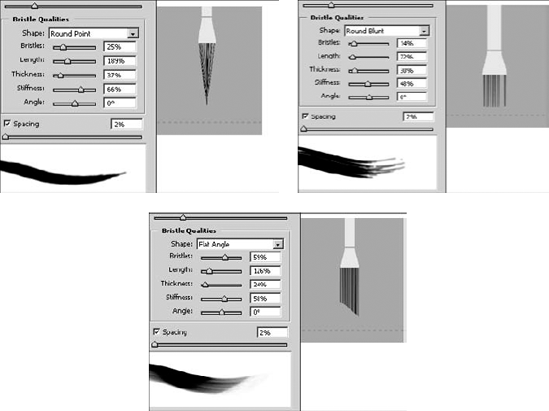
Figure 16.19. Photoshop provides a Bristle Brush preview window that allows you to see the shape of the bristle brush based on the settings you apply in the Brush panel.
One of the most useful features of the Bristle Brush preview is that it provides you with the ability to see the behavior of the painting stroke through a simple animation. As you paint, the brush comes down to the bottom of the preview window. The dashed line close to the bottom represents the paper, and you can see the bristles bending as the brush stroke is applied. This feature is most useful if you are using a stylus pen, because it also shows you the pressure and angle of the brush, as shown in Figure 16.20.
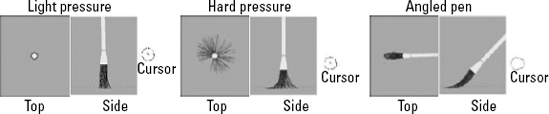
Figure 16.20. The Bristle Brush preview window animates the movement of the brush and bristles when you are applying paint stokes. You can see the curvature of the bristles caused by the pressure and angle of the stylus pen.
Note
The preview window shows two different views of the brush: the top and side views. To toggle between the two views, click the preview window.
In addition to setting the brush shape and attributes, Photoshop provides many additional options that define the behavior of the brush as you apply painting strokes. These options are available by selecting them in the Settings menu below the Brush Tip Shape setting. These settings can be toggled on and off by selecting or deselecting the check box next to them.
The settings also can be locked and unlocked by clicking the lock icon next to the name. Locking the setting keeps the values static, even as you toggle between other brushes and change other settings. Settings that are not locked can be reset to the default values by selecting Reset All Locked settings from the Brush panel options menu. This feature is great if you need to reset the behavior of the brush and start over.
The following is a list of the simple behavior settings in the Brush panel that do not have additional dialog box options:
Noise: This adds noise along with the paint as the stroke is applied. This has the effect of adding extra texture to the paint stroke and minimizing harsh changes made by editing paint tools.
Wet Edges: This tries to add an element of wetness of the painting effect in the edges of the stroke. This can help soften the edges of paint strokes. This option is not needed or available when you are using the Mixer Brush tool.
Airbrush: When this option is selected, the stroke is applied in gradual tones to the image. This is a great way to soften the effect made by editing paint tools.
Smoothing: When this option is selected, the brush stroke produces smoother curves. This option is most effective when you are using quick paint strokes with a stylus. This is a nice option, but it may produce a slight lag time when rendering the stroke.
Protect Texture: When this option is selected, the same pattern and scale are applied to all brush presets that have a texture to help simulate a consistent canvas texture when painting with multiple, textured brush tips.
The following sections cover the more advanced behavior settings in the Brush panel that contain extra dialog box options.
The Shape Dynamics settings, shown in Figure 16.21, are designed to help you control the size, angle, and shape of the brush during the actual painting stroke.

Here are the settings you can configure to control the Shape Dynamic effect:
Control: The Control setting defines what input is used in determining the variance applied by the jitter settings. Setting the Control to Fade allows you to specify how many steps the jitter adjustment is applied over. The other settings allow you to use the pen pressure, tilt, and stylus wheel values to control the variance that's applied. The Size Jitter, Angle Jitter, and Roundness Jitter settings all have Control settings that allow you to define how the value of each is controlled.
Size Jitter: The Size Jitter settings control the variation in the brush tip's size as the stroke is being created by dragging the cursor. A Size Jitter setting of 0 percent means that the brush tip size doesn't change at all during the stroke. The higher the percentage, the more the size dynamically changes as the stroke is being made. The Minimum Diameter setting specifies the minimum size that the jitter can reduce the brush as the stroke is being applied.
Using the Pen Tilt setting to control the size jitter gives you the most control. If you are using the Pen Tilt option in the Control setting, the Tilt Scale option can be used to define the amount of variance in the Size Jitter. The larger the Tilt Scale setting, the more variance you see in the size of the brush.
Angle Jitter: The Angle Jitter setting allows you to vary the angle of the brush based on different Control options. In addition to the regular Control options, if you have a stylus tablet that Photoshop recognizes attached to your system, you have the option to use the following:
Rotation: This varies the angle of the brush based on the rotation of the stylus pen.
Initial Direction: This varies the angle based on the initial direction of the brush stroke. This is similar to holding the brush at a specific angle throughout the stroke and is a great option if you are using the brush to add calligraphic text.
Direction: This varies the angle based on the current direction of the brush stroke. This reduces the impact that flat brushes have when changing angles.
Roundness Jitter: The Roundness Jitter setting allows you to vary the roundness of the brush as the stroke is being created. The more round the brush, the more consistent the brush stroke is. Reducing the roundness allows for more dramatic brush strokes to appear in the image. You can specify a Minimum Roundness value that keeps the brush from varying too much.
Flip X Jitter/Flip Y Jitter: The Flip X Jitter option flips the jitter across the X axis of the painting stroke. The Flip Y Jitter option transposes the jitter across the Y axis of the painting stroke.
The Scattering settings, shown in Figure 16.22, are designed to help you apply a scattering effect as you apply the brush stroke. The Scattering option creates the effect of scattering the brush tip in a random displacement along the path of the stroke, as shown in Figure 16.23.
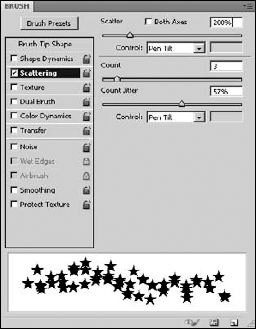
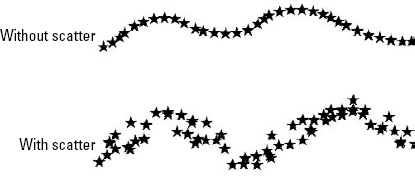
Figure 16.23. This shows the effect of using the scattering option. One of the lines is drawn without scattering, the other with scattering.
Here are the settings that you can configure to control the Scattering effect:
Control: The Control setting defines what input is used in determining the variance applied by the scattering settings. Setting the Control to Fade allows you to specify how many steps the scattering adjustment is applied over. The other settings allow you to use the pen pressure, tilt, rotation, or stylus wheel values to control the variance that is applied.
Scatter: The Scatter settings control the variation in the scattering of the brush as the stroke is applied. The variance of the scattering is controlled by the method specified in the Control setting.
Both Axes: When this option is selected, the brush tip is scattered both horizontally and vertically. When this option is not selected, the brush tip is scattered only horizontally or vertically in a direction perpendicular to the movement of the stroke.
Count: This specifies the amount of brush tips to include in the scattering.
Count Jitter: This specifies the amount to vary the scattering and how to control the variance of the count based on the Control setting.
The Texture settings, shown in Figure 16.24, are designed to help you apply a texture effect to the brush strokes. Using the texture effect, you can simulate textures such as an oil paint canvas or wall that show up in the brush strokes.

Here are the settings that you can configure to control the Texture effect:
Texture: This allows you to select the texture from the patterns list that is currently selected in the Presets Manager. Clicking the Texture option displays the list, and you can click the triangle button to display a list of preset lists and options to load and save presets.
Invert: This inverts the pattern used to apply a texture to the brush stroke.
Scale: This sets the size of the pattern applied to the brush stroke. Setting this value too high makes the pattern very apparent in the brush strokes. Setting this value too low eliminates the result of applying the pattern.
Texture Each Tip: When this option is selected, the texture is applied individually to each brush mark in the brush stroke rather than to the entire stroke when it is finished. Enabling this option is very CPU-intensive, but this option is required for the depth variance option to have an effect.
Mode: This specifies the blending mode to use when applying the texture pattern to the brush stroke (before it is applied to the pixels below). This setting does not override the blend mode setting in the Brush tool options.
Depth: This specifies how deeply the paint penetrates into the texture. A value of 0 percent means that no pattern shows through.
Minimum Depth: This specifies the minimum penetration depth that is applied to a stroke, even if the variance control reduces penetration below that level.
Depth Jitter: The Depth Jitter setting allows you to vary the depth that is applied to the texture as the brush stroke is being created. Increasing this value can give the texture a much more dramatic appearance.
Control: The Control setting defines what input is used in determining the variance applied by the depth texture setting. Setting the Control to Fade allows you to specify how many steps the depth texture variance is applied over. The other settings allow you to use the pen pressure, tilt, rotation, or stylus wheel values to control the depth variance that is applied.
The Dual Brush option allows you to use two brushes at the same time to apply each stroke. Using the Dual Brush option can add a whole new level of dynamics to your brushing techniques. When the Dual Brush option is selected, the Brush panel dialog box changes to allow you to select the second brush. You also can select the blending mode used to combine the two brush strokes before they are applied together to the image. Additionally, you can set the size, spacing, scatter, and count to use in the second brush.
The Color Dynamics option, shown in Figure 16.25, provides a dynamic coloring effect by changing the brush stroke from the foreground to the background color as you apply the brush stroke. Using the Color Dynamics option allows you to essentially paint with two colors at the same time.
The Foreground/Background Jitter setting controls the jitter between the foreground and background color. A value of 0 percent applies only the foreground color. A larger value means more jitter between the two colors.
The variance between the foreground and background colors is adjusted using the Control setting. The Control setting defines what input is used in determining the variance between the foreground and background colors. Setting the Control to Fade allows you to specify how many steps the color variance is applied over. The other settings allow you to use the pen pressure, tilt, rotation, or stylus wheel values to control the color variance that is applied.
You also can vary the hue, saturation, brightness, and purity in the colors by adjusting the sliders in Figure 16.25.

The Transfer option, shown in Figure 16.26, gives you an additional level of control over how the brush stroke is applied to the pixels below by varying settings such as wetness, flow, and opacity. The Transfer option really has two modes: one for painting/editing brushes and one for the Mixer Brush tool.
When you have a painting or editing brush selected, you can use the Transfer option to set an amount of Opacity Jitter and Flow Jitter that occurs when applying the brush strokes. Increasing the Opacity Jitter and Flow Jitter varies the intensity of the brush stroke and thus varies the effect of the painting tool in a dynamic way.
The variance in all the Transfer controls is adjusted using the Control setting. The Control setting defines what input is used in determining the variance in each transfer setting. Setting the Control to Fade allows you to specify how many steps the variance is applied over. The other settings allow you to use the pen pressure, tilt, rotation, or stylus wheel values to control how the variance is applied.

As you can see from the previous section, the options in configuring the shape and behavior of brushes are limitless. This makes the ability to save brush settings a critical part of using the painting features in Photoshop.
The Brush Presets panel, shown in Figure 16.27, displays a list of the preset brushes with their corresponding brush stroke preview. The Brush panel menu also allows you to set the preview mode to text only; small, medium, or large thumbnails; and small or large thumbnail lists. You also can select one of the many sets of preset brush lists from the panel menu. Brush presets can be added, renamed, and removed from the current list using the buttons at the bottom of the panel menu.
The panel menu provides the following options to manage the brushes that are applied to the presets list:
Reset Brushes: This resets the preview list to the Photoshop default.
Load Brushes: This launches a dialog box to load a saved set of brushes from a file. The new set is added to the existing set.
Save Brushes: This launches a dialog box to save the current set of brushes as a new preset file. This is the best way to permanently organize the brushes you are using.
Replace Brushes: This launches a dialog box to load a saved set of brushes from a file. The new set replaces the existing set.

In addition to the brush style painting tools listed earlier, Photoshop also provides the Paint Bucket and Gradient tools, shown in Figure 16.28, that allow you to paint large areas of an image with a color, gradient fill, or pattern. These tools apply paint using a general filling method rather than individual brush strokes.

Figure 16.28. The Paint Bucket and Gradient tools allow you to add paint to an image by filling an area rather than using individual brush strokes.
The Paint Bucket tool applies paint to the layer when you click a pixel. All pixels that match the pixel directly below the cursor are replaced by the foreground color or a pattern. The Paint Bucket tool paints only to the layer currently selected in the Layers panel. Also if a selection exists, the Paint Bucket tool paints inside that selection only.
You can set the following options when using the Paint Bucket tool:
Source: This allows you to select either the foreground layer or pattern.
Pattern: You can use this option to select a pattern to fill the image from the drop-down list shown in Figure 16.29. You also can select from several pattern sets using the side menu to the pattern list, also shown in Figure 16.29. Using this menu, you can load and save the preset lists, open the preset manager, and add new patterns.
Mode: This allows you to select the blending mode to use when applying the paint to the image.
Opacity: This sets the opacity of the filling paint.
Tolerance: This sets the tolerance to use in determining whether a pixel matches the color of the selected pixel.
Anti-alias: This allows you to toggle anti-alias smoothing around the edges of the paint fill. When this option is enabled, the edges blend more with the surrounding pixels.
Contiguous: When this option is enabled, the fill occurs only in pixels of the same color that are also contiguous to the selected pixel. When this option is disabled, all the pixels in the image that match the selected pixel are painted.
All Layers: When this option is selected, Photoshop uses all layers to sample the selected pixel instead of just the selected layer. This helps if you want to paint in a layer based on a pixel color that exists in a different layer.

Figure 16.29. The Paint Bucket tool allows you to fill an area using a pattern from a list. The side menu of the patterns list allows you to load different sets of patterns, load and save pattern presets, and even create new patterns.
Figure 16.30 shows some examples of applying paint with the Paint Bucket tool. The first fill is a solid foreground color. Notice that only the black portion of the image is painted. The second fill is a pattern fill with the Contiguous option selected. Notice that only the white pixels contiguous to the cursor are filled in.

The Gradient tool applies a gradient fill by selecting start and end points in the image. The Gradient tool paints only to the layer currently selected in the Layers panel. Also if a selection exists, the Gradient tool paints only inside that selection.
You can set the following options when using the Gradient tool:
Gradient pattern: This allows you to select a gradient pattern or launch the Gradient Editor. The Gradient Editor is discussed in the next section.
Gradient style: This allows you to set the gradient style. You can select from the linear, radial, angled, reflected, and diamond styles.
Mode: This allows you to select the blending mode to use when applying the gradient fill to the image.
Opacity: This sets the opacity of the filling paint.
Reverse: This reverses the direction of the gradient fill.
Dither: This adds a dithering effect as the gradient is applied that makes the transitions appear smoother.
Transparency: When this option is selected, the transparency in the gradient allows the pixels below to show through. When this option is not selected, the gradient has no transparency.
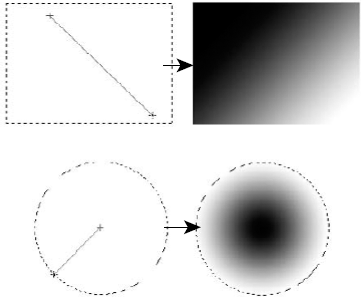
Figure 16.31 shows some examples of applying paint with the Gradient tool. In one example, a linear gradient is used to paint inside a rectangle. Notice that the angle of the gradient follows the angle between the two points. In the other example, a radial gradient is used to fill in a circle. Notice that with the radial, the gradient flows in all directions from the first selected point.
The Gradient Editor allows you to define your own custom gradients. To define a new custom gradient click on the Gradient Pattern in the Gradient tool options menu to bring up the dialog box shown in Figure 16.32 and set the following options:
Name: This specifies the name of the gradient. This name appears in the gradient lists and when you hover the mouse above the icon.
Gradient Type: You can choose from two types of gradients: Solid and Noise. The Solid gradient is created from solid color points that blend into each other. The Noise gradients are created by setting specific color channel settings and then generating a gradient based on noise (randomly selected colors) in those channels.
Smoothness: This defines how smooth the transition between two colors appears.
Transparency Stops: This sets the value of transparency for a specific spot in the gradient. For each transparency stop, you can set the opacity and a location value. The location value corresponds to the midpoint diamond shown between two stops. The closer the location is to the transparency stop, the less effect the stop value has in that direction.
Color Stops: This sets the value of color for a specific spot in the gradient. For each color stop, you can set the color and a location value. The location value corresponds to the midpoint diamond shown between two stops. The closer the location is to the color stop, the less effect the color stop value has in that direction.

Figure 16.32. Using the Gradient Editor, you can create custom gradients that involve several colors and transparency levels.
Clicking the Gradient Presets menu button shown in Figure 16.32 displays a menu that allows you to select, load, and save sets from the preset lists.
The tools discussed so far in this chapter provide an incredible arsenal for creative minds. They can be applied in limitless ways. So far we have discussed only the basic behavior of the tools. In this section, we show some examples and techniques to use the tools to paint creatively.
Note
One technique not listed here is to add a stroke to a shape or path. Using paths to create shapes and then adding a fill and stroke to them is a great way to paint specific objects. To learn more about paths and shapes, see Chapter 17.
The most basic form of painting is to use a blank canvas and use painting tools to paint onto the canvas. You can paint onto a blank canvas in really countless methods, and this example simply gives you a few steps to try out some different techniques:
Open the blank image using the default Photshop size of 7 by 5 inches.
Select the Gradient tool, and set the foreground color to a good blue sky color and the background color to white.
Use the Gradient tool to create a linear gradient from the top of the canvas down.
You can use the Shift key to help you draw the gradient in a perfect vertical line. The gradient shown in Figure 16.33 is drawn by dragging from the top of the image down to the center of the image.
Select the Rectangle Shape tool, and set the background color to a soft brown.
Use the rectangle shape tool to draw a rectangle that is brown on the bottom of the canvas, as shown in Figure 16.33.
Notice that you now have a skyline.
Note
If you create the rectangle as a shape layer, you need to set the Style option to the default of None so that a gradient style is not applied to the gradient.
Create and select a new layer.
Although this step is optional, it is a good idea and shows how you can add to a painting on a separate layer without affecting the bottom.
Select the Brush tool, and from the Brush Presets list, select the grass brush, shown in Figure 16.34. Launch the Brush panel to configure a new brush.
Set the size of the brush to 21, enable the Shape Dynamics, Scattering, Color Dynamics, and Smoothing options.
Set the Scattering to 33 percent, the Count to 2, and the Count Jitter to 100 percent, as shown in Figure 16.34. This creates a brush that scatters the grass as you paint the strokes onto the canvas.
Set the foreground color to a soft gold, and paint the grass onto the new layer, as shown in Figure 16.35.
Notice how the brush technique scatters the grass.
Create and select a new layer.
From the brush styles list, select the soft brush, shown in Figure 16.36, and launch the Brush panel to configure a new brush.
Set the size of the brush to 70, and enable the Shape Dynamics, Scattering, and Smoothing options.
This time, on the Shape Dynamics, increase the Size Jitter to 100 percent and set the Minimum Diameter to 20, as shown in Figure 16.36. This creates a brush that varies the size of the soft brush and helps create a soft cloud effect.
Set the foreground color to white, and paint the clouds onto the new layer, as shown in Figure 16.37.
Notice how the brush technique varies the size of the stroke and helps create the variance in the clouds.
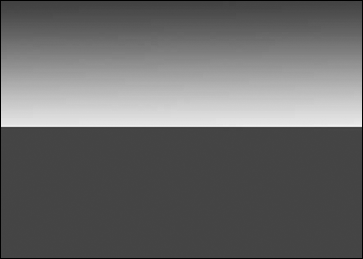


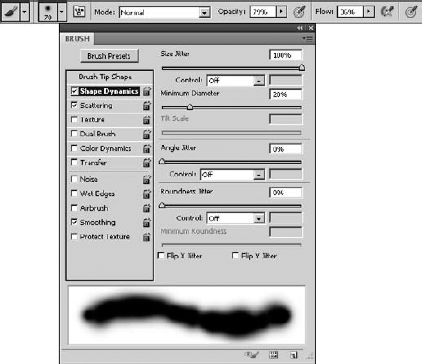
Figure 16.36. Selecting a soft brush style and adding a jitter to the size as well as a scattering effect help create a brush that quickly applies a cloud technique to the image.

Note
The project used to create the image in Figure 16.37 is available on this book's Web site as Figure 16-37.psd. You can view the different layers and get a view of the actual color image.
A common technique that artists use is sketching the subject area prior to painting it. Photoshop provides a great method for sketching general shapes. The method is to simply create a new layer and then use the Pencil tool to draw the edges. Remember that when you hold down the Shift key, you can draw straight vertical or horizontal strokes, and when you hold down the Shift key and click in two different locations, you draw a straight stroke between them.
When you are tracing the image, it is a good idea to create three extra layers. The topmost layer is the layer you draw on. The next layer should be a simple white canvas that you can turn off when you are tracing and turn on to see what the tracing looks like, as shown in Figure 16.38. The next layer down sits above the image as an adjustment layer; its purpose is to lighten the image to make it easier to see your tracing lines while you are tracing but still see the image behind.
Figure 16.38 shows an example of loading an image, creating a new layer, and then using the Pencil tool to trace some general shapes. Notice that the finished product automatically provides a good perspective in the sketch.

Figure 16.38. Using a new layer and the Pencil tool, you can quickly trace shapes in the image below to create a quick sketch to paint from.
Note
The project used to create the image in Figure 16.38 is available on this book's Web site as Figure 16-37.psd. You can view the different layers used to create the sketch.
One of Photoshop's biggest advancements in the past years is the addition of the Mixer Brush tool. The Mixer Brush tool allows you to treat pixels already existing in an image as wet paint. You can use the Mixer Brush tool to brush around the paint that already exists, which can fix small portions of images or apply an effect to larger areas. You can use all the power of the Brush panel to create special brushes and then use them as wet paint on the image.
Tip
You also could start by using the Filter
Figure 16.39 shows an example of using a simple fan brush with the Mixer Brush tool to create brush strokes on an image to simulate the appearance of an oil painting. The cool thing about this effect is that it was applied in only a few minutes. If you spend longer, you can really fine-tune the brush strokes and create some fairly nice artwork.
In Figure 16.39, we disabled the Load Brush After Stroke option so no new paint would be added. We also enabled the Clean Brush After Stroke option so the brush would be clean before touching the image again. This allows us to keep the paint from mixing too much.

Photoshop merges its world-class photo-editing tools with its paint brush tools to provide the best of both worlds. This chapter discussed the Brush tools available for editing, such as the Dodge and Burn tools, as well as the tools Photoshop provides for painting, such as the Paint and Mixer Brushes. You can use these tools to edit photos, paint new images, and even combine painting with photo editing.
The Brush panel enables you to create custom brushes that extend your capability in editing and painting images. You also can use Photoshop blending modes to apply the effects from the Brush tools in a variety of ways.
In this chapter, you learned about the following:
Customizing the Brush tool settings using the Brush panel
Using some Brush tools for editing localized areas of images and some for painting pixels
Adjusting the blending mode to completely change how brush stroke effects are applied to the pixels below
Erasing specific pixels in the image
Using Photoshop's wet paint capabilities to create a painting from an existing image
Tracing techniques to quickly give you a basis and perspective for painting images