
The Layer menus
The Layers panel
Adding layers
Adding layer effects
Masks
When you open an image in Photoshop for the first time, that image is one layer, just as if you'd laid a photo out on a table. When you add things to that image such as text or another image, think of it as putting a transparency containing those items over the original image. Rather than destroying the integrity of the image, you are simply adding layers to it to change the way it looks. That's exactly how the Layers panel works. You can keep stacking up the layers to change the way your image looks, and those layers don't have to contain objects; they can be composed of a filter or style. Meanwhile, your original image is still available to you in its original, unaltered state.
That's the basics, anyway. Of course, because this is the digital world of Photoshop, a great idea has gotten so much better over time. Everything from changing the settings of filters that were added months ago to animating is all part of the Layers panel in Photoshop CS5, and having a good, solid understanding of how it all works is essential to your Photoshop success.
A basic understanding of the Layers panel including the icons and menu options is a good place to start. Then I show the different kinds of layers you can add. I end the chapter by showing you everything you need to know about layer masks. After you've been introduced to the Layers panel, you'll be ready to get into the meat of what Photoshop is all about—image correction and special effects, where the Layers panel is used constantly.
Although I am going to show you the ins and outs of the Layers panel and how to add special effects and adjustment layers later in this chapter, I want to start by diving right in and showing you what it looks like when you have multiple layers in your document and how to work with those layers.
Figure 10.1 shows a type layer on top of an image layer. This is about as basic as two layers get. As you can see in the photo, the type layer is opaque so the image can't be seen through it.

Look at the Layer menu. Each layer is represented by a thumbnail and a row in the Layers panel. The layer at the bottom of the list—the image, in this case—is the layer that is on the bottom of the "transparencies." All the layers placed above it cover it in some way, and the hierarchy goes from there.
The image in Figure 10.1 is a background layer. When you open a new image in Photoshop, it automatically becomes the background layer. A background layer is locked, so you can't make any changes to the layer and it can't be moved; it is always the bottom layer. You can make the background layer into a regular layer by double-clicking it and giving it a name. You also can create a background layer from a regular layer by choosing Layer
Tip
Although you can find options for working with layers in both the Layer menu and the Layers panel menu, I like to take a shortcut by right-clicking individual layers. This pops up a menu that has more specific options for that particular layer. For instance, a Type layer pops up a menu that includes all the Type options and none of the Smart Object options.
The text is a type layer, as evidenced by the T in the layer thumbnail. In order to make changes to it, it must be selected by clicking the thumbnail and highlighting it in the Layers panel. Then you can use the tools or Layer menu options to make changes.
Note
Probably the most frustrating aspect of layers for the new user, and even admittedly for those of us who have been around the block a time or two, is that you can't make any changes to a layer unless it is selected in the Layers panel. I've done it many times—tried to move or make changes to a layer and nothing happens or the wrong layer is affected. Keep this rule in the back of your mind, and it soon becomes a habit to check the Layers panel to make sure the correct layer is selected before trying any changes.
After you've turned your background layer into a standard layer, you can swap layers by dragging and dropping them above or below one another as shown in Figure 10.2. Of course in this example, with the text layer on the bottom, it is no longer visible in the image.

Speaking of visibility, the "eye"cons next to the layers indicate that they are visible. Click the eye next to either layer and the visibility is turned off, as if the layer never existed. It can't be seen or changed until the visibility is turned back on.
Layers can be created in many different ways; adding additional images to your document, turning selections into layers, and adding text or shapes to your document are only a few of these ways. As you add each new layer, it is placed at the top of the hierarchy. You can, of course, move it from there.
I show you how to add layers that change your image such as adjustments or layer styles later in this chapter. Smart Objects are another area of layers that requires its own section. In this section, I show you the basics of adding new elements to your document as separate layers. These new elements can be another image, text or shape layers, or a selection.
If you are combining two or more documents into one image either by merging them or by creating a photo collage, adding additional documents as new layers to your original document couldn't be easier. There are four easy ways of doing so:
Use File

Use Mini-Bridge: Use the Mini-Bridge panel to find the image that you want to bring in as a new layer and drag it from Mini-Bridge into your document. The new image is placed as a new layer into your original document, and you have the option of resizing or rotating it before accepting placement. You can place images in the same way using the full Bridge application as well.
Copy and paste: You can copy and paste documents into one another as additional layers. Open the document with which you want to make a second layer. Use Ctrl/

Move layers between documents: This used to be the easiest method when the document windows floated in Photoshop. Now that they are tabs, it is a little bit trickier, because at least one of the documents needs to be in a floating window for this to work. If you are working with tabs, choose Window

Adding text or shapes as layers in your document is a no-brainer, because when you use the Text or Shape tools, a new layer is automatically created with these elements on it. These layers are identified by Photoshop as either a text or a shape layer, giving them a unique look, as well as their own menu options. Text and shapes are covered in Chapter 17.
Selections can be made in the document you are working on or in other documents to be copied and pasted into the original. In Chapter 9, I show you how to export selections as new layers using the Refine Edge dialog box. If you have a layer containing a selection in one document that you want to place into another document, you can move just that layer into your original document by dragging and dropping it. You also can use the copy and paste commands to copy a selection and paste it as a new layer into the same document or a different one. You don't need a special paste command; using the paste command automatically creates a new layer.
As with any panel, tool, or dialog box in Photoshop, knowing the menu options available while working with layers is what gives you the power and versatility to make the Photoshop creations you've envisioned. I've listed the menus here as a reference; they'll be much easier for you to understand after you've read this chapter and worked at least a little bit with layers, but be sure to come back to them, because I guarantee you'll find options you forgot about.
When it comes to layers, two menus do all the work: the Layer menu, found in the menu bar above the document window, and a compact version in the Layers panel menu, found in the top-right corner of the Layers panel. These menus have some identical options, but some options are found in one menu and not the other. I start with the Layer menu, because it has the most options, and then move on to the options that are found only on the Layers panel menu.
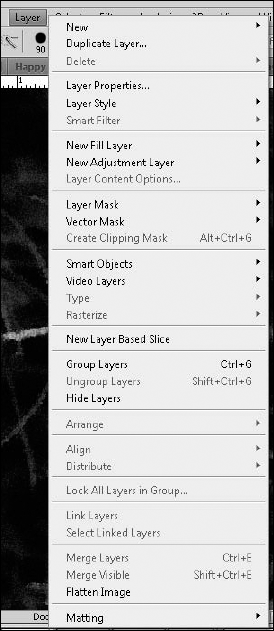
The Layer menu, as shown in Figure 10.4, has these options for working with layers:
New:
Layer: Creates a new blank layer in the Layers panel.
Background from layer: Turns the current layer into a locked background layer.
Group: Creates a group in the Layers panel.
Group from Layers: Creates a group in the Layers panel and adds all selected layers to that group.
Layer via Copy: Creates a new layer containing the last item copied into the clipboard.
Layer via Cut: Creates a new layer containing the last item cut.
Duplicate Layer: Creates an exact copy of the layer that is selected.
Delete:
Layer: Deletes the currently selected layer.
Hidden Layers: Deletes any layers that have the visibility icon turned off.
Layer Properties: Displays the name and associated color of the currently selected layer.
Layer Style: Adds a new layer style to the currently selected layer. Layer styles can be anything from drop shadows to inner glows and are covered later in this chapter; I also discuss several of the Photoshop effects throughout the book.
Smart Filter: Allows you to make changes to any Smart Filters attached to the selected layer. Smart Filters are covered later in this chapter and used throughout the book.
New Fill Layer: Adds a fill to a layer. This fill can be a color, gradient, or pattern.
New Adjustment Layer: An adjustment layer is an image enhancement that is placed as a non-destructive layer over your image. These adjustments range from levels to hue and saturation adjustments. Fill and Adjustment layers are covered in more depth later in this chapter.
Layer Content Options: Opens the settings of a selected Smart Filter, Fill layer, or Adjustment layer so you can change them.
Layer Mask: Creates a new pixel mask on the selected layer.
Vector Mask: Creates a new vector mask on the selected layer.
Create Clipping Mask: Creates a clipping mask using the layer below the selected one. Masks are covered in greater detail later in this chapter.
Smart Objects: This option has a submenu of multiple options for creating and using Smart Objects. Smart Objects are discussed in detail later in this chapter.
Video Layers: Provides options here for working with video layers. They are covered when we discuss working with video in Chapter 26.
Type: Provides options having to do with layers containing text. They are covered in Chapter 17.
Rasterize: Creates a raster image from the vector objects listed in the Rasterize submenu. As discussed in Chapter 3, a vector object is based on a set of values that describe lines. A raster image is one that is made up of pixels.
New Layer Based Slice: Creates a slice that conforms to the proportions of the selected layer.
Group Layers: Groups the selected layers.
Ungroup Layers: Ungroups the selected layers.
Hide Layers: Turns off the visibility of selected layers.
Arrange: Changes the position of the selected layer(s) in the Layers panel relative to the option chosen. For instance, you can bring the selected layer to the front, which places it at the top of the Layers panel.
Align: Aligns the objects on the selected layers based on the parameters found in the Align submenu. For instance, you can center all the selected layers with each other so they create a symmetrical row.
Distribute: Moves each layer the exact same distance from one another based on the parameters in the Distribute submenu. To use this option, at least three layers must be selected and none of the layers can be locked.
Lock all Layers in Group: Locks all the layers in the group with the selected layer.
Link Layers: Links two or more selected layers. When layers are linked, moving, resizing, or otherwise transforming one also affects the other layer, just as if you had both layers selected in the layers panel.
Select Linked Layers: Selects all the layers that are linked.
Merge Down: Merges the selected layer(s) with the layer directly beneath it.
Merge Visible: Merges all layers with the visibility icon turned on.
Flatten Image: Merges all the layers into a single background layer.
Matting:
Color Decontaminate: Reduces a color fringe or halo around the edges of a selection by reducing the saturation of any color on the edges that isn't found in other areas of the selection.
Defringe: Removes halos from selections by replacing aberrant color with pixels farther into the selection.
Remove Black or White matte: Removes halos around images whose edges have been anti-aliased and that have been cut out of a black or white background. The anti-aliasing caused the edges of these images to blend with the background, creating a halo.
The Layers panel menu, shown in Figure 10.5, has the most common options found the Layer menu. A few of the options do basically the same thing as options found in the Layer menu but go under a different name. Some of the options have to do strictly with the Layers panel, so they are found only in the Layers panel menu.

These additional options are found only in the Layers panel menu:
Convert to Smart Object: This option converts the selected layer into a Smart Object for use with Smart Filters. This option is found in the Layer menu under the Smart Objects option. It is discussed later in this chapter, as well as in areas of the book where filters are discussed.
Edit Contents: The contents of a Smart Object are effectively kept in a different file to protect them from changes. This option allows you to make changes to the original file.
Blending Options: This option opens the Layer Style menu where you can create a Blending option for the selected layer. This is not as easy or straightforward as simply using the Blending options drop-down menu found on the Layers panel itself. Blending options are covered later in this chapter.
Edit Adjustment: This option opens the Adjustments panel for a selected Adjustment layer and allows you to edit the settings.
Animation Options: Additional options for the Layers panel deal with animation. These options can be shown automatically when an animation is being created, or they can be turned on or off. These options are discussed in Chapter 26.
Panel Options: This option allows you to change how your Layers panel appears and how layers are shown. Figure 10.6 shows the options that are available.
Close: This option closes the Layer panel.
Close Tab Group: This option reduces the entire tab group containing the Layers panel to an icon.

The Layers panel is arguably the most used panel in Photoshop. It is so popular that it appears in every panel preset. Whether you are a photographer using Photoshop to enhance your photographs or working with 3D objects, the Layers panel is a vital part of what you are doing in Photoshop.
The panel is found in the lower-right corner of the Photoshop workspace, but as you learned in Chapter 2, you can move it to any position you would like. It works out well at the bottom, though, because the Layers panel has a tendency to grow. You'll see what I mean very soon.
A quick look at the Layers panel, shown in Figure 10.7, shows several icons, settings, and drop-down menus. They are covered throughout this chapter.

The Opacity and Fill drop-down menus both allow you to change the opacity of a selected layer, but in different ways. The opacity setting is just that, a representation of the opacity of the selected layer. The higher the percent that is displayed, the more opaque the selected layer is. As the percentage goes down, the layer becomes more transparent.
The Fill setting also adjusts opacity, but only the opacity of the fill. A normal image layer disappears just as easily with a Fill adjustment as an Opacity adjustment, but an object or text layer reacts very differently. Figure 10.8 demonstrates how adjusting the fill opacity on a shape layer reduces just the fill, while the outline (or stroke) remains, along with any styles that have been applied.
Note
Try different Layers panel setting by downloading Figure 10-8 from the Web site.
You can adjust both the Opacity and the Fill settings in three ways. The first is to highlight the percentage that is shown and type a new percentage. If you know exactly what percentage to use, this is probably the fastest method. Second, you can click the down arrow to open the drop-down slider and use it to adjust the setting. The third, and by far the easiest, method is to use the scrubber. Click and drag over the setting name (Opacity or Fill) and a two-sided arrow appears. Drag left to decrease the setting and right to increase it.
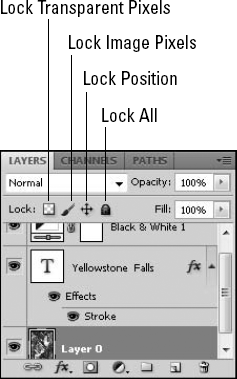
The Layers panel has four different lock settings, as shown in Figure 10.9. Locking different aspects of your layers means that those aspects can't be changed. Each lock works on a different aspect of your layer, giving you a wide range of versatility. Select the layer you want to lock, and then decide which lock you want to use.
The first option is Lock Transparent pixels. Click this icon, and all the transparent pixels in your image are locked. You can add fills, make color corrections, or add styles or filters to the rest of the image, but the transparent pixels remain pristine.
The second option is Lock Image Pixels. This protects the image pixels from the paint tools.
The third option is Lock Position. This locks the position of the objects in the layer, keeping them static inside the document. You can still change other things about the layer, adjusting the color or adding a filter, for instance.
The last option is Lock All. This keeps your layer visible but protects it from any accidental changes. A background layer is automatically locked.
Blending modes create amazing special effects by changing the way layers affect each other. At the beginning of this chapter, I asked you to imagine that layers were like transparencies stacked on top of one another. Using Blending modes is an example of how using digital technology has taken this idea one step further. Imagine that your transparencies are made of gel rather than plastic, and that rather than sitting on top of one another, they can blend with each other. Then imagine that you can determine which areas of the images on your transparencies would blend and how. Last but not least, imagine that you finish blending them, and you hate the result, but you find that you can pull them apart and start all over with your original images.
But blending modes do more than blend two images together. They can be used on any layer that is added to your Layers panel. You can use them to change the way a layer style is applied, to blend a pattern into an image, or even to change an adjustment layer into a special effect.
The drop-down menu at the top of the Layers panel shown in Figure 10.10 shows the different blending modes you can use to choose how the selected layer affects the layers under it. The blending modes are divided into six general categories, explained in the following sections.
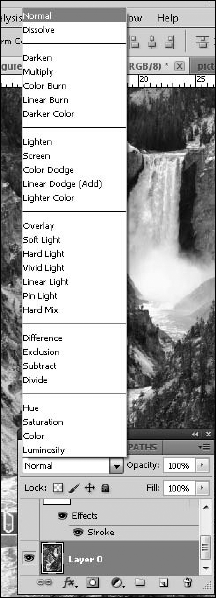
The Normal blending mode is the default setting in the Layers panel, and when it is used, layers act as you would expect. When the opacity of a layer is set to 100 percent, any pixels in that layer completely cover the layers below. As you reduce the opacity of a Normal layer, it becomes universally more transparent. If you choose the Dissolve blending mode, it looks the same at 100 percent opacity as the Normal mode, but as you reduce the opacity, the selected layer disintegrates or dissolves, losing pixels rather than opacity.
Normal: This is the default option. The blend is applied uniformly by painting each pixel based on the layer value and opacity setting to make it the resulting pixel.
Dissolve: This blend is applied by randomly replacing the pixels with either the base value or the layer value, depending on the pixel location and the opacity setting. Using this option allows you to dissipate the effect of the layer more than just changing the opacity.
The next group within the Blending modes menu contains darkening effects. Each of these five blending filters leaves the darker areas of the selected layer opaque and creates translucency in the lighter areas of the image.
Darken: The blend is applied by replacing the pixels with the darker of the base value or the layer value. In other words, the layer is applied only to pixels in the underlying image that are lighter than the value of the layer pixel. This has the effect of darkening the image and can be extremely useful if applying filters to overexposed images.
Multiply: The blend is applied by multiplying the base value of each pixel by the layer pixel value. Multiplying a pixel by black always produces black, and multiplying a pixel by white leaves the pixel value unchanged. This mode has the overall affect of darkening the image.
Color Burn: The blend is applied by darkening the base channel based on the blended color by increasing the contrast between the two. This has the effect of darkening the image as well as increasing color contrasts.
Linear Burn: This darkens the image as it applies the blend by decreasing the brightness based on the value of layer pixel.
Darken Color: The blend is applied by replacing each channel of a pixel with the darker between the base pixel channel and the layer pixel channel. This option works a bit better than using the Darken mode because it uses the darkest values from each channel to create the resulting color.
The lightening blending modes work opposite of the darkening blending modes: Instead of leaving the dark areas opaque, the lighter areas of the selected layer remain opaque and the dark areas are translucent.
Lighten: The blend is applied by replacing the pixels with the lighter of the base value or the layer value. This has the effect of lightening the image and can be extremely useful if applying filters to underexposed images.
Screen: The blend is applied by multiplying the inverse of the channel values of the layer and base pixels. This results in a lighter color than either the layer value or the base value. This has the same effect as projecting multiple photographic slides on top of each other.
Color Dodge: This applies the blend by decreasing the contrast between the color of the channels in the layer pixel and the base pixels. This lightens the base pixels using the layer pixel values.
Linear Dodge (Add): This lightens the images as it applies the blend by increasing the brightness based on the layer value of each channel.
Lighter Color: The blend is applied by replacing each channel of a pixel with the lighter between the base pixel channel and the layer pixel channel. This option works a bit better than using the Lighten mode because it uses the darkest values from each channel to create the resulting color.
These blending modes create contrast between the selected layers and the layers under it, making the lighter areas lighter and the darker areas darker. Here's information you need to know to apply these modes:
Overlay: This applies the blend by mixing the layer values with the base pixels while preserving the shadows and highlights. This reduces the effect of extreme layer adjustments that dramatically reduce the detail in the original image.
Soft Light: This applies the blend based on the gray value of the filtered pixel. If the value of the layer pixel is darker than 50 percent gray, then the base pixel is darkened using a multiplying method. If the value of the layer pixel is lighter than 50 percent gray, then the base pixel is lightened using a dodging method. This has a similar effect to shining a diffused spotlight on the image.
Hard Light: This applies the blend based on the gray value of the layer pixel. If the value of the layer pixel is darker than 50 percent gray, then the base pixel is darkened using a multiplying method. If the value of the layer pixel is lighter than 50 percent gray, then the base pixel is lightened using a screening method. This has a similar effect to shining a harsh spotlight on the image. This option is great for adding shadows while applying the filter.
Vivid Light: This applies the blend based on the gray value of the layer pixel. If the value of the layer pixel is darker than 50 percent gray, then the base pixel is darkened by increasing the contrast. If the value of the filtered pixel is lighter than 50 percent gray, then the base pixel is lightened by decreasing the contrast.
Linear Light: The Linear light acts as a combination of Linear Burn, Linear Dodge, and Vivid Light. The lighter colors brighten, but not as much as using Linear Dodge; and the darker colors darken, but not as much as using Linear Burn.
Pin Light: This applies the filter based on the gray value of the layer pixel. If the value of the layer pixel is darker than 50 percent gray, then the darker of the layer pixel and base pixel is used. If the value of the layer pixel is lighter than 50 percent gray, then the lighter of the layer pixel and base pixel is used.
Hard Mix: This adds the value of each RGB channel in the layer pixel to the corresponding RGB channel in the base pixel. The values above 255 and below 0 are clipped, so this can result in a large loss of detail.
These blending modes blend the layers based on the difference between the two layers:
Difference: This applies the blend by setting the resulting pixel to the value of the difference between the upper pixel and the base pixel. Blending white inverts the pixel value, and blending black results in no change.
Exclusion: This works similarly to the Difference blend mode, but has less contrast.
Subtract: Subtracts the brightness value of the pixels in the source layer from the corresponding pixels in the target layer. The result is divided by a scale factor and then added to the offset value. The brighter the source, the more the blending mode subtracts.
Divide: Divides the brightness value of the pixels in the source layer from the corresponding pixels in the target layer. This option has a much larger variance then the Subtract blending mode.
The final group of blending modes gives the selected layer a color influence over the layers under it:
Hue: This applies the blend by creating the resulting pixel using the luminance and saturation of the base pixel but the hue of the filtered pixel. This reduces the blend to affect only the hue of the base layer.
Saturation: This applies the blend by creating the resulting pixel using the luminance and hue of the base pixel but the saturation of the filtered pixel. This reduces the blend to affect only the saturation of the original layer.
Color: This applies the blend by creating the resulting pixel using the luminance of the base pixel but the hue and saturation of the filtered pixel. This limits the blend so that it does not affect the brightness of the original layer.
Luminosity: This applies the blend by creating the resulting pixel using the hue and saturation of the base pixel but the luminance of the blended pixel. This allows you to apply so that it affects only the brightness of the original layer.
As you can see, it's actually hard to describe the effects that Blending modes can have on your image. The layers you are working with really make a difference in how the blending modes look, so the best way to get a feel for them is to jump in and play with them using your own images. I show two examples of how to do this.
Here is an example of how to blend two images together using Blending modes:
Note
You can create this effect yourself or look at my finished PSD file by downloading Figure 10-11a, 10-11b, and 10-11c from the Web site.
Open an image in Photoshop to be your base image.
For the effect we are going to use in this example, a darker image would be best, such as the first photo shown in Figure 10.11.
Add a second image as a layer on top of the first image.
This image should have highly contrasting light and dark areas, such as the second photo in Figure 10.11.
From the Blending modes drop-down menu, choose the Linear Dodge (Add) Blending mode.
Make sure your top layer is selected. The Linear Dodge (Add) Blending mode is a lighten Blending mode, which means that only the lighter areas of the image are visible. The photo of the fireworks is ideal because only the fireworks themselves are now visible, as shown in the last image in Figure 10.11.

Figure 10.11. Using the Linear Dodge (Add) Blending mode makes the lighter pixels in the fireworks image visible and the darker pixels transparent, leaving a great view of the image underneath.
Here is another example of using Blending modes. In this example, I am going to add a color cast to a photo. This is a good way to create sepia-toned images, but you can use any color you want:
Note
You can see the final image in color or try adding a color cast yourself by downloading Figure 10-12a and 10-12b from the Web site.
Open an image to which you want to add a color cast.
Choose Solid Color from the New Adjustment Layer menu in the Layers panel.
Choose a color to tint your photo.
A dark brown creates a beautiful sepia-tone, but you can choose any color you want. (The dark browns can be found in the orange/reds at the bottom of the color spectrum.)
Click OK.
The color fill is added as a new layer, as shown in Figure 10.12, leaving your image looking like a rectangle of solid color.
Choose Color from the Blending modes drop-down menu in the Layers panel.
Be sure the color layer is selected when you do this. Now the color fill affects the image by using the brightness values of the image to map the color fill onto the image, as you can see in Figure 10.12.
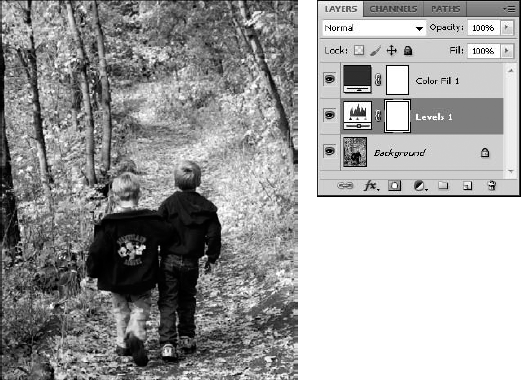
Figure 10.12. Although you can't actually see the color cast, you can see by the Layers panel that the Blending mode has been applied.
The previous exercise created a solid color cast. The best thing about using Blending modes is that the effects are only as limited as your creativity. You can change the look of this effect by reducing the opacity of the color fill layer, or better yet, changing your image into a black and white photo before doing so.
On the bottom of the Layers panel is a whole new set of icons for working with layers. The left icon, as shown in Figure 10.13, is the Link layers icon. Layers that are linked move together and are resized together, and creating a selection on one also creates a selection on all.
To link layers, select two or more layers by holding down the Shift key to select contiguous layers, or holding down the Ctrl/

The next three icons in the Layers panel are the Layer styles, Layer masks, and Fill and Adjustment layer icons, as shown in Figure 10.13. Along with Smart Objects, these are the most powerful non-destructive tools in the layers repertoire. Because the options related to these icons are extensive, each is covered later in this chapter under its own heading.
Just like you create folders on your computer's hard drive to organize your files, you can create groups in the Layers panel to organize your layers. Click the Group icon in the Layers panel, and a new Group appears, as shown in Figure 10.13. You can rename the group by double-clicking the name in the Layers panel or by right-clicking it and selecting Group Properties from the pop-up menu.
To add layers to a group, simply drag them and drop them onto the group. These layers still behave in the layer hierarchy just as they are placed, but now you can toggle the group closed by clicking the little black triangle in the group layer, hiding the layers inside the group. If you are working with many different layers, this is a lifesaver.
To create a blank layer to copy a selection to or to draw on, click the New Layer button on the Layers panel and a new transparent layer is created directly above whichever layer you have selected.
At the bottom right of the Layers panel is a trash can. You can delete layers by selecting them and clicking the trash can. If your layer has a mask, you can delete the mask by selecting just the mask. Do this by clicking directly on the mask. You see a highlight appear around it, showing that it is selected. Click the trash can, and the mask is deleted. If you have the layer thumbnail selected, the entire layer disappears, including any masks or filters.
A Fill or Adjustment layer can adjust the color, levels, or brightness and contrast of your image. These changes are added as a separate layer placed in the layer hierarchy directly over the selected layer. They are portable and editable. You can create layer masks for each one. You can use Blending modes to change the way they affect other layers, and because they are full layers, you can turn them into Smart Objects.
The best thing about a Fill or Adjustment layer is that it does not change the pixels of your original image. This is the best of non-destructive editing. All the options available for Fill or Adjustment layers can be applied directly to an image file by selecting Image
Note
Vector layers, such as text, shapes, or 3D files, cannot be adjusted using the Image
You can place a Fill or Adjustment layer into your file by clicking the Create New Fill or Adjustment layer icon in the bottom of the Layers panel. This icon looks like a half-black, half-white circle. Clicking this icon opens the Fill or Adjustment layer menu, which includes 18 options, as shown in Figure 10.14. Clicking the option you want opens a dialog box or the Adjustments panel, which allows you to adjust the settings for that option. These options and settings are covered in the next few sections.

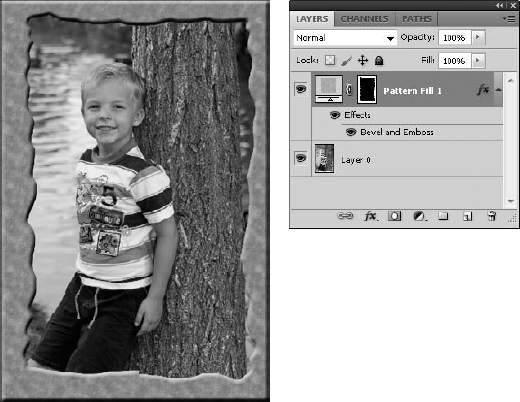
A Fill layer is a Color Fill, Gradient, or Pattern that is added as its own layer in the Layers panel. After you have added one, it fills the entire canvas. It may seem ridiculous at first to fill the canvas with a color or pattern, completely covering your original file, especially because the Fill dialog box doesn't have that many options. Remember that you are working with a separate layer, however. After you have added a fill, you can reduce the opacity or utilize a Blending mode to create a color cast, use masks to create a background, or use a clipping mask to cut custom shapes from the fill layer. In Figure 10.15, you can see an example of how I used a pattern fill to create a custom border for a photo.
Note
You can see the layers used to create this effect by downloading Figure 10-15 from the Web site.
To create any one of these layers, choose the Fill and Adjustment layer icon in the Layers panel and select Solid Color, Gradient, or Pattern from the pop-up menu. Each option opens a dialog box. Although these dialog boxes are fairly straightforward, they are covered in greater detail in Chapter 16.
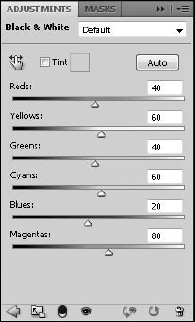
Adjustment layers change the lightness or color of your image. All the best image adjustments can be accomplished by adding an Adjustment layer to your image. When you add an Adjustment layer to your image, you won't see a dialog box; you use the Adjustment panel, shown in Figure 10.16, to make changes to each Adjustment layer. This is handy, because you can go back to this panel at any time to make changes to your Adjustment layers.
Adding Adjustment layers goes beyond using a non-destructive layer to improve the look of your photo. Using layers gives you the option to create masks that allow you to apply adjustments to selected areas of your image, providing the ability to change the mask as well as the adjustment at a later time, if needed.
For instance, the Exposure option is meant to correct exposure problems in your image. This is a handy adjustment to use in conjunction with a mask that can cover correctly exposed portions of your photo as you adjust areas that are too light or too dark. Figure 10.17 is an example of using a selection to isolate the boy and lighten the exposure on him to create a dramatic improvement to the photo.
Note
You can try a targeted exposure setting on this image or see my targeted exposure by downloading Figure 10-17a and 10-17b from the Web site.
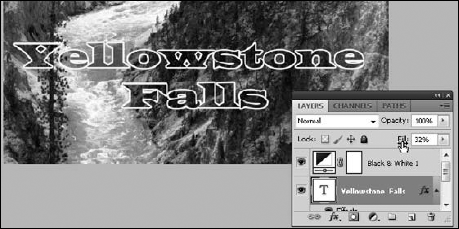
You also can use layers in conjunction with adjustments to create two different versions of your image. For instance, if you want to create black and white version of a color photo, but keep the color photo available, you can use a Black and White adjustment layer and toggle the visibility to see it in black and white or in color.

Figure 10.17. Using the exposure adjustment selectively makes the boy a stronger focal point in this image.
Another reason to use the Black and White adjustment layer is that most color photos do not convert well to black and white images, because they are usually lacking in contrast. In Figure 10.18, the first image was converted to black and white by changing the color mode to grayscale. You can see that the result is bland and not very engaging. The second image has a Black and White adjustment layer placed over it. The ability to adjust the levels of color in the image gives me the power to make the reds darker (the pistils and freckles) and the yellows brighter (the flower itself), increasing the contrast of the image and making it a much better image overall.
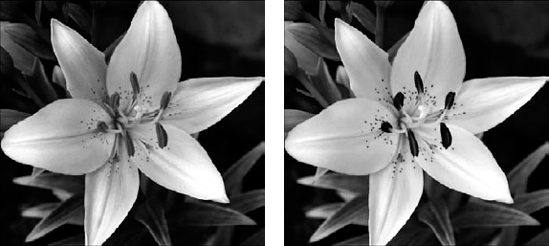
Figure 10.18. Creating a successful black and white photo from a color photo takes more than just removing the color information.
The adjustments themselves are covered in detail in Chapters 12 and 13, because you need to do much more to them than just add another layer to the Layers panel.
After you've created a Fill or Adjustment layer, you still have lots of options in how it is applied to your file. You can move it or delete it, edit the properties, or create a mask for it.
I've already mentioned how you can move a Fill or Adjustment layer, or any other layer for that matter, by dragging and dropping it where you want it to go. I can just as easily drag and drop the Curves layer into the trash, deleting it completely.
After you have created a Fill or Adjustment layer, you can go back at any time to edit the properties of the effect created with the layer. You might find that you need to do this because you have added more objects, layers, or special effects and you just need to tweak your effect without having to start all over again.
Nothing is easier. Just double-click the thumbnail on the effect layer, as shown in Figure 10.19, to open the Adjustments panel and make changes to the original effect. These changes take place as you are editing them. When you are finished, simply close the Adjustment panel to get it out of your way.

A Layer Style is any one of several effects including Drop Shadow and Inner Glow. Each Layer Style is contained in its own sublayer and can be edited, turned off, or discarded. These sublayers can even be turned into their own full layers and can be moved, filtered, color corrected, and edited just like any other layer in Photoshop.
The Layer Style menu is found at the bottom of the Layer menu. The icon for it is the fx. To add a Layer Style to your file, click the fx icon to bring up the Layer Style menu and choose a Layer Style.
When you have added a new style, it is displayed as a new sublayer under the object layer, as shown in Figure 10.20.
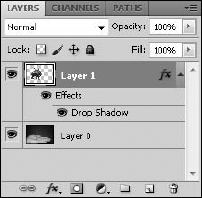
Figure 10.20. A Layer Style is added the Layers panel as sublayer of the selected layer rather than an independent layer.
Note
You also can open the Layer Style dialog box by Choosing Layer
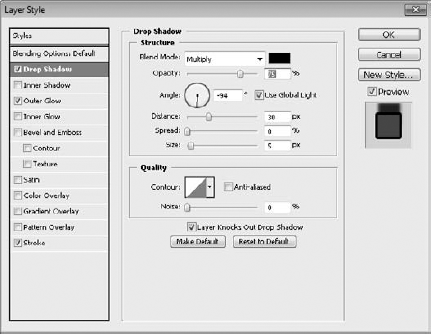
The Layer Style dialog box is very versatile. After you have opened it, you can choose one or more styles to add to your object by clicking the box next to the style name to add a check mark to it. Highlight the style name by clicking it, and the dialog box changes to give you the settings for that style. In Figure 10.21, you can see the Layer Style dialog box with three different Layer Styles selected.
Several Layer Styles are available. They all have very different effects. Here is a list of what they are and what they do:
Drop Shadow: This option creates a shadow behind your image or selection. You can set options such as the shadow size and distance.
Inner Shadow: An inner shadow casts a shadow over your image. You can set options such as the Opacity and Choke.
Outer Glow: This option allows you to add a glow around your image. You can set options such as the color of the light and the size of the glow.
Inner Glow: This option is like the Outer Glow, but it creates a glow inside your image. You can change options such as the Opacity and Technique.
Bevel and Emboss: The Bevel and Emboss option creates edge effects. This can give a 3D look to images or objects in your file. I applied a bevel to the frame in Figure 10.20 to make it pop up.
Satin: Satin creates a gradient wave across your object that mimics the look of satin. You can set options such as distance and size.
Color Overlay: A color overlay adds a color over your object. You can change the color or the opacity to get a solid color or a mixture of colors.
Gradient Overlay: You can add a Gradient over your object to change the shadow and color of it. You can choose from several preset gradients or create one of your own.
Pattern Overlay: Like the color and gradient overlays, the pattern overlay sets a pattern over your 3D object. Again, you can set the opacity to completely cover your object or to mix with the object's color. You also can set the scale of the pattern larger or smaller.
Stroke: Stroke creates an outline of your object. You can change the color, width, and position.
As you highlight each style available in the Layer Styles dialog box, the settings for that style are displayed. Some of these settings are self-explanatory; others are not. Here is a list of the settings that you might not be familiar with:
Use Global Light: Checking this box makes all the light settings in the Layer Styles universal. That means that if you add an inner glow and a drop shadow, the angle of the light is set the same for both effects.
Contour: A Contour controls the shape of the Layer Style. The shape of the contour represents the color fade from a set opacity to transparent. You can use preset contours or create one of your own.
Anti-Aliased: If this box is checked, the contour has softer edges.
Layer Knocks out Drop Shadow: This setting simply keeps the drop shadow from being seen through a transparent layer.
Jitter: Jitter is available when you are creating a gradient glow. It randomizes the colors used for the glow.
Whether you create one Layer Style at a time or use the dialog box to create several at once, each style shows up as its own sublayer underneath the selected layer. Notice in Figure 10.20 how the layer style is grouped under an Effects heading. You can turn off the Layer Styles collectively by clicking the eye next to the Effects heading, or you can do this individually by clicking the eye next to the style you want to hide.
You can make changes to the Layer Styles at any time by bringing up the Layer Style dialog box. Rather than duplicating a Layer Style, the changes you make are reflected on the styles already shown in the Layers palette.
The way a Layer Style is created in the Layers panel is neat and efficient, and it locks the Layer Style to the object that it was created for. Occasionally, though, you want to create an independent layer from a Layer Style so you can edit the Layer Style separately from the Image layer.
For instance, you may want to create an outline of an object and just use the outline in a composite. Also, you may want to create a shadow and separate it from the object, giving it greater distance than you can create through the Layer Style settings.
You can separate the Layer Styles from the original layer by right-clicking them and choosing Create Layers. This creates a separate layer for each Layer Styles, as you can see in Figure 10.22. Notice that the names of the Layers are very descriptive; Layer 1's Drop Shadow is obviously just what it says it is.

Note
You can see how the final result was created by downloading Figure 10-22 from the Web site and looking at the layers.
After you've created a full layer for them, the Layer Styles are individually editable. You can move them, add special effects to them, create masks from them, or use any of Photoshop's many techniques. In Figure 10.22, I changed the perspective of the drop shadow using the Edit
I've shown you how you can use non-destructive, editable Fill and Adjustment layers and Layer Styles on your image. You can apply another type of change to your image—filters. The Filter menu has always been the fun menu in Photoshop, where you could change your photos into stained-glass windows or liquid metal. More mundane filters are available, including more useful filters such as those that perform noise reduction and sharpen your images.
Adding filters to a file has always been a tricky trial-and-error process that can be time-consuming and frustrating. Even if it's something you do on a frequent basis, every new file changes what filters you want to add in what order and why. Smart Filters take a time-consuming process that almost seems like work and turns it into play.
A Smart Filter is added to your image on a separate sublayer much like the Layer Styles. This gives you the capability to edit it, move it, or discard it at will without having to go back in your step history or change any of the other filters or effects you may have added to your object.
Because Smart Filters are sublayers, they are non-destructive to your image. You can view the image with the filter or turn the view of the filter off, so you can see the image without the effect. This is especially helpful when you add more than one filter because you can see exactly how the filters affect each other. You can even swap the filters around, changing the order in which they are applied to your image.
Because each filter is contained in its own layer, you also can make adjustments to the filter after the fact. By clicking the icon shown on the right side of the Filter layer, you can adjust the Blend mode. You also can right-click the Filter layer and choose Edit the Filter to adjust the original settings of the filter applied.
Unlike the Fill and Adjustment layers or the Layer Styles, Smart Filters do not have their own icon on the Layers panel. In fact, before you can add Smart Filters to any layer, you need to turn that layer into a Smart Object. Turning a layer into a Smart Object actually saves that layer as a separate file so it is protected. I go into that a little more later on.
You can convert any pixel or vector layer to a Smart Object. To convert a layer to a Smart Object and add Smart Filters, select that layer and choose Filter

The primary characteristic of a Smart Object in Photoshop is that the layer is saved as a separate embedded file in the original file. This allows the layer to maintain its image quality no matter how many edits or filters are used and reversed. Double-click on the Smart Object and a dialog box will pop up letting you know that after any changes are made to the original layer, you can save those changes and they will be updated in the Smart Object. Once you click OK, a new document will open containing the original layer before it was turned into a Smart object. Make desired changes and then save and close this document to return to your original document containing the Smart object.
Note
You can't change any of the pixel data in a Smart Object. This is because a Smart Object can be a Vector file such as a shape layer or a 3D model, as well as a Raster file. In order to change pixels, the file needs to be a Raster file. Changing a Smart Object into a regular layer will rasterize it.
Now that you've changed your layer into a Smart Object in Photoshop, you can click on the Filter menu and most of the options are highlighted for use as Smart Filters.
Note
Certain filters, such as Liquify and Vanishing Point, are not available as Smart Filters.
From here, you can choose a filter or open the Filter Gallery to add a filter to your Smart Object. Select Filter
Note
The Filter Gallery is great place to play. You can learn all about filters and how to use the Filter Gallery in Chapter 20.
After you've exited the Filter Gallery, you see that the filter you applied has been added as a Smart Filter sublayer in the Layers panel. The Smart Layer is labeled "Filter Gallery" because the Filter Gallery was used to create the filter.
You also can choose individual filters from the Filter menu itself. For instance, select Filter

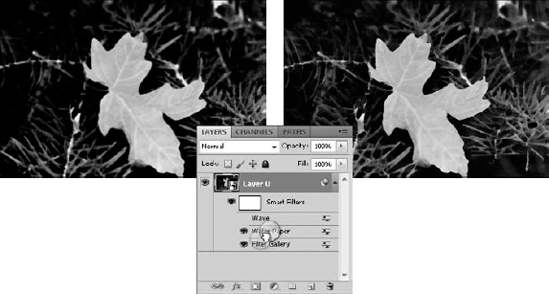
The image in Figure 10.24 has three filters applied: a Filter Gallery effect that consists of two filters, a water paper effect, and a wave filter. To see the image without the wave effect, I can simply click the eye on the filter layer. As the eye disappears, so do the effects applied by the Filter Gallery.
You can adjust the settings of any one of the layers by double-clicking that layer. The Filter Settings dialog box opens and allows you to make changes to the original filter settings.
You also can change the look of the filter layer by changing the Blend mode of the layer. Double-click the Filter Blending Option icon that appears on the right side of the filter layer. This brings up the Blending Options dialog box, where you can choose from a list of several modes that change the way the filter is applied, as shown in Figure 10.25.

Figure 10.25. You can change the Blending options for each filter to change the way it affects the image.
You also can rearrange the order in which the Filters are applied to the Smart object by simply dragging and dropping them into a different order. This can change the look of your image because each filter affects the filters that were added before it but not the filters added after. For instance, the Grain and Watercolor filters added to the image in the Filter Gallery give the photo a painted look. When these filters are added first, the other filters that are added on top, such as Water Paper, change the effect, giving the image jagged edges. When the order of these two filters is reversed, the Water Paper gives the image texture, but the Grain and Watercolor filters smooth out the jagged edges and create a better effect, as shown in Figure 10.26.
You also can create masks so that filters are applied only to a selected portion of your image. I discuss how to do this in the next section.
Think of a mask as a stencil. If you place a stencil over an area that you are painting, it protects the areas that are covered and creates a painted design in the bargain. Masks in Photoshop work the same way, but you can do so much more with an image than just paint over it. Every enhancement or filter available in Photoshop can be applied to just a portion of your image while leaving the rest of your image untouched using masks.
Wait a minute. Doesn't this sound just like what a selection does? It's true, a selection is actually a type of mask—a selection mask, and I've already shown you how to work with Quick Masks and the color overlay masks to refine your selections.
Now we're going to move one step beyond selections to Layer Masks, which are more permanent extensions of selections.
A layer mask is what most people think of when thinking about masks in Photoshop. Figure 10.27 shows a layer mask. Just like a stencil, the black parts cover areas of the image that will be unaffected by any changes made to this layer. It also makes those areas transparent so that any layers underneath will be visible.
The white areas of the mask are areas that will be affected by any changes made to the layer. These areas behave just as if they were all the image pixels contained in this layer. For instance, you can see in Figure 10.22 that the Drop Shadow Layer Style that was added created a drop shadow only of the unmasked areas of the image.

One of the best aspects of using digital layers over stencils is that it is incredibly easy to create semi-permeable areas of a mask with grayscale tones. The lighter a grayscale area is, the more any changes you make to your image affect those areas.
You can create layer masks in several ways. All but one of these ways usually begins by creating a selection. After you've created a selection, turning it into a mask is fairly simple. After you've created a mask, you can move it between layers to facilitate image composites and special effects.
The fastest way to create a mask is to click one of the Add Mask icons in the Layers panel or in the Masks panel, as shown in Figure 10.28. If you have an area in your image selected, a mask is created from that selection. You also can create a mask from a path. If no selection or path is active, the mask is blank.
Two different types of masks can be created using these icons: a pixel mask and a vector mask. The type of mask created depends on whether you create the mask from a selection or a path.
Pixel masks are rasterized masks and behave just like raster images, as discussed in Chapter 3. They are built from pixels and lose quality if they are resized. If you create a mask from a selection, it is a pixel mask, whether you use the Add Layer Mask icon in the Layers panel or the Add Pixel Mask in the Masks panel. If you click the Add Vector Mask icon in the Masks panel, the selection is not used to create a vector mask on the selected layer.

Vector masks are built mathematically and are recomputed as they are resized so they don't lose quality. You can create a vector mask from a path either by creating a path or turning a selection into a path. These masks can be edited using only the vector tools, such as the pen tools or the shape tools. Just as a selection can't be used to create a vector mask, a path can't be used to create a pixel mask.
I showed you the ins and outs of the Refine Edge dialog box in Chapter 9. New in Photoshop CS5, you can use this dialog box to export your selection as a mask over your current layer, a mask over a new layer, or a mask over a new layer in a new document. Regardless of which option you choose, your selection is changed into a mask with properties identical to the mask shown in Figure 10.36. Using the Feather option in the Refine Edge dialog box adds an increasingly more transparent edge to your mask, which is indicated by levels of grayscale.
You can create type masks over your image by using the type mask tools found in the Toolbox, as shown in Figure 10.29. These tools work like the type tools, but rather than creating solid text on a separate layer, the type mask tools create a selection that surrounds the type on the selected layer. After you've created a selection using type, you can create a mask from that selection using the Refine Edge dialog box or the Add Mask icons.

Clipping masks are not created using a selection, nor do they look like a traditional mask in your Layers panel. A clipping mask is created by taking the shape of one layer and cutting that shape out of the layer above it.
Create a clipping mask by following these steps:
Note
Try it yourself by downloading Figure 10-30a and Figure 10-30b from the Web site.
Open an image you want to clip.
This can be any image you want. I've chosen the Halloween photo pictured first in Figure 10.30.
Double-click the background layer to turn it into a regular layer.
You can name the layer if you would like to.
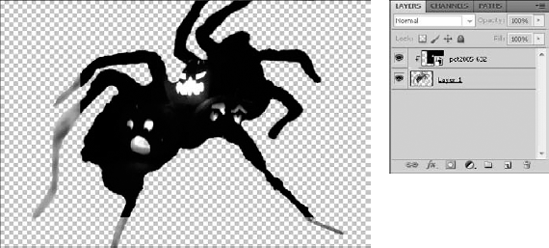
Create a layer with a cut-out to clip from.
This can be a shape layer, a text layer, or a selection from another image. I chose the latter option and used the selection of a spider I copied and pasted into its own layer, as shown in the second image in Figure 10.30
Place the layer with the cut-out underneath the image layer.
If you've created a new layer in your document, it was automatically placed above your image layer. Click and drag it underneath your image layer.
Select the image layer.
This is the layer that you want to be visible in the end. My selected layer is the one with the jack-o-lanterns.
Right-click the image layer, and select Create Clipping mask from the pop-up menu.
This uses the bottom layer as a template to cut the top layer, as shown in Figure 10.31. The bottom layer becomes a silhouette for the top layer.

Note
Look at my final product by downloading Figure 10-31 from the Web site and looking at the layers.
Creating a clipping mask changed the way the layers look in the Layers panel, but not by placing a mask thumbnail in the selected layer. Instead, the layer containing the jack-o-lantern image has been turned into a Smart Object, and an arrow has been placed pointing down to indicate that this layer is being affected by the layer underneath.
You can release the clipping mask by right-clicking the top layer again and choosing Release Clipping Mask from the pop-up menu.
After a mask thumbnail has been placed in your Layers panel, you can edit it. You can edit the mask using the image, the channels, or the Masks panel.
To edit the mask using the image, you must have the mask selected in the layer. Make sure the mask thumbnail has a white highlight around it, rather than the image thumbnail. This is sometimes hard to see, so click back and forth a couple of times to see the difference.
After you have selected the mask, you can use the Brush and Eraser tools to add to or subtract from the masked area. Using the Brush adds to the mask and using the Eraser subtracts from it. Use these tools directly on your image. The only difference you see is a change in the masks effects. Depending on what those changes are, this might not be the ideal way to edit your mask, because it is hard to be precise if the effects of the mask aren't obvious. For instance, the mask in Figure 10.32 is placed over an exposure adjustment, and changes made to this mask simply lighten or darken the image a little, a hard change to see.
Note
Reducing the opacity on either the Brush or the Eraser tool paints levels of grayscale, creating a semi-permeable area of your mask.
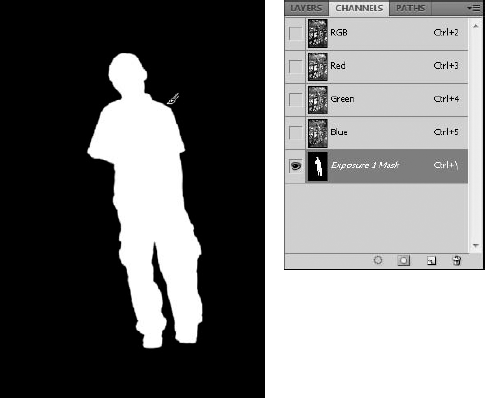
A better option for editing this mask is to use the Channels panel. With the mask selected in the Layers panel, open the Channels panel, as shown in Figure 10.33. The channels panel contains the color channels found in your image, but it also contains any masks placed in your image. When you open the Channels panel, the mask channels are not visible. If you turn the visibility icon on, a rubylith mask appears in your image, reminiscent of the Quick Mask. Now as you make changes to the mask, you can see them clearly.
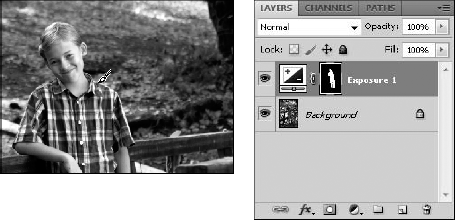
Figure 10.32. The white outline showing that the mask is selected means that I am making changes to the mask with the brush, rather than the image.
If you would like to make changes to the mask all by itself, without a view of the image, you can deselect the visibility icon in the full color channel (RGB, in this example) and only the mask is visible in your document window, as shown in Figure 10.33.
The Masks panel is the most comprehensive way to edit masks, not only giving you the option to add to or subtract from them but also allowing you to refine the edges, choose a color range, or invert it. You also can change your mask into a selection.
Figure 10.34 shows the Masks panel. These options are available:
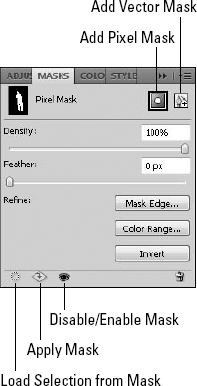
Mask thumbnail: The mask thumbnail shows you the currently selected mask as well as whether the mask is a pixel mask or a vector mask.
Add Pixel Mask: This button adds a pixel mask to the selected layer. If that layer contains an active selection, it is converted to the mask.
Add Vector Mask: This button adds a vector mask to the selected layer. If that layer contains an active path, the path is converted to the mask.
Density: This slider adjusts the density or translucency of the mask.
Feather: This option adjusts the gradual translucency of the edges of the mask, creating a feathering effect.
Refine:
Invert: This inverts the mask, selecting areas that were not previously selected and deselecting areas that were. Areas that are semitransparent also are inverted.
Load Selection from Mask: This option does not disable the mask, but allows you to make changes to it as if it were a selection. The marching ants appear on your image, and you can use selection tools to add to or subtract from the mask. You also can use the Quick Mask to paint in changes to the mask.
Apply Mask: Clicking this option combines a selected mask to the image, turning all masked areas into transparent pixels and deleting the mask.
Enable/Disable Mask: This "eye"con allows you to see the image as if no mask were applied. When the eye has a red line through it, the mask effects are not visible in the image.
The Masks panel menu: The Masks panel menu has options that allow you to add or subtract selections to or from your mask. You also can see the mask properties that allow you to change the color of the overlay and give names to your masks.
To unlink a mask from its layer, simply click the link icon between the layer thumbnail and the mask thumbnail in the layer. When the mask is unlinked, it is no longer transformed with the image when it is resized or moved.
You also can move masks from one layer to a different layer. You would probably do this if you wanted to create a selection in one layer, but use the mask in an entirely different layer. Let me show you what I mean.
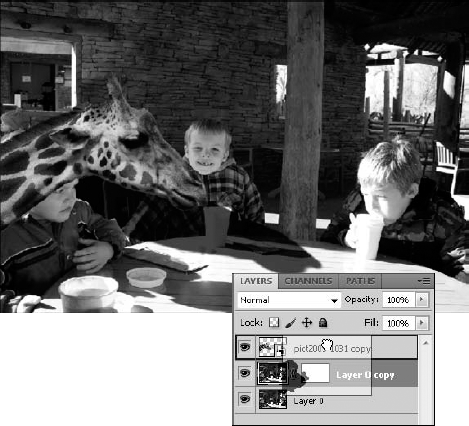
The first image in Figure 10.35 is a photo of some boys gathered around a table at the zoo. The second image is a cold baby giraffe that just wants a bit of hot chocolate. In order to create the photo composite you see in the last image in Figure 10.35, I had to create a mask on the layer containing the image of the boys and move it to the layer containing the image of the giraffe.
Note
Give this effect a try, or see my final results, by downloading Figure 10-35a, 10-35b, and 10-35c from the Web site.

Figure 10.35. This baby giraffe just wants to join in the fun. Moving masks from one layer to another made this final image possible.
I selected the grouchy boy in the foreground using the Quick Selection tool and then inverted the selection so the grouchy boy was the only thing that was deselected. After refining the edges, I exported this selection as a new layer with a mask. Now changes can be made to everything in this image except the grouchy boy. The problem is that I don't actually want to make changes to this image; I just want to insert the giraffe in between the two boys on the left. The best way to do this is to place the mask I've just created on the giraffe, so the outline of the boy is cut out of the giraffe.
First, I place the giraffe in the photo just where I want it, as shown in Figure 10.36. It is fairly obvious that it doesn't belong to this image. I can fix that, though. By clicking and holding the mask thumbnail, I can drag it to the layer containing the giraffe, also shown in Figure 10.36, effectively masking the portion of the giraffe that I want to appear behind the boy, creating the effect that the giraffe is part of the picture.
The Layer Comps panel is a way to take "pictures" of different layer arrangements in the same document. For instance, if I were creating a brochure and a flyer that had the same images and text but different layouts, I could make a layer comp for each in the same document.
To create layer comps, follow these steps:
Create a layout in Photoshop.
This layout is completely up to you. You can see an example of a flyer in Figure 10.37.
Open the Layer Comps panel.
Choose Window
Note
You can see how layer comps work by downloading Figure 10-37 from the Web site.
Select the Create New Layer Comp icon to create a new layer comp.
You can give it a custom name if you like. Layer properties such as position, visibility, and appearance are saved in this layer comp.
Make changes to the position, transparency, or appearance of your layers.
These are the only changes that can be preserved in your layer comp, so resizing or deleting your layers is out of the question.
Select the New Layer Comp icon again, and save your new layer comp.
You should have two layer comps in the dialog box shown in Figure 10.37. You can toggle back and forth between them by selecting the icon next to them to make them visible.

When you have made your changes and you are sure that you don't need separate layers any longer, you can merge them. Not only does this clean up your Layers panel, but it reduces the size of your file. Each layer you add makes the file bigger. You can see this in Figure 10.38; the two different file sizes listed in the document window are the document size with layers and the document size, respectively.

Figure 10.38. The document window shows two sizes: the size of the document with layers added followed by the size of the original document.
You can merge your layers in three ways:
Merge Layers: This option merges the selected layers. Use it when you want to merge some, but not all, of your layers.
Merge Visible: This option merges the layers that are visible, leaving any layers that have the Show/Hide Layer icon (the eye) turned off.
Flatten Image: This option flattens all the layers, leaving you with a background layer that contains the visible information of all the layers. After you've flattened your image, you can't make changes to the individual elements that were contained in the layers; they are now part of the background layer.
Knowing how to use layers is an important part of being effective in Photoshop. This chapter covered everything you need to know about the Layer menus, the Layers panel, and layers themselves. Although you may have some questions about the effects that can be added to the Layers panel, you should be able to add them, move them, and edit their settings. You have the skills to perform the following tasks:
Adding layers to your document in several different ways
Moving and editing those layers in your document as well as the Layers panel
Using Blending modes to effectively combine layers
Creating effects layers and understanding how they work
Creating layer masks to perform several different functions