
IN THIS CHAPTER
Adjustment Workflow
Making auto adjustments
Using the Adjustment panel
Every edit you make to your photo alters the pixels, reducing the quality and increasing the possibility of bruising—visible areas of pixel distortion. Even if your edits are made using non-destructive layers, the visible end result is the same. Some adjustments are more destructive than others, so creating a workflow that takes you from least destructive to most is a very important step in achieving the best results possible.
As you add Adjustments to your image, the fastest and most efficient way to do so is using the Adjustment panel. You can use icons for a quick-click to add and edit adjustments without having to open and select adjustments from a menu. The adjustments added from the Adjustment panel are added as non-destructive adjustment layers.
This chapter explains the importance of workflow and introduces you to the Adjustment panel.
Using an organized workflow to edit your images is not only the best way to make edits in the most non-destructive way, it's a good organizational habit to get into so you aren't inadvertently skipping important steps in correcting your photo.
Not all images need all corrections, of course, but you'll want to follow the same order for each one, skipping steps when they aren't required. Here's a good workflow to follow:
Correct your photos in Camera Raw.
Whether your photos are raw images, TIFFs, or JPEGs, you can open them in Camera Raw, make relatively quick, non-destructive changes to them, and then save them or open them in Photoshop. Follow the same workflow in Camera Raw as in Photoshop to create your edits.
Note
If you open a JPEG in Camera Raw and make changes to it, you must save it as a TIFF, PSD, or DNG file to preserve the metadata and keep the edits non-destructive. After you save your changes to a JPEG file, they become part of the image and you cannot reverse them.
Open your image in Photoshop.
Whether you are coming from Bridge, Camera Raw, or another program, this step is a no-brainer if you want to edit your image in Photoshop.
Crop, straighten, and resize your photo.
Unless you want several different aspect ratios (such as 4×6 and 8×10), you want to crop your photo strictly to the area you want.
Correct overall lighting.
Correcting the lighting in your image is usually instrumental in correcting the color, so it should always be done first.
Correct the overall color.
After you've corrected both lighting and color in your image, it should look pretty good, with lighting and color at the best settings and evenly distributed across your image. Now you are ready to make targeted adjustments.
Clean the unwanted elements out of your photo using the Clone Stamp and Healing Brushes.
While your lighting and color is still uniform, you want to clean up scratches, lens spots, blemishes, or stray elements in your photo that distract from the subject. These tools in Photoshop are fantastic and create realistic results, but bruising is an unavoidable result of using them.
Combine images.
If you are combining two or more images to create a collage or special effect, now is the time to do it. If you are using the Clone tool to create head swaps or otherwise add elements from one photo into another, you want to make sure the lighting and color are as uniform between the two images as possible before you begin. This makes the next step much easier.
Make targeted lighting adjustments.
When your image is uniformly correct, you can start correcting areas in your image that are still not ideal, such as an overexposed sky. You can make these adjustments by creating a selection or mask so the adjustments you make are applied only to the targeted area. This is where you need to be careful with how the adjustments are applied, watching edges for halos, hardness, or aberrations that prevent your changes from looking natural.
Make targeted color adjustments.
As with lighting, some areas of your image may need a targeted color correction. You also may want to create a color effect, such as oversaturating areas of your photo or creating a black and white photo with color accents.
Add Filters or Layer styles to create artistic effects.
Now that your image is put together and the lighting and color are just right, you can add Layer styles and/or Filters to create amazing images to your heart's content. You can add these effects to your entire image or to targeted areas. These changes dramatically alter the pixels in an image or selected areas, so again watch your edges.
Reduce noise and sharpen your image.
Because each previous change can create noise and distort sharpness to further decrease image quality, these changes should be the last you make.
Prepare your image for output.
Whether you are preparing it to be printed or exported to the Web, you want to adjust your color settings accordingly and save your image in the correct format.
Before you get into making your own adjustments, you should know that Photoshop makes several adjustments for you. These are great for quick fixes on photos that you don't want or need to spend lots of time on or to get a start on. While you are new to Photoshop, they are a great way to get started on your own adjustments. Three auto adjustments are available in the Image menu: Auto Tone, Auto Contrast, and Auto Color. Auto buttons also are available in the Levels, Curves, or Black and White dialog boxes.
An auto adjustment is an algorithm that uses the brightness values in an image to take a best guess at the adjustment you are applying. Although auto adjustments are frequently better than the original image, they are hardly ever the best possible settings to use.
You can customize the way that the auto color corrections are applied to your image for the best results. With the Alt or Option key held down, the Auto button in either the Levels or Curves panel in the Adjustments panel transforms to the Options button. Press it to open the Auto Color Corrections Options dialog box, as shown in Figure 12.1.
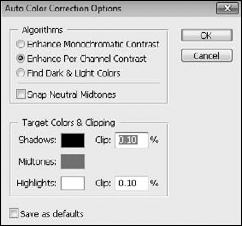
Photoshop can use three algorithms when making auto adjustments. These algorithms correspond to the Auto adjustments found in the Image menu. The Levels and Curves adjustment can use any one of the three, and you set which one here. These are your options:
Enhance Monochromatic Contrast: This is the algorithm used to set the Auto Contrast. It enhances shadows and highlights by increasing the contrast in the midtones of an image, clipping the color channels uniformly. This preserves the color integrity, but although it won't introduce a color cast, it won't remove one either, an important element of both the Levels and Curves adjustments.
Enhance per Channel Contrast: This algorithm is used by the Auto Tone adjustment. It finds the lightest and darkest areas of each color channel and adjusts them individually to create the most contrast of the three algorithms. Although this adjustment may introduce color casts or even fringing, this is the optimal setting in most cases for Levels or Curves because it adjusts the lighting balance of each color channel.
Find Dark and Light Colors: This algorithm is used by the Auto Color adjustment and uses an average of the darkest and lightest pixels in your image to create contrast with the least amount of clipping. The Auto Color adjustment uses the Snap Neutral Midtones to find colors that are close to neutral and changes their values so they are indeed neutral, shifting the values in the entire image to match.
Note
A neutral color is easy to find or create with RGB values. Each of the three values is identical.
You also can set the target colors that determine what colors are considered highlights, midtones, and shadows. The defaults here of .1 percent are on the high side if you are working with images that have been scanned or taken at high resolution with modern equipment.
The bottom line here is that you can use the Auto adjustments for a quick fix that might actually work if you take the time to figure out which setting is best with each individual image. Does this sound like too much work for something that was supposed to be easy? I think so too. Stick to custom adjustments; you'll have less to remember, and your images will look better in the long run.
The Adjustments panel is your one-stop shop to quickly click an adjustment layer over your image. I've already introduced you to the icon in the Layers panel that allows you to add a fill or adjustment layer—the half-black, half-white circle. The Adjustment panel is accessed with the same icon, as shown in Figure 12.2.

Tip
If you are correcting photos often, you probably spend lots of time with the Adjustment panel. Use the Photography workspace to quickly readjust your panels so that the Adjustment panel is in the main panel area above the Layers panel. If you are unsure how to do this, review workspace presets in Chapter 2.
The upper portion of the Adjustment panel is dominated by the Adjustment icons. Although they are not labeled, you will soon get the hang of which is which. To get started, hover over and high-light each of them and watch the name appear in the Adjustment name area of the panel.
These adjustments are found in the Adjustment panel:
Brightness/Contrast: This option gives you two basic sliders. The first adjusts the brightness of the image, unilaterally enhancing or reducing the brightness of the pixels. The second adjusts the contrast, changing the value of the midtones in the image by making the tones on the dark side 50 percent darker and the tones on the light side lighter.
Levels: You can adjust the levels of the brightness values in your file by adding a Levels layer to it. As you choose the Levels option, you see a histogram that represents the brightness values found in your file. By adjusting the sliders, you can increase (or decrease) the darkness of your darkest pixels or increase the brightness of your brightest pixels. You can do this in all the color channels together or in each one individually.
Curves: The curves option allows you to add up to 14 points along the tonal range from shadows to highlights. The dialog box also includes a preset menu to give you a jumping-off point.
Exposure: The Exposure option is meant to correct exposure problems in your image. Change the Exposure, Offset, and Gamma Correction to give your file highlights or dark tones similar to overexposing or underexposing a picture.
Vibrance: This option works selectively to saturate areas of your image that have less color while leaving already saturated areas alone.
Hue/Saturation: This option allows you to change the hue, saturation, or lightness of the different color channels contained in your file or all of them at once. You can use a drop-down list to choose a color range or use the eyedropper to customize the color you change.
Color Balance: The Color Balance panel gets right to the point. You can change the levels of the color channels in your file using the Highlights, Midtones, or Shadows. This is the easiest way to directly affect individual colors in your file.
Black & White: This option gives you the most power in creating a black and white image from a color photo. The Black & White adjustment includes options that let you set the levels of the colors in your image so that they are mapped to the grayscale values that you choose.
Photo Filter: Using a Photo Filter on your image mimics using the same filter on your camera. You can use one of 20 preset filters or change the color of the filter using the Select Filter Color dialog box.
Channel Mixer: The Channel Mixer lets you adjust the color levels in each channel separately. A drop-down menu gives you several preset options.
Invert: The Invert option changes all the colors in your file to their exact opposite, creating a negative image. The Invert adjustment doesn't have any panel controls; it simply changes every color to 255 minus its original value.
Posterize: Using the Posterize option on your image allows you to change the color brightness range from 2 to the full 255. When you set the levels at a low range, you reduce the number of colors used in the image, giving the colors a banded look.
Threshold: Using the Threshold option changes your file into a true black and white image—not grayscale. The dialog box contains a slider that allows you to set the Threshold level. Every color above that brightness level is changed to white, and every color below that level becomes black. Although it doesn't make your image look very good, it is ideal for finding the brightest and darkest values of your image. This helps you choose settings for many of the other adjustments.
Gradient Map: A Gradient Map takes a gradient and uses the lowest tones of the gradient to replace the darkest tones of your file and the highest tones to replace the lightest and everything in between.
Selective Color: This option allows you to change the level of colors individually. Choose from nine color options in the drop-down menu, and change the CYMK sliders to adjust that color.
When you click any one of these Adjustment icons, an adjustment layer is created above the selected layer in your Layers panel, and the Adjustment panel changes to display the settings for that adjustment, as shown in Figure 12.3. To edit any one of your adjustment layers, select it in the Layers panel and the settings reappear in the Adjustment panel, allowing you to adjust them.

When an adjustment is displayed in the Adjustment panel, new icons appear on the bottom of the Adjustment panel, as shown in Figure 12.4. You can reset the adjustment to defaults, toggle the visibility, or return to the Adjustment list to add a new adjustment.

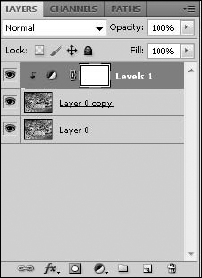
You also can choose to clip the adjustment to the layer below it. Generally, when you add a layer to the Layers panel, it affects all the layers below it, but if you want your adjustment to affect only the layer below, you can click this icon. You know if your adjustment layers are clipped to the layer below them because they look like the layers in Figure 12.5, with an arrow added to the adjustment layer pointing to the layer below. The layer that is being affected by the adjustment has an underlined name.
The center area of the Adjustments panel is full of adjustment presets that you can use or add to create quick fixes for images that are similar in lighting or color. For instance, if you have several photos of the same model under the same lighting, you could adjust the color curves to perfection in the first image, save those settings as a preset, and then apply them to subsequent images.
To save a preset, change your settings and click the Adjustment panel menu icon to display the Adjustment panel menu, as shown in Figure 12.6. Choose Save Preset, and give your preset an easily identifiable name.
To access the presets, click the appropriate adjustment setting and select a default preset or one of your own from the preset list, as shown in Figure 12.7.


This chapter introduced you to the workflow you should use when applying adjustments, corrections, and artistic effects to your image. It also introduced you to the auto adjustments and the Adjustment panel, so you will know how these elements work as you use them in coming chapters.
I covered these topics:
Workflow organization
Making auto adjustments
Using the Adjustment panel