
IN THIS CHAPTER
The Photoshop CS5 workspace has had years to develop into a fine-tuned working environment, and with bigger monitors and faster processors, working in Photoshop has only become much more fun. With all the room that larger display options give you, you can easily organize the panels, documents, and tools in the workspace to provide an efficient photo-editing environment.
With all its features, Photoshop can be a bit daunting at first. The purpose of this chapter is to familiarize you with the Photoshop workspace, how to navigate around, find tools, customize settings, and set the environment so it works best for you.
At first glance, the Photoshop workspace seems a little dreary—lots of gray, but that is very misleading. With beautiful photographs (or other colorful graphics) in the work area and fascinating tools at your fingertips, you'll soon be addicted to the Photoshop playground. In fact, you probably are glad that the background not only makes a good contrast for colorful files but is easy on the eyes.
So without any further ado, I give you the Photoshop workspace, as shown in Figure 2.1.
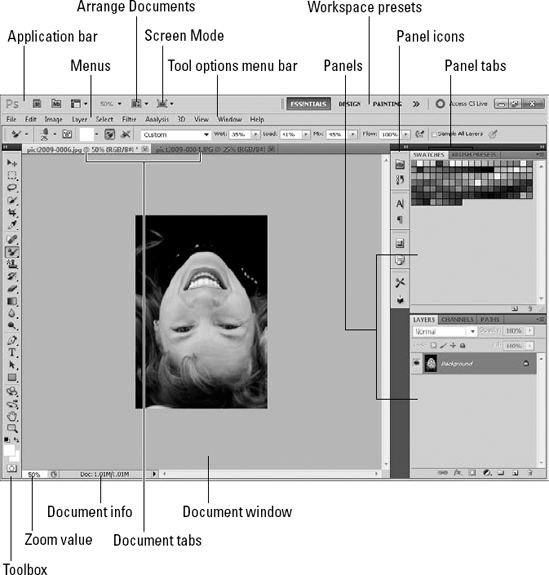
The document workspace, in the center area of the workspace, houses the documents (image files) that you are currently editing. The document workspace is large enough to really get some work done; it gives you the flexibility to expand your image to a workably large size and keep your favorite panels open and docked as well. The document workspace is also home to the panels and Toolbox discussed later in this chapter.
Note
The screenshots in this book were taken at a screen resolution of 1024×768, which is a really low resolution, especially if you have a larger screen. If your resolution is set higher, you have a larger work area than is shown here. If you set your resolution as high as 1920×1200 (which is what mine is usually set to), you have an insane amount of room to expand your panels, tile your document windows, and generally make everything available to you at once. Of course, if your resolution is set lower than 1024×768, your work area is smaller.
As you open image files, they appear in the center of the document workspace, and you have several options for viewing them. When you click the View menu, as shown in Figure 2.2, and you can choose the following basic options:
Fit to Screen: If you are working on your entire document (and not working with other files), your best option is to choose Fit to Screen so you can see all of it as large as possible.
Actual Pixels: The Actual Pixels mode is the best option if you want to see the cleanest view of a specific area because the pixels in the image match the pixels in the screen, so no interpolation is necessary.
Print Size: The Print Size option is handy if you want to get a better idea of how the document will look when printed.
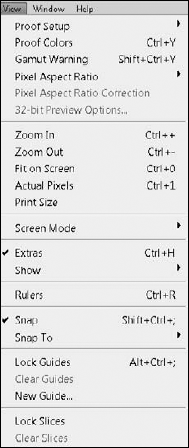
Figure 2.2. You can change the way your image fits into the document workspace by using the View menu.
Tip
Don't use the zoom options in the View menu; you have several better options—the Zoom tool, the Magnify box, and the roller wheel on your mouse, all of which are discussed later in this chapter.
In addition to the standard View modes, you can easily zoom in and out on the image, depending on your editing needs. Notice at the bottom-left corner of the document windows is a percentage representing the Zoom value and the document information. You can change the size of your document by selecting the Zoom value and typing a new percentage.
Another useful feature in the document window is the information section at the bottom. By default, the document information displays the size of your file. Keep an eye on this as you begin to add multiple layers and effects to a document; you might be surprised by how these changes can increase the size of your document.
If you click the arrow next to the document information, a pop-up list opens, as shown in Figure 2.3, that gives you several options for the information display. You can choose to display the Adobe Drive, the Document Size, the Document Profile, Document Dimensions, Measurement Scale, Scratch Sizes, Efficiency, Timing, the Current Tool, and the option to preview an image at 32-bit exposure.
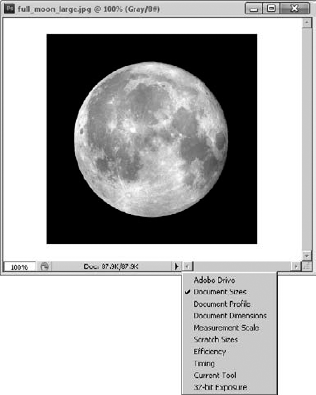
Figure 2.3. The information section of the document window can be very useful when you are editing images. The menu allows you to display several types of information.
When multiple documents are open in the document workspace, Photoshop provides tabs for each of them, as shown in Figure 2.1. These tabs display the document name, and you can access the document for editing by clicking its tab. Using the tabs is the most economical and organized way to have multiple files open, and you probably will prefer this option most of the time.
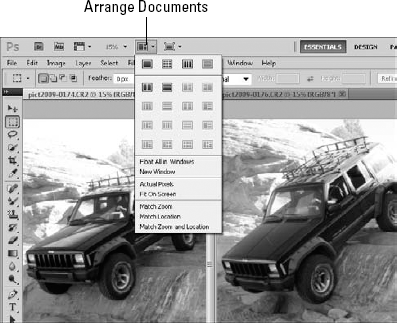
There are also other View options when you have multiple documents open. To change how the document windows are organized, select Window
Cascade: Cascading your documents shows the document windows in a cascade fashion from the upper left to the lower right of your document workspace.
Tile: Tiling adjusts the size of all open document windows so they can all be viewed together in the workspace. For example, if you are working with two or more documents at the same time, cloning areas of one into another, you probably want to tile your documents in the document workspace.
Float in Window: Floating your documents releases them from the document workspace or from a floating group to their own individual window. When the document windows are floating, they are independent of the Photoshop interface, and you can use the standard operating system window controls on them. You can organize floating windows into groups by dragging one window on top of another window. When more than one document is in a floating group, their tabs are displayed at the top of the window. You also can float windows by grabbing the tab in the floating group or document workspace and dragging it out. You can add a floating document to a group or document workspace by dragging it into the tabs.
Float All in Window: This causes all windows to float.
Tip
You can quickly cycle through open tabbed document windows by using the Ctrl/

Consolidate All to Tabs: This docks all floating windows into the document workspace. This option is great if you find that you have so many windows open that navigating them is difficult. You also can consolidate windows to the document workspace or floating group by right-clicking the tab bar at the top and selecting Consolidate All to Here.
Match Zoom: This sets the zoom percentage of all open document windows to match the value of the active document window. This is useful when you are working with multiple images that eventually will be consolidated into a single document.
Match Location: This sets the center panning position of all open document windows to match the center position of the active document window. This is useful if you are working with multiple versions of the same image or a sequence of images and you want to quickly move to the same location in all windows for comparison.
Match Rotation: This sets the rotation angle of the image in all document windows to match the rotation angle of the image in the active document window.
Match All: This sets the zoom, center panning position, and rotation of all document windows to match the values of the active document window.
The application bar (refer to Figure 2.1) provides quick links to the following options:
Bridge: This starts the Adobe Bridge application or navigates to it if it is already open. Bridge is the application that you should use to organize your image files.
Mini Bridge: This opens a miniature version of Bridge inside Photoshop. You can use the Mini Bridge panel to easily select files to edit.
Note
Bridge is a great tool for organizing your files for use in Photoshop as well as other Adobe applications. Mini Bridge is new to CS5 and gives you a panel-sized version of Bridge to work directly from in the Photoshop workspace. Both applications are covered extensively in Chapter 6.
Guides/Grids/Rulers: Next to the application icons is the View Extras icon, which allows you to quickly control the visibility of guides, grids, and rulers to the document window using a simple drop-down menu. The guides, grids, and rulers are shown in Figure 2.4, and the following list describes the purpose of each:
Guides: Guides are vertical or horizontal lines that you can add to a document using the View

Tip
When you click and hold down the mouse button on the ruler, the cursor changes to a guide adjustment cursor. You can quickly add guides to an image by clicking the ruler and dragging them into the document.
Grids: Grids are a mesh of vertical and horizontal lines that you can use to more easily see the alignment and organization of objects in your images. Photoshop also divides the grids into subdivisions of lines that are not as visible but are visible enough to be useful.
A great feature of Photoshop is that you can force items to be snapped to grids by selecting View
Rulers: When rulers are enabled, a vertical ruler is displayed on the left and a horizontal ruler is displayed on the top of the document window. You can change the rulers' unit of measure by right-clicking the ruler and selecting the unit from the drop-down menu. While you are moving the cursor over the documents, the exact placement of the cursor is noted in the ruler by a line that moves with the mouse. The Ruler tool is very important if you are preparing items for print.

Zoom: The Zoom Value found in the document window is duplicated on the application bar. An added benefit is the easy-to-use drop-down menu that allows you to quickly choose from 25%, 50%, 100%, or 200%. You also can enter a custom value by highlighting and changing the percentage.
Arrange Documents: The Arrange Documents icon gives you more convenience and versatility than the View menu for arranging more than one open document in the document window. Use the drop-down menu shown in Figure 2.5 to choose from several tiling options, float all windows, or open a new window. Use the Match Zoom and Match Location options to show all your open files at the same percentage and in the same location. You also can fit your selected document to the screen or view actual pixels.
Screen mode: The Screen mode is the last icon on the application bar. The Screen mode icon lets you choose between standard screen mode, full screen mode with menu bar, and full screen mode.
Standard Screen Mode: Standard screen mode is the default, and it allows you access to other applications that are running.
Full Screen Mode with Menu Bar: This mode looks similar to standard screen mode, but you can't access other programs, through the Windows taskbar for instance.
Full Screen Mode: This mode hides everything but the selected document so you can work without distractions. The Photoshop tools are still available to you; just hover over the tool you want to use and it appears, or press the Tab key to view all your tools. Press Esc to return to standard screen mode.
The workspace presets shown in the middle right of the application bar are quick ways to change the layout of the panels and tools in Photoshop, depending on the task you are performing. When you select a preset, the panel layouts are adjusted so you have easier access to the tools that are typically used for the selected task. Presets are selected by clicking the name or the double arrows and selecting one of the options from the drop-down menu:
New in CS5: This displays the panel icons for panels with new features in CS5, such as the new 3D tools, paint brush, the paragraph and character presets, and Mini Bridge.
Essentials: The Essentials preset gives you full access to the most commonly used panels in Photoshop, including the navigation, swatches, and layers panels.
Design: The Design preset gives you the more common graphic design panels, such as the swatch, character, and paragraph panels.
Painting: The Painting preset makes the paint brush and brush presets readily available.
Photography: The Photography preset provides the histogram and adjustments panels that make it easy to apply adjustments to photographs.
3D: The 3D preset displays the 3D, Mask, and Layers panels that are used heavily when working with 3D objects.
Motion: The Motion preset displays the Animation {Timeline} and Clone Source panels that are frequently used in animation.
Reset/New/Delete: When you select a workspace preset and then adjust the panels, Photoshop remembers those adjustments so you don't have to make them each time you start the application. The Reset option restores the currently selected workspace to the original settings so you can start over with a fresh set of panels. The Create option allows you to save the current panel layout as your own custom workspace. The new workspace then shows up in the list. The Delete option deletes the currently selected workspace preset.
The Toolbox, shown in Figure 2.6, provides easy access to all of the tools in Photoshop that require mouse or stylus interaction with the document. The Toolbox includes tools such as selection tools, painting tools, erasing tools, and much more. We discuss each of the tools available in the Toolbox later in this chapter.

Figure 2.6. The Toolbox provides access to the mouse/stylus tools. Each time you select a new tool, the tool options bar changes to reflect settings for the new tool.
The tool options menu bar, usually referred to as the "options bar" or the "tool menu," sits below the main menu. The tool options menu looks very different depending on the tool you have selected in the Toolbox. Figure 2.6 shows the different options for the Move, Brush, and Type tools.
It is always smart to keep an eye on what is going on in the options bar. When you select a tool, the options are set to default values that are commonly used, but not necessarily the values you would use in a particular situation. After you change the options for any given tool, those options stay changed, even after using other tools. The options bar is so useful and important that you'll see many examples throughout this book of different ways to set your options, and as you use Photoshop, you soon become very familiar with it.
Now we come to the menu bar. The menus listed here give you a good comprehensive idea of what you can accomplish in Photoshop. In this section, I show you the primary purpose of each menu and highlight some of the menu options that might not be covered in other areas of the book. As you learn how to use the Photoshop tools throughout the book, you learn so much more about many of the menu options, so for now, I just give you a brief overview.
The File menu has many of the options that you would expect, and many of them are self-explanatory. For the most part, all the options listed are different ways to open, save, or export your documents. The options in the File menu are covered throughout the book, opening and saving files are covered in Chapter 3, exporting to the Web and mobile devices is covered in Chapter 30, and batch operations on files are covered in Chapter 31.
Again, this menu is a familiar menu found in most applications with many familiar options. Above and beyond cut, copy, and paste, you can step backward, undoing several of the last changes you made. Farther down the menu, you find the transformation edits—Content-Aware Scale and Puppet Warp among them. These are covered in Chapter 19. You learn about using color in Chapter 4 and color profiles in Chapter 29. Setting Preferences and using the menus and shortcuts options to customize menu and shortcut behavior are covered later in this chapter.
The Image menu is loaded with lots of options for changing your image. Making changes to your image is different than making changes to your file, because these options actually affect the look of your image.
The options in your Image menu let you change the color mode, resize, rotate, or duplicate your image, among other things. Neatly tucked into the Image adjustments menu you find some of the most powerful tools for correcting the color and light of your image. These are covered in Chapter 13. The Apply Image and Calculations options blend the channels of your image and are covered in Chapter 11. Image variables and data sets allow you to create multiple images with similar components by defining and replacing layers. These options are covered in more detail in Chapter 10.
The Layer menu is built specifically for use with the Layers panel. Layers are an important part of working efficiently and non-destructively in Photoshop, and you want to learn all you can about how they work. Layers and the Layers menu are covered extensively in Chapter 10.
You might not have thought that an entire menu could be dedicated to selections. The Selection tools are some of the most powerful tools in Photoshop. They allow you to create masks, cut precise areas out of an image, and edit only specific parts of the image. The Toolbox contains several Selection tools, and they are covered, along with the Selection menu, in Chapter 9.
Filters are placed over images to change their appearance. There are corrective filters such as Sharpen and Reduce Noise, and there are also special effect filters that can make your image look like it is being viewed through rippled glass or embossed into chrome. Filters are most definitely the fun side of Photoshop. You learn how to use them and their menu options in Chapters 14 and 20.
The Analysis menu is all about measuring and, of course, analyzing areas in your document. You can customize the tools found here for your own use to measure, scale, and mark your images. You can choose from six menu options. I don't list them in the order they appear in the Analysis menu because they make more sense in the order listed.
The Ruler tool is simply a tool that allows you to drag from one area in your image to another and measure it. The measurement information is displayed in the Info panel. By default, the measurement is displayed in pixels. The Ruler tool plays an important role in the other options found in the Analysis menu.
Selecting the Count tool and clicking your document leaves a number behind, in increments of one. This allows you to count and mark multiple items in your image. If you were trying to count a flock of birds, for instance, you would click each bird until each one had been marked. The last number placed would be the number of birds in the photo.
Clicking Record Measurements opens the Measurement Log panel on the bottom of your document window, as shown in Figure 2.7. As you create measurements, click the Record Measurements button on the Measurement Log panel and the measurement details are recorded. Notice that the first measurement was taken by the Ruler tool, and the second measurement was taken by the Count tool.
You also can use the Measurement Log to export these measurements. Simply click the Export icon to export the measurements as a text file to any specified location. You also can access the Measurement Log menu by clicking the menu icon.

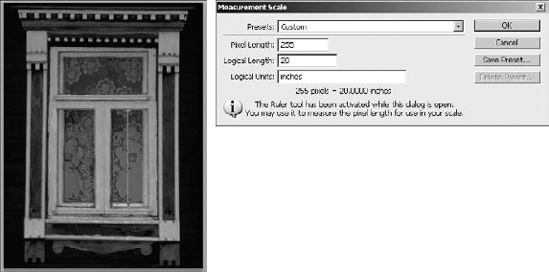
The measurement scale can be set to Default, which simply means that one pixel is equal to one pixel. If you choose the custom option, however, it allows you to translate a set number of pixels in your document to any other measurement you prefer.
For instance, in Figure 2.8, if I know the measurement of the right window pane is 20 inches, I can choose Analysis
After closing the Measurement Scale dialog box, I can activate the Ruler tool and measure other areas of the photo. These measurements are recorded in the Measurement Log panel. Notice that the third measurement in Figure 2.7 was taken after the Measurement Scale was set. The scale indicates that 225 pixels = 20 inches; the scale unit is inches and the length is 20 (rounded up, of course).
The Measurement Log shows data on each measurement you record. You can choose what data to keep and display by selecting specific data points. Click Analysis
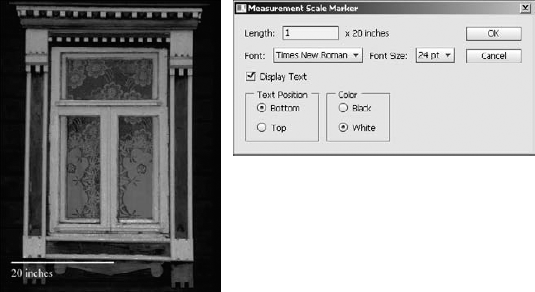
You can place a scale marker in your image to denote scale. Figure 2.9 shows a scale marker in the window indicating the length of 20 inches in the document. To place a scale marker, choose Place Scale Marker from the Analysis menu to open the dialog box. You can choose the length of the scale by selecting more than one unit of measurement.
In Figure 2.9, the unit of measurement is indicated by 20 inches, the measurement set by the measurement scale. If I were to change the number from 1 to 2, my scale marker would appear twice as long and be labeled "40 inches." You also can choose to display the text and what font and size that text will be. Finally, you have the choice to display the scale marker at the top or bottom of your document and in black or white.
The 3D menu is packed full of goodies for helping you work in the 3D environment. The 3D environment allows you to bring in 3D models and use the powerful Photoshop tools to make incredible changes to their appearance. The 3D menu is covered in Chapter 22.
The View menu has the basic options for adjusting the view of your document, such as its size (fit screen, actual pixels, print size, and so on) and screen mode (full screen, full screen with menus, and standard screen) that I discussed earlier in this chapter. The proof options let you soft-proof your documents before printing; these settings are covered in more detail in Chapter 29. Options for setting pixel aspect ratios are available as well; these settings are for use with video files and are covered in Chapter 25. Several more menu options of interest will help you as you work with documents in Photoshop.
You might find it interesting that the Extras option allows you to see non-printing guides like selections, bounding boxes, and grids. If you deselect the Extras option, any of these items that are visible in your document disappear. The Show menu lets you customize which non-printing items are visible.
Select the Ruler option if you want Rulers to appear in your document window. The rulers start at 0 in the upper-left corner of your document and measure the actual print size of your document.
As you move things around in your work area, whether they are selections, panels, or objects, you can choose to have them snap to the guides or to other objects. For instance, as you customize your panels, they snap together so you can easily place them right next to each other with no space between them and no overlaps.
The Snap To option lets you choose what elements your objects snap to: guides, grids, layers, and so on. The elements that have a check mark will draw objects you are moving, like a magnet. If you want to place things without the guides snapping them one way or the other, just deselect Snap in the View menu and you have full control.
The line under text and the bounding box around a placement in your document are guides. They help you see and move such objects. You can make your own guides to help you with placement and alignment in your document. Select View
You also can lock these guides so you don't accidentally move them or clear them out of the way entirely by choosing Lock Guides or Clear Guides.
The Lock Slices and Clear Slices options allow you to lock slices from being altered and to clear the existing slices so you can easily clean them up. Chapter 30 discusses slices in more detail as part of preparing images for the Web.
The Window menu is a comprehensive list of the panels that are available to you. From this menu, you can select the panels that you want to be visible. When a panel is visible, a check mark appears next to it. Selecting a visible panel makes the panel invisible; selecting a hidden panel makes the panel visible. The different panels are discussed later in this chapter.
The Help menu contains information about and help for Photoshop and the plug-ins that are installed. It also contains Web links to various sites that Adobe thinks might be of interest to you. The two menu options worth noting are Photoshop Help and Deactivate.
Photoshop Help is a great resource that can be very helpful if you are stuck figuring something out. Click the Help link, and you are taken to the Photoshop Help Web site where you can browse through the Help contents, search the Adobe Help resources, or even show articles and threads from others who are looking for and adding help.
This menu option is one that is absolutely imperative for you to know. When you install Photoshop on your computer and activate it, Adobe keeps a record of it. After you have done this twice (with the single-user application, at any rate), Adobe doesn't allow you to activate your product and you can't use it. This obviously keeps you from passing your copy of Photoshop to your friends, neighbors, and your cousin's boyfriend's sister-in-law.
Adobe's anti-piracy feature becomes a problem, however, if you are restructuring your system or purchasing a new computer. In order to reinstall Photoshop on a new system, you need to deactivate it on the old one. Go to the Help menu and choose Deactivate. Doing so allows you to activate your software the next time you install it.
The panels in Photoshop are really mini-applications with their own windows, controls, and menus. You rely heavily on the Photoshop panels to do most of the editing. Photoshop has many panels, each of which provides its own set of functionality. The purpose of this section is to familiarize you with how panels work in general and how to organize them.
Panels tend to take up quite a bit of the workspace, so efficient management helps with how easy it is to get things done. Because panels tend to take up quite a bit of space in the work area, Photoshop allows them to be visible, collapsed into an icon, or hidden. To hide or unhide a panel, select the panel from the Window menu. Figure 2.10 shows a collapsed panel group and a visible panel group. To collapse the panel group, click the Collapse button. To expand a panel in a collapsed group, click the icon.

Note
You typically only have a small number of panels that pertain to your current workflow open at a time. This makes finding the panels you need much easier.
A panel group is one or more panels that are connected to each other. To add a panel to a group, drag the panel or icon onto the group. To remove a panel from a group, drag the panel out of the group. Organizing panel groups is really no different that organizing the items on your desktop. You can decide which panels go in which groups. The bottom line is, if you know where to find a panel, you can use it much faster.
The panel groups have the following basic components, as noted in Figure 2.10:
Panel tabs: The panel tabs are used to select which panel is visible in the group and to drag panels out of the group.
Collapse button: This button collapses the panel to an icon to reduce the footprint in the work area.
Settings: The settings area contains the controls used by the panel to perform various tasks. Each panel has different settings.
Panel menu: All panels have a menu that pops out when you click the menu button in the top-right corner. The panel menus usually include additional features that are not included in the main settings area. If you can't find something, it is probably in the panel.
Panel buttons: Panels often have buttons on the bottom that do things such as add or delete items or perform common tasks needed by the panel.
Another way to organize panel groups is to dock them either together or to the sides of the Photoshop workspace. Panel groups can be docked by dragging the groups to the side or bottom of another group. They can be docked to the side of the workspace by dragging them until the mouse is on the workspace edge.
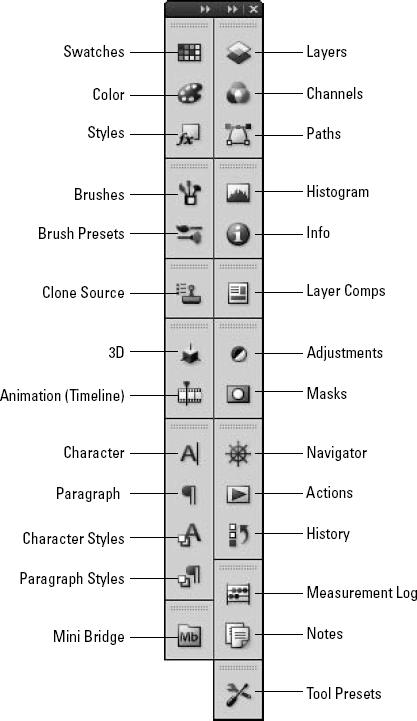
The functionality of each individual panel is far too much to cover in a single chapter, so the panels are covered in various chapters throughout the book. Figure 2.11 shows the icons for each of the panels, and the following list describes them and where they are covered in the book to give you a quick guide:
Swatches: Provides a simple way to manage sets of colors that you use in different documents. See Chapter 4.
Color: Allows you to quickly select any color in the possible ranges that Photoshop supports. See Chapter 4.
Styles: Allows you to manage the style sets that can be applied by various tools when painting or applying filters. See Chapters 10 and 16.
Brush: Provides a robust interface that allows you to define different types of brush qualities and behaviors that are used by Brush tools. See Chapter 16.
Brush Presets: Allows you to easily manage sets of brushes that can be used by the various Brush tools. See Chapter 16.
Clone Source: Provides a dynamic interface to control the source used by the Clone tools to heal areas of photos and remove unwanted items. See Chapter 15.
3D: Provides a powerful interface that allows you to manipulate 3D objects and lighting. See Chapters 22, 23, and 24.
Animation (Timeline): Provides a timeline-based utility that adds animation to images. See Chapter 26.
Character: Provides options to quickly format character styles, fonts, and spacing of textual elements in images. See Chapter 18.
Paragraph: Provides options to quickly format paragraph styles and spacing of textual elements in images. See Chapter 18.
Character Styles: Allows you to create and save character style settings that allow you to keep text consistent between documents. See Chapter 18.
Paragraph Styles: Allows you to create and save paragraph style settings that allow you to keep text consistent between documents. See Chapter 18.
Mini Bridge: Provides a portion of the functionality of Bridge that allows you to quickly select and organize images files. See Chapter 6.
Layers: Allows you to select, create, edit, and mange layers. This is one of the most common panels you'll use. See Chapter 10.
Channels: Allows you to view and manage each of the different color channels in an image as well as create additional channels such as alpha channels. See Chapter 11.
Paths: Allows you to manage and utilize vector paths in images. See Chapter 17.
Histogram: Provides a simple-to-understand view of the overall distribution of color and levels in an image. See Chapter 4.
Info: Allows you to view color and other information about individual pixels in the image by hovering the mouse over them. See Chapter 4.
Layer Comps: Allows you to easily create, manage, and view multiple versions of a layout in a single Photoshop file. See Chapter 10.
Adjustments: Allows you to apply several adjustments to a layer in an image. See Chapters 10 and 13.
Masks: Provides a simple interface to create masks from selections and vector data. Masks shield areas of an image when certain effects are applied. See Chapter 10.
Actions: Allows you to record and then reapply a series of commands that perform common tasks such as applying filter settings. See Chapter 5.
History: Provides access to the history states of the document that are recorded each time the document is changed. See Chapter 5.
Navigator: Provides a simple interface that allows you to quickly zoom in on areas of an image. The interface includes a slider control at the bottom that zooms in on the image. It also displays a miniature of the images with a red rectangle that you can move to pan to a specific area of the image, as shown in Figure 2.12.
Measurement Log: Keeps track of measurements as discussed earlier in this chapter.
Notes: Allows you to view and manage notes that are created by the Note tool. This is discussed later in this chapter.
Tool presets: Allows you to quickly view and select presets for the tool that is currently selected in the Toolbox.

The Toolbox, shown in Figure 2.13, provides easy access to all the tools that you use to interact directly with pixels in the document window. To enable or disable the Toolbox, select Window
Most of the tools shown in the Toolbox expand by holding down the mouse button over them to reveal several other tools, as shown in Figure 2.13. From the expanded tool menus, you can select other tools. The icon of the currently selected tool is displayed in the Toolbox, and the cursor changes to reflect the current tool as well.
Note
As you select different tools in the Toolbox, the tool option menu bar changes to reflect specific options for the new tool. The settings in the tool option menu define the behavior of the tool selected in the Toolbox and extend the capabilities of what you can do. The changes you make to the tools settings are the same the next time you return to the tool, so you can usually use multiple tools and keep the same settings when you return to the tool.
Just as with panels, the tools in the Toolbox are covered in various sections throughout the book. The purpose of this section is to familiarize you with the organization of the Toolbox and what kind of tools you can find there.

Figure 2.13. Photoshop provides several tool sets in the Toolbox, and the tool sets can be expanded to reveal additional tools.
Tip
A great feature in Photoshop is the ability to quickly select and even temporarily switch tools on the fly. In many of the tool sets, you see a letter on the right side of the tools. Pressing that letter on the keyboard selects that tool set. Holding down the Shift key while pressing the letter on the keyboard toggles through the different tools in the tool set. You can temporarily switch tools by holding down the letter key for the tool while you use it, and when you release the key, Photoshop reverts to the original tool. For example, if you hold down the V key when another tool is selected, Photoshop temporarily changes to the Move tool and you can move objects. When you are finished moving items, release the V key and the tool reverts to the original tool.
The following list describes each of the tool sets in the Toolbox briefly and where you can find more information about them in this book:
Move tool: Only one tool allows you to move items in the document window, and this is it. It allows you to move several items, including guides, objects and shapes in shape layers, and text objects.
Shape Selection tools: These tools allow you to quickly select areas of the document using rectangle, ellipse, row, and column shapes. See Chapter 9.
Lasso Selection tools: These tools allow you to quickly select areas of the document by using the mouse to draw a lasso around them. See Chapter 9.
Quick Selection tools: These tools can intelligently select areas of the document by detecting areas that are similar to those selected by the mouse. See Chapter 9.
Crop and Slice tools: The Crop tool lets you select an area of the document to keep and remove the area around it. See Chapter 3. The Slice tools are used for creating clickable hot areas for Web images. See Chapter 30.
Eye Dropper/Ruler/Note/Count tools: This tool set is a catchall. The Eyedropper tool is used to select foreground colors directly from pixels in the image. See Chapter 4. The Ruler tool is used to measure areas in an image. The Note tool allows you to add notes to an image that help you retain things such as to-do editing lists with the image. The Count tool allows you to count and log items in the image, which can be useful if you are working with medical images. The Ruler, Note, and Count tools were discussed earlier in the menus section of this chapter.
Healing tools: The Healing tools provide quick ways to apply brush strokes that can heal areas of an image, from removing dust and scratches to removing red eye. See Chapter 15.
Brush tools: The Brush tools allow you to apply painting techniques to repair, enhance, and create images. See Chapter 16.
Stamp tools: The Clone Stamp tool allows you to select an area of the image and then stamp or brush that area into other parts of the image or even other documents. See Chapter 15. The Pattern Stamp tool allows you to apply a style pattern to an image using brush strokes. See Chapter 16.
Eraser tools: The Eraser tools allow you to quickly remove pixel data from an image. See Chapter 16.
History Brush tools: The History Brush tools are used to repair and enhance areas of an image by painting data from previous editing states of the image. For example, you could change the image to grayscale and then use brush strokes to add color to specific areas. See Chapter 5.
Blur/Sharpen/Smudge tools: The Blur and Sharpen tools allow you to use brush strokes to blur or sharpen specific areas of an image. The Smudge tool allows you to use brush strokes to smudge existing pixels into each other. See Chapter 16.
Gradient/Paint Bucket tools: The Gradient tool allows you to paint a gradient pattern onto an image. The Paint Bucket tool allows you to apply a paint color to sections of an image. See Chapter 16.
Dodge/Burn/Sponge tools: The Dodge and Burn tools allow you to use brush strokes to lighten or darken areas of an image. The Sponge tool allows you to use brush strokes to remove or add color saturation in areas of an image. See Chapter 16.
Path Creation tools: The Path Creation tools allow you to create vector paths by creating lines between anchor points. See Chapter 17.
Path Selection tools: The Path Selection tools allow you to select and manipulate vector paths by adjusting the anchor points. See Chapter 17.
Text tools: The Text tools allow you to add textual elements to images. See Chapter 18.
Shape tools: With the Shape tools, you can easily create and manipulate simple geometric vector shapes and lines as well as custom vector shapes. See Chapter 17.
3D Object tools: These tools allow you to create and manipulate 3D objects. See Chapters 22, 23, and 24.
3D Camera tools: These tools let you to manipulate camera views when working with 3D elements. See Chapters 22, 23, and 24.
Hand/Rotate View tools: Using the Hand tool, you can grab onto the image and pan by dragging the mouse. This is available only when you are zoomed in on the image, but it's very useful for navigating around your image. The Rotate View tool allows you to rotate the canvas in the document window by dragging with the mouse. If you hold down the Shift key while rotating the canvas, the rotation occurs in 15-degree increments. Rotating the canvas can be useful if you need to align elements in the image with the vertical or horizontal axis of the display screen for editing.
Zoom tool: The Zoom tool allows you to use the mouse to drag a specific rectangle to zoom in on the image. You also can zoom in at 100 percent increments by simply clicking the document with the mouse. You can zoom out at 100 percent increments by holding down the Shift key while clicking the document. The options menu for the Zoom tool provides several buttons to resize the document view based on actual pixels, print size, and screen size.
If you have OpenGL Drawing enabled then you can use the Scrubby Zoom option in the Zoom tool options menu. When you enable Scrubby Zoom, then you can click and drag the mouse to the left and right on the image to zoom in and out.
Background/Foreground: The background/foreground area of the Toolbox allows you to see and modify the current background and foreground colors. The foreground color is used by several tools to paint onto the image. The background color is used by several tools when removing pixels from the image. See Chapter 4.
Tip
Pressing D on the keyboard resets the foreground and background colors to Black and White, respectively. Pressing X on the keyboard swaps the foreground and background colors.
The foreground is represented by the front square and the background by the back square. The color of each is changed by clicking the square to launch a color chooser. The two can be switched by clicking the curved line with arrows on each end. To revert to the default of black and white, click the small black and white icon.
Edit in Quick Mask mode: This toggles between Normal and Quick Mask mode. The Edit in Quick Mask mode option allows you to tweak selections using the brush tool to paint the exact shape. See Chapter 9.
Tip
You can activate the Quick Mask mode using the Q key whenever you have an active selection in the document.
As you become more familiar with options available for different tools panels in Photoshop, you realize that it takes a while to get some tool settings and panels optimized for what you need them to do. If you have to do that over and over, it can become very time consuming. That's where presets come into play.
A preset is simply a set of saved settings that can be easily reloaded to make the tool behave the exact same way each time the preset is used. Presets are organized into sets that can be loaded for each tool or panel and then easily selected. You will work with presets throughout the book, but this section is designed to familiarize you with what presets are and the tools that you use to select and manage them.
The simplest way to select tool presets is from the Preset menu option that's in every tool options bar, as shown in Figure 2.14. For the Crop tool, you see presets for each of the standard photo sizes. Selecting one of the presets configures the Crop tool to crop the image to the specific size without changing the settings manually.

Figure 2.14. The Presets option in the tool options bar allows you to quickly configure settings for the tool by selecting a preset from a list of tool configurations.
Note
Presets can be selected from the Tool Presets panel. If you deselect the Current Tool Only option, the list in the tool options menu and in the Tool Presets panel displays all currently loaded presets instead of just those for the current tool. Selecting a preset switches to that tool with the appropriate settings.
Presets are organized into sets, and each set is saved as a separate file on the file system. The Preset Manager, shown in Figure 2.15, allows you to create, load, and manage the sets of tool presets. To access the Preset Manager, select Edit
The Preset Manager provides the Preset Type option that allows you to select the preset types. In addition to tool presets, you find presets for paint brushes, color swatches, styles, and others. When you select a different type, the list of presets changes to reflect the presets for that type.
You can use the mouse to select presets from the list, including any new ones you have created, and then use the Save Set button to save the selected presets as a new set. To load additional presets, click the Load button. When you try to load a new set, you are prompted to add the set to the current list or to append the loaded set to the existing list.
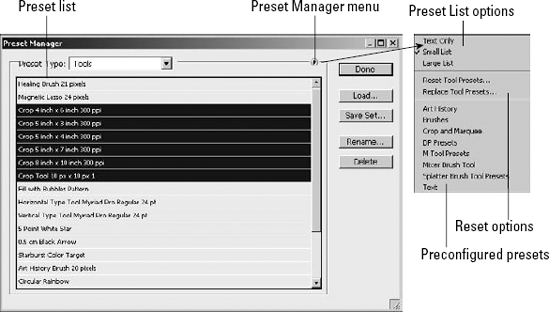
Figure 2.15. The Preset Manager allows you to load, save, and manage presets for Photoshop tools as well as other settings types such as brushes, text, and colors.
Clicking the Preset Manager Menu button loads a menu similar to the one in Figure 2.15. The menu is different for each preset type, but they are all organized into the following sections:
List options: This defines how to display the presets. You can select icons only, lists with icons, and different sizes of icons, depending on the preset type.
Reset options: The Reset Presets option resets the preset list for the selected preset type to the Photoshop default. This option is a must when you begin tweaking lists and appending sets. The Replace Presets option allows you to load a preset list from a file on disk and replace the current preset list.
Preconfigured presets: Photoshop provides several preconfigured preset sets that can be applied to the current set. The list of preconfigured presets is different for each preset type. When you select one of these sets, you are prompted to either replace the current list or append the new list to the current list.
Presets are created differently depending on what type of preset you are creating.
Follow these steps to create a new tool preset:
Select a tool from the Toolbox.
Adjust the settings in the tool options menu.
Open the Preset option for the tool, as shown in Figure 2.15.
Click the Add New Preset button.
Enter the name that you want to use for the preset, and click OK.
This permanently saves the preset in the Preset Manager until it is deleted.
Follow these steps to create a custom style preset:
Select a layer that is not locked.
Select one of the options in the Add a Layer Style button at the bottom of the Layers panel to launch the Layer Style dialog box.
Adjust the options for each effect to be included in the preset.
Click the New Style button in the Layer Style dialog box, and name the preset.
Follow these steps to create a custom brush or pattern preset:
Select the pixels you want to use to create the brush or pattern.
Area selections are discussed in Chapter 9.
Select Edit
Name the Brush or Pattern and click OK.
Select the Brush tool if you are creating a custom brush preset.
Refine the brush or pattern by adjusting the settings in the Brushes panel.
Follow these steps to create a custom shape preset:
Create the path.
Select a path in the Paths panel.
Select Edit
Name the shape preset.
Follow these steps to create a custom color swatch preset:
Click the Foreground color in the Toolbox to launch a Color Picker.
Define the custom color.
Hover the mouse cursor over a blank area in the Swatches panel until the cursor changes to a paint bucket.
Click to add the color to the Swatches.
Note
When you save preset lists, the filename must be saved with the appropriate file extension. This actually makes the preset files easy to locate later by searching the filesystem if you forget where you saved them. The default extensions are brushes (.abr), color swatches (.aco), contours (.sch), custom shapes (.csh), gradients (.grd), patterns (.pat), styles (.asl), and tools (.tpl).
Setting the preferences allows you to work in a customized environment that feels comfortable to you. Whether you like to have more precise cursors or you would like your rulers to show centimeters instead of inches, you can make a range of changes using the preferences dialog box.
The preferences are under the Edit menu, so choose Edit
Before you get started setting preferences, though, you'll probably want to know how to restore the Adobe presets, just in case. To restore all the settings to the Adobe defaults, press and hold the Ctrl/

The General panel has several basic options that either apply to Photoshop as a whole or just don't fit well into any other menu:
Color Picker: Several applications of Photoshop require you to choose a color—most notably, when you choose a new background or foreground color using the color control displayed in the Toolbox. You use a color picker to choose a color. Color pickers are usually color wheels or a color palette. The Adobe color picker is the default used, and in many cases it's the best choice; it was custom designed for Photoshop, after all. You also have the option to use the standard color picker for your operating system—Mac OS or Windows. At some point, you may install plug-ins that give you additional color picker options. They also are displayed in the Color Picker drop-down menu.
HUD Color Picker: This allows you to define the style of color picker that is used by the HUD (Heads Up Display).
Image Interpolation: When images are resized, transformed, or otherwise manipulated, pixels are added or taken away to make up the difference. This is called interpolation, and the method of interpolation determines not only the quality of the resulting image but the speed with which the image is processed. Figure 2.17 shows examples of an image of a rose increased four times using each method of interpolation. I zoomed way in so the difference would be much more obvious.
Note
You can change the image interpolation in the Image Size dialog box. A drop-down menu includes all the options available. The option you set in the preferences is the default in the Image Size dialog box.
Nearest Neighbor (preserve hard edges): If you select Nearest Neighbor, Photoshop simply copies the pixels and creates identical pixels next to them. This is a much faster process, but for obvious reasons, it creates an image with jagged edges.
Bi-linear: The Bi-linear method of interpolation takes the four surrounding pixels and averages them to create the new pixel. This is a softer look than the Nearest Neighbor option, creating a smoother image but at the sacrifice of sharpness.
Bicubic (best for smooth gradients): The Bicubic option goes one better than the Bi-linear option by using the eight surrounding pixels to create an average. It also creates more contrast between the pixels, restoring some sharpness to the image.
Bicubic Smoother (best for enlargement): Bicubic Smoother is designed to create the smoothest possible transition when enlarging an image. It reduces the jagged edges and overall "filled-in" look you get when pixels are created to fill in the gaps of an image.
Bicubic Sharper (best for reduction): Bicubic Sharper uses the Bicubic method of interpolation and adds a sharpening filter to further increase the sharpness of the pixels. This option is best for reducing the file size.
Note
It should be obvious from reading about image interpolation that the more you manipulate an image, the more that image deteriorates. Although some changes are usually necessary to get the results you desire, be careful how many steps you take to create those changes. If you want to make an image smaller, for instance, and you reduce it more than you anticipated, don't just make the reduced image larger. Step backward and undo the first resize and then try reducing again.
Auto-Update Open Documents: When this option is checked, Photoshop automatically checks the hard disk for changes made to any open file and updates the file to reflect the saved changes. The best time to use this option is when two or more collaborators are working on the same file and you want to keep up with the changes being made by others.
Beep When Done: If you select this option, Photoshop beeps whenever it finishes an operation. This could be useful if you are making less obvious changes and want to be sure the operation is finished, or you're making more time-consuming operations and you want to walk away from your computer while they process.
Dynamic Color Sliders: When you open Adobe's color picker, you use a color slider to change the range of colors visible in the color selection box. With Dynamic Color Sliders turned on, as you move the slider, the box changes color in real time. The only reason to turn it off is if you are using a computer that was built sometime in the last millennium and it just can't handle the real-time change without slowing you down.
Export Clipboard: This option copies Photoshop's clipboard to the operating system's clipboard, allowing you to copy or cut from Photoshop and paste into other applications.
Use Shift Key for Tool Switch: The Toolbox includes "tool drawers" or more than one tool hiding behind the visible icons in the Toolbox. Hotkeys also provide access to these tools. With this option on, you need to press the Shift key and the hotkey to switch tools. If this option is turned off, pressing the hotkey more than once cycles through the available tools.
Resize Image during Paste/Place: When you are pasting or placing an image into another document, having this option on resizes it to the base document specs. For instance, if I am placing a very large file into an open image that is much smaller, the document resizes to fit into the smaller canvas area. If this option is not turned on, the larger document may overlap the canvas area and the entire image isn't visible. Keep in mind that any resizing compromises the image quality and should be kept to a minimum if possible.
Animated Zoom: Use this option to continuously zoom with the Zoom tool by holding down the left mouse button. It's a great way to have control over how far you want to zoom in (or out), but be warned: It can be a little slow with larger files.
Zoom Resizes Windows: This option works only if you are using floating windows for each of your documents. These windows are resized as your images are resized. This eliminates the white space around images that have been reduced and keeps the images that you've zoomed into in view, instead of hanging out of the edges of your window. If you use floating windows very often, I suggest turning this option on.
Zoom with Scroll Wheel: This is my personal favorite zoom preference to turn on. With this option activated, you can use the scroll wheel of your mouse to zoom in and out of the selected image. No looking around for the Zoom tool or trying to remember its hotkey; just use the scroll wheel, and you can take a closer look at that area of your image you are trying to get just right and then zoom right back out to fit it in the screen.
Zoom Point Clicked to Center: When you click an area of your image with the Zoom tool, it zooms into that area generally, and with the Zoom Point Clicked to Center option turned on, the area you click becomes the center of the zoomed image.
Enable Flick Panning: When this option is enabled, you can use the Hand tool to click the document, drag quickly and then release the mouse button, and the document continues to pan just as if you had flicked it.
Place or Drag Raster Images as Smart Objects: When this option is selected, raster images in layers can be dragged and placed. Photoshop does this by temporarily converting them to Smart Objects and then back to raster. This option can use up lots of processing power, so you should enable it only if you are willing to sacrifice some computer speed.
History Log: This option lets you keep a log of what editing has been done to the file using the following settings:
Save Logs To: The Save Logs To option lets you store the history as metadata inside the image file itself, as a separate text file, or both. Keeping Log as Metadata makes the history data easily transferred between systems, but it increases the size of the file, and you need to remove the history before distributing it to others.
Edit Log Items: This option allows you to specify how detailed the history is. The Session Only option records only the date and time you edit the file in Photoshop. The Concise option also records the text that appears in the history panel. The Detailed option additionally records the commands used to edit the file. Obviously, the more detailed the history, the more the file size grows.
Reset all Warning Dialog Boxes: This option enables any warning dialog boxes that have been disabled by selecting the warning dialog box's "Don't Show Again" option.

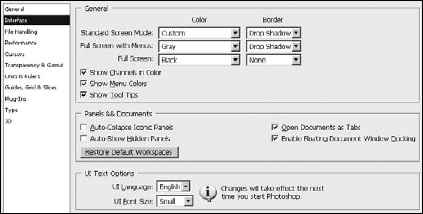
The Interface panel, shown in Figure 2.18, allows you to define the general look of the Photoshop interface including windows, panels, and documents:
General: This defines the color and border used for the standard and full screen modes. You also can specify whether to show the following:
Show Channels in Color: By default, channels are displayed in grayscale when you view them individually. Displaying the channels in color can give you a better perspective on the color, but it's not the best option when trying to determine tonal adjustments that need to be made to an individual channel. See Chapter 11.
Show Menu Colors: When this option is enabled, the colors that you define using Edit
Show Tool Tips: When enabled, a textual description of tools, settings, windows, and panels is displayed when the mouse hovers over these things.
Panels & Documents: This defines the behavior of panels and document windows using the following options:
Auto-Collapse Iconic Panels: When enabled, panels that are opened by clicking the panel icon close automatically when you click another panel or tool in the workspace.
Auto-Show Hidden Panels: This reveals hidden panels on rollover.
Restore Default Workspaces: Photoshop keeps track of the panels that are opened and layout changes you make to the current workspace. When you open the workspace again, the panels are back to the way you left them. The Restore Default Workspaces button resets the workspace to the default settings.
Open Documents as Tab: When enabled, files are opened in tabbed document windows that are docked to the document workspace. When disabled, files are opened in a floating document window.
Enable Floating Document Window Docking: When enabled, you can dock floating document windows with each other to make floating document groups that can be controlled together.
UI Text Options: This allows you to set the language and font size used for the text in Photoshop's menus, tools, panels, and so on. You need to restart Photoshop after changing these settings.
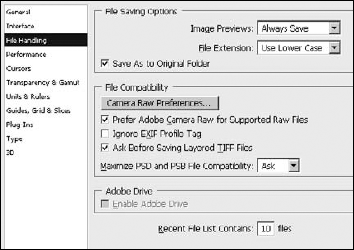
The File Handling preferences panel, shown in Figure 2.19, provides the following settings to define behavior when saving files:
File Saving Options: This controls the following behavior when saving files:
Image Previews: This controls whether to save the preview thumbnail data to the file when you save the image. Options are Never Save, Always Save, or Ask When Saving.
File Extension: This specifies to save the extension with uppercase or lowercase.
Save As to Original Folder: When enabled, Photoshop defaults to the original folder the file was opened from when using File
File Compatibility: This provides the following settings for file compatibility when saving files:
Camera Raw Preferences: This launches a dialog box to set camera raw preferences. See Chapter 7 for more information about camera raw settings.
Prefer Adobe Camera Raw for Supported Raw Files: This causes camera raw files to be opened by Adobe Camera Raw instead of other applications, including Photoshop.
Ignore EXIF Profile Tag: EXIF information is data about the photo that is embedded by a digital camera when the photo is taken. Cameras typically embed color profile data with the image to help ensure color correctness. However, if the camera has faulty color data, the image may not look as good as it should.
Note
If your photos aren't looking quite right, enable thisoption and see if they look better. If so, you may need to disable this option for images taken with that camera. You also may try assigning a different color profile to the image, as discussed in Chapter 29.
Ask Before Saving Layered TIFF Files: This prompts you before layers are saved in a TIFF file to make certain you don't want to flatten the file. Keeping layers in TIFF files is a great way to keep the file in a very editable state. However, saving layers in the TIFF file may result in a much larger file size, and some applications that support TIFFs do not support layers. Keep this setting on, just as a reminder when saving TIFF files.
Maximize PSD and PSB Compatibility: This controls whether Photoshop tries to maximize the PSD compatibility between older versions of Photoshop when you save an image. Options are Never, Always, or Ask. Maximizing compatibility is good, but it comes at the cost of greater file size. This preference defaults to Ask, but if you know that you will never use an older version of Photoshop, disabling it saves you an extra mouse click.
Enable Adobe Drive: This enables Adobe Version Cue through Adobe Drive that manages file versions when multiple people need to work on the same files. Version Cue can track changes to a file as different people work on it. This option should be enabled only if you are using Version Cue.
Recent File List Contains: This specifies the number of files to show in the File
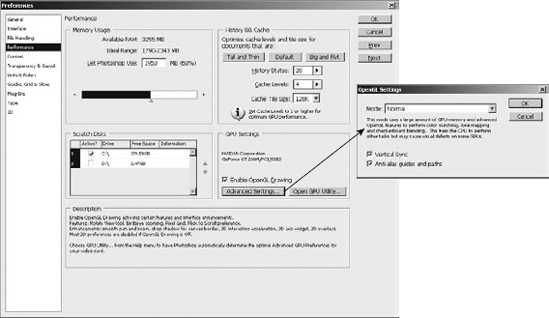
The Performance preferences panel, shown in Figure 2.20, provides the following settings to control some of Photoshop's features that are performance-intensive:
Memory Usage: This defines how much system memory Photoshop is allowed to consume. This option displays the current system memory and gives a suggested range. The slider and text box defines the maximum amount of RAM Photoshop is allowed to use. Processing images is very CPU- and RAM-intensive. The more RAM you allow Photoshop to consume the faster it performs, but then less memory is available for other applications.
Warning
Allowing Photoshop to consume too much memory can lead to extremely poor system performance that affects all applications, even Photoshop. This is one case where more is not necessarily better.
Scratch Disks: This displays a list of devices that you can select for scratch disks. Scratch disks are used by Photoshop to cache data not currently being used when processing data that requires more memory than the system has available.
History & Cache: This defines settings for document caching and history retention that can improve Photoshop's performance. You have these choices:
Optimize buttons: The first three buttons optimize the cache for documents that are Tall and Thin, Default size, or Short and Fat. This option takes into account your computer hardware and current system settings.
History States: This specifies the number of History States to cache. These history states are accessible from the History panel as described in Chapter 5. A higher number gives you more states that you can use to backtrack changes but results in additional memory consumption.
Cache Levels: This specifies the cache setting used to define the behavior of the cache. Caching improves performance by caching lower-resolution versions of the image to display in the document window. This allows for much faster rendering by Photoshop. A setting of 1 essentially disables caching because the full image size is stored in the cache. This gives you a more accurate view of the image but results in slower rendering times. Increasing the cache number caches more low-resolution versions of the image, which improves performance while sacrificing rendering quality in Photoshop. You need to restart Photoshop for changes to the cache to take effect.
Cache Tile Size: This specifies the number of bytes that Photoshop stores or processes at once. Typically, the rule is to use a larger tile size when working with larger images and a smaller one when working with smaller images or images with lots of layers. You need to restart Photoshop for changes to the Cache Tile Size to take effect.
GPU Settings: The GPU settings allow you to enable or disable OpenGL drawing by your video adapter. OpenGL drawing utilizes the processor on your graphics adapter to render images. Using the video adapter to draw can significantly improve performance in many of Photoshop's tools such as the Zoom, 3D, and Paint tools. Enabling OpenGL also enables several advanced features in Photoshop, such as the rotate view, Birdseye zooming, pixel grid, and flick to scroll.
Clicking the Advanced Settings button loads the dialog box, shown in Figure 2.20, that allows you to set the following advanced options for OpenGL:
Basic Mode: This uses the least amount of GPU memory and has the least impact on other applications running OpenGL features on the system. However, this mode can result in slowness in some areas of Photoshop that are GPU-intensive, such as 3D.
Normal Mode: This uses the most amount of GPU memory and enables additional OpenGL features, but may cause visual defects on some GPUs.
Advanced Mode: This uses the same amount of memory as Normal mode but enables even more OpenGL features that can improve performance and enhance some of Photoshop's rendering features such as zoom animation. This mode also may cause visual effects on some GPUs and interfere with other applications using the GPU.
Vertical Sync: This synchronizes the OpenGL drawing with the vertical sync of the display which provides much smoother pixel transitions at the cost of an additional performance hit.
Anti-alias guides and paths: This smoothes guides and path lines. Disable this option if your guides and paths appear too wide or heavy.
The Open GPU Utility button launches a dialog box that guides you through the process of optimizing the GPU in your video card for Photoshop. This process is very CPU-intensive so you want to run it at a time that you are not using your computer. You also should disable you screen saver while it is running so the screen saver does not taint the results.
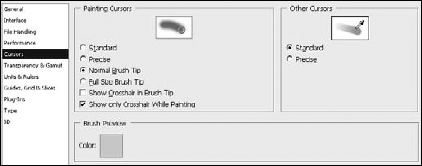
The Cursors preferences panel, shown in Figure 2.21, provides the following settings to define the appearance and size of mouse or stylus cursors:
Painting Cursors: This defines the appearance and size of the cursor used with painting tools such as the brush. You have these options:
Standard: This looks like the painting tool icon.
Precise: This displays a crosshair, which is much better for seeing the exact center of the brush stroke.
Normal Brush Tip: This creates a circle the size of the paint stroke, not taking into account any feathering caused by brush settings. This option is better for seeing the immediate area that will be affected by the brush stroke.
Full Brush Tip: This creates a circle that is the full pixel size of the paint stroke, including any feathered edges. This option is better for seeing the full area that will be affected by the brush stroke.
Show Crosshairs in Brush Tip: This displays a crosshair in the center of the Normal and Full Brush tips.
Show Only Crosshairs While Painting: This changes from the Normal Brush Tip or Full Brush Stroke Tips to the Crosshair Tip when you are dragging the mouse. This allows you to see the size of the brush better before using the precision tip.
Other Cursors: This defines the brush tip cursor used for tools other than the painting tool.
Brush Preview: This allows you to use a color chooser to define the color that is used for the brush editing preview.
The Transparency & Gamut preferences panel, shown in Figure 2.22, provides the following settings to define the appearance of the transparency grid and gamut warning:
Transparency Settings: Allows you to set the size and colors of the grid used to denote transparent pixels in an image. The size options are None, Small, Medium, and Large. The Grid Color setting provides several predefined color sets, or you can select Custom to choose your own set of colors for the grid. Typically, you have no reason to adjust the transparency colors unless you have a pattern that is very similar in the image you are editing.
Gamut Warning: Specifies the color used to warn you when a color is out of range for a specified color profile—for example, when you use the View

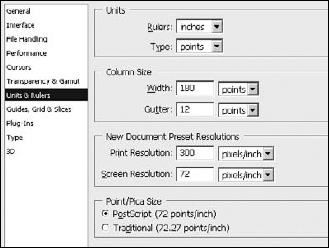
The Unit & Rulers preferences panel, shown in Figure 2.23, provides the following settings to define the units, column sizes, document resolution, and point size to use in Photoshop:
Units: The Rulers option specifies the units used for rulers and measurements in Photoshop. The Type option specifies the units used to measure all the settings used by the Type tools as well as the Character and Paragraph panels.
The options are pixels, inches, cm, mm, points, picas, and percent (where percent is in relation to the size of the image). When working in a print workflow, using inches or picas is best. When working in a Web output workflow, using pixels is typically best.
Column Size: Several Photoshop dialog boxes use column width as a unit of measurement, including the New, Image Size, and Canvas Size dialog boxes. The columns in those dialog boxes are based on the setting here. Using columns can be very useful if you are preparing an image or multiple images that can be broken up into columns.
New Document Preset Resolutions: This specifies the default print and screen resolutions used when creating a new document with the File
Point/Pica Size: This allows you to set the values used to define the number of points and pica in an inch. The PostScript method defines a pica as about 1/6 of an inch and a point as about 1/72 of an inch. Applications from years ago used a different system where there were 6.06 picas per inch and 72.27 points per inch. You should keep this setting on Postscript unless you have a specific need to use the traditional method.
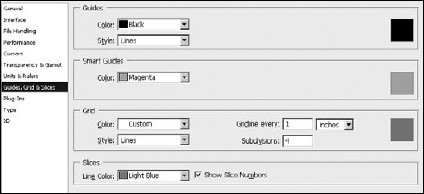
The Guides, Grid & Slices preferences panel, shown in Figure 2.24, provides the following settings to define the color, line style, and arrangement used when displaying guides, grids, and slice bounding boxes in the document window:
Guides: The Guides setting allows you to set the color and line style for guides. You can choose any color from the drop-down menu or select Custom to launch a color chooser that lets you select any color Photoshop can display. You typically want to set the guide color to something that has a high contrast with the colors in the image so you can see it better. You also can select to have the guide be a dashed or solid line.
Smart Guides: The Smart Guides setting allows you to set the color of the smart guides only. Smart guides are the lines that temporarily appear around the pixels on a layer when you move items. Smart guides are great at helping you align the content of one layer with the content of another.
Grid: This allows you to set the color and line style used when displaying the grid. You want to select a color that contrasts with the image well and also contrasts with the color of the guides so you can easily distinguish the lines apart. You also can set the spacing between grid lines and the number of subdivisions to include between grid lines. Subdivisions show up as less apparent lines.
Slices: This allows you to specify the color of slice bounding boxes and whether to display the slice number when displaying the slice.
Note
For more information about slices, see Chapter 30.
The plug-ins preferences are discussed in Appendix B, along with several of the plug-ins that are available to add functionality to Photoshop.
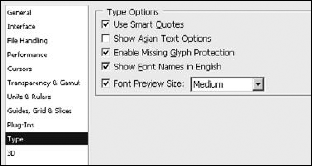
The Type preferences panel, shown in Figure 2.25, provides the following settings to define behaviors such as using smart quotes and font substitutions used when adding text to images:
Use Smart Quotes: When enabled, Photoshop scans through the text, detects the starting and ending quotation marks, and automatically converts them to quotes that curve toward the text inside the quotes. You may not want this option enabled if you are using text that has lots of single quotes in it—for example, using double quotes to signify inches and a single quote to signify feet.
Show Asian Text Options: When enabled, additional options are displayed in the Character panel to support Asian languages. This causes additional overhead, so you should leave it disabled unless you need it.
Note
For more information about fonts, glyphs, and adding text to images, see Chapter 18.
Enable Missing Glyph Protection: When enabled, Photoshop automatically makes font substitutions for any missing glyphs that appear in the text, but not in the selected font. This option can be important if you are keeping text as a vector layer and transferring the file between machines. When loaded on the second machine, if the font is not present, Photoshop automatically makes a font substation. If this option is disabled, Photoshop prompts you first.
Show Font Names in English: When enabled, the names of fonts in the font list always show up as English, even if you are working with different language fonts.
Font Preview Size: This allows you to enable and disable adding a font preview to the font selection lists. The font preview is useful in choosing a font because you can see what the sample looks like. However, the font preview is computer processor-intensive, so you may not want to enable it unless you are working with lots of text. This option also allows you to specify the size of the font preview that is displayed in the font lists, from Small to Huge.
The concepts surrounding 3D preferences are tightly coupled with the 3D chapters in this book. Therefore, we included a description of the 3D preferences in Chapter 22. Please refer to that chapter for information about setting 3D preferences.
Photoshop provides a tremendous amount of power by including feature after feature after feature. Unfortunately, that means Photoshop also had to include menu after menu after menu. With the sheer number of menus and tools that Photoshop has to offer, you can quickly find yourself spending more time finding tools than using them. The solution to that problem is to customize your menus and to use keyboard shortcuts.
Tip
You can create and name several customized shortcuts or menu sets. You may want to create different sets for the type of editing you are doing and then load the set that best matches your workflow.
Photoshop allows you to customize the menus in two ways. You can hide menu items that you do not intend to use, or you can color code menu items to make them easier to find. To customize Photoshop's menus, select Edit

Figure 2.26. The Keyboard Shortcuts and Menus dialog box allows you to create custom menus that hide unwanted items and display important items in organized colors.
From the Menus tab, you can use the following options to create and manage customized menu sets:
Set: The Set option allows you to select the default menu set or a saved menu set from the drop-down list. The Save Set icon next to the Set list allows you to save changes to the currently selected set. The New Set icon allows you to save the current menu configuration as a new set that is displayed in the Set list. The Delete icon removes the currently selected set from the list.
To create a new custom menu, make all adjustments to the menus, click the New Set icon, and name the set. You can then reload that set any time you like.
Menu For: This allows you to select whether you want to edit the application menus or the panel menus. When you change this option, either the application or panel menus are displayed, depending on which option you choose.
Menu list: The menu list displays a list of menus that can be adjusted. You can expand and collapse a menu in the list by clicking the triangle next to the menu name. When the menu is expanded, you can customize each menu option by doing the following:
Change Visibility: Use the mouse to toggle the eye icon to hide or show the menu item in Photoshop. Figure 2.26 shows that the Group from Layers option is hidden while the others are visible.
Change Color: You also can change the color used for the background of the menu item. This allows you to color code certain menu types or highlight important menu items so you can more easily find them. To change the color, select a color from the drop-down menu shown in Figure 2.26.
One of the best features Photoshop has to offer in improving your workflow speed is the use of keyboard shortcuts. Keyboard shortcuts allow you to use a key sequence to quickly perform tasks, select tools, and open panels. Throughout this book, we describe the important keyboard shortcuts when describing various tools. If you take the time to learn and use these shortcuts, you can be much faster at using Photoshop.
Photoshop also allows you to customize the keyboard shortcuts. To customize Photoshop's keyboard shortcuts, select Edit
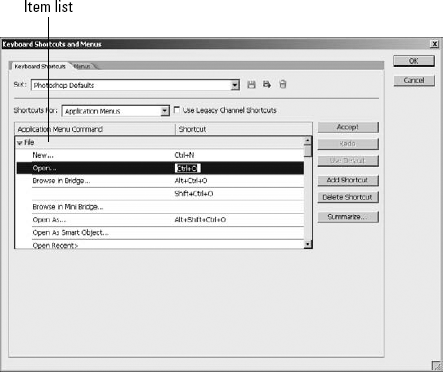
Figure 2.27. The Keyboard Shortcuts and Menus dialog box allows you to customize the keyboard shortcuts that you use to perform common tasks in Photoshop.
From the Keyboard Shortcuts tab, you can use the following options to create customized keyboard shortcut sets:
Set: The Set option allows you to select the default shortcut set or a saved shortcut set from the drop-down list. As with the customizing menus, the Save Set icon next to the Set list allows you to save changes to the currently selected set. The New Set icon allows you to save the current keyboard shortcuts as a new set that is displayed in the Set list. The Delete icon removes the currently selected set from the list.
To create a new custom shortcut set, make all adjustments to the shortcuts, click the New Set icon, and name the set. You can then reload that set any time you like.
Use Legacy Channel Shortcuts: This changes the channel switching shortcuts back to the pre-CS4 form for users who are used to those options.
Shortcuts For: This allows you to select whether to edit the shortcuts for application menus, panel menus, or tools. When you change this option, the list below changes to reflect the option you choose.
Item list: The item list displays a list of shortcuts for the type selected in the Shortcuts For option. You can expand and collapse items in the list by clicking the triangle next to the item name.
To change or add a shortcut to an item, click in the Shortcut column of that item. A text box appears with a cursor. When you type a key sequence into the text box, that key sequence is added to the text box. Figure 2.27 shows an example of the text box and key sequence for the Open menu item. To apply the key sequence as a shortcut, click the Accept button. To undo the change you made, click the Undo button. To revert to the Photoshop default, click the Use Default button.
Add Shortcut: This adds an additional shortcut to the item so it has two. This may help if you are used to different shortcuts from another application.
Delete Shortcut: This removes the selected shortcut from the item.
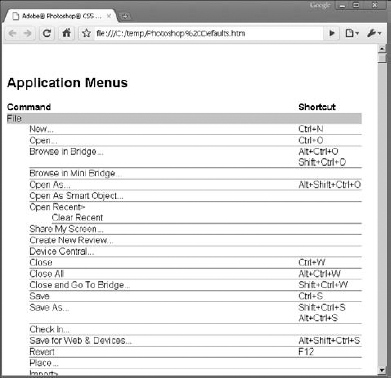
Summarize: The Summarize button launches a file dialog box that allows you to select a location to store an HTML summary of the keyboard shortcuts. After the file is saved, the summary is automatically displayed in your default Web browser, as shown in Figure 2.28. This is a good way to review the settings that you made.
Note
Appendix A contains tables that provide a quick reference to the most commonly used keyboard shortcuts.
This chapter discussed the Photoshop workspace, including the document windows, menus, panels, tools, and preferences. Photoshop provides lots of power, and if you learn how to configure and use the workspace, you can be more efficient and have much more fun.
Photoshop provides a fairly intuitive interface in most areas and some powerful features, such as grouping document windows and customizing menus that enable you to speed up your workflow.
In this chapter, you learned these concepts:
How to organize and arrange document windows
What's in all those menus
How to use grids, rulers, and guidelines
All about the tools in the Toolbox and where they are covered in this book
How to organize panels
How to create custom panels and keyboard shortcuts to make Photoshop easier to use
Creating and saving tool presets so you can easily configure tools for later use.