
The 3D environment in Photoshop has been a part of the extended version since CS3, but it changed dramatically in CS4, and with the ability to turn vector paths into 3D meshes with Repoussé in CS5, the ability to open, maneuver, edit, and even create 3D objects has become an important aspect of the extended version of Photoshop.
Although you can create basic 3D models and add textures to them in Photoshop, its main purpose is not to create, redesign, or even animate 3D objects or scenes. Instead, being able to work with a 3D object in Photoshop allows you to use Photoshop's powerful filters, styles, and other Paint tools to dramatically improve the way a 3D image looks and to create fantastic composites.
A 3D object is usually composed of at least two different files: the 3D object itself, which is a vector file, and the texture of the 3D object, or the file that defines what the 3D object will look like, which is a raster file. You need to understand how these files work together in the 3D environment in order to utilize the capabilities of Photoshop to change the look of a 3D object.
The Layers panel also looks different with a 3D object selected. A 3D object with a texture attached has at least one sublayer, often more than one. This chapter gives you a complete overview of how to work with 3D layers.
By adding the 3D extensions, Photoshop added a whole new array of readable file formats to its already impressive repertoire. Photoshop supports five 3D file formats:
3DS: 3DS is a file format used by 3ds Max, the most widely used 3D application. It has become so much the industry standard that most 3D modeling programs of whatever type export their files in this format.
OBJ: The .obj file format is also a widely used industry standard. The 3D models that come with the Photoshop bonus content are .obj files.
DAE: Also known as COLLADA, this is the file format used by the video gaming industry. It was originally developed to facilitate transporting digital content from one creation tool to another. COLLADA is also a widely supported file format.
U3D: The Universal 3D file format allows users to share 3D graphics with other users who don't have the 3D modeling program used to design the image. Like .jpg or .tif files, these files are working toward being universally available to most image viewers.
KMZ: This is the file format created and used by Google Earth. This file format is specific to the 3D geography that you see when you explore Google Earth.
You can export 3D objects from Photoshop in all of the above formats except 3DS.
Whenever you are working with a 3D model, you are working with a vector file. Vector files are made up of geometric shapes that are defined by mathematical equations. When you change the size of a vector file, the image is simply recomputed and the file doesn't lose any quality.
A 3D object rendered in wireframe mode is a basic example of how vector images work. In the example in Figure 22.1, the outlines of the hat are stored in the computer numerically, with the length, width, and placement determined by mathematical equations describing each component.

Because 3D images are vector files, editing them is very different than editing a raster image. You can't directly affect a 3D object with the raster tools, such as the Paint Brush or filters. These tools are designed to change pixels, and a vector file doesn't contain any pixels, of course. Photoshop can rasterize any vector file, making it possible to use any of the tools or filters on that file, but rasterizing a 3D object flattens it, turning it into an image rather than a 3D model. Sometimes when you are creating a composite, you want to do just that; but most of the time, you want your 3D objects to maintain their capabilities. Fortunately, Photoshop has provided several ways of changing a 3D object without affecting it directly.
As a general rule, if you work with 3D models often, you probably use a 3D modeling program that's built to create 3D objects and is much better at it than Photoshop was ever meant to be. When you bring these models into Photoshop, your goal is probably to do one or both of two things: to change the texture of your 3D file or to create an image composite using a blend of 3D objects, photos, text, and other Photoshop elements.
I've already shown you that a 3D model is a vector file, or a mesh, and it doesn't contain any color information. The texture of a 3D file is the raster file that is created to wrap the 3D object in, to give it color, texture, and definition. If you are bringing a 3D object into Photoshop to add a texture or edit the existing texture, you probably want to open it just like you open any supported file in Photoshop: Browse to the 3D file in Bridge or Mini Bridge, and double-click to open it in Photoshop.
If you are creating a composite with more than one 3D object or other file, you want to place any secondary files into the first one as new layers. You can do this using the File
Using the File
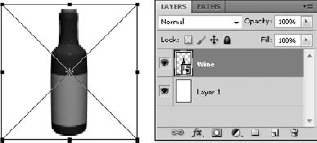
Figure 22.2. Using the File
If you choose to create a new layer from a 3D file, the 3D object is placed into your file as a new layer at its default size and placement. It remains a 3D layer, and all the 3D tools can be used to manipulate and edit it.
You can create basic 3D meshes in Photoshop in several ways. You can use presets to create a quick and basic 3D object that doesn't have a texture applied and doesn't use an image as the texture, you can use the grayscale brightness values in an image to create a depth map, or you can use multiple two-dimensional cross sections to create one 3D object. These methods of creating a 3D object were all available in CS4. CS5 includes a new utility called Repoussé that allows you to create unique 3D objects from vector paths.
You have two options for choosing how to create a 3D object: You can use the 3D menu or the 3D panel, both shown in Figure 22.3. The 3D panel is more versatile and easier to access, so in most cases, you want to use it to work from.

Note
If you have a 3D layer selected, these options in the 3D menu are grayed out and the panel options are different. Although you can merge 3D layers, you can't create more than one 3D object on a layer in Photoshop.
When you use the 3D panel to create a new 3D object, you can use the drop-down menu to select a source for that object. You can choose from these sources:
Selected Layer(s): Most of the time, you want to use the selected layer or layers to create a 3D object. This option uses only the content of the currently selected layer to create a 3D object.
Work Path: This option allows you to create a 3D object from a selected work path. Although you can create other 3D objects from layers containing paths (such as turning text into a 3D postcard, for instance), you can use the Repoussé function only if you choose this option.
Current Selection: This option uses the current selection to create a 3D object, cutting the unselected areas from your image entirely. Again, this option creates a 3D object using the Repoussé utility only.
File: This option uses the entire file to create a 3D object. You want to use this option if you have an image composite that you want to wrap around a 3D preset or manipulate into a 3D scene.
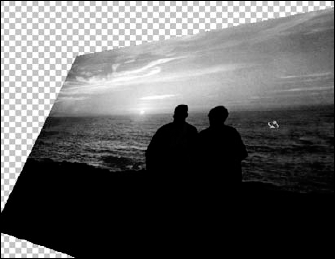
A 3D postcard is the simplest form of 3D object. It is essentially a two-dimensional image or object that has been converted to a 3D mesh so it can be manipulated with the 3D tools. It maintains its two-dimensional appearance, as you can see in Figure 22.4, but now you have the added versatility of being able to quickly manipulate it in 3D space, adjusting perspective or creating a unique look. You also can use many of the 3D tools to modify it, including editing its texture, adding lights, or combining it with other 3D objects to create a scene.
Photoshop ships with 12 presets that create basic 3D shapes that range from very basic shapes such as cubes to more complex shapes such as a wine bottle or hat. These shapes use the selected layer as a texture. If you have a white background layer selected, the object is white. If you fill the background with a color or pattern, your object has that color or pattern. If you open or import an image and select that layer when you create the object, the image is wrapped around the 3D object and becomes the texture, as shown in Figure 22.5.
Note
You can easily edit textures in Photoshop, so if you're not sure what you want to wrap your object up in just yet, don't let it stop you from creating it. You can change the texture later.

Just as with any presets in Photoshop, you can create and save your own objects as presets. This isn't done as easily as clicking a save preset button, however. The 3D object must be exported as a DAE (Collada) file and placed in Program Files
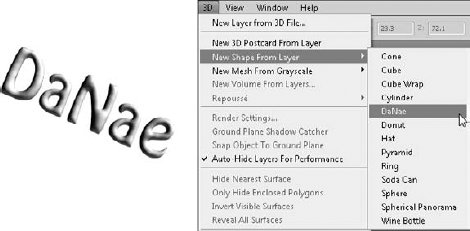
The Repoussé utility is new in Photoshop CS5 and gives you the capability to create a 3D object using a vector path. Not only do you have the scope of creating almost anything with the vector tools to change into a 3D object, the Repoussé utility has many different options for how it is interpreted into a 3D object.
The vector layer can be anything—text, a shape, some clip art, or your own custom drawing. The thing to remember is that Repoussé is not going to make a drawing of a complicated object look like a 3D model of that object. An image of a car, for example, is not going to look like a die cast model after using the Repoussé utility. Instead, it looks more like a mold of a car, with depth, but not much extra shape to the depth. The end result depends on the settings you choose, of course, so you might decide to make a 3D swirl from the shape of the car rather than a mold, but the important thing is that you still are very limited when it comes to creating very technical 3D objects.
That being said, the Repoussé utility serves an amazing function when it comes to bringing your Photoshop creations to life and giving them new depth.
Follow these steps to see how you can create a new 3D object using Repoussé:
Create a new blank document of any size.
Create a vector path in the new document.
I suggest you do something simple to start. I typed my name.
With the new vector layer selected, select 3D Repoussé Object from the 3D panel and click Create.
You are warned that the vector layer must be rasterized in order to create a 3D object. Click Yes. This opens the Repoussé utility, as shown in Figure 22.7.
Choose a Repoussé preset.
This determines how the vector file is extruded to create the 3D object. The thumbnails give you a fair representation of how your object will look, with the blue-green surface representing the original vector surface and the gray areas representing the added 3D sides and back. Because you are just getting familiar with Repoussé, I suggest you click several of these options and see their effects in real time on your object.
Rotate your object to look at it from different angles as you make changes to it.
On the left side of the Repoussé dialog box are the Mesh Move tools. The Rotate tool is selected by default and gives you a good look at the sides of your object if you drag over it to rotate it. All these tools correspond to the 3D Move tools that are used to manipulate your object and are covered later in this chapter.
Tip
You can use the Widget tool to move, rotate, and resize your 3D object even while you are using the Repoussé utility. You learn more about this later in this chapter.
Choose Extrude options.
The next options in the Repoussé dialog box allow you to define the depth and properties of the 3D area added to your object. Set the following options:
Warning
Pressing Enter after entering new settings closes the Repoussé dialog box. You want to click the next setting instead.
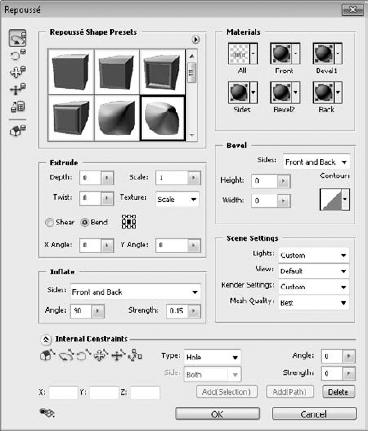
Depth: This determines the depth of the object. You can type a value or select one using the slider that appears when you click the drop-down arrow. You also can use the scrubby arrow that appears when you hover over the depth label.
Scale: This setting determines the size of the extrusion. At a setting of 1, the extrusion is the same size as the vector object. Go lower and the extrusion gets gradually smaller until the back of the object is the size specified, as shown in Figure 22.8. Go higher and the back gets larger.
Twist: The Twist setting turns the extrusion either clockwise using a positive number or counterclockwise with a negative number. A setting of 360 turns the extrusion all the way around once, as you can see in Figure 22.8.
Texture: This determines how the texture is laid across your new 3D object. Scale scales the texture proportionally to the shortest length of the image size, Tile causes the texture to repeat, and Fill stretches the texture to fit the new 3D object, possibly distorting the texture.
Shear: You can shear the back of the extrusion to the left or the right if you change the X angle; you can shear it up or down if you change the right angle, as seen in Figure 22.8.
Bend: Create a bend in the extrusion using the X and Y angles, as shown in Figure 22.8. You can change where in the extrusion the bend starts by using the reference point location, which looks like a box made up of dots. Click any dot to turn it black and set it as the reference point for the bend.

Inflating a 3D object makes it look as if it is made of rubber and being filled with air, as you can see in Figure 22.9. Choose whether you want to inflate the front or the back or both, and set the angle and strength. The angle determines which direction the edge is pushed, and the strength determines how hard it is pushed.
Choose the texture material.
You can choose from several texture material presets and change several different areas on your new 3D object. Figure 22.10 shows two textures on the front and sides of my name.
Note
You can learn much more about materials and textures and how to edit them or add new ones to the presets in Chapter 23.
Create a bevel on the surface of your 3D object, as seen in Figure 22.11.
You can create a bevel on your 3D object just as you would on a two-dimensional image. Changing the height creates a bevel that comes up (or down) from the surface of the 3D object. Changing the width creates a bevel that is wider (or narrower) than the surface. The counter sets how the bevel is applied; the straight, diagonal line creates a straight, diagonal bevel. You can use one of the contour presets, or you can click the contour icon once to create your own contour map.
You can change the type of light on your object, change the view and render settings, and set the mesh quality to make your object look very different, as shown in Figure 22.12. These settings are a little advanced for having just jumped into working with 3D, so you see much more about them throughout the next few chapters.
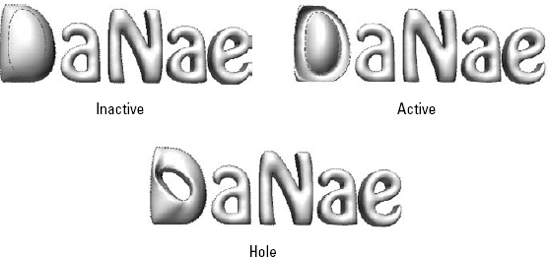
So far, Repoussé has treated the vector object as a single object even though it may be made of several different paths. In my name, for instance, the oblong shape that makes up the hole in the center of the D is a different path than the D shape that makes up the outside. I can manipulate these separate paths using the internal constraints. The settings within the internal constraints are similar to the settings used in other areas of the Repoussé utility, but you can apply them to a selected section of the path.
Use the 3D Constraint tools at the top of the Internal Constraint options (they look like the 3D Move tools which are covered later in this Chapter) to select an individual path on your 3D object. You can change the internal constraint of this path to one of the following three types:
Inactive: This makes the path part of the 3D object. You can see in Figure 22.13 that the center of the D is filled in. It is static and can't be edited.
Active: This option also makes the path part of the 3D object. An active path is still individually editable, however, and you can use the Constraint tools to move it around and the Angle and Strength tools to inflate it so it is dimpled.
Hole: This is the default for the path that is the center of the D. It uses the path to punch a hole through the 3D object. This path is also active and can be moved and changed using the Constraint tools.
Use the visibility tool found in the bottom-left corner of the Repoussé utility to toggle the visibility of the objects in your 3D scene on and off.
These objects include the widget, the ground plane, the lights, and the bounding box for your 3D object.
Click OK to exit the Repoussé utility and finalize the changes to your new 3D object.


Creating a 3D mesh from grayscale creates a depth map based on the brightness levels of the image you are using. Areas of your image that have brightness values that are brighter than midtone are pushed out, and areas that are darker than midtone are pushed in. Midtone areas stay on the original plane. You can see a basic representation of this in Figure 22.14. I used a simple radial gradient, which created a smooth depth map.
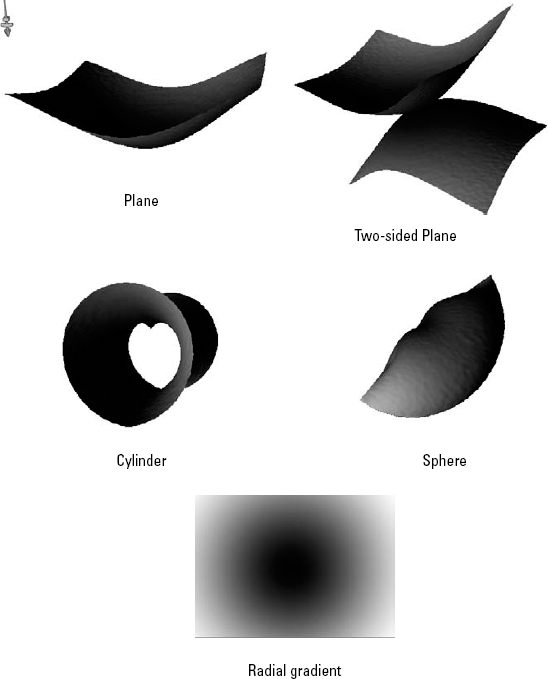
Figure 22.14. A simple radial gradient makes it easy to see how creating a mesh from grayscale works.
When you create a depth map, you have four options:
Plane: Creates a depth map centered on the original plane.
Two-sided plane: Creates a mirror image of the original depth map.
Cylinder: Creates the depth map and then wraps it into a cylindrical shape.
Sphere: Creates the depth map and then wraps it into a ball.
Note
Your image doesn't have to be in grayscale for this to work. Photoshop uses the green channel to create a depth map.
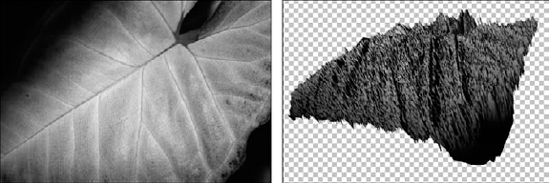
This type of 3D object is great for creating textures or another unique look for an image file. They also can be used to create planes from elevation maps or to save and recreate planes from one 3D modeling file to another. A simple image file can quickly become a mountain range, as seen in Figure 22.15.
The 3D volume option is used to create 3D objects out of image files that are slices of 3D objects, such as several DICOM files that are created by taking slices out of the center of an image. Using this option allows you to create a 3D object from the image layers that can be moved, manipulated, and viewed from all angles, giving you a versatile way to view these medical images.
The layers of a 3D object are more complicated than most images. When you open a 3D object in Photoshop, unless that object doesn't contain any textures at all, you have at least one sublayer listed under a textures heading. On top of that, every filter you can add or edit you can make to a 3D object that involves the Layers panel in one way or another. It doesn't take very many changes to add several layers to a 3D file or composite. Don't panic yet: Like a well-organized filing cabinet, the Layers panel is a clean and efficient way to organize your effects and filters.
Figure 22.16 shows the Layers panel after creating a ring by using the 3D shape from the layer option. The thumbnail of a 3D layer is distinctive. It includes the icon of a three-dimensional cube in the corner in addition to the thumbnail of the actual 3D object. This indicates that the 3D menu is active and the 3D tools can be used on this layer.

Notice the sublayers. The primary sublayer is named Textures, and underneath it is another layer labeled Background. This layer is the texture that has been applied to the 3D mesh to give it surface area and color. It is named Background because I didn't bother to change the name of the background layer before I created a 3D object from it. This layer is actually an embedded file. Double-clicking this layer opens the background layer as a separate two-dimensional file that I can change and rename if I want. I also can add more textures to this object, which show up as additional layers under the texture sublayer. Each of these textures can be opened and edited individually.
Note
Editing textures is a primary reason to bring a 3D object into Photoshop. I cover this aspect of 3D objects in greater detail in Chapter 24.
Imagine that you are standing in a room. As you move in a straight line left to right, you are moving along the X-axis. If you were to jump up and down in place, you would be traveling along the Y-axis. This is a two-dimensional plane, in which coordinates can be given with two numbers: an X location and a Y location. When you work with a two-dimensional file in Photoshop, you are working with an XY plane. To add the third dimension, the Z-axis is added, creating depth to the XY plane. To move along the Z-axis you would walk front to back within the room.
The 3D tools in Photoshop allow you to move 3D models within all three of these planes. If you are already familiar with any 3D modeling software, you will find the tools used in Photoshop familiar. Photoshop has designed its manipulation tools to a very standard look and feel. If you have never used 3D tools, you will find that they are fun and easy to use. Jumping in and working with them as we introduce them to you in this chapter is the best way to familiarize yourself with them very quickly.
As you work with your 3D model, keep in mind that your final product in Photoshop will be a two-dimensional view, not a 3D scene or animation. This helps you keep in perspective what you can accomplish in Photoshop and how to do it.
If you are familiar with 3D modeling software, you should be aware of one important difference in Photoshop. The 3D tools in Photoshop change the selected 3D layer, not the 3D scene. When you roll, rotate, or otherwise change the position of a 3D object, you are simply changing your view of it, not its positioning relative to the scene it was created in. Being able to manipulate your 3D object allows you to make changes to its texture and place it in a composite that eventually becomes a two-dimensional image.
That means that the X, Y, and Z planes remain static. Whether you are manipulating a 3D layer or the camera, X and Y are always side to side and up and down, and Z is always depth. Just imagine that you are looking at the 3D objects through a window that doesn't move. You can move the 3D objects around behind the window, but you can't go into the room and walk around among them like you can in a standard 3D modeling program.
The 3D object and camera tools are located in the Toolbox, as shown in Figure 22.17. When you select the active tool by clicking it or hitting K on the keyboard, the Options bar changes to show not only the options that are available for the tool, but all the other 3D object tools, as shown in Figure 22.18. These tools are used to move your object through 3D space.

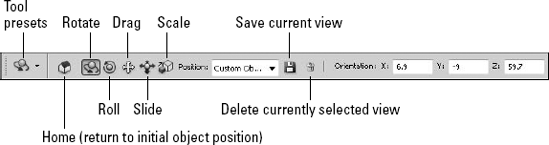
The first button in the options bar is the Home button. At any time while you are manipulating your object, you lose it in "outer-space," or just feel as if you've contorted its position beyond repair, you can hit the Home button to bring your object back to its initial position.
Tip
It is incredibly difficult to explain moving an object through 3D space in a book with still shots. The quickest way for you to understand what I am trying to teach you is for you to use the tools in conjunction with this book. Create a quick 3D object by opening a new document, choosing 3D
Turning a 3D object around a central point is done by using tools to rotate or roll that object. Rotating or rolling an object turns and skews it around the X-axis, Y-axis, or Z-axis. While using the Rotate and Roll tools, your object moves around a center point, which never changes position.
Changing an object's orientation is the most obvious reason to use the Rotate and Roll tools. But you also can change the lighting on your object. As you move your object, notice that if you have a light placed in your scene, the lighting changes on your object.
Another use for the Rotate and Roll tools is checking the texture of your object and making sure it is the way you want it, especially if you made any changes to it in Photoshop. You can select the Home button at any time to return your scene to its original settings.
You can turn a 3D object around a central point using the Rotate and Roll tools, or you can enter the orientation numerically in the options bar.
Using the Rotate tool rotates the 3D object around the X-axis and Y-axis. The X-axis is a line running side to side through the center of an object. Like a hot dog turning on a roasting stick, if you rotate your object only on the X-axis, the top of the object rotates toward you or away from you. The Y-axis runs up and down through the center of your object. As you rotate your object around the Y-axis, the sides of the object move toward you or away from you.
Click and drag back and forth across your 3D object to rotate it along the Y-axis or drag up and down to rotate it along the X-axis, as shown in Figure 22.19. You can constrain the rotation to either the Y-axis or the X-axis by holding down the Shift key as you drag in the appropriate direction.
Note
As you manipulate your 3D object using the 3D tools, you notice that the 3D Axis Widget (shown in Figure 22.19) also moves in relation to the position of the 3D object. I show you how to use the widget to manipulate a 3D object later in this chapter.

Rolling your object around the Z-axis is a similar concept to rotating your object around the X-axis or Y-axis. Visualize a line running from front to back through the center of your object, allowing it to roll left to right and back again. You can roll your object around the Z-axis by clicking and dragging back and forth with the Roll tool, as seen in Figure 22.20.

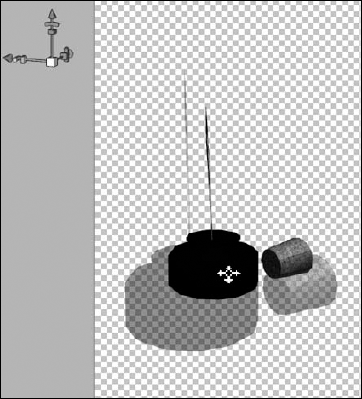
Dragging or sliding a 3D object moves it to a different location in your 3D workspace. Moving your object allows you to place it in the desired position so you can create composites by adding a photo background or other 3D objects. You also may want to move an object to adjust the lighting or change the perspective.
Dragging moves the object around the XY plane and is visually similar to using the Move tool to move a selection in a regular image file. You can drag your object by selecting the Drag tool in the options bar or the Toolbox, as seen in Figure 22.21.
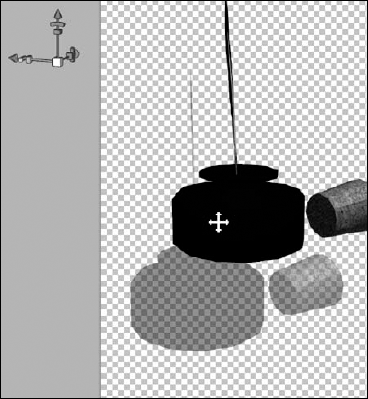
Sliding moves the object along the XZ plane, so you can move it side to side, just as you can with the Drag tool, or in and out along the Z plane. As you move your object toward you or away from you along the Z plane, it looks very similar to scaling, or resizing, your object, as shown in Figure 22.22. Although it looks the same, when working with 3D, sliding an object is a very different effect from actually making the object bigger or smaller, just as walking away from an object in real life doesn't change its actual size, just your perspective of it.
When you have the Drag or Slide tool selected, you can change the position of your 3D object numerically by entering values in the X, Y, or Z indicators in the options bar.
Scaling a 3D object in Photoshop is very similar to using the Transform tools to scale an image or selection. By selecting the Scale tool, you can click and drag across your object to make it bigger or smaller, as seen in Figure 22.23. As you change the size of your 3D object by using the Scale tool, the proportions of the object are automatically maintained. By holding down the Alt/Option key while you click and drag, you can adjust the object non-proportionally by making it taller or shorter. If you hold down the Shift key, you can make your object wider or narrower.
When you have the Scale tool selected, you can change the size numerically by entering values in the X, Y, or Z indicators in the options bar. This is usually a better way to scale your object disproportionately. You also can change these values by scrubbing across the letter that applies to the value you want to change.

As you manipulate a 3D object, you can change the position of it to several presets, as shown in Figure 22.24. When you change the position of your object using the menu, you lose any position changes you have already made to it.
If you've created a position that is different than any of the presets, you can save the position by clicking the Save button and naming the new position. It is then added to the list of presets, and you can access it at any time. You can delete the view by selecting it in the drop-down menu and clicking the garbage can.

As you've used the tools to manipulate your 3D object, you've probably noticed the colorful widget shown in Figure 22.25. It moves with your 3D object and is a good visual representation of its position. It's so much more than that, however. You can use it to perform all the manipulation techniques that I've just shown you how to do with the 3D object tools. I show you how.
Note
The 3D Axis Widget appears by default when you have a 3D layer selected. If the 3D Axis Widget isn't visible in your 3D workspace, click the Toggle Misc 3D Extras button at the bottom of the 3D panel and select 3D Axis.

The widget has three different colored arrows coming out of a cube. Each arrow represents a different axis or plane:
Red = X
Green = Y
Blue = Z
The end of each arrow has three different shapes: a cone, an arc, and a cube. Each of these shapes represents a movement. Hover over each shape, and it becomes highlighted. Your mouse icon changes into a different manipulation tool that represents the movement of the highlighted shape, as shown in Figure 22.26. Click and drag to use each tool:
Cone: Drags or slides the object along the plane represented by the arrow.
Arc: Rotates or rolls the object around the specified axis.
Cube: Scales the object. Because you are using only one plane, the object isn't scaled proportionately.

Figure 22.26. Each of the shapes at the end of the arrows can be used to manipulate your object along the selected axis or plane.
If you are not specifically over an area of the widget, but just generally hovering around it, your mouse icon turns into the Rotate tool, and you can click and drag in any direction to freely rotate your object around any axis. If you hover closer to the center cube connecting the arrows, an orange square plane appears that connects two of the arrows. This constrains the rotation to the two axes that are connected by the plane. For instance, if the orange square connects the green and blue arrows, you can freely rotate your 3D object around both the Y and Z axes, based on the direction you move your mouse, but not the X axis.
Hover directly over the square, and it turns yellow and your mouse icon changes to the Drag tool. Now you can drag your object along the two indicated planes. Hover directly over the cube, and the Scale tool appears, allowing you to scale your object proportionally, as shown in Figure 22.27.

Figure 22.27. Using the connecting squares and the cube allows you to move and scale more than one axis or plane.
The 3D Axis Widget isn't always the easiest tool to use, especially if you want to make small, controlled movements, but it is certainly the most convenient. With a little practice, you can make quick, controlled manipulations without having to toggle through the 3D object tools.
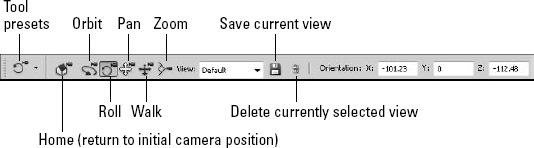
You can position and reposition the camera that is viewing the 3D object. These movements are very similar to moving the object, allowing you to view your object from any angle. A few subtle differences let you know you are working with and moving the camera rather than the object.
Probably the first difference you notice between changing a camera view and manipulating the object is the lighting. When you manipulate the object, the camera and the lights are stationary and the object is moving. Therefore, the light changes on the object as it turns and rotates. When you move the camera rather than the light, however, both the object and the light are stationary, so the light stays constant on the 3D object.
Because the movements you make are to the camera, another difference you see right away is that your view shows you a mirror image of your actions as you drag the mouse. For instance, as you orbit the camera left by clicking and dragging to the left of your object, your object appears to be rotating to the right.
When you select a 3D camera tool in the Toolbox, the options bar changes to reflect the fact that you are working with the camera rather than the object itself, as you can see in Figure 22.28. The tools themselves have very similar functions to the object tools, so I introduce them more briefly:
Note
Notice that the 3D widget also changes when you select the 3D camera tool. It now shows a camera icon just under its menu bar. With the 3D camera tool selected, the widget moves the camera instead of the object.
Home: This returns you to the default view.
Orbiting with the camera: Unlike moving a 3D object by rotating it, orbiting the camera moves the camera around your object. As you orbit the camera, it is oriented toward the central XY point on the object and continues to stay the same distance from that point. You can orbit the camera in a perfect circle around a 3D object's center point.
Rolling the camera: Rolling the camera is similar to rolling an object. The camera itself rotates around its Z-axis, changing the orientation of the object in the camera's view. You can roll the camera from side to side around its Z-axis by using the Roll tool in the Camera Transformation toolbar.
Panning the camera: Panning the camera moves the camera up and down or back and forth on its XY plane, moving the object accordingly in the view of the camera. You can pan the camera by selecting the Pan tool in the Camera Transformation toolbar.
Walking the camera: Walking the camera is similar to sliding a 3D object. Instead of moving the object back and forth in space, you are going to walk the camera closer to or farther away from your object. You can walk with your camera using the Walk tool in the Camera Transformation toolbar.
Zooming the camera: Changing the focal length of the lens of a camera allows you to zoom the view in and out. The Zoom tool works the same way. Zooming allows you bring the object closer in the camera's view without actually walking toward the object.
Changing the view: The view allows you to change the position of the camera to a preset and save your own presets, just as you could use and save preset positions with the 3D object tool.
Note
As with the 3D object tools, you can change the position of the camera numerically. You also can hold down the Alt/Option key to temporarily change the XY tools into the Z tools, and vice versa.