
Understanding the non-destructive nature of Photoshop
Using the History panel to manipulate past adjustments
Using the history of edits to paint out changes
Using Photoshop's built-in action to save time
Creating custom actions
Editing images in Photoshop is done by applying a series of adjustments to modify the original pixels in the image. Each adjustment builds on the others until you achieve the desired results. Photoshop provides two powerful features that allow you to be more productive by utilizing and manipulating the sets of adjustments made to images.
The history feature tracks each change to the individual image. This allows you to have a record of each state of the image during editing. Photoshop provides several highly useful tools that allow you to make dynamic adjustments to the image by manipulating the history states. These tools also allow you to play around with different techniques because you can quickly revert back to previous states or remove adjustments that do not work well.
The actions feature allows you to bundle a set of adjustments as an individual action. You can save actions to a file and then use them in other images. This feature saves lots of time when you are performing similar adjustments to images.
One of the most powerful features of Photoshop is the ability to make numerous edits to images and see the effects of those edits without destroying the underlying pixel data or previous edits. Many of the edits done to images in Photoshop are the result of a series of adjustments using a variety of tools. Each adjustment builds on another until the end result is reached. Unfortunately, it is not an exact science, and you have to try different adjustments until you find a combination that culminates in the desired outcome.
The non-destructive nature of Photoshop allows you to freely play around with the edits, tweaking them until they are just right without the fear of ruining previous edits or the original pixels in the image. In fact, you can even remove a single adjustment that was made early on without affecting the original pixels or the subsequent adjustments.
To help understand the value of non-destructive editing, think about editing an image for hours and realizing that one of the first edits you had made was a bad decision. If you could not undo that edit, the hours of work would be wasted.
The following is a list of the major non-destructive features/tools available in Photoshop:
History: The History panel, discussed later in this chapter, provides a means of quickly viewing each of the adjustment that have been made to the image. The History panel also provides a means of creating snapshots that you can easily revert back to and removing individual edits from the history.
Dialog boxes: Most of the dialog boxes in Photoshop allow you to use the key sequence Ctrl/

Layers: Using adjustment layers, discussed in Chapter 10, you can make adjustments to the image without affecting the actual image itself. The adjustment layers contain adjustment data that affects how the image looks when they are applied. Layers are very useful because they can be removed, reordered, and even moved from one document to another in Photoshop.
Layer Comps: The Layer Comps panel is similar to the History panel, but it contains the changes made to each layer. Using the Layers Comp panel, you can easily create multiple versions of the edited image, each with its own set of changes. This makes tracking multiple changes to the image easy.
Masks: Creating masks, discussed in Chapter 10, allows you to create a protective shield for an area in the document that protects it from adjustments made. One of the major advantages to masks is that they can be altered at any time, and the alterations are automatically updated in the results because they actually sit between the adjustment layer and the layers below.
Alpha channels: The alpha channel, discussed in Chapter11, allows you to add information that can be applied to areas of the image without actually affecting the other channels. For example, you can add transparency information to an RGB image without affecting the normal pixels in the image.
Smart objects: Smart objects are a useful feature of Photoshop that provide powerful, yet non-destructive adjustments to images. Using smart objects, you can combine a series of one or more layers, documents, and so on into a single combined object. Then you can apply filters and make other adjustments to the object without actually changing the contents. You can change the contents of the original object at any time, and the adjustments apply only to the updated object. This allows you to create a base source image and quickly try different edits without the worry of damaging the work done to make the source image or the original pixels.
Crops: Photoshop allows you to crop images in a non-destructive manner. When you start to crop an image, as discussed in Chapter 3, two options appear in the Options menu: Hide and Delete. If you select Delete, the pixels outside the crop box are thrown away and you work only with the remaining pixels. If you select Hide, the pixels outside the crop box are masked, and although you see the pixel inside the crop box, only the pixels outside the crop box are still present in the image. To restore the cropped pixels, select Image

Note
The Hide and Delete options in the crop tool menu are available only if you are cropping a layer that does not have the pixels locked. For more information about layers and layer locking, see Chapter 10.
Revert: At any point while you are editing an image, you can revert to the original state of the file when it was opened or last saved by selecting File
The History panel can be one of your best friends in Photoshop because it has the ability to save you hours of lost work. When you are editing images in Photoshop, you are really working from one change to another. These changes are tied together and build on one another.
The purpose of the History panel is to track and manage each adjustment you make to the image. The History panel is designed to give you much more flexibility and control than that traditional undo/redo functionality. Using the History panel, you can go undo and even modify one, some, or all of the changes you have made to an image.
Note
Photoshop allows you to log some of the history information as either metadata in the file or as a separate file. The history logging feature is set from the General panel in the Preferences dialog box as discussed in Chapter 2.
The following sections discuss the History panel and how to get the most out of it. They also cover using the Eraser, History Brush, Art History Brush, and selections to roll back and modify individual edits.
You load the History panel by selecting Window

The History panel can be configured by setting the options in the History panel menu and by setting the preferences for history in the general Photoshop Preferences. To configure options from the History panel, select History Options from the History panel menu (refer to Figure 5.1) to bring up the History Options dialog box, shown in Figure 5.2. Using the History Options dialog box, you can configure the following options:
Automatically Create First Snapshot: This automatically creates a snapshot of the original document when it is loaded into Photoshop. This is a useful feature that allows you to always have an original snapshot to use with the history tools; however, if you know that you do not need to use the history, then turning off this option reduces some processing overhead and memory.
Automatically Create New Snapshot when Saving: This automatically creates a snapshot every time you save the file in Photoshop. This can be a useful feature; however, it also can be a problem if you have the tendency to save after every little change you make. You may end up with a huge list that really isn't meaningful. If you use this feature, make sure you are careful about when you save.
Allow Non-Linear History: Typically, the edits to a document are built on top of each other in a linear fashion. The problem with the linear method is that if you delete one state in the history list, then all the subsequent states also are deleted. When the Allow Non-Linear History option is selected, the history states become disconnected and you can delete one of the states in the middle without deleting the subsequent changes.
Note
Some of the changes you make to a document are very tightly connected. You should be very careful when using the Allow Non-Linear History option so you do not delete a state on which another state is depending.
Show New Snapshot Dialog Box by Default: This specifies whether to show the New Snapshot dialog box when creating snapshots. If this option is disabled, the New Snapshot dialog box is not displayed unless you select New Snapshot from the History panel menu. Disabling this option can speed up creating snapshots using the button on the History panel if you do not need to specify a name or source.
Make Layer Visibility Changes Undoable: If this option is not selected, which is the default, then turning layer visibility on and off is not recorded in the history. When this option is selected, turning a layer visibility on or off is recorded in the history and you can undo it using the history tools.

By default, Photoshop keeps a record of at most 20 history states. Each history state takes up memory and requires extra computer processing by Photoshop. For the most part, 20 history states is enough to work from; however, if you are working on an image that requires lots of different edits, you may need to increase the number of history states that are recorded so you can revert or adjust some of the corrections that you are performing.
The maximum number of history states is specified in the general preferences of Photoshop. To increase the number of history states that Photoshop keeps available, select Edit
Navigating through the different history states can be done either directly using the History panel or by using keyboard shortcuts. The most common method is to open the History panel, scroll through the history, and select the history state you want to view. When you select a history state, the image window changes back to that state.
A sometimes faster option is to use the Ctrl/
Tip
If you select a snapshot in the History pane, then you can use the Ctrl/
A very useful feature of the History panel is the ability to create snapshots of the image based on a specific state. The snapshot data remains, even if the history data is deleted. This feature provides a very versatile way to make different adjustments to an image and quickly compare between the adjustments.
To create a snapshot, click the Create Snapshot button at the bottom of the History panel or select New Snapshot from the History panel menu to bring up the New Snapshot dialog box, as shown in Figure 5.3. Name the snapshot, and select the snapshot source. The snapshot can be taken from the full document, the current layer, or all layers merged. When you click OK, the snapshot appears in the snapshots list at the top of the History.
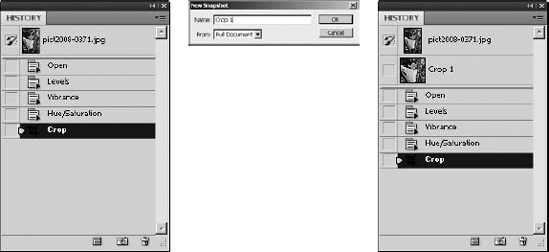
Figure 5.3. Creating a snapshot of a history state adds a state that you can go back to at any time.
The snapshots can be treated very much like the history states. You can delete them and even use the History Brush tool on them.
Another useful feature of the History panel is the ability to quickly turn a history state into a separate document. This feature is useful if you are editing an image and want to send someone multiple versions for her approval. You can make the full edit of the document and then use the History panel to create documents based on the states that you think might meet expectations.
To create a document using the History panel, select the state or snapshot to create a document from and then click the Create New Document from Current State button or select New Document from the History panel menu. A new document with the image data from the selected state or snapshot is loaded in Photoshop. The name of the new document is the name of the state or snapshot.
Clearing the history can be done in a couple of ways. You can select a history state and click the trash can in the History panel or select Delete from the History panel menu.
Warning
If the Allow Non-Linear History option is selected for the History panel, only the state that was selected is deleted. However, if the Allow Non-Linear History option is not selected, which is the default, then all subsequent history states are deleted as well. Make sure you know which option is selected before you delete a large amount of history that you need.
You also can clear out all the history in the History panel by selecting Clear History from the History panel menu. This removes all history states. The Clear History option works only on history states; snapshots remain after clearing the history.
A powerful feature of the History panel is the ability to select a history state and paint or erase directly from that history state or snapshot. This allows you to paint through the changes that have been made until you get down to the selected history state. If you consider the number of brush styles and transparency options available when painting, painting from history opens a variety of possibilities.
To enable painting from the History feature, you need to click the box beside the desired state or snapshot in the History panel. The box changes to the History Brush icon, as shown in Figure 5.4. Photoshop uses that state as the base level when painting from history.
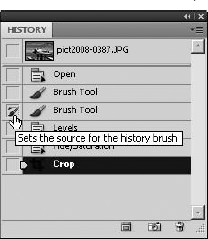
Figure 5.4. Selecting the History Brush option for a history state enables the History Brush, the Art History Brush, and the Eraser to utilize the history data.
One of the best features of Photoshop's History panel is that it allows you to erase part of the history without having to remove all the history. To help you understand how this works, consider the following example.
We start with the image shown on the left in Figure 5.5. Notice that the boy's shirt is very light, and the light coming through the trees is so bright that it really washes out his face in the photo. We fix this problem with a simple contrast adjustment, the History Panel, and the Eraser tool using the following steps:
Select Image
Adjust the brightness and contrast down until you have reduced the brightness of the overall image, as shown in the middle image in Figure 5.5.
Open the History panel by selecting Windows
Click the Enable History Brush icon for the Open history state, as shown in Figure 5.6.
Select the Brightness/Contrast history state, as shown in Figure 5.6.
Select the Eraser tool from the Toolbox.
Change the Mode to Brush in the Eraser Options bar, as shown in Figure 5.6.
Change the Brush Style to a dissipating brush with a very large size in the Eraser Options menu, as shown in Figure 5.6.
Set the Opacity of the brush to about 75% to allow the adjustment to be a bit gradual.
Select the Erase to History option in the Eraser Options bar, as shown in Figure 5.6.
Click the boy's face in the image several times using the Eraser tool until most of the original brightness in the face comes back.
The more you click, the more the change of brightness is erased from around the face. The end result is shown on the right in Figure 5.5; the face pops out a bit better than in the original.
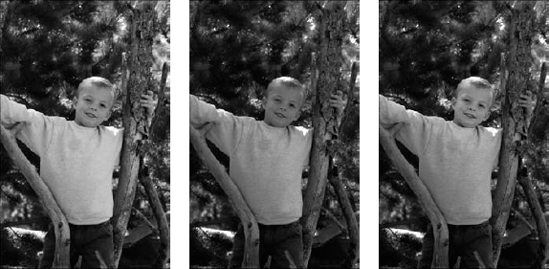
Figure 5.5. Using the Erase to History option on the Eraser allows you to make an adjustment to an entire image and then erase a portion of that change.

The History Brush tool actually works in the same way to erase part of the history of changes as using the Eraser tool with the Erase to History option checked—except backward. Instead of erasing the changes made since the history state was set in the history panel, you use that history state to draw on the currently selected history state. Either way, the end result is the same.
Note
Using the History Brush gives you a major advantage over using the Eraser in that you can utilize the brush modes to provide more effects when painting on the history. For more information about using the brush and brush modes, see Chapter 16.
The Art History Brush tool also works the exact same way to erase part of the history of changes as using the Eraser tool with the Erase to History option checked. Once again, you have to think about it in reverse terms. Instead of erasing the changes made since the history state that was set in the history panel, you are using that history state to draw on the currently selected history state.
Tip
Using the Art History Brush has a major advantage over using the History Brush tool: In addition to utilizing the brush modes, you also can choose a style to apply to the brush, giving an impressionistic appearance. For more information about using the brush and brush modes, see Chapter 16.
Sometimes, you want to limit the area of an image on which history is being painted. You can use selections to limit the area of the image that will be affected by the Eraser, History Brush, and Art History Brush tools.
Follow these steps to use a selection to limit the area painted on while using the history painting options:
Click the Enable History Brush icon for the history state you want to paint from.
Select the history state you want to change.
Use the selection tools to select the area of the image you want to paint history into.
Use the Eraser, Art History Brush, or History Brush to paint into the image.
Only the area inside the selection is painted on.
Photoshop does an excellent job of providing simple keyboard shortcuts (hotkeys) for most common tasks. The more you use Photoshop, the more you will rely on these shortcuts. They save lots of time, allowing you to create at a much faster rate. However, even performing shortcuts over and over can become tedious. That is where actions come into play.
Actions are a list of operations to perform from the current window. Actions can include most of the tasks that you can perform using the shortcuts, menus, and panels in Photoshop. Actions can range from something as simple as adding a special effect to the active document to a long series of operations that include creating several new documents and layers with numerous effects, filters, and masks. There really is no limit to what you can do with custom actions.
Actions save so much time because you can perform an action, whether it involves 2 steps or 50 steps, with just the click of a button or a hotkey. Photoshop comes with several predefined action sets for various common tasks.
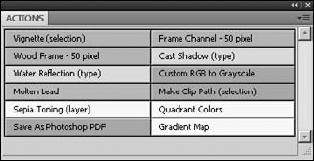
The predefined Photoshop action sets do everything from creating frames to applying a sepia toning effect to an image. As you work more with Photoshop, you likely will find tasks that you repeat over and over that get tedious. Then you will want to create custom actions. Recording a custom action is as simple as recording the steps you take as you perform those tedious tasks.
Note
After you play an action, you can click the History tab to view the History panel and see each step that was taken by the action.
The first step in helping you implement actions to speed up your work is to help you understand the organization of the Actions panel. The Actions panel can be accessed by selecting Window
The Actions panel is made up of four main sections, as shown in Figure 5.7; the action list, the Actions panel menu, the toggle boxes, and the Quick Buttons.
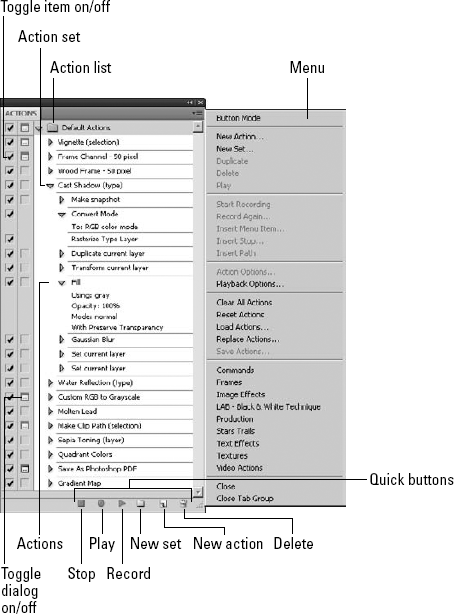
Located in the main portion of the panel, the action list is made up of three components: action sets, actions, and recorded commands.
Action sets: An action set is simply a way to file a list of actions into a category. An action set is distinguished by the folder shown next to the name of any given set. You can see two sets in Figure 5.7: Default and Video. You can load any one of seven predefined action sets from the Actions panel menu, or you can create your own. Click the triangle next to the action set name to see a list of actions contained in the set.
Actions: An action is a preset list of operations that can be preformed quickly and automatically by selecting an action and clicking the play button in the Actions panel. Click the triangle next to the action name to see a list of recorded commands contained in the action.
Recorded commands: A recorded command is a list of commands that have been recorded in a set order to perform the same series of operations every time the action is played. These commands may also contain submenus. For example, clicking the triangle next to the Stop command in Figure 5.7 shows the message displayed by the command.
Available by clicking on the menu button located in the upper-right corner of the panel, the Actions panel menu contains menu items that allow you to set the panel mode, add new actions, load action sets, save action sets, and set other options for the Actions panel.
Located along the left side of the panel are two toggle boxes available for each action set, action, and operation in the action list. The left toggle box enables or disables the set, action, or operation. If the toggle box is not checked, the operation is not applied when the action is run. The right toggle box enables or disables any dialog boxes contained in the set, action, or operation.
If a dialog box is displayed in the toggle box, Photoshop displays the dialog box associated with the operation when running the action. For example, if an operation adjusts the levels of an image, having the dialog box toggled on displays the Levels dialog box and waits for you to adjust the levels manually every time the action is run.
Located on the bottom right of the panel, the Quick Buttons are icons that provide quick access to the Stop, Record, Play, Create New Action Set, Create New Action, and Delete tasks for actions. These options are available in the panel menu as well.
Just when you thought you had a handle on the Actions panel, you can dramatically change the way it looks by choosing Button Mode from the Actions panel menu. Figure 5.8 shows that the actions list has converted to buttons. This allows you to simply click the action you want to perform without the dual steps of highlighting it and pushing Play. You can see that the action sets are delineated by color.
When you initially open the Actions panel, it is populated with the default action set. At this point, you can use one of the available default actions, load an existing action set, or create a custom action set.
Loading an existing action set can be accomplished in one of two ways. Photoshop's predefined action sets are listed at the bottom of the panel menu. These action sets are predefined for specific purposes such as frames, image effects, and textures. They can be loaded by simply clicking them. You also can load action sets that you have created previously or downloaded by clicking the Load Action option in the panel menu and then navigating to the location of the action set.
Note
Action sets have an .atn file extension.
When you load an action set, it is added to the action list. Photoshop automatically expands the action set to show all actions contained inside.
Custom actions are created by recording operations you want to add to the action as you apply them. After you begin recording the action, all steps that affect the current document are recorded, including creating new documents. Be prepared to perform the steps in order without any extra steps.
Follow these steps to create a custom action:
Select New Set from the Actions panel menu.
If you want to add the action to an existing set, skip to Step 3.
Type the name of the new action set, and click OK.
Select the action set to add a new action to or create a new one.
Create a new action by selecting New Action from the Actions panel menu to bring up the New Action dialog box, as shown in Figure 5.9.
Type the name of the new action.
You also can select a function key that automatically runs the application after it is recorded. And you can select a color to be used when displaying the action in Button Mode.
Start recording the action by clicking the Record button in the New Action dialog box.
As soon as you click Record, Photoshop begins recording operations, so be ready.
Perform the desired operations in order.
Perform the operations as you normally would, including modifying settings in dialog boxes and so forth.
Note
Don't worry if you mess up a little bit when performing the operations. You can go back and insert forgotten operations, delete unwanted operations, and even modify operations that weren't performed quite right.
Stop recording and save the action by clicking the Stop button in the Actions panel shown in Figure 5.7.
The new action appears in the action list.

You can edit an existing action in several different ways. For example, you may realize after recording an action that you need to add additional steps. You may also realize that you need to add menu items, stops, or paths to fine-tune the behavior. The following sections discuss the different ways that you can fine-tune your actions.
A stop is an operation that pauses the running action and displays a message. The user can read the message and decide whether to continue running the action. You may want to insert a stop into actions prior to performing complex or data-changing actions. For example, if your action makes changes and then saves the document, you may want to display a message to that effect so the user can decide if he really wants the file changed on disk.
To insert a stop into an action, select the operation that you want the stop to be inserted above and select Insert Stop from the panel menu. This opens the Record Stop dialog box, as shown in Figure 5.10. Create a warning message, and check the continue check box if you want the user to be able to continue after the stop. After you click OK, the stop is inserted before the highlighted command.

You may decide that you want to add more operations to an existing action. This can be useful for a couple of purposes. You may have forgotten a step when you recorded the action, or you may want to create a variation of an existing action.
To insert additional operations into an action, highlight the operation that you want to add additional operations below and click the Record button. Then perform the operations that you want to add. When you are finished recording operations, click the Stop button, and they are added to the action.
Operations can be moved from one location in the action list to another by simply dragging and dropping them in the new location. Operations can even be moved from one action set to an entirely different action set. You can select multiple operations in the same action by holding down the Ctrl/
You can duplicate operations or actions by holding down the Alt/Option key while dragging and dropping them into their new location. Holding down the Alt key leaves the original operation or action in place and creates a copy of it in the new location. If you duplicate an action inside the same action set, "copy" is added to the name.
Some operations also can be modified after the action is recorded. This can be extremely useful if, for example, you made a mistake or you decide later that you want the operation to use different settings. Instead of having to delete the operation and re-record it, you can just double-click the operation and the dialog box used to create it is displayed. Change the settings that you want to modify, and click OK on the dialog box to update the action.
To manually insert an operation into an existing action, highlight the operation right before the operation you want to insert. Then select Insert Menu Item from the Action panel menu to bring up the Insert Menu Item dialog box shown in Figure 5.11. You can now add an operation by clicking through the menu path of the operation. For example, if you want to zoom into your image, choose View
You can create a complex path as part of an action, but if you try to record several complex paths, each new path replaces the last one. You can create a path with a pen tool, use a path found in the Paths panel, or import a path from Illustrator. You can insert a new path into an action using the following steps:
Start recording an action by clicking the record button shown in Figure 5.9.
Select an action's name to record a path at the end of the action, select a command to record a path after the command, or select an existing path from the Paths panel.
Choose Insert Path from the Actions panel menu to add the path to the action.
Note
Paths are essentially a set of points connected by lines that make up vector shapes. Paths will be covered in much more detail in Chapter 17.

You also may want to remove operations from an existing action. Select the operations, and drag and drop them in the trash at the bottom of the Action panel to delete them. You can select multiple actions and delete them at the same time using the Ctrl/
You can modify the options of an existing action, including the name, function key, and color. To open the Action Options dialog box, hold down the Alt/Option key and double-click the action. You also can choose Action Options from the Actions panel menu. You can then use the Action Options dialog box to modify the name, function key, and color of the action.
After you have created a new action or modified an existing one, you need to save the action. You do this by saving the action set, which is a document. Select the name of the action set, and choose Save Actions from the Actions panel menu. You can use the default location or browse to a location that suits you better.
You can temporarily adjust the actions by selectively toggling the operations in them off or on. If you click the left toggle box for an operation and deselect it, running the action skips the deselected operation. You can save lots of time in creating new actions if you use this feature judiciously. Create an action with all the possible steps that you might want to take, and then deselect the steps that aren't necessary depending on the circumstance.
Now that you've learned everything about creating and modifying actions, you can get to the fun part—using them. Playing an action is an incredibly simple process. If you are in Button Mode in the Actions panel, you can simply click the button and the action is performed. If you are in List Mode, select the action and click the Play button at the bottom of the Actions panel. If you've set up a hotkey for a particular action, you can use that too.
You also can play an action starting at a particular operation in the action list by selecting that operation and then clicking the Play button.
With the default action set, seven predefined action sets available in the Actions panel menu and as many more as you want to create or download waiting in the wings, you can imagine how cluttered the Actions panel can become very quickly if it's not managed well. These Actions panel menu options can help you keep your actions cleaned up:
Clear All Actions: The Clear All Actions option wipes the Actions panel clean of any action sets. It doesn't get much cleaner than that!
Reset Actions: Choose the Reset Actions option to replace all the action sets in the Actions panel with the default set. You also can choose Append to add the default set to the actions on the panel rather than replacing them.
Replace Actions: You can replace the actions in the Actions panel with an action of your choice by choosing Replace Actions from the Actions panel menu. You can browse for the action you want to add to the panel.
This chapter discussed the non-destructive nature of Photoshop and how to use the history and actions features to save time and effort when editing images. Photoshop does a good job of tracking the changes that are made to images and providing tools to manipulate them.
The history tools allow you to view the set of changes made to the image and manipulate them to modify the outcome of the edit. The action tools allow you to create, modify, and use actions to combine a series of changes into packages that can be quickly and easily applied to one or more images.
In this chapter, you learned the following:
How to configure the History panel
That creating a snapshot preserves the current state of the image to be used later
How to use the History Brush and Eraser tools to paint a previous history state onto a later state
How to use the Action panel to save lots of time when editing images
That Photoshop provides several built-in actions
How to create and organize custom actions