
IN THIS CHAPTER
One of the most important yet least loved tasks that is necessary when working with images is organizing and managing the image files. It is difficult to keep files organized in an effective manner, especially with the number of images that get generated by digital cameras.
Adobe tries to solve the problem of organizing files by providing the Bridge application. Bridge is designed to simplify the process of importing, organizing, and finding files. Bridge also provides a direct interface to Photoshop that allows you to take advantage of Photoshop image-processing capabilities. The following sections discuss the Bridge application, how to configure it, and how to use it to quickly organize and manage your image files.
The Bridge utility is a versatile application that allows you to create workspaces that allow you to easily navigate, organize, and process your images. The purpose of this section is to help you understand how the Bridge utility is organized and how to customize it to best fit your needs.
The Bridge utility, shown in Figure 6.1, is divided into four main areas: the main menu, toolbar, window panes, and content view controls. The following sections discuss each of these parts of the Bridge utility.
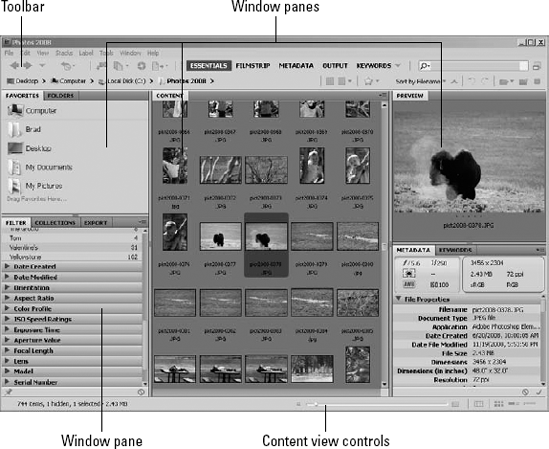
Figure 6.1. The main areas of the Bridge utility are the main menu, the toolbar, the window panes, and the content view controls.
The Bridge main menu provides access to functions of the Bridge utility that you cannot reach easily through the toolbar or the windows in the window panes area. The following is a list of the main menu headings with a description of the types of commands that are available in them. Many of these commands are discussed later in this chapter:
File: Allows you to work with the filesystem to create folders, move files, import files, view file information, and interact with Photoshop.
Edit: Provides options that allow you to select and copy files, duplicate files, rotate files, and set preferences for the Bridge utility.
View: Provides settings to configure how files are viewed in the Bridge utility. You also can sort files, change to full-screen preview mode, and start a slideshow from this menu.
Stacks: Provides options to create and configure stacks. Stacks are discussed later in this chapter.
Label: Allows you to add, remove, and change labels and ratings files. You can use labels and ratings to filter files later.
Tools: Provides options to interact with Photoshop, batch process files, manage metadata templates, and manage caches of files.
Window: Allows you to control which windows are displayed in the window panes. You also can use this menu to quickly switch which workspace to use in Bridge. Another option available in the Window menu is New Synchronized Window, which launches a second instance of the Bridge utility that is completely synchronized with the first, so that if you change images or windows in one, the other changes as well.
Help: Provides access to the Bridge help and the online support for Bridge at
adobe.com. You also can update Bridge, launch Adobe's Extension Manager, and get information about the version of Bridge from this menu.
The Bridge toolbar, shown in Figure 6.2, provides quick access to many of the features in Bridge without having to navigate the menus. The following list describes each of the major areas of the toolbar and what tools can be found there:
Navigation tools: The navigation tools provide some shortcuts to navigating through the filesystem to find files. The left and right arrows allow you to navigate forward and backward through previous navigations. You also can click the down arrow to select any of the favorite locations or one of the subfolders in the current path. The Reveal Recent File or Goto Recent Folder button provides several options to navigate back to recent locations and files. The navigation bar, below the others, shows you each folder in the current path; you can select any folder to go back to that level.
Tip
If you click just to the right of the navigation path, a text box appears and you can manually type in a filesystem path. This can be much faster than navigating by clicking folder icons if you know the name of the path that you want to select.
Import/export tools: The import/export tools provide options to import a file from a camera, open a file in Camera Raw, and batch rename and output files to PDF or for the Web.
Workspace selection: The workspace selection area allows you to quickly select the workspace option that Bridge is using. This is useful when you want to switch between options when you change from navigating to images and working with them.
Search: Allows you to limit the files displayed by restricting them based on the text typed in the search field. Bridge matches the text against the filename and keywords. Only the files that contain the specified text in the filename or keywords are displayed. This is extremely useful if you are searching for a specific set of files.
Thumbnail options: These allow you to quickly configure how Bridge builds thumbnails to display in the content pane. Bridge can use the thumbnails embedded in the image for faster preview; however, these thumbnails are not as high quality as the ones Bridge generates otherwise.
Sort and filter: This area provides buttons to filter files by rating and labels and to sort files by name or different items in the file metadata.
Rotation: This allows you to quickly rotate images 90 degrees to the left or right. This is useful if you are processing images taken with a camera tilted on its side.
File and folder control: This area allows you to quickly create folders and delete folders and files. You also can open files from the Adobe Photoshop Recent File list.

The window panes area of the Bridge utility provides an area for window panels to dock. This area actually contains five different windows panes (refer to Figure 6.1). Each window pane can contain one or more Window panels. Different Window panels in a pane can be accessed by clicking the tab at the top of the window pane.
You can drag Window panels between panes by clicking the Window panel tab and holding the mouse button down while moving the Window panel to the new pane. Also, window panes can be resized by using the control handle in the middle of the pane bars that separate the panes.
Window panels are added and removed from the window panes by selecting/deselecting them in the Window menu. The following is a list of the Window panels that you can choose to view in the window panes:
Folders: Displays a folder tree view. Use this panel to navigate and find files in the filesystem.
Favorites: Displays a list of favorite folders. You can drag folders from the Content panel to this panel to add them to the list. This allows you to configure a set of folders that you use often to speed up navigation.
Content: Displays a list of contents of the selected folder in the Folders or Favorites panels. You can double-click folders in this panel to navigate into them to find files.
Preview: Displays a preview of the image(s) selected in the Content panel. You can use the pane controls to change the size of the preview pane, which changes the size of the image displayed.
Metadata: Displays the metadata information contained in the image selected in the Content panel. Each of the main metadata areas is divided into collapsible/expandable areas. To collapse an area, click the downward triangle next to the area title. To expand an area, click the rightward triangle next to the area title.
Keywords: Allows you to create new keywords and add keywords to the file(s) that are currently selected in the Content panel.
Filter: Allows you to quickly limit the files that are displayed in the Content panel based on ratings, keywords, creation date, and last modified date.
Collections: Allows you to create and manage collections of files. A big advantage of using collections is that the files in a single collection do not need to be in the same folder on the filesystem.
Export: The Export panel is used to add and manage modules and export presets used to export images from Bridge to other applications.
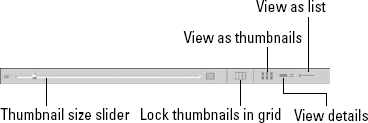
The content view controls shown in Figure 6.3 allow you to change the view of the Content pane. These tools are useful when you need to switch between viewing lots of images in a folder to more detailed information about a specific set of files.
The following list describes the different views for the Content pane:
Thumbnail size slider: Allows you to quickly change the size of the thumbnails displayed in each of the content views using a slider or the smaller/larger button on the left/right side of the slider.
Tip
When working with large number of files, use the thumbnail size slider to shrink the thumbnails so that more images are displayed in the Content panel, and then scroll down to the area where the files you want to work with are located and use the slider to increase the size of the thumbnails to more accurately select images.
View as thumbnails: Shows only a thumbnail of the image and the filename.
Lock thumbnail grid: Similar to the View as thumbnails option; however, the images are locked into evenly sized grids. This feature is useful if you are working with images that are not the same shape.
View as details: Displays the thumbnail, filename, creation date, modification date, file size, document type, and some of the metadata such as ISO, focal length, and color profile.
View as list: Displays the files in a more traditional list form with columns for each of the metadata items. This view is useful because you can click the top of any column to sort the images by the values of that column.
The Bridge utility provides several different workspaces that give you a different look at the files you are working with. Each workspace automatically sets the number, size, and shape of the windows panes and the window panels that are available in each pane. The different workspaces completely change the look and functionality of the Bridge utility.
Note
Changes you make to a workspace by adjusting window panes and window panels are persistent. The same settings are in effect the next time you switch to that workspace and when you close and reopen Bridge.
Each of these views has advantages over the others. You likely will find yourself switching between the different workspaces to accommodate your current workflow. The following are the workspaces defined in Bridge:
Essentials: The Essentials workspace is the best overall workspace to navigate and find files and do general organization. It provides a large content panel in the middle from which to select files.
Filmstrip: The Filmstrip workspace is great for previewing files. It provides a large Preview panel to view the images.
Metadata: The Metadata workspace is great for viewing the metadata of images. A large content panel allows you to quickly select different files, and a metadata panel allows you to view the metadata.
Output: The Output workspace is designed to help when you want to output a series of files to a PDF file or to the Web.
Keywords: The Keywords workspace is designed to help you quickly add and manage keywords for images.
Preview: The Preview workspace provides the largest area for previewing images. The Content panel is narrow and vertical, which is sometimes difficult to use.
Light Table: The Light Table workspace displays only the content panel. This is excellent for selecting files after you have already navigated to the files you need.
Folders: The Folders workspace is designed to help you navigate the filesystem to find the folders and files that you need to work with.
The true value of the Bridge utility is in the ability to quickly find and organize images. Bridge provides direct access to all metadata contained in the images file and allows you to add additional metadata in the form of keywords, labels, and ratings. Bridge also allows you to organize photos in a more usable fashion than a traditional filesystem by arranging them in collections and stacks.
When you keep your files organized, you save lots of time looking for images. The following sections discuss how to use Bridge to organize your image files.
An extremely useful feature of Bridge is its ability to import files from a camera or card reader directly to your computer filesystem. Most cameras and card readers allow you to easily copy files to your computer, but Bridge offers many more options than just a file copy.
To import images from your camera or card reader to Bridge, select File

Figure 6.4. The content view controls in Bridge allow you to quickly change how files are displayed in the content pane.
Using the Photo Downloader, you can define where to download the images, what to name them, and several other options. The following sections discuss each of the options available when downloading images.
The Get Photos From option provides a drop-down menu with a list of available devices. If you can plug the camera directly into the computer, it shows up in the list as well as memory card readers.
You can click the Browse button in the Location area to bring up a dialog box that you can use to select a destination folder for the new files. This is the location on your filesystem where the new image files are downloaded.
You can tell the Photo Downloader to create subfolders on the filesystem for the new files being imported. From the Create Subfolder(s) drop-down list, you can select None, Custom Name, Today's date, or a variety of combinations of the shoot date with custom data, as shown in Figure 6.5. The sequence of month, day, and year used when naming the folders is noted next to each option as mm, dd, and yyyy, respectively.

Figure 6.5. Selecting subfolder creation option for a destination folder when downloading image from a camera or card reader
The Create Subfolders option can be extremely valuable if you are importing files that were taken on different dates and you want to keep them separate. Photo Downloader can automatically separate them based on the dates taken.
Another useful feature contained in the Photo Downloader is the ability to rename files. Most cameras use a simple sequence name that has no meaning except to the camera. Using the Rename Files option in the Photo Downloader, you can choose to rename files based on the current date, shoot date, custom name, parent folder name, or a customized name.
Tip
Using the parent folder name can be useful if you are using descriptive filenames because when working with collections, you cannot easily see which folder the image resides in.
When you select the Advanced Rename option, a dialog box similar to the one in Figure 6.6 is displayed. This Advanced Rename option allows you to create custom filenames based on up to ten different components including text, new extension, current filename, preserved filename, sequence number, sequence letter, date, time, and metadata.

Figure 6.6. Configuring custom filename options when downloading images from a camera or card reader allows you to organize files much more usefully.
Using the Advanced Rename option is useful to organize filenames based on many aspects of the image. For example, you could organize photos based on Lens attribute in the metadata. Then you could easily find all your images that were taken with a specific lens.
The Adobe Bridge option is used to automatically open Bridge if it is not already open when using the Photo Downloader. Because we are discussing using the Photo Downloader from within Bridge, you don't need to worry about this setting.
When the Convert to DNG option is selected, Photo Downloader converts the images to the DNG file format before saving them to your filesystem. When you enable this option, the Settings button next to it is enabled. When you click the Settings button, the DNG Conversion Settings dialog, shown in Figure 6.7, is displayed.

Figure 6.7. Configuring the DNG conversion settings when converting an image to DNG while downloading it
Tip
You shouldn't convert files that are not in Camera Raw format, such as JPEG files, to DNG when importing them. Because they have already been converted to another format, the Camera Raw data has already been lost. Editing them will be faster by just using the current format; there is no advantage to converting them to DNG.
Using the DNG Conversion Settings dialog box, you can configure the following settings to be used during the conversion:
Preview: This allows you to set the size of the JPEG thumbnail embedded in the DNG file to large, medium, or none. Using thumbnails can make Bridge run faster; however, they make the file size larger. If you are not sure, use the medium setting.
Compression: When Compressed is checked, the data compression used to store the DNG data is completely lossless. Unless you have a really good reason to turn this option off, you should leave it on to keep your image data intact.
Preserve Raw Image: When Preserver Raw Image is selected, the image data is stored in the original format if the DNG converter can read the raw data. This is the best option because you can always convert the RAW data over to a linear form, but you cannot convert it back.
Convert to Linear Image: This converts the image to a linear form, which stores the data more efficiently but is different from the original RAW format.
Embed Original Raw File: This embeds the original RAW file inside the newly created DNG file. This option is useful for full preservation of data; however, it more than doubles the size of most files on disk.
When the Delete Original Files option is selected, Photo Downloader removes the file from the camera or memory card after it has been downloaded. This option is useful in managing photos. At some point, most people end up with a memory card containing files that they are not certain have been downloaded to their computer. Using this option eliminates that problem.
When the Save Copies To option has been selected, Photo Downloader saves an additional copy of the image file to a location specified using the Browse button. This option is useful to help you keep an automatic archive of your images.
The Apply Metadata feature allows you to automatically add metadata items to images as they are downloaded to the computer. This can save lots of time later adding metadata to individual files. You can select one of the custom defined metadata templates (discussed later in this chapter) using the Template to Use box. The selected custom template is applied to each image as it is downloaded to the filesystem. You also can add the Creator and Copyright metadata to the file by typing into the appropriate text boxes.
The metadata of an image is often as valuable as the pixels in the image itself. Some files simply are not useful without their metadata, and others are much more useful because of their metadata. Bridge displays metadata about files in various views and even allows you to filter a list of files based on the metadata.
The metadata contained in each file can provide lots of useful functionality. For example, the metadata of photos typically contains information about the time and date that the photo was taken, which can be used later to accurately label and organize files. Photo files also typically contain information about the camera, lens, and settings that were used for each photo. For serious photographers, this saves lots of time recording the settings that were used for each shot. Photographers can use the settings to compare results in multiple images to get a better feel for what camera settings and lenses to use.
This section discusses the two major features of Bridge that you use when viewing and changing metadata: the Metadata panel and the File Info utility. The Metadata panel, shown in Figure 6.8, allows you to quickly view all available metadata for the image selected in the Content panel. The Metadata panel is accessible by selecting Window

The data in the Metadata panel are organized into the following major sections; you can expand or collapse these sections by clicking the triangle next to the section title:
File properties: Displays information about the image file itself, such as the filename, size, type, dimension, and color mode.
IPTC Core: Displays the IPTC (International Press Telecommunications Council) data, including creator info, copyright description, and keywords.
Camera Data (Exif): Displays information about the camera used to take the photo, including the lens, ISO setting, aperture, and so on.
Audio: Displays the information about audio files, including the artist, album, song, genre, and so on.
Video: Displays information about video files, such as the tape name, scene, shoot, and date.
DICOM: Displays the DICOM information associated with the image, including patient name, date of birth, study information, physician, and so on.
Mobile SWF: Displays information about SWF (Small Web Format) files, such as content type, persistent storage, and background alpha.
Bridge also allows you to edit the metadata associated with a file using the File Info utility shown in Figure 6.9. You can use the File Info utility to add keywords, copyright data, descriptions, and much more.
To use the File Info utility, select one or more images and then select File
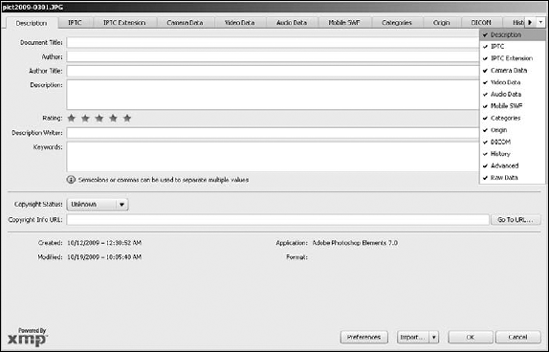
Tip
The File Info utility allows you to set the metadata on multiple images at the same time. When setting metadata for multiple files, select all files that have the same metadata settings and then make the changes.
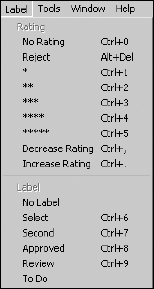
Bridge allows you to assign ratings and labels to files. Adding ratings to files helps you organize files that you like better than others. Ratings are based on values of one to five stars. This helps when you are finding files because you can filter out the ones with fewer stars.
Bridge also allows you to add labels to files to help you organize them to use later. You can label files with the Select, Second, Review, Approved, and To Do labels. To add a rating or a label to a file, select Label from the main menu in Bridge and then select one of the options shown in Figure 6.10.
An extremely useful feature of file metadata is the ability to add keywords that identify or link the file with a person, event, place, or some other piece of data. Bridge makes good use of the keyword feature by allowing you to create new keywords and keyword groups and assigning them to files using the Keywords panel, shown in Figure 6.11. After the keywords have been assigned to files, you can use them to find the files much easier later.
To add an existing keyword to one or more files in Bridge, open the Keyword panel. Then select the file(s) in the Content panel. Then select the keyword you want to add to the file(s); the keyword is written to the metadata of the file.
The Keywords tab displays only the basic keywords and keywords that exist in the selected files. If you want to add a new keyword to a file that doesn't exist already, click the New Keyword button in the Keywords panel or right-click in the Keywords panel and select New Keyword from the pop-up menu. A new keyword is added to the list, and you can type the name in the provided text box.

As you add more and more keywords, you realize that you need to organize them into subgroups. Bridge allows you at add sub-keywords to an existing keyword already in the list. If you want to add a new keyword to a file that doesn't exist already, click the New Keyword button in the Keywords panel or right-click in the Keywords panel and select New Sub Keyword from the pop-up menu. A new keyword is added as a sublevel to the selected keyword, and you can type the name of the new keyword in the provided text box.
Note
When you select add a keyword to a file, any sub-keywords under it are not added to the file. You need to add each sub-keyword for them all to apply.
Sometimes even having keywords divided into subgroups doesn't make it easy enough to find the keywords. You can use the search field in the Keywords panel to search for keywords. As you type into the search box, the keywords matching the search are displayed in the list. The search is not case sensitive and searches for text anywhere in the keyword name.
Bridge allows you to quickly rename and delete keywords to keep your list organized. To rename a keyword, right-click it in the list and select Rename from the pop-up menu. Then type the new name of the keyword. Bridge modifies the metadata in all the files containing that keyword to update the keyword name.
To delete a keyword, right-click it in the list and select Delete from the pop-up menu. The keyword is deleted from the list.
As discussed earlier, you can rename files as you import them from a camera or a memory card. Bridge also provides the Batch Rename utility to rename files that already exist on the filesystem. To rename files in Bridge, select them in the Content panel and then open the Batch Rename utility, shown in Figure 6.12, by selecting Tools

These options are available when renaming files using the Batch Rename utility:
Preset: This allows you to select a default rename configuration or a configuration based on string substitution or to use one of your previous renaming configurations.
Destination Folder: This allows you to specify whether you want Bridge to place the renamed files in the same folder, move them to another folder, or make a copy in another folder while keeping the original.
New Filenames: This area allows you to specify custom filenames based on up to ten different components including text, new extension, current filename, preserved filename, sequence number, sequence letter, date, time, metadata, and string substitution.
Options: This lets you specify whether to preserve the current file in the XMP metadata of the file. You also can specify whether to enforce the new filename to be compatible with filename requirements on Windows, Mac, or Unix.
Preview: Displays a preview of how the renamed filenames will appear.
One of Bridge's biggest strengths is in quickly finding files you are looking for. Bridge provides several tools to help you quickly find files. The following sections discuss using the Filter panel, the Find tool, and the Review Mode to find files using Bridge.
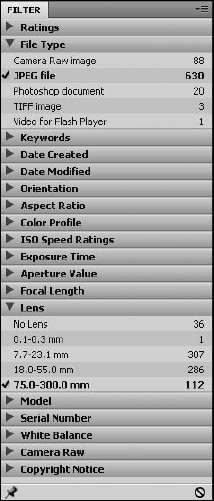
As discussed earlier, you can add keywords, labels, and ratings to files, and Bridge helps you quickly find files based on those and other values. To use metadata information to find files in Bridge, open the Filter panel, shown in Figure 6.13. The Filter panel keeps a list of categories of metadata that can be used to filter the list of files displayed in the Content pane. These categories can be expanded and collapsed using the triangle button next to the Category title.
To filter on a specific item, expand the Category and select the item. A check mark appears next to the item selected, as shown in Figure 6.13. You can select as many items as you like. Bridge displays only the items that match the criteria of the selected metadata items.
Tip
If you need to browse several folders when searching for files, you can click the Pin button on the bottom left of the Filter panel to keep the filter in effect when browsing through folders and collections.
Another extremely effective method of finding files in Bridge is using the Find tool by selecting Edit
The Look in field of the Find tool allows you to specify a folder or collection to search from. You also can launch the Find tool by selecting a collection or folder in the Collections, Favorites, Folders, or Content panels and typing Ctrl/
You can specify the search criteria on a specific metadata item or on all metadata by selecting the option from the drop-down list. Then specify the criteria matching option and a value. To add more criteria, click the plus button. To remove criteria, click the minus button next to the criteria. You also can specify to add the file if any of the criteria are met or only if all the criteria are met. You also can tell the search to include the subfolders of the selected location and non-indexed files.
Tip
When you are creating collections, a good place to start is using the Find tool to get a list of the files that you want to place in the collection. Then select all the files in the Content panel and add them to the collection.
After you have a list of files in the Content panel, one additional feature in Bridge can help you find the files you want. Typically, you view the files as thumbnails and look for specific files. Bridge also provides the Review Mode utility, shown in Figure 6.15, to quickly view and locate images.

Figure 6.14. Using the Find tool, you can specify a set of criteria to match in the metadata of files while searching the filesystem.
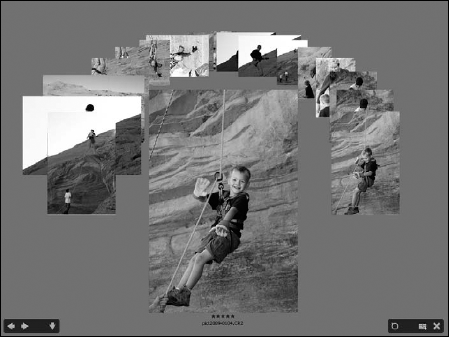
Figure 6.15. Using the Review Mode utility lets you scroll through a list of images in the Preview panel.
The Review Mode utility, available by selecting View
A collection is a set of files that are grouped together in Bridge. The collection concept does not exist outside of Bridge, which offers some advantages and disadvantages. The advantage is that you can create and delete collections in Bridge without affecting the actual files on disk. You also can add files to collections regardless of where they exist in the filesystem. The disadvantage is that although you can view collections of files quickly in Bridge, you cannot view them in other applications (except Photoshop using the mini-Bridge panel).
Using Bridge collections is useful for keeping track of files that belong together. The following sections describe creating collections of files in Bridge using the Collections panel, shown in Figure 6.16.

You create a new collection in Bridge by clicking the New Collection button in the Collections panel. A new collection appears, and you can type the name of the collection. You can rename the collection at any time by right-clicking it and selecting Rename from the pop-up menu. To delete a collection, right-click it and select Delete from the pop-up menu.
After you have created a collection, you can drag files from the Content panel onto the collection in the Collections panel. When you select a collection, all files that have been added to the collection will appear in the Content panel.
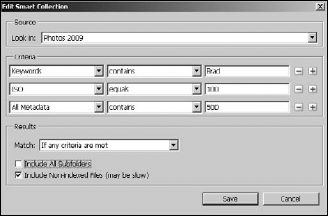
Collections are great for creating one-time sets of files. A much more dynamic option is to use the smart collection feature built into Bridge. Smart collections are dynamic collections that update continually. You point them to a location, and they update every time new images are placed into that location.
A major advantage of smart collections is that they update based on a configurable filter set. The filter set is the same set that is available in the Find tool. You can specify the search criteria on a specific metadata item or on all metadata by selecting the option from the drop-down list. This allows you to add files to a smart collection only if they are taken with a certain lens or ISO setting or if they contain a specific keyword or rating.
To create a smart collection, click the New Smart Collection icon in the Collections panel to bring up the Smart Collection dialog box, shown in Figure 6.17. Then select the source folder to search when looking for new files. Then set up the criteria on which to filter when adding files to the collection. You can edit the criteria at any time by clicking the Edit Smart Filter in the Collections panel or in the Content panel when a smart collection is selected.
The invention of the digital camera has resulted in one serious side effect. Instead of just single photographs, people tend to take several. This can present a problem when organizing files in Bridge. Instead of a simple list of the photos to choose from, you end up with an extended list containing sections of duplicate photographs that are difficult to scroll through. Bridge solves this problem with the stack feature.
The stack feature in Bridge allows you to take a group of duplicate folders and place them in a stack, just as you would on a desktop. You place the best image on top, and that is the only image you have to view when browsing in Bridge. The other images are still there and can be accessed. However, they are hidden from the general view.
Note
When you open a stack from Bridge by double-clicking it, the images open as separate files. You also can select Tools
To create a stack from a group of images, select the images in the Content panel. Then select Stacks
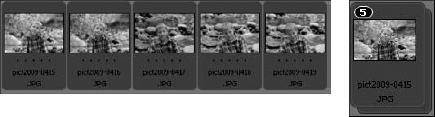
Figure 6.18. Grouping images as stacks allows you to hide duplicate images while browsing through images in Bridge.
The stack can be expanded or contracted by clicking the count icon in the top-left corner. To promote an image to the top of the stack, simply drag it to the left so it is in the top-left position in the stack.
To remove an image from a stack, select it and then select Stack
All metadata operations apply to the stack, so if you add a rating, label, or keyword, it is applied to all images in the stack.
Bridge allows you to remove files from being viewed in two ways: deleting and rejecting. Deleting a file also removes it from the filesystem. Rejecting a file tags it so that Bridge no longer displays it normally. These options are straightforward, but you should know for sure that you want to permanently remove the file before deleting it.
To delete or reject a file in Bridge, select the file and click the Delete key. A dialog box appears that enables you to either reject or delete the file.
Note
Even if you have rejected a file in Bridge, they can still be viewed in the Content panel by selecting View
As you have seen in the previous sections, Bridge is a powerful tool that allows you to organize and manage image files. In addition to organizing image files, Bridge utilizes an interface with Photoshop to help you process the images directly while you are organizing them. The following sections discuss some of the main image-processing operations that you can do from within Bridge.
One of the most common processing tasks done in Bridge is opening images in Photoshop. Photoshop is where the images are edited. Rather than having to open Photoshop and use the standard File
Bridge makes it fast and easy to open images as their own document in Photoshop. Simply select the image(s) that you want to open in the Content panel, and then select File
Bridge also makes it possible to place images into other images in Photoshop. To place an image into another image in Photoshop, make sure the original image is active in Photoshop. Then select the image in the Content panel and select File
Another useful way of opening images in Photoshop from Bridge is to open them as layers in a single document. This is useful when you are working with a series of images that you need to combine into a single composition.
To open a series of images in Photoshop using the Bridge utility, select the files in the Content panel of Bridge that you want to open as layers in Photoshop. Next select Tools

When you are working with Camera Raw images, you likely will want to first open them in the Camera Raw editor, which is discussed in Chapter 7, before opening them in Photoshop. This allows you to make adjustments directly to the unprocessed Camera Raw pixel data.
Bridge allows you to open images directly into the Camera Raw editor using an underlying interface. To open images in the Camera Raw editor from Bridge, select the image(s) in the Content panel and then select File
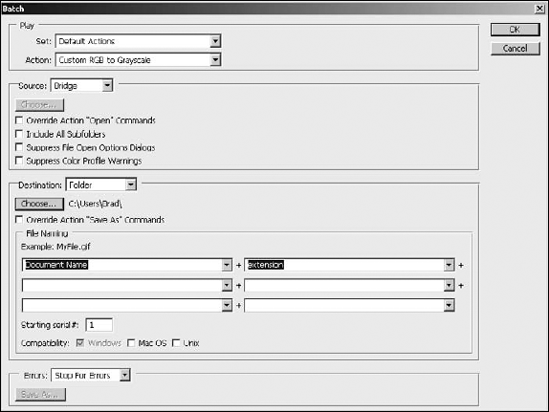
One of Photoshop's strengths is the ability to automate the processing of images. One of the utilities that Photoshop provides to automatically process images is the Batch tool. Bridge makes use of Photoshop's batch tool by providing a direct link to it from the Bridge utility. This allows you to combine Bridge's strength in organizing and finding images with Photoshop's automated processing engine. The result is that you are more efficient in collecting files and then quickly processing them.
To use Bridge to launch batch processing of files, select the files you want to process in the Content panel and then select Tools
Using the Batch utility, you can select the action set and action to apply to the files. Do not change the Source from Bridge because it is using Bridge to get the list of files to process. However, you can modify the Destination and Errors settings. We discuss the Batch tool in much more detail in Chapter 31.
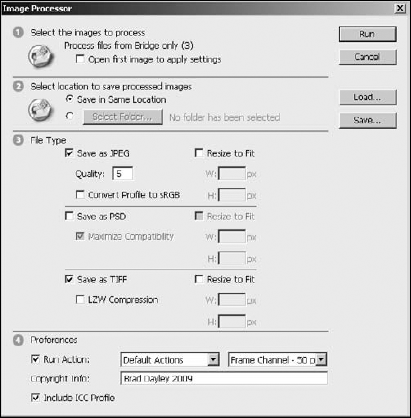
Another very useful tool Photoshop provides when processing images is the Image Processor utility. The Image Processor utility is especially useful to quickly convert a set of files, one or all of, to the JPEG, PSD, or TIFF formats. Bridge provides a direct interface with Photoshop's Image Processor utility, allowing you to quickly find the files using Bridge's interface and then convert them using Image Processor.
To use Bridge, launch the Image Processor on a set of files, select the files that you want to process in the Content panel, and then select Tools
Using the Image Processor utility, you can set the destination of the modified images, file types to convert the images to, and actions to be performed on the files as they are converted. Photoshop provides the best conversion based on the actions specified. We discuss the Image Processor tool in much more detail in Chapter 31.
Merging photos is a concept that was nearly impossible until the invention of digital image processing. Computers now make it possible to analyze the data in images and combine them effectively.
Two types of photo merging techniques can be applied to images. The first type is to combine a set of photos taken from the same position but at different points in the subject. The result is that single images, each containing part of the subject, can be combined into a larger image that contains the entire subject.
The second type of photo merge is to take a set of images taken at the exact same point on the subject and combine them into an HDR (High Dynamic Range) image. An HDR image contains much more tonal depth than is traditionally capable from a single image. In fact, there is more tonal data than can be seen on a computer monitor or even when printed on high-quality photo paper.
The following sections discuss how to use Bridge to select images and then use the photo merging capabilities of Photoshop to actually merge the images.
Photoshop provides the Photomerge utility to combine a series of photos taken at different points in a subject into a single combined panoramic image of the entire subject. You can select multiple images using Bridge's interface, and then launch Photomerge to combine that set of images together.
To use Bridge, launch the Photomerge utility on a set of files, select the files you want to process in the Content panel, and then select Tools
Photoshop provides the Merge to HDR utility to combine a series of photos taken at the same point in a subject into a single combined HDR image. You can select multiple images using Bridge's interface, and then launch Merge to HDR to combine that set of images together.
To use Bridge, launch the Merge to HDR utility on a set of files, select the files you want to process in the Content panel, and then select Tools
The interface that connects Bridge with Photoshop also provides an Auto Collection script that automatically processes files and combines them into stacks of images that can be processed into panoramic or HDR images.
Images are collected into stacks based on capture time, exposure settings, and image alignment. The Auto Collection script analyzes each stack to determine if the stack should be processed into an HDR image or a panorama. If the content of the images across the stack overlap by more than 80 percent and the exposure settings vary, then the stack is interpreted to be an HDR image. However, if the content overlaps by less than 80 percent and the exposure is constant, then the stack is interpreted to be a panorama.

Figure 6.22. Using Bridge, you can select a series of files to be merged into a single document by Photoshop's Merge to HDR utility.
Use the following steps in Bridge to process photos into stacks of HDR and panoramic images:
Select Edit

Select the Startup Scripts panel, shown in Figure 6.23.
In the Startup Scripts panel, make certain that the Auto Collection CS5 is selected and then click OK.
Open the Folders panel in Bridge.
Navigate to the folder with the HDR or panoramic shots.
Select Stacks
This creates stacks in the folder containing sets of images that can be combined into an HDR or panorama.
Tip
Running the Auto-Stack Panorama/HDR setting from Bridge is very processor-intensive on your computer. It analyzes all the files in the selected directory. To reduce the overhead, move the files you know need to be stacked into their own directory. This reduces the amount of processing that is required.
Select Tools
The results are displayed in Adobe Bridge.

Bridge allows you to output a set of images in either a PDF or a Web gallery. This is another useful feature of Bridge because you can use Bridge's capabilities to find the files you are looking for and then quickly output them.
To create a PDF file from a set of images, select the images in the Content panel of Bridge. Then click the Output button in the toolbar and select Output to Web or PDF to bring up the Output window, shown in Figure 6.24. Click the PDF icon, set the following options for the PDF output, and click Save to create the PDF file:
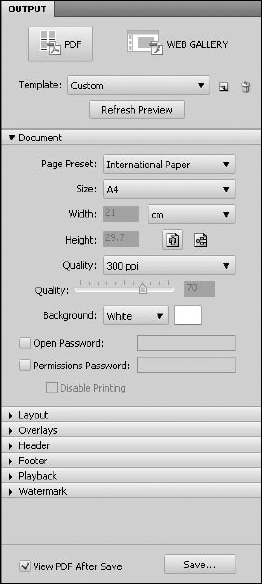
Template: The Template field allows you to select a predefined template from the drop-down list. Several predefined templates change the settings for PDF output. You also can click the Save Template button to save changes you make to the PDF output settings as your own custom template. To delete the template, click the trash can icon next to the Template field.
Refresh Preview: You can click the Refresh Preview button at any time to apply the current output settings to the Output Preview window. This allows you to make changes to the settings and see how they will appear in the final PDF.
Document: The Document panel allows you to set the page size and orientation as well as the output quality and background color. You also can add a password to the PDF file that protects it from unauthorized viewing. You can disable printing from the Document options panel as well.
Layout: The Layout panel allows you to specify how images are placed on each page of the PDF file. You can set the number of columns and spacing.
Overlays: This panel allows you to set whether to add the filename and extension as an overlay below the image. You also turn on and configure page numbering in this panel.
Header: The Header panel allows you to enable/disable headers and define the text, font, and look of the header.
Footer: The Footer panel allows you to enable/disable headers and define the text, font, and look of the footer.
Playback: The Playback panel allows you to configure the behavior of the PDF file when it is played back as a presentation. You can specify to use full-screen mode, automatic advancement, and looping. You also can specify the transitions between pages.
Watermark: The Watermark panel allows you to add watermarks to the created PDF file. This protects images in the file from copyright violations. You can specify to use text or an image for the watermark. You also can control the size, location, rotation, and opacity of the watermark. Using the watermark is a good idea if you are adding images to the PDF file that you want to be copy-protected.
View PDF After Save: When this option is selected and you click Save, the saved PDF file is loaded by the default application.
Using Bridge to create a Web gallery is a great way to post images on the Internet. Bridge creates the necessary image files, Web pages, and scripts to support the Web gallery. The Web gallery allows you to use a browser to view images in a professional interface.
To create a Web gallery from a set of images, select the images in the Content panel of Bridge. Then click the Output button in the toolbar to bring up the Output window, shown in Figure 6.25. Click the Web Gallery icon, and set the following options for the Web gallery output. After you have the gallery the way you want it, click Save to save the gallery to the local filesystem or Upload to upload the gallery to a remote FTP server:
Template: The Template field allows you to select a predefined template from the drop-down list. Several predefined templates change the available styles and settings for Web gallery output. You also can click the Save Template button to save changes you make to the Web gallery output settings as your own custom template. To delete the template, click the trash can below the Template field. Each template provides a different look and feel to the Web gallery. Try each of them until you find a look and feel you like.
Warning
When you switch between template styles, you may lose information specified in the output settings. You should select the template style you like first before making changes to the output settings.
Style: This specifies the style used in generating the gallery. Styles include Lightroom, Darkroom, Medium Thumbnails, and Small Thumbnails. The available styles may change when you change the template.
Refresh Preview: You can click the Refresh Preview button at any time to apply the current output settings to the Output Preview window shown in Figure 6.25. This allows you to make changes to the settings and see how they will appear in the final Web gallery page.
Preview in Browser: You can click the Preview in Browser button to view how the gallery will look in the Web browser. This launches the default Web browser to view the gallery contents. You can use the links in the gallery to navigate the images.
Site Info: This panel allows you to specify the site information that is displayed on the Web gallery page. You can set the gallery title, caption, contact info, and so on in this panel.
Color Palette: This panel allows you to specify the background, menu, title, and thumbnail colors that are displayed on the gallery page.
Appearance: This panel allows you to define the appearance and behavior of the Web gallery. You can specify whether to display the filename, and you can specify the size and quality of the thumbnails and slideshow. You can even define the length and type of transitions to use between pictures during the slideshow. On the Airtight templates, you can specify the layout of the images, including number of columns, borders, and spacing.
Image Info: This panel allows you to add a caption to an image.
Output Settings: This panel allows you to specify the output quality of the images being added to the image gallery.
Create Gallery: This panel allows you to specify the folder on the local disk that the images and Web pages will be uploaded to when the Save button is pressed. You also can set the FTP server address, user, password, and path to use when uploading the image gallery to a remote server. When you click the Upload button, Bridge uses a mini-FTP client to attach to the FTP server and upload the Web gallery.

As you saw earlier in this chapter, the Bridge utility is useful in finding files. The only drawback is that you have to switch to another application window to do it. Or do you? Not anymore. Photoshop has added a minimal version of the Bridge tool directly to the Photoshop interface. This provides some of the useful functionality of Bridge directly from the same Photoshop interface you are using to edit images.
To launch the Mini-Bridge tool, click the Launch Mini Bridge button at the top of the Photoshop application. The Mini-Bridge tool, shown in Figure 6.26, is displayed. The following sections discuss how to configure the Mini-Bridge tool and how to use it in Photoshop.
To configure the Mini-Bridge panel, select the Settings option in the home page shown in Figure 6.26. This changes to the Settings panel, where you can configure the following settings:

Bridge Launching: Mini-Bridge requires that the Bridge application be running to browse files. You can specify what to do if Bridge is not currently running when you start Mini-Bridge. You can select to automatically start Bridge and automatically start browsing or display the home page and wait until the Browse option is selected. You also can specify whether to use the existing Bridge window or to create a new one when the Open Bridge option is selected in Mini-Bridge.
Appearance: This panel allows you to set the Mini-Bridge interface brightness and backdrop level. You also can enable or disable the Color Management panel for Mini-Bridge.
Manage Modules: This panel lets you enable/disable the plug-in modules to Mini-Bridge. These modules provide additional functionality in linking Mini-Bridge with other applications, but they also require additional overhead to manage. You should turn off any of these modules that you do not need to use.
The Mini-Bridge tool is used similarly to the Bridge application. You should recognize most of the features that you see in Mini-Bridge from Bridge. Mini-Bridge includes only a small subset of the functionality of Bridge. However, it is a useful tool for quickly finding files from within Photoshop. This section briefly discusses the options available in Mini-Bridge when browsing for files.
Tip
The Mini-Bridge tool still needs lots of work before it can ever replace the Bridge tool for most of the things you want to do. The Mini-Bridge tool is useful when selecting files already in collections or small folders. Use Bridge for organizing your images first, and then you can use the Mini-Bridge tool to find them and open them in Photoshop. Also, for just one or two files, it is still much faster just to use the standard Open File dialog box.
To begin browsing for files in Mini-Bridge, click the Browse button shown in Figure 6.26. This changes the Mini-Bridge panel to a format similar to the one in Figure 6.27. The following sections discuss the panels, buttons, and menu options available when browsing in Mini-Bridge:
Navigation buttons: The navigation buttons allow you to move backward and forward using the left and right arrows. The down arrow opens a pop-up menu that allows you to select from a list of previous folders/collections that you have visited.
Navigation bar: The Navigation bars show the paths that you have navigated in the filesystem or in the Navigation panel. You can click any point in the path to move to that folder/collection.
Bridge button: The Bridge button switches you to the Bridge application. This is a quicker way of getting to Bridge than navigating the multiple open windows on the system.
Panel View settings: This menu allows you to select which of the Navigation, Preview, and Content panels are displayed in Browse mode. Typically, you want to start with all of them, but you may want to switch to just the Content panel when you find the folder/collection you are looking for, to reduce the size of the Mini-Bridge panel.
Search: This launches a simple search tool to search for files. However, the Search window has a link to the advanced search in Bridge, discussed earlier in this chapter.
Navigation panel: The navigation panel is similar to the Favorites panels in Bridge. You can select a recent location, favorites, collections, or even
Photoshop.comalbums to browse files.Content panel: The Content panel works the same way as the Content panel in Bridge. The items in the currently selected folder/collection are displayed in the Content panel. You select items in this panel to use the Mini-Bridge tools. You can drag images out of the Content panel into Photoshop, and a new document opens for that file. If you drag an image into an existing document in Photoshop, the image being dragged is placed in that document as a smart layer.
Preview panel: The Preview panel works the same way as the Preview panel in Bridge. The items currently selected in the Content panel are displayed in the Preview panel. You also can drag images out of the Preview panel into Photoshop, and a new document opens for that file.
Filter button: The Filter button displays a list of ways to filter items displayed in the Content panel. You can filter by ratings, labels, rejected files, and hidden files.
Sort button: The Sort button displays a list of fields that can be selected to sort images in the Content panel. When you select one of the items from the Sort list, the files in the Content panel are rearranged in order based on that selection.
Tools button: The Tools button provides the same interface in Photoshop that the full Bridge application does. You can place images in Photoshop documents or load them as layers in a new document. You also can open the selected files in the Batch, Image Processor, Photomerge, and Merge to HDR utilities in Photoshop.
Thumbnail slider: This slider changes the size of the thumbnail displayed in the Content panel.
Preview settings: This changes the mode of previewing files in the Preview panel. You can choose from normal preview, full screen, slideshow, and review mode. You also can configure the slideshow options from this menu.
Content View settings: This allows you to select the method to display files in the Content panel. Typically, you want to view them either as thumbnails or a list in Mini-Bridge because of the lack of space in the utility.

This chapter discussed using the Bridge application to quickly import and organize files. Organizing files is one of the most tedious and disliked tasks that must be done when working with image files. Bridge solves several of the problems by allowing you to quickly organize your files into collections. Bridge also helps you quickly find files by using advanced search criteria or filtering based on metadata stored in the images.
In this chapter, you learned the following:
Using Bridge to view and modify image metadata
Finding files quickly by searching or filtering on metadata
Organizing images into smart collections that continually update
Renaming multiple files at the same time
Batch processing images using Photoshop
Automatically merging sets of files into panoramic or HDR images
Using the Mini-Bridge tool in Photoshop to quickly find and select images