
Preparing images for the Web
Slicing images to enable hot spots
Adding transparency to Web images
Adding animated images to Web pages
Converting images to Web formats
Adding zoomable images to Web pages
Although Photoshop is not typically thought of as a tool used for creating Web pages, Photoshop does have some powerful features that can aid graphic designers in preparing images for Web applications. One of the biggest obstacles to overcome when preparing images for the Web is adjusting the size and file format to support the limited capabilities of Web browsers. That's where Photoshop comes in.
This chapter discusses some of the basics of how and why images are prepared for viewing on the Web, such as color settings, slicing images, and adding transparency and animation. We also discuss the Save for Web & Devices utility to prepare and output images in formats that are supported on the Web with the necessary supporting HTML data.
You can prepare images for use on the Web in many ways. Web browsers support only a limited number of file formats, so images must be converted to one of these formats. You also likely need to resize images to reduce them to reasonable sizes that can be supported by the limited network bandwidth.
The following sections cover the basic Web formats, how to use color management to ensure consistency between browsers, adding animation to images, and adding transparency to make images flow better with Web page backgrounds.
One of the most basic decisions that you face when preparing images for the Web is the file format of the image. You should decide on the file format before you make too many changes to the image, because they vary in color and transparency support. The following list describes the most common file formats used for the Web:
Note
For more information about different file types, see Chapter 3.
GIF: Graphic Interchange Format (GIF) images were the standard format for Web images for a long time because they are very small in file size relative to the image size. GIFs support only 256 colors, which is good for Web icons, logos, and text but not so good for pictures. GIF images also support embedded animation that is triggered when the file is loaded. Another advantage of GIF files is that they support transparency, which allows the background color and patterns on the Web page to show through parts of the image.
Tip
If you are planning on creating GIF or PNG-8 images, you should change the color mode to Indexed color, because that's the basic format of these file types. This keeps the colors in the image limited to the 256 colors of the indexed color table that are supported when you save the file, so you won't be editing colors that won't exist in the final image.
JPEG: Joint Photographic Experts Group (JPEG) images support 16.7 million colors, so they are much better for displaying photographs or colorful images. They are supported by most Web browsers, so they easily can be embedded in Web pages or viewed as a standalone file. JPEG images do not support animation or transparency, so they aren't commonly used for buttons, logos, and icons.
Another downside to using the JPEG format is that unless you specify a lossless JPEG compression algorithm, JPEG images can result in artifacts in the images.
PNG-8 and PNG-24: Portable Network Graphic (PNG) images were created to replace GIF and, to an extent, JPEG images. PNG-8 is similar to the GIF format in that it is 8-bit and supports only 256 colors. PNG-8 also supports transparency and animation just like GIFs.
PNG-24 is similar to JPEG in that it supports the same number of colors. However, because PNG-24 files use a lossless compression, file sizes are larger than JPEGs, but they do not exhibit the same types of artifacts. A big advantage of PNG-24 is that they support transparency in the image using an alpha channel.
WBMP: Wireless Bitmap (WBMP) files use a 1-bit format that is widely supported by mobile devices that can display only black and white pixels. Most current devices support color images, such as JPEG and PNG, but if you are creating an image that needs to be displayed on all devices, you may want to create a WBMP copy along with the color copy.
When working with images that are intended for the Web, you want to use the RGB color mode by selecting Image
You should use the sRGB color profile when editing images for the Web. The colors are limited to ones that are supported on most displays, so your images look the same for every person no matter what computer is accessing the Web.
Tip
You can proof the way that images will look on the Web by selecting View
Another task you may need to perform when preparing images for the Web is to slice them up. Slicing images involves assigning areas of the image as hot points that have meaning in the Web page. These hot points can be assigned descriptions that pop up when the mouse hovers over that area of the image and even links that allow users to navigate to different Web pages by clicking different areas in the image.
The following sections discuss the different types of slices that can be created and the tools that you can use to create and define the slices in the image.
Photoshop provides four types of slices that vary in their behavior and how they are created. Slices are designated by a bounding box with an icon in the upper-left corner. The icon and color of the bounding box designate the type of slice. The following list describes the types of slices, and Figure 30.1 shows the icons used for each:

Figure 30.1. The User, Layer Based, and No Image slices are designated by different icons in the top-left corner. The Auto slices are designated by a gray bounding box and icon.
User Slice: User slices are the basic slices that you draw yourself. They are designated by a blue bounding box and the icon shown in Figure 30.1.
Auto Slice: Auto slices are slices that Photoshop automatically generates and assigns to the areas of the image that are not defined as user, layer based, or no image slices. Auto slices are designated by the same icon as user slices but have a gray bounding box instead of blue.
Layer Based Slice: Layers based slices are created by selecting a layer in the Layers panel and then selecting Layer

No Image Slice: A no image slice instructs Photoshop to treat that region in the image as HTML-encoded text. The text that is displayed in the Web page is configured using the Slice Option dialog box, discussed later in this chapter.
Using HTML-encoded text areas in the image keeps the text crisp even if the display size in the browser is changed. Another important benefit is that the encoded text is readable by search engines, making the content available for Web searches.
The Slice tool, shown in Figure 30.2, is used to quickly carve up the image into slices. Using the Slice tool, slices can be created in one of three ways, as shown in Figure 30.3:
Figure 30.2. The Slice tool allows you to quickly carve up an image into slices manually or by using guidelines.
Manually: Slices can be created manually by dragging the Slice tool across the image to create the bounding box. The Style setting in the Slice tool options menu allows you to control how slices are created. The Normal style allows you to create a simple rectangle by dragging the cursor. Holding down the Shift key while dragging creates a box. The Fixed Aspect Ratio style forces the rectangle to match the ratio specified by the Width and Height settings. The Fixed Size style creates a bounding box the exact size specified by the Width and Height settings.
Figure 30.3 shows how the slices are created by dragging the Slice tool. Notice that the area selected is defined into a user slice and the rest of the area is automatically sliced up into auto slices.
Using Guidelines: A great way to create slices is to define guidelines in the document by selecting View
From Layers: As mentioned earlier, a slice can be created by selecting a layer from the Layers panel and then selecting Layer
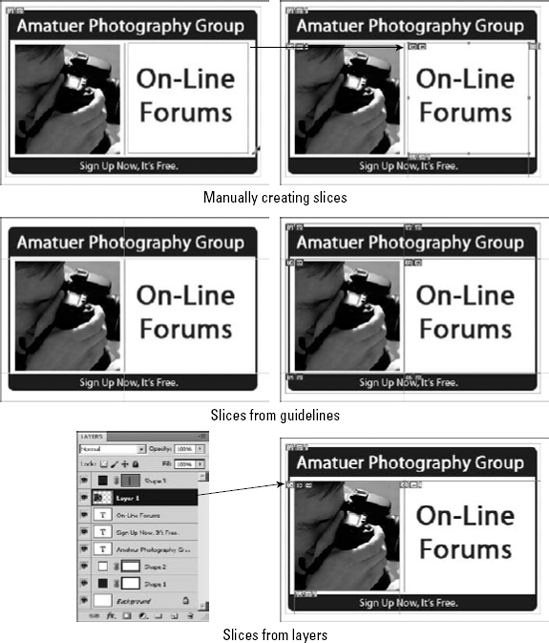
Figure 30.3. Slices can be created manually by dragging the Slice tool, automatically based on guidelines, or from a layer.
Tip
You should use the fewest slices you can to keep the HTML code as simple as possible. Avoid having slices overlap each other, and try not to leave gaps between the slices because these force Photoshop to create auto slices to fill those areas. It might help to select View
The Slice Select tool, shown in Figure 30.4, is used to select, manipulate, and configure the slices after they have been created. Using the Slice Select tool, you can change the size of the slices by selecting them and dragging the control handles on the bounding box.

Figure 30.4. The Slice Select tool allows you to quickly carve up an image into slices manually or by using guidelines.
Note
You can access most of the slice configuration options by right-clicking the icon in the upper-left corner of the slice to display the Slice pop-up menu. From this menu, you can change the order of the slice as well as promote, delete, and divide it.
You can select one or more slices and use the following options in the Slice Select tool Options bar to organize and configure the selected slices:
Order: These options adjust the order of the selected slices either to the top, up one, down one, or to the bottom.
Promote: Clicking the Promote button promotes an auto or layer slice to a user slice.
Divide: Clicking the Divide button launches the Divide Slice dialog box, shown in Figure 30.5. From the Divide Slice dialog box, you can specify either evenly spaced or fixed slice divisions to be added to the current slice. The result is that the current slice is divided into the specified set of slices, as shown in Figure 30.5.
Align: The Align option allows you to quickly align the selected slices with each other. Only the selected slices are affected.
Hide Auto Slices: The Hide Auto Slices option hides the auto slices from the document display window. This allows you to more easily see the interaction with the other slices.
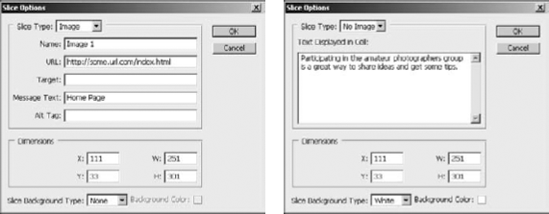
Slice Options: The Slice Options button launches the Slice Options dialog box shown in Figure 30.6. From the Slice Options dialog box, you can set the type of the slice to Image, No Image, and Table. When you set the slice to Image, you can configure the HTML tag information for the image slice, as shown in Figure 30.6. When you select No Image, you can set the text that is converted to HTML-encoded text.
You can set the dimension of the slice in the Dimension setting. The X and Y options specify the coordinates of the top-left corner of the slice box. The W and H settings set the width and height in pixels.
The Slice Background Type option allows you to set the background type to black, white, or a custom color. You also can set the background to matte. The Matte setting is used for the partially transparent areas in images. PNG and GIF files support only fully opaque or fully transparent pixels, so the matte color is used to blend in the partially transparent pixels to fully opaque. Typically, you would set the matte color to the same color as the background of the Web page.

An important aspect of some Web images is the ability to use transparency to help an image seem to belong as part of the Web page. Image files are always rectangular with a height and width dimension. When you place a rectangular image in a Web page, it stands out from the background.
The way to solve that problem is to add transparency to the image and save it as a GIF or PNG file. The transparent areas of the image allow the background of the Web page to show through the image, making the image blend with the background.
Tip
When adding transparency to images that are intended for the Web, keep in mind that PNG and GIF files support only fully opaque or fully transparent pixels. So you want to either use only fully transparent pixels or use a matte color that matches the background color of the Web page. The matte color is used to blend in the partially transparent pixels to fully opaque pixels.
The simplest way to create transparency is to add a layer mask alpha channel to the image that masks the area of the image you want opaque using the following steps:
Open the image in Photoshop.
Select the area of the image that you want to remain opaque in the Web page.
Figure 30.7 shows that the moon is selected in the image.
Click the Add a Pixel Mask option in the Masks panel shown in Figure 30.7.
A new layer mask is created using the current selection with a corresponding layer mask alpha channel. The area outside the selection becomes transparent.
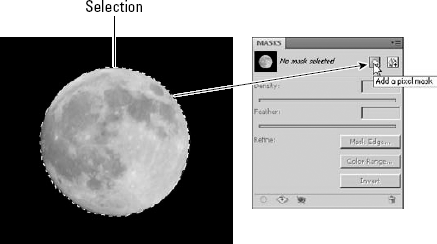
Figure 30.7. To add transparency in an image, simply select the areas that you want to remain opaque and select Add a Pixel Mask in the Masks panel.
Figure 30.8 shows the layer mask and alpha channels that result from adding the pixel mask. Notice the transparency in the image that results from the layer mask alpha channel. Because the alpha channel is embedded in a GIF or PNG file, the transparency also is embedded.
Note
You can easily tweak the mask used for transparency using the techniques discussed in the alpha channel section of Chapter 11 and the layer masks section of Chapter 10. This allows you to fine-tune what areas of the image are transparent.
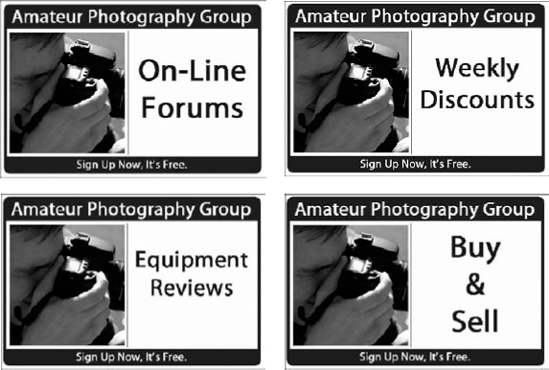
Another important aspect of Web page images is animation. Animation can be used in a variety of ways, from dancing icons to Web ads. Animation in Web ads is particularly important because you can get much more information to the viewer by changing the text and images displayed in the image. For example, Figure 30.9 shows a simple animated Web ad that updates the text over a period of time to display features of the Web site.
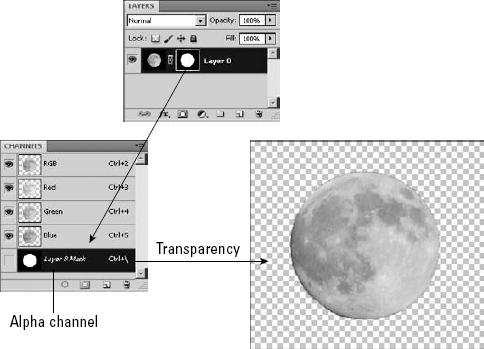
Figure 30.8. Adding a layer mask alpha channel to an image results in transparency that can be embedded in the alpha channel of the image.
Note
Chapter 28 discusses animation in much more detail than can really be covered here. Please refer to that chapter to understand how to animate the image using the Photoshop timeline.
The most powerful tool that Photoshop provides to output images to the Web is the Save for Web & Devices utility shown in Figure 30.10. This interface has three basic purposes. One is to preview how the outputted image will look and behave. The second is to convert the image to a size, format, and set of colors that are supported in the Web browsers. The third is to save the image to the appropriate format with the needed supporting HTML code to render the image in the browser.
To launch the Save for Web & Devices utility, select File
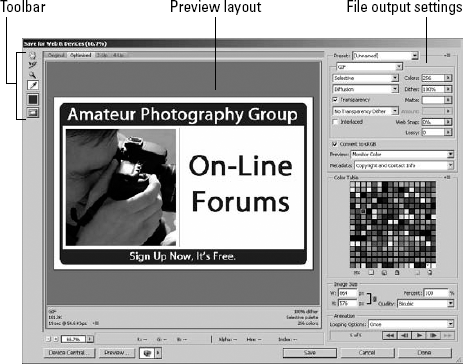
Figure 30.10. The Save for Web & Devices utility allows you to make the necessary adjustments to the file format, size, colors, and other items to prepare images for the Web and mobile devices.
The preview layout is designed to give you a sense of what the outputted image will look like as you prepare it for the Web. The preview layout offers four tabs that define what version(s) of the image is displayed in the preview pane. The options are Original, Optimized, 2-Up, and 4-Up.
The optimized preview shows what the image will look like based on the values in the file output settings to the right of the preview. The 2-Up and 4-Up tabs display either two or four versions of the image. You can select a version by clicking in the preview pane and using the control settings on the right to adjust the values of that version. Using the 2-Up and 4-Up options is a great way of previewing different versions of the image, as shown in Figure 30.11. In the example, we use three file formats, but you could just use the 4-Up view to compare four optimization settings for the same file type.

Figure 30.11. Using the 4-Up preview, you can compare four versions of the image to see which file output settings are best.
Notice in each of the preview panes that the file format is listed along with the size and download time. The image size can be very important if you need your Web image to conform to a standard that limits the maximum image size, such as for advertisements. The download rate can be adjusted using the pop-up menu.
Below the preview panes you can see the RGB levels as you pass the cursor over pixels in the image. Also displayed on that line are the Alpha, Hex, and Index values of the pixel currently under the mouse. Here's what those settings mean:
Hex: The Hex value shows the hex value of the pixel. The hex value is very useful if you are trying to match colors in the HTML code with colors in the image.
Alpha: The Alpha value displays the value of the alpha channel, with 255 being completely opaque to 0 being completely transparent.
Index: The Index value is the index in the color lookup table for the pixel directly under the cursor.
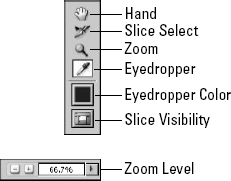
The following tools, shown in Figure 30.12, are used to control and manipulate the image in the preview:
Hand: The Hand tool moves the image inside the preview pane. This is especially useful if you are zoomed in on an image and want to check out different locations. Using the Hand tool moves the images in all preview panes.
Slice Select: The Slice Select tool works just like the one in the Photoshop Toolbox described earlier in this chapter. You can manipulate the slices using the control handles, right-click to expose the slice options, and double-click the slice to set the HTML options.
Zoom: This tool allows you to zoom in on a specific area of the slice by dragging a rectangle around that portion.
Eyedropper: The Eyedropper tool is used to select colors in the image. The color is selected in the color table, discussed later in this section.
Color: This tool displays the currently selected color. Selecting this tool displays the color chooser.
Slice Visibility: This tool toggles the visibility of slices on and off. You typically want slices to be visible only when you are editing them.
Zoom Settings Level: This tool gives you the ability to quickly set a specific zoom level for the preview pane.
The most important aspect of the Save for Web & Devices utility is the ability to convert images from the editing format to a format that is suitable to be displayed on a Web page. The file output settings pane in the Save for Web & Devices utility allows you to define the Web file format and parameters used to convert the image to that format.
Each file format provides different output options used in conversion. Figure 30.13 show the options for GIF, PNG-24, and JPEG. (PNG-8 is not shown because the options are identical to GIF with the exception that the Lossy option is omitted.)

Figure 30.13. The file output settings pane allows you to control options used when converting the image from the editing format to the Web file format.
The following list describes each of the output options:
Presets: Provides a list of predefined settings for general purposes such as JPEG High quality or PNG-8 128 Dithered.
File Format: Allows you to specify the output file format. These file formats were discussed earlier in this chapter.
Color Reduction Algorithm: Allows you to specify the conversion method used to convert the image from the current format to the Web format. When converting color images to another format, especially one supporting fewer colors, Photoshop must decide what colors to use in the destination file for source pixels that don't match up. The following list describes how each conversion option maps colors:
Perceptual: Gives priority to colors for which the human eye has greater sensitivity. This option is often the best choice to use because most Web images are intended for viewing only.
Adaptive: Creates a palette from the colors that appear most commonly in the image. This option typically keeps the most detail in the image because there is a wider range of pixels in that area to support detail.
Selective: Similar to the perceptual option, but it favors broad areas of color while preserving the Web colors. This option usually produces images with the highest color integrity, if not the best perceptual integrity.
Restrictive: Uses a standard 216-color color table common to both Windows and Mac OS, ensuring that no browser dither is applied to colors when the image is displayed using 8-bit color. Because this option creates larger files, you should use it only if browser dithering is of high priority.
Custom: Allows you to create your own custom color palette used in converting the image. The color palette is customized in the Color Table pane in the Save for Web & Devices utility.
Black-White: Uses only black and white colors in the output image.
Grayscale: Uses a grayscale color palette to convert the image to grayscale.
Mac OS: Uses the Mac OS color palette to convert the image. This option should be used only for images that will be viewed from Mac OS browsers.
Windows: Uses the Windows color palette to convert the image. This option should be used only for images that will be viewed from Windows browsers.
Color: Specifies the number of colors in the color palette that is used by the conversion algorithm to convert the image. A smaller number here usually results in a smaller file size.
Specify the Dither Algorithm: Allows you to select the method of dithering the image during conversion. Dithering simulates colors not available in the color display system of the computer. Often when you convert an image with continuous color tones to a smaller number of colors, banding is the result. One downside of dithering is that it increases the size of the image.
Figure 30.14 shows an example of the banding that occurs in an image when we convert it to 64 colors, as well as the effects that dithering has to simulate more colors by diffusing the pixels on the boundaries. Notice the banding in the non-dithered image and how using diffused dithering results in the appearance of more skin tones than exist in the actual image.

Figure 30.14. Using dithering when reducing the number of colors in an image can resolve banding effects and give the visual appearance of more colors in the image than actually exist.
You can specify the following methods for applying dithering to the image during conversion:
No Dither: Applies no dithering to the images. This results in a smaller file size but also may result in banding, as shown in Figure 30.14.
Diffusion: Attempts to smooth transitions by scattering the colors of the two neighboring pixels along the edges. When this option is selected, you can control the amount of dithering by adjusting the percentage value in the Dither option to the right. The higher you increase the Dither setting, the larger the file size that results.
Pattern: Applies dithering by using a predefined pattern of pixels to attempt to produce the intermediate colors between the bands.
Noise: Applies dithering by introducing random pixels in the image. This option usually results in the least appealing results.
Dither: Specifies the percentage of dithering to apply to the image. A larger amount of dithering softens edges and removes pixelization but results in some blurring of the overall image.
Transparency: GIF and PNG-8 files support transparency, but only in the fully transparent pixels. If the Transparency option is enabled, Photoshop tries to preserve the semitransparent information, such as drop shadows, by applying a matte to the semitransparent pixels to create a fully opaque pixel.
The color of the matte used is determined by the Matte setting. If the matte color matches the background color of the Web page, the image looks much better when it is viewed on the Web page.
If you enable transparency, you also can specify a dithering option in the drop-down menu below Transparency. The dithering options are the same as for the image conversion, but they apply only when adding the matte to semitransparent pixels.
Interlaced: Sends a version image that contains information for every other line of pixels to the browser first so the browser can render a low-resolution copy to the user while the rest of the image is downloaded. This can improve the speed with which Web pages are loaded, but it also results in a larger image file. This option is not used very much anymore because Internet connections are much faster now.
Web Snap: Specifies a tolerance level that is used to shift colors to the closest Web palette equivalents. This prevents the colors from dithering in the browser. The higher the value, the more colors are being shifted.
Lossy: Allows you to control how aggressive the GIF compression algorithm is when compressing the images. The higher the number, the more aggressive the algorithm is, thus reducing the file size. However, the more aggressive the algorithm is, the more data is lost during compression. Typically, you can get away with a value of 5–10 for most GIF images without sacrificing too much quality.
Quality: Specifies the JPEG image quality setting from Low to Maximum. This setting is a tradeoff; the higher the quality, the better the image but the larger the file size. This option also can be controlled by setting a value between 0 and 100, where 100 is the maximum quality.
Progressive: Displays the image progressively in the Web browser. Progressive means that the image is displayed as a series of overlays allowing the browser to display a low-resolution image that progressively gains quality as more of the image is downloaded. Using this option results in a larger file size.
Blur: Specifies an amount of blur that is added to the image. Adding blur applies a Gaussian Blur Filter to the image and allows JPEG images to be compressed more, resulting in a smaller file size.
Optimized: Creates an enhanced JPEG file with a slightly smaller file size. This option is great for reducing the file size, but some older browsers do not support enhanced JPEG images.
Embed Color Profile: Embeds the color profile in the image.
Note
Color management is an important aspect of Web images because the images will be viewed on a variety of displays. You want the images to appear the same on all of them. See Chapter 29 for more information about color profiles in general and the sRGB color profile.
Convert to sRGB: Converts the image to the sRGB color profile that is the default color model for displaying images in Web browsers on many different displays.
Preview: Allows you to specify the color profile used to render the images in the preview pane of the Save for Web & Devices utility. Basically, this option controls the gamma used to display the image in the preview pane. Because Mac OS uses a different gamma than Windows, images display differently and are sometimes washed out on one when they look fine on another. Take a minute to use the different preview options to verify how the image looks on the different machines.
Metadata: Allows you to set the metadata information to include with the converted file. Metadata is a great way to keep track of information in the file. The problem is that sometimes the metadata contains information you do not want to distribute to anyone downloading the file from the Web—for example, camera settings or personal information.
The Metadata option allows you to control what metadata is included in the Web image. The options are None, Copyright, Copyright and Contact Info, All Except Camera Info, and All. The excess metadata items are stripped out of the converted file.
In addition to the settings in the file output pane, you also can use the following options from the side menu that help when configuring the file output settings:
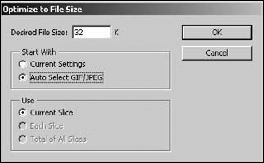
Optimize to File Size: Launches the Optimize to File Size dialog box, shown in Figure 30.15, which allows you to specify a file size and then use that size to automatically configure the options to match the desired output settings. The Start With option allows you to use the currently selected file format or allow the dialog box to choose either JPEG or GIF. The Use setting allows you to control how the output is applied to slices in the image.
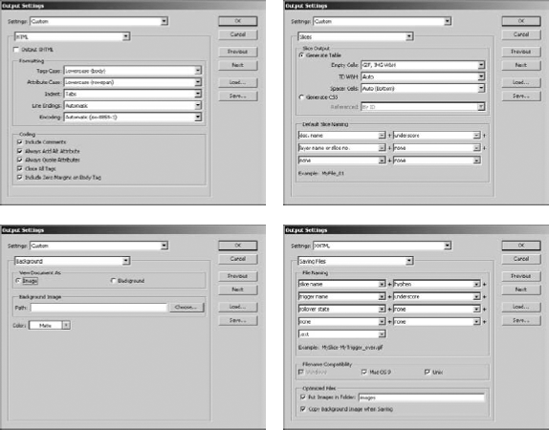
Edit Output Settings: Launches the Output Settings dialog box, which controls how the image is actually outputted for the Web. The Output Settings dialog box is really four different dialog boxes, shown in Figure 30.16, which allow you to set the following output options:
HTML: Allows you to configure the HTML settings such as using XHML, tag casing, line encodings, and how to encode the HTML tags.
Slices: Allows you to configure if slices are encoded as an HTML table or CSS, as well as the default naming scheme used for slices. The naming options should be familiar to you by now.
Background: Allows you to control if the image is to be viewed as the background for the Web page or just an image. You also can specify the color to use as the background for the Web page.
Saving Files: Allows you to configure the file naming, compatibility, and location to output images to. When Photoshop saves the image, it generates several supporting HTML, CSS, and other files.
The Color Table pane in the Save for Web & Devices utility allows you to control and manipulate the color palette used for GIF and PNG file conversion. Only colors in the color palette will exist in the outputted image, so manipulating the colors in the Color Table pane lets you control the colors in the outputted image.
You can select colors in the table by clicking the table with the mouse or by clicking in the image using the Eyedropper tool. You can select multiple colors in the table by holding down the Shift key while you click them. After you have colors selected in the table, you can use the following options, shown in Figure 30.17, to control the color palette:
Number of Colors: Displays the number of colors in the color table.
Map to Transparent: This maps the currently selected color(s) in the Color Table to transparent pixels. The pixels that are this color will be transparent in the outputted GIF or PNG-8 image. This can be useful if you have solid colors in the image that you want to make transparent.
Shift to Web Palette: If the currently selected color is outside the Web palette, it will be shifted into the Web palette. If the currently selected color is already shifted into the Web palette, it is "un-shifted" back out.
Lock Colors: This locks the currently selected color so it isn't dropped from the outputted image. This option is especially useful if you have a specific mono-color item—such as a logo or symbol—that you want to ensure remains in the original color in the outputted image.
Add to Palette: This adds the color from the Color tool in the preview area to the color palette. This option allows you to define specific colors that you want included in the color palette.
Remove from Palette: This removes the selected color(s) from the color palette, allowing you to add additional colors.
The Image Size pane in the Save for Web & Devices utility, shown in Figure 30.18, allows you to control the size of the outputted file without affecting the size of the original. The Image Size pane allows you to set a specific height and width for the image using the H and W settings. If the lock icon is selected, height and width changes are proportional. You also can set the size of the output image using the Percent option when 100% is the original size.
When changing the size of the image, Photoshop must interpolate the values of pixels that either didn't exist in the original image because the size is growing or are the result of multiple pixels if the size is decreasing. The Quality option allows you to specify which of Photoshop's interpolation algorithms to use. The options are Nearest Neighbor, Bilinear, Bicubic, Bicubic Smoother, and Bicubic Sharper.
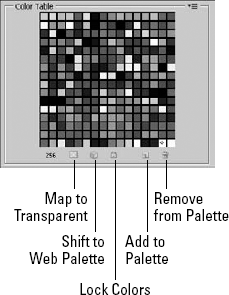
Figure 30.17. The Color Table pane allows you to use the color palette to manipulate the colors and transparency that will be included in the outputted image.
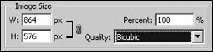
Figure 30.18. The Image Size pane allows you to control the size of the outputted image without affecting the size of the original image.
Note
Image resizing, including the various algorithms used in the Quality setting, is discussed in more detail in Chapter 3. See the resizing section of that chapter when making a determination of which algorithm to use.
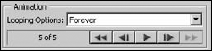
The Animation pane in the Save for Web & Devices utility provides two features. The first is to set the Looping Options that get embedded with the animated image. The Looping Options can be set to Once, Forever, and Other. If Other is selected, a dialog box is displayed that allows you to set the number of times to loop the animation. How many loops you choose is purely subjective. Playing the animation too many times can get annoying with some images but is necessary in others.
The Other feature of the Animation pane, shown in Figure 30.19, allows you to preview the animation in the preview pane. The Play, Rewind, and Fast Forward options allow you to see each of the frames in the animation and preview the behavior.
A great feature of the Save for Web & Devices utility is the ability to quickly preview the image in a Web browser by clicking the Preview button. When you click the Preview button, the image is displayed in the Web browser based on the output settings. All the supporting Web code is displayed below in the image, as shown in Figure 30.20. The HTML files also are created in the output directory so you can actually test the images in the Web browser.
Note
The list to the right of the Preview button allows you to configure a list of Web browsers to test and to select the Web browser used by the Preview button. This allows you to quickly test Web images against a series of browsers.
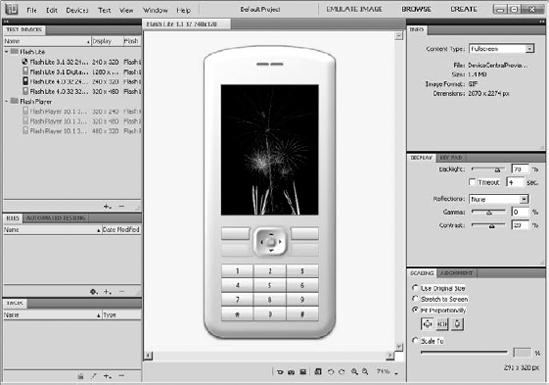
The Save for Web & Devices utility also allows you to quickly preview the image on mobile devices by clicking the Device Central button to launch the Device Central application. When you click the Device Central button, the image is loaded into Device Central and you can view how it looks on different mobile devices with various settings, as shown in Figure 30.21.
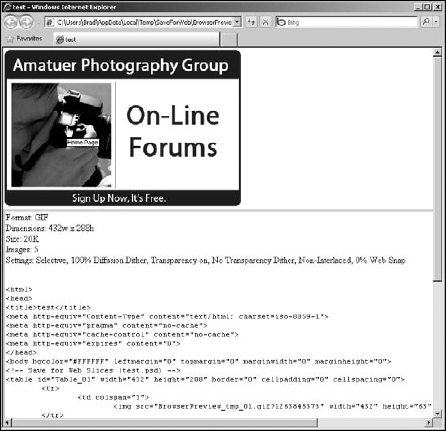
Figure 30.20. The Preview button in the Save for Web & Devices utility launches a Web browser that allows you to quickly preview the look and behavior of the image before saving the image.
Note
Images with slices cannot be emulated in Device Central. If you are previewing images for both the Web and mobile devices, make sure you save a separate file with the slices for the Web version.
Device Central provides a list of devices as well as display, scaling, and alignment tabs that allow you to see the image based on different device settings. Using Device Central goes beyond the scope of this book, so it is not covered. However, documentation is available at the Adobe Web site that you can reference for information on how to use it beyond previewing images.
Photoshop provides the Zoomify plug-in as an additional feature to output images to the Web. Zoomify, shown in Figure 30.22, carves an image up into a series of JPEG tiles that can be used by a Flash browser utility to quickly zoom in and out, as well as pan images in a Web page. By breaking the image up into a series of tiles, less data needs to be sent to the Web browser, so the performance in viewing images is very good.
To launch the Zoomify tool, select File

Figure 30.22. The Zoomify utility is used to carve up a high-definition image into a series of smaller JPEG tiles so the image can be easily zoomed in/out and panned using a Flash Player in a Web browser.
The following is a list of the files/folders that will be generated by the Zoomify tool in the Output Location. You can transfer these files/folders to your Web browser to be included in your Web site:
<Base Name>.html: The HTML file based on the Base Name setting that is used to display the Zoomify Flash Player utility. The appropriate code in this file can be cut and pasted into your Web page code to include the image on your Web site.
<Base Name>: A folder based on the Base Name setting that contains the following items:
ImageProperties.xml: Specifies data necessary for the Zoomify Flash Player.
zoomifyViewer.swf: Zoomify Flash Player utility that renders the images and provides the controls in the browser to zoom in and out on the image.
TileGroup#: A series of folders that contain the JPEG tiles of the image. Each tile is named using the #-#-#.jpg filename format. Each number represents a location in the image and zoom scale, and the numbers are used to display the zoomed portions of the image.
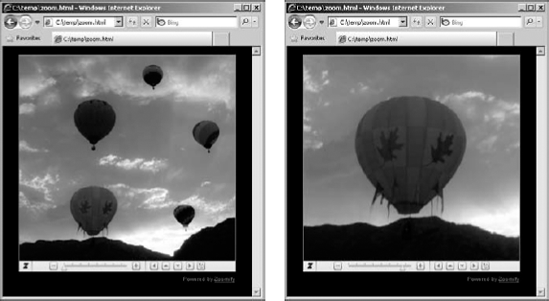
Figure 30.23 shows how a Zoomified image appears in a Web browser. Using the utility, we are able to easily zoom in and pan to an individual balloon.
Note
When you click the OK button in Zoomify, a Web browser launches to display the Zoomified image. You may need to enable the Zoomify activeX application when the browser launches.
Photoshop provides several powerful features that can aid graphic designers in creating and preparing images for Web applications. Photoshop provides the tools necessary to convert image formats to formats supported by Web browsers, set the size of images to reduce the bandwidth they require for download, and apply color profiles to ensure that the image colors are consistent across multiple Web browsers.
Photoshop also provides features that allow you to quickly add animation and transparency to give your images a much better look and feel. This chapter discussed the Save for Web & Devices utility that allows you to quickly configure image file formats, preview output, convert images, and generate the HTML output necessary to support them.
In this chapter, you learned these things:
How to convert images to file formats that are supported by Web browsers.
Using color profiles ensures that image colors remain consistent between Web browsers.
How to add transparency to Web images so they flow better with the Web page.
Using Zoomify is a simple way to add high-resolution images than can be zoomed and panned to Web pages.
The Save for Web & Devices utility allows you to control what image metadata is included in Web images so you can show copyright information but hide camera settings.
How to preview images in Web browsers and Device Central before outputting them to the new file format.