Getting to know the Animation (Frames) panel
Tweening in the Animation (Frames) panel
Creating frame-by-frame animation
Now that you are familiar with how the Animation (Timeline) panel works, I introduce you to the Animation (Frames) panel. The Animation (Frames) panel is very different from the Animation (Timeline) panel; it has a different look and feel and different features to go along with it. The Animation (Timeline) panel is made primarily for you to import video files and color correct, enhance, or create artistic effects with them. The Animation (Frames) panel is meant primarily to be used with the painting and drawing tools to create cartoon animations, primarily animated GIF files for the Web.
An animated GIF is a small animated image or icon that you see almost anywhere on the Web. They are usually simple, such as the animated smiley faces, and operate at an extremely slow frame rate, giving their motion a jerky appearance.
Although Frame animation has most of the capability of Animation (Timeline), you'll find that its strength lies in creating short, crude animations, such as animated GIFs. Being able to see each frame without dragging the current time indicator around is very handy. Frame animation can get very unwieldy in a very few frames, however, as you'll see when you begin to create animations in this chapter.
Some of the other advantages of frame animation are being able to reverse frames or set the frame rate of each frame individually without too much effort. If you change an Animation (Timeline) to a Frame animation, however, you permanently lose some of the properties of the keyframes set in your Animation (Timeline). You must determine which animation method you want to use before you begin a project.
You'll find that the panels and menus of these two types of animation are completely different from one another. In this chapter, I introduce you to the Animation (Frames) panel and show you different methods of animating using this panel.
Before I show you how to create animations using the Animation (Frames) panel, let's look at the features that distinguish the Animation (Frames) panel from the Animation (Timeline) panel.
Just as the name implies, the Animation (Frames) panel is composed of thumbnails of each individual frame in your animation. This gives it an entirely different look than the Timeline, as shown in Figure 28.1. The look of the animation is not the only thing that's changed; the panel itself has completely different options. Let's look at what the differences are and why they are different.
The frame delay time allows you to quickly set the time you want each frame to last. Click the arrow next to the time set, and select the number of seconds or fractions of seconds you want your frame to last. Click Other if you would like to set a time that is not specified. You can select one frame at a time and set different rates, or you can select all the frames to change the rates in all of them at the same time. When you add a new frame to the animation, it automatically retains the delay rate of the frame immediately before it.
This icon doesn't appear by default on the frame icons, but if you right-click one or more selected thumbnails, you are asked to choose a disposal method. Choosing Do Not Dispose or Dispose creates a different icon for each method of animation.
A disposal method simply determines whether the current frame is disposed of as the next frame is displayed. There are three disposal options:
Automatic: This is the default option. This allows Photoshop to determine the disposal method for each frame automatically. The current frame is disposed of if the next frame contains layer transparency. When this option is selected, no icon appears in the frame thumbnail.
Do Not Dispose: This setting preserves the current frame as the next frame is brought into view. If any part of the frame is transparent, the preceding frames show through.
Dispose: This option disposes of the frame as the next frame is displayed, preserving the transparency of the current frame.
Setting the looping option simply decides how many times your animation plays without stopping. Click the Looping Options icon to open a drop-down menu, and select Once, 3 times, Forever, or Other. If you select Other, a dialog box opens allowing you to specify the number of times you want the animation to loop.
There are no keyframes in the Animation (Frames) panel, but you can still take advantage of tweening. Tweening is the process of creating frames between two frames with different properties, making the change gradual over several frames. When you have enough frames, you give the change the illusion of true motion. Although the Animation (Frames) panel has no layer properties, the properties that can be animated in the Timeline are the same properties that can be tweened in the Animation (Frames) panel. These properties are position, opacity, and style.
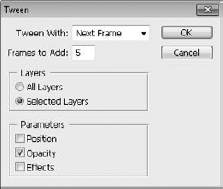
To create tweening frames, select one or two frames in the panel and click the Tweens Animation Frames icon, shown in Figure 28.2. The Tween dialog box, shown in Figure 28.3, opens, allowing you to set options for the Tweening.
The first option available in the Tween dialog box is the Tween With drop-down menu that allows you to set which frames you are going to tween:
Selection: If you've selected the two frames that you want to tween, this option is the default in the menu. If you don't have two frames selected, this option isn't highlighted.
First Frame: This option can be chosen only if you have selected the last frame in the animation. If you select First, Photoshop tweens between the last frame and the first frame of the animation, creating a seamless loop.
Last Frame: This option is available only if you have the first frame of the animation selected. Just like the last option, this creates tweening from the last frame to the first.
Previous Frame: This creates tweening between the selected frame and the preceding frame.
Next Frame: This creates tweening between the selected frame and the next frame.
The next option in the Tween dialog box is simply how many frames you want to have created between the frames you are tweening. You should take into account how long your frame rate is and the complexity of the difference in the frames you want to tween.
Next in the Tween dialog box, you can set the layers that will be affected by the tween. Select All Layers if you would like to animate all the layers within the file, or choose Selected Layers to confine the tweening to layers you have selected. In Figure 28.2, I am animating the sun as well as the drop-shadow of the boy, so I choose All Layers.
The Parameters setting is reminiscent of the animation properties in the Animation (Timeline) panel, where you can decide whether to tween all changes in position, opacity, and style or if you want to tween only one or two of these parameters. Choosing a parameter is the equivalent of using linear keyframes in an interpolation, whereas deselecting a parameter is like creating a hold keyframe.
After you set the Tweening Options, click OK. The frames you have specified are created, as shown in Figure 28.4.
Click the Duplicates Selected Frames icon on the bottom of the Animation (Frames) panel, and all the frames you have selected at the time are copied and pasted directly behind the last frame selected. This is a quick and easy way to duplicate the last frame and then make changes to it.
With this handy icon, you can toggle back and forth between the Animation (Frames) panel and the Animation (Timeline) panel. This should be done before you start working with your animation. Moving from the Animation (Timeline) panel causes some of the properties—keyframes in particular—to be lost. Toggling back to the Animation (Timeline) panel does not restore the lost properties. It's best to decide which animation panel you want to work in before opening or creating a new document, and stick to that decision.
Just in case you hadn't noticed yet, the Animation (Frames) panel menu lets you know that you are not working with the same tools as the Animation (Timeline) panel. As shown in Figure 28.5, the menus not only look different, but they have completely different options.
These differences highlight the features of each panel and reasons why each panel can perform equally important but different functions. I define the features found on the Animation (Frames) panel here. Many of these options are self-explanatory, but a few may be new concepts. If you find that a short definition isn't enough, don't worry, You'll see more on these features later on in this chapter:
New Frame: This creates a frame at the end of the animation. This frame is a duplicate of the last frame in the animation.
Delete Frame: This deletes any selected frames.
Delete Animation: This deletes all frames except the first, leaving an image rather than an animation.
Copy Frame: This copies selected frames.
Paste Frame: This pastes copied frames. You can choose four options for pasting a frame:
Replace Frames: This replaces all selected frames and their accompanying layers with the copied frames.
Paste over selection: This pastes the copied frames over the selected frames, creating two levels of layers—the layers in view, belonging to the copied frames, and the layers that are hidden, belonging to the selected frames.
Paste before selection: This pastes the copied frames before the first selected frame.
Paste after selection: This pastes the copied frames after the last selected frame.
Link Added Layers: This automatically links layers in the pasted frame. It is a good idea to link the layers of frames in the animation so that you can more easily make adjustments during animation editing.
Select All Frames: This selects all frames within the animation.
Go To: This selects the frame specified—next, previous, first, or last.
Tween: This performs the same function as the tween icon in the panel. It creates a specified number of frames in between two selected frames to bridge the gap in their differences.
Reverse Frames: This reverses the order of any selected frames. If only one frame is selected, the order of the entire animation is reversed.
Optimize Animation: You can reduce the file size of an animation by optimizing the frames to include only areas or pixels that change from frame to frame. You have two options for optimization: Bounding Box crops each frame to an area around the changing pixel, and Redundant Pixel Removal makes any unchanged pixels transparent. Both of these options can be enabled when optimizing the animation.
Make Frames from Layers: This option is available when the animation contains only one frame or image. Select Make Frames from Layers, and all the layers contained in the image become an individual frame.
Flatten Frames into Layers: Create an individual layer for each selected frame in the Layers panel by selecting this option.
Match Layer Across Frames: This option allows you to align layers according to the parameter of position, visibility, and style.
Create New Layer for Each New Frame: This creates a new layer in the Layers panel for every frame created in the Animation (Frames) panel.
New Layers Visible in All Frames: When this option is checked, the new layers that you create on any frame are visible in all the frames. Uncheck this if you want to add a layer to a selected number of frames.
Convert to Timeline: Just like the Convert to Timeline Animation icon on the Animation panel, choosing this option converts your Animation (Frames) panel to the Animation (Timeline) panel.
Panel Options...: This option allows you to set a thumbnail size for the frames in your animation.
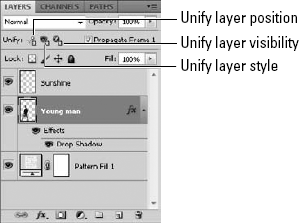
When you are using the Animation (Frames) panel, you not only see differences in the Animation panel and the Panel menu, you see differences in the Layers panel as well. Added to the Layers panel is an array of tools that allow you to unify changes made to the layers displayed in the Layers panel. The properties that can be unified are the same properties that can be animated. By default, making changes to these properties takes place only on the selected frame. By unifying these properties, changes can be made to all the frames at once, similar to changing an entire layer across the timeline. Figure 28.6 shows the icons that are used for this purpose.
Unify layer position: Click the Unify layer position icon to make changes in the position of a layer throughout the animation. Deselecting this option allows you to make changes in the position of the selected image only, leaving the rest as they were.
Unify layer visibility: When this option is selected, changing the visibility of a layer will change the visibility in all frames; otherwise only the selected frame(s) will be changed.
Unify layer style: Create a layer style across all the frames in the animation by selecting this option.
Propagate Frame 1: When this box is checked, all the changes made in the first frame of the animation also are made to subsequent frames in the animation. This is an easy way to make the changes that can be animated in other frames and still be able to change the position, opacity, and style of all the frames at once.
Now that I've shown you all the basics of the Animation (Frames) panel, I show you the steps needed to create a frame-based animation. In this section, I show you how to create an animation using the tweening process, which essentially produces the same results as using keyframes in the Animation (Timeline) panel.
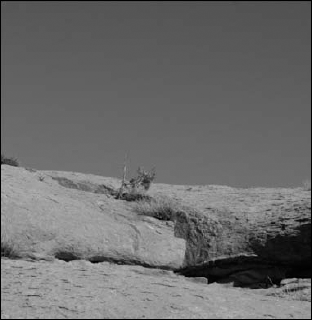
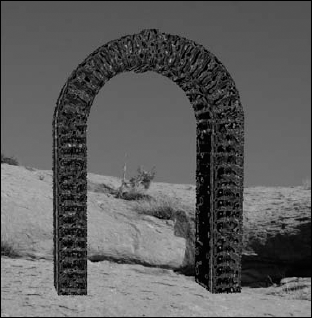
The first step is to open or create a file in which you want to animate at least one of three properties: position, opacity, or effects. An image that is composed of several layers and styles can be much more interesting and fun to animate than simpler images. Figure 28.7 shows an image created by using a composite of a photo, a 3D object, and several layer styles to show a gateway to another world. I use this image to animate the gateway opening.
After opening a file, choose Window
Your image has become the first frame in your new frame animation. For simple animations, you may want take a moment to change the frame rate to a smaller speed, such as 15 fps, by clicking the arrow at the bottom of the frame thumbnail. This makes the file smaller, but less smooth in transitions. Remember that you also can change the size of the thumbnails by opening the Panel menu and choosing Panel Options.
Now that you've opened a document and the animation panel, you need to create keyframes. I know, you're thinking that we left keyframes behind in the Animation (Timeline) panel. It's true that the Animation (Timeline) panel allowed you to create keyframe icons that let you visualize where the changes were being made. It's also true that a keyframe is defined as a frame that determines a change in the animation process. In Frame Animation mode, we can actually visualize our keyframes themselves, because they each have a frame thumbnail in the panel. The downside is that after we've tweened those keyframes, nothing distinguishes them from any other frame in the panel.
To create a keyframe, you need to determine what you plan to animate and how you want that animation to proceed. Is the image you opened the first, middle, or last of your animation? Before you create a new frame, change anything you need to in the first image to make it look like you want your first frame to look.
I want to make two new keyframes for my other-world gateway. First, I want to have the gateway appear, and then I want the gateway to activate. Because I start with a view of just the photo, I change the opacity of the layer containing the arch and the layer style to zero, as shown in Figure 28.8.
Now you are ready to create a new frame. Click the Duplicates Selected Frames icon at the bottom of the Animation (Frames) panel. A new frame is created that has the exact same features of the first frame—same frame rate and same image. You need to make changes to this second frame to make it your second keyframe.
In my example, I turn the opacity of the gate up to 100 percent to create my second keyframe. The gate is in Dissolve Blend mode. After tweening these two frames, my gate dissolves into being over several frames, shown in Figure 28.9. I want my gate to dissolve in more slowly than I want it to activate, so I change the frame rate of my second keyframe to one-half second, which is half the rate of the first keyframe.
You can continue to create keyframes just like this—create a new frame and make changes to it to create one more step in your animation. I have one more keyframe to create in my animation, so I create another frame and turn the opacity of the layer style up to 100 percent in that layer. Now I have the same image that I brought in, creating three distinct keyframes, as shown in Figure 28.10.
Now that you've created the keyframes, it's time to create an animation by tweening them. Select the first keyframe, and click the tween icon at the bottom of the animation panel. The Tween dialog box opens, allowing you to determine the tween settings. Tween to the next frame, and enter the number of frames to add to the animation. If you made changes to more than one layer, tween All Layers; if not, choose Selected Layers. Deselect any properties that are not being tweened.
With my first frame selected, I add five frames to tween it to the next frame. The only parameter I changed between the first frame and the second is the opacity of the gateway, so I choose Selected Layers and Opacity, as shown in Figure 28.11. After I add the frames between the first and second frame, I select the second keyframe and repeat the process. The result is 13 frames, creating the animation of the appearing gateway, as shown in Figure 28.12.
As you create more frames, you start to see the limitations of frame animation. If you created an animation at the video standard, it would be 30 frames per second of animation. My gateway animation is 9.5 seconds long; it is very jerky, and with the relatively miniscule number of 13 frames, it is already unwieldy and hard to manage. You can imagine what it would be like if I had tweened it out to 300 frames to create a smooth animation!
So even though the Animation (Frames) panel has the capability of animating almost anything that the Animation (Timeline) panel can, its feasibility is limited to small animated GIFs.
Note
The project file used in Figure 28.7 through 28.12 is available as Figure 28-12 on the Web site as a PSD file. You can play the animation and try adding your own background and adjusting the animation.
When you want to create an animation using the Paint tools in Photoshop, you need to animate it frame by frame, using a new layer for every frame so you can add whatever paint or effects you want to each frame without affecting any of the other frames.
In this section, I show you how to use the Photoshop Paint tools to build an animation frame by frame. You can do this in two different ways: You can create a layered image, containing all the elements needed for an animation and then turn it into an animation, or you can simply start building the animation right in the Animation (Frames) panel. I show you how to create an animation both ways.
When you create an animation from a layered image, you need to first create an image with several layers that eventually become frames in your animation. You can create an image in Photoshop that contains all the layers needed to turn it into an animation in just a few simple steps:
Note
You should try to do this activity with your own animation, just to get the hang of it. If you want to look at my final project, however, it is available as Figure 28-16 on the Web site as a PSD file.
Open a new document in Photoshop.
Fill the background layer however you want, or leave it blank.
Click the Create A New Layer icon in the Layers panel to create a new layer.
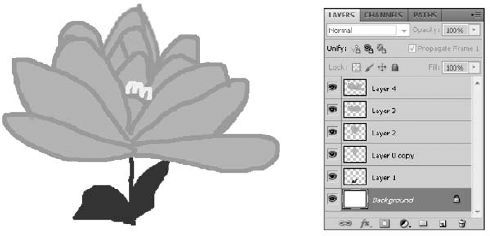
In the new layer, create any part of the animation that will be present in every frame, as shown in Figure 28.13.
Create another layer.
In this layer, you create what is going to be the first real frame of your animation. This layer, combined with the first two layers, should make a complete image.
Continue creating new layers, changing each layer to create movement from the last.
Toggle your views of previous layers on and off when helpful. When you are finished, you should have a file that contains several layers, as shown in Figure 28.14.
Save your file.
Choose Window

Click the Frame animation icon at the base of the Animation (Timeline) panel to convert it to the Animation (Frames) panel.
From the Animation (Frames) panel menu, choose Make Frames from Layers.
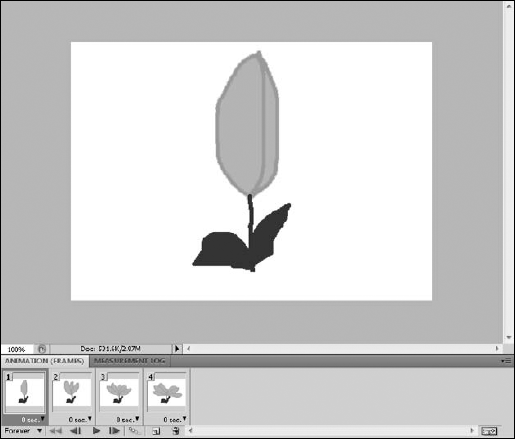
Each layer of your project becomes a separate frame inside the animation, as shown in Figure 28.15.
With the first frame selected (the background layer) and the Propagate Frame 1 selected in the Layers panel, turn the visibility of the second frame on.
This should make the second layer visible in all other layers, as shown in Figure 28.16.
With the first frame selected, choose Match Layer Across Frames from the Animation (Frames) panel menu.
This opens a dialog box that asks you which properties you want to match. Choose one or all of the properties, and click OK. Now you should have a solid background in each frame.
Now that each frame is exactly how it should look, you can discard frames 1 and 2.
Click the Delete icon twice to accomplish this. You should be left with the full frames shown in Figure 28.17. You need to click the Yes button after clicking the delete icon.
From the Animation (Frames) panel menu, choose Select All Frames.
Click the arrow in the bottom-right corner of the first frame, and change the frame delay time to 1 frame per second.
Creating a small, animated GIF with this method has several advantages. Although the Layers panel can eventually get unwieldy, it really is a neater package than trying to work with frames and layers at the same time—as you do in building the animation in the Animation (Frames) panel. The disadvantage to this method is that any frame that includes changes in position, opacity, or effects must be re-created in a new layer.
Building an image from scratch utilizes the Animation (Frames) panel to create new frames as you create new layers, or vice versa. Each new frame contains a change from the last frame, and over several frames, they turn into an animation.
You can build an animation by creating a new frame each time you make a change to your image.
Note
Find the final version of this animation saved as Figure 28-18 on the Web site.
Open a new document in Photoshop.
Open the Animation panel by choosing Windows

Click the Convert To Frame Animation icon at the base of the Animation (Timeline) panel to convert it to the Animation (Frames) panel.
In the Animation (Frames) panel menu, select Create a New Layer for Each New Frame.
In the Animation (Frames) panel menu, deselect New Layers Visible in All Frames.
Create a background for your animation on the existing frame, or leave it blank and create a new frame to create a background on.
Tip
To change the background layer into a regular layer that you can paint on, right-click it in the Layers panel and choose Layer From Background.
Click the Duplicates Selected Frames icon at the base of the Animation (Frames) panel.
A new frame is created, as well as a new layer in the Layers panel. This frame initially has the same properties as your preceding frame.
Note
Because you are working in a new layer, you can change anything you want about your image and the changes are not reflected in any other frames. If you do want your changes to be consistent across frames, select New Layers Visible in All Frames from the Animation (Frames) panel menu.
Use any and all of the tools in Photoshop to create the next frame for your animation.
Repeat Steps 7 and 8 until you have completed your animation, as shown in Figure 28.18.
Discard any background frames that aren't part of the animation.
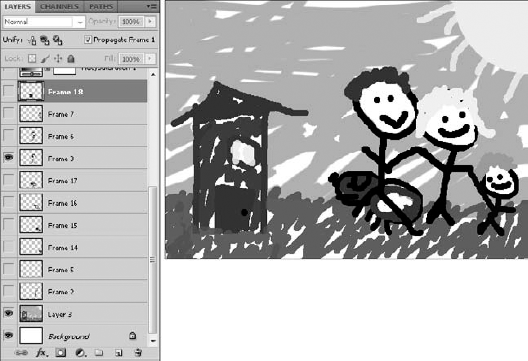
When you build an animation using frames and layers, you can animate position, opacity, and effects instead of creating a new layer. For example, in the animation of my crayon family, each member of the family only has three poses: two walking poses and a face front pose. In frame 2, I show Dad entering the picture; in frame 3, he walks farther into it with a different stride; in frame 4, I discard the new layer and turn on the visibility of frame 2, moving Dad forward again. Figure 28.19 shows Frames 2, 3, and 4 of my animation. I did the same with each figure in my animation.
Looking at the Layers panel in Figure 28.20, you see that the frames are not in order. That's because the last few frames of my animation show a dog running in and joining the family. I wanted the dog to run behind the family, so after creating the layers that animate the dog, I dragged them under the layers that contain the family.
I also created a Hue and Saturation adjustment layer and changed the hue of the entire image every other frame by simply clicking the visibility of this layer on and off. You may be able to see the difference in Figure 28.19. I added this element so the whole picture would seem to change slightly between frames, not unlike storyboard animations that can be seen in commercials or children's television. You can add any filters or adjustment layers as you change each of your frames. Unlike the tweening process, you can animate anything as long as you are creating new layers.
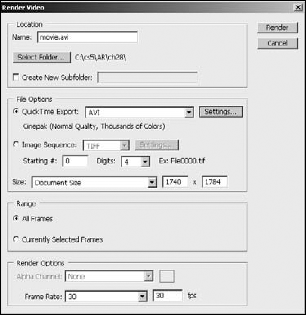
Once you are finished editing the animation/video project, you can render the project to a video file. To render the animation/video to a video file, select File
Note
Chapter 30 discusses outputting animations to Web file formats that can be incorporated into Web pages.
Name: This specifies the name of the video file that will be rendered.
Select Folder: This allows you to specify the location to store the rendered video file.
Create New Subfolder: When this is enabled, a new subfolder will be created in the location specified by the Selected Folder option.
Quick Time Export: This renders the animation/video as a video file. It allows you to specify the file format to use when rendering the video file. The file options are 3G, FLC, QuickTime Movie, AVI, DV Stream, Image Sequence, and MPEG-4. Clicking the Settings button launches a dialog box that allows you to adjust the audio and video settings used to render the final video file.
Image Sequence: This renders the animation/video as a sequence of images of the type specified by the drop-down menu. Clicking the Settings button allows you to adjust the settings, such as compression, used to generate the image files.
Size: This specifies the document size used to generate the image files. You can select a standard size, such as NTSC, PAL, HDTV, and so on, from the drop-down list.
Range: This allows you to specify whether to use all frames or only the currently selected frames when rendering the video.
Alpha Channel: This allows you to specify how to matte alpha channels into the video. Matting makes the partial transparency in the alpha channel blend better. The options are:
None: This does not apply alpha channels to the rendered video.
Straight Unmatted: This does not matte the alpha channel when rendering.
Premultiplied with Black: This uses a black background matte to render the semi-transparency in the alpha channel. This option is often the best for video that will be displayed on TVs.
Premultiplied with White: This uses a white background matte to render the semi-transparency in the alpha channel.
Premultiplied with Color: This allows you to specify a custom color to use for the background matte to render the semitransparency in the alpha channel. The color is selected by clicking the color box to the right.
Frame Rate: This specifies the number of frames per second that will be rendered in the video.


